ClearWater Lights Billie Brake Light User manual


Page 2
Step 1: Parts List and Bike PreparationSummary of CANopener Features & Operation
Page 1
Step 1: Mounting & Wiring The Billie Brake Light
Congratulations on the purchase of this revolutionary Billie brake
light. This is a high output brake-tail light that is computer controlled by the
Clearwater CANopener. This brake light is intended for use on specic BMW
motorcycles that use the CANbus control system.
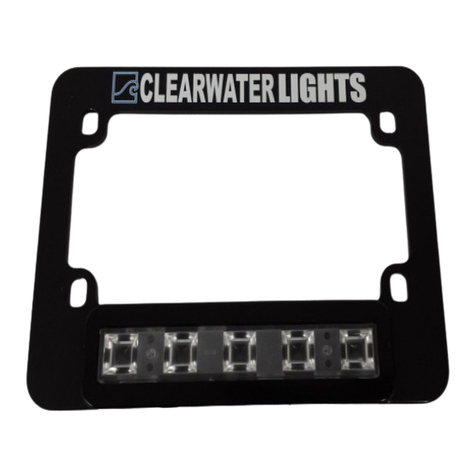
This brake light installs in place of your license plate frame (our apologies to your
dealer for robbing his valuable advertising space). The Billie brake light and frame
are CNC machined from billet aluminum and are very solid. The aluminum frame
not only helps mount your license plate, but also serves as a heat sink for the
powerful RED LED emitters.
Installation is simple. Just feed the small black cable up through your bike’s rear
fender section and up to the area under your rear seat. Then, secure your license
plate to the Billie frame with the included bolts. Use the included bolt spacers if
there is any chance for the grommet to become kinked against the rear fender.
Now, connect the RED wire from the Billie to the RED wire coming out the back
of the CANopener. Finally, connect the BLACK wire from the Billie to the BLACK
wire coming out of the back of the CANopener. Ignore the yellow wire on a BMW
installation.
Check routing of wires and tuck the CANopener back in place.
Note: The bike must be running for the brake light to function.
Billie Brake Light Features
-Automatic brake light activation with variable ash rates.
-Adjustable tail light and brake light intensity for daytime.
-Adjustable tail light and brake light intensity for nighttime.
-4 brake light ashing programs
-Speed sensitive activation

Page 3
Step 1: Parts List and Bike Preparation
Mounting Diagram
Page 2
Long Spacer
Short Spacer

Page 4
TSC = Turn Signal Cancel
WW = WonderWheel (BMW multifunction controller)
TPM = Tire Pressure Monitor
FTP = Flash To Pass
Function Command Modes
Clearwater
Brake Light
Dimmer
To enter the dimmer
program, you must rst
hold the front brake, next
press and release the TSC
button before holding
the WW to the right until
the light ashes twice to
indicate you’ve entered
the dimming mode.
Rotate WonderWheel to select 10
brightness levels (10% to 100%)
• To adjust brightness on the tail
light - release the brake after
entering dimming mode, then
rotate the WW.
• To adjust brightness on brake
light- hold the brake while rotate
the WW.
Clearwater
Brake Light
While stationary, press
and release the TSC but-
ton then press and release
the front brake lever 5
times within 5 seconds to
cycle through Modes 1 - 4.
Example: Brake light
begins in Mode 2, running
through the mode chang-
ing procedure brings
you to Mode 3. Running
through the mode chang-
ing procedure again will
bring you to Mode 4
Mode 1 – o
Mode 2 – functions identically to
BMW brake light (default)
Mode 3 – California legal strobe
on brake activation (4Hz ash)
Mode 4 – speed sensitive
(ashes faster and brighter with
harder braking)
Note: Modes 3 & 4 will only acti-
vate when speed is above 5 mph.
Page 3
Default Brightness
Levels
Tail Brake
Day 20% 70%
Night 10% 60%

Page 5
Page 4
CANopener Mounting Location:
The following pictures list CANopener mounting locations on various bikes.
CANopener location
on an R1200GSW.
CANopener location
on a K1600GT.
CANopener location
on an R1200RTW.
Lean-angle
sensor hidden
here.
Tire Pressure
Monitor hidden
here.
CANopener Mounting Location
Tire Pressure
Monitor hidden
here under frame.
Front of Bike

Page 6
Step 1: Parts List and Bike Preparation
Page 5
How To Adjust Brake Light Intensity:
1. To enter the dimmer program, you must rst hold the front brake lever. Next,
press and release the Turn Signal Cancel (TSC) switch once before holding the WW
to the right for (2) seconds. The light will ash twice, indicating you’ve entered the
dimming mode. The brightness on the brake is adjusted by continuing to hold
down the front brake lever while rotating the WW. The brightness on the tail light
is adjusted by releasing the front brake lever before rotating the WW.
2. Wait 3 seconds with no adjustments or press the TSC again to end the program-
ming mode. A single ash indicates end of programming mode.
Note: There are two settings for brake and running light levels: day and night. The
ambient light sensor in the instrument cluster determines the level the light is set
to during night or day. The daytime levels can be adjusted by shining a ashlight
at the instrument cluster. Conversely, the instrument cluster can be covered up to
adjust the nighttime levels.
How To Adjust Brake Light Modes:
While stationary, press and release the TSC, then press and release the front brake
lever 5 times within 5 seconds to cycle through Modes 1 - 4. When cycling to a
new mode, the brake light will ash a number of times equal to the mode it is
now in.
Mode 1 – No brake light.
Mode 2 – Standard brake light; functions identically to BMW brake light
(default on Version 1.7 and later).
Mode 3 – California compliant brake mode; 4 ashes at 4 ashes/second when
front/rear brakes applied followed by constant on. Disabled below 5mph.
Mode4 – Active brake light; ash rate depends on deceleration rate. Disabled
below 5mph.
Stationary Brake Flash (CANopener Version 1.82+):
The brake will not ash in modes 3 or 4 if the speed of the bike drops below
5mph. This is to avoid the nuisance of ashing in heavy, stop-and-go trac.
If ashing is still needed while the bike is stationary, a 4-ash burst can be
generated by pulling on the brake lever twice. If the user is holding onto the
front brake lever, releasing and holding the brake lever again will activate 4
ashes.
Clearwater Billie Brake Light Features & Operations

Page 7
Page 6
Automatic Brightness (CANopener Version 1.82+):
In Brake Modes 3 and 4 (the two brake ashing modes), the brightness
of the brake light is automatically controlled by the rate of deceleration. Light
braking always results in a minimum of 25% of the dierence between the
brake and tail brightness levels. This will increase to the full programmed brake
brightness at a deceleration rate of 0.4G is reached.
For very vigorous braking, the intensity can even exceed the
maximum programmed value (see previous programming discussion) for
braking above 0.4G, limited only by the maximum brightness of the brake
light. As the bike comes to a stop (below a speed of 5mph), the brake light
returns to the programmed braking brightness as long as the brake lever
(or pedal) is held.
For example, if the tail level is set to 20%, and the brake level is set to 60%, the
dierence between the two levels is 40. 25% of 40 is 10, so at bare minium, the
brake light brightness will increase to 10% above the tail light level, i.e 30%.
As the deceleration increases, however, the brake light will increase,
reaching the full programmed brightness of 60% at 0.4G of braking.
However, under very heavy braking in an emergency situation, the brake
can reach the full 100% brightness that it is capable of at 1.0G (highest
typical braking rate based on tire traction), regardless of the maximum
programmed level.
Inertial Braking (CANopener Version 1.82+):
When the CANopener is switched to California legal strobe mode (mode
3) or speed sensitive mode (mode 4), the brake light automatically engages
when the deceleration of the bike reaches a threshold value, even when the
brakes are not engaged (engine braking).
Once the CANopener is in mode 3 or 4, there are 3 subcategory modes
that can additionally be changed (see chart on Pg. 8). To switch between these
modes, while stationary, press and release the TSC button, then press and
release the rear foot brake lever 5 consecutive times (front brake released). Each
mode will be signaled by a corresponding number of ashes by the brake light
as well as by any other clearwater lights you may have installed.
- Inertial Brake Mode 1a: Inertial braking disabled. The front and/or back brake
lever must be engaged for the brake light to activate.
-Inertial Brake Mode 2a: Low sensitivity mode. The brake light will activate when
the engine braking level reaches 0.4G.
Clearwater Billie Brake Light Features & Operations

Page 8
Step 1: Parts List and Bike Preparation
Page 7
Inertial Braking Mode (CANopener Version 1.82+):
-Inertial Brake Mode 3a (Default Mode): High sensitivity mode. The brake light
will activate when the engine braking level reaches 0.2G. This will make the
activation of the brake light during engine braking happen more frequently,
under less deceleration.
Inertial braking is disabled during standard brake light mode (Brake Mode 2)
but works equally well using the California 4-ash (Brake Mode 3) or variable
ashing (Brake Mode 4) modes. In either of these modes, the brake light will
appear just as if the rider had engaged the brake, including the programmed
ashing and automatic brightness control.
Adding mechanical braking at some point during the engine braking
process provides seamless, uninterrupted action of the brake light.
Factory Reset Default:
To reset the CANopener to the factory settings, press and release the
TSC button, hold the turn signal to the left, then press and release the ash-
to-pass button 6 times within 6 seconds. Release left turn signal. All factory
preset dimmer levels and modes will be selected.
A successful reset is indicated by ve ashes of the Clearwater lights.
Billie Indicator Light:
Included with the Billie Brake Light Kit is an optional feature that
allows the user to conveniently monitor what the Billie Brake Light is doing
while on the bike. The Indicator light is very simple to install. Fasten the LED
to an area that can be easily seen when riding, then route wiring to the
back of the bike near the CANopener. Next, the red and black wires from the
Indicator light will be Posi-Locked to the CANopener red and black wires,
along with the red and black wires from the Billie Brake Light. The image
below shows our recommended mounting location.
Clearwater Billie Brake Light Features & Operations

Page 9
Step 1: Parts List and Bike Preparation
Page 8
Notes:
Brake Mode Chart
To toggle between brake modes 1-4, press and release the TSC button, then press and release the front brake lever 5 times with 5 seconds. After this
procedure, brake light will ash a number of times indicating what mode it is in.
Mode 1: Clearwater
brake light is disabled.
Mode 2: Clearwater
brake light functions
identically to BMW
brake light.
Mode 3: Clearwater
brake light gives a 4Hz
ash, otherwise know as
a California legal strobe.
Flashing will also get
brighter as the bike is
decelerating.
Mode 4: Clearwater
brake light changes rate
of ashing depending on
how fast bike is deceler-
ating. Flashing will also
get brighter as the bike is
decelerating.
Inertial Braking Modes:
Mode 1a: Inertial braking is
disabled.
Mode 2a: Low sensitivity
mode. Brake ashing will
activate at .4G.
Mode 3a: High sensitivity
mode. Brake ashing will
activate at .2G.
To toggle between inertial
braking modes 1a-3a, press
and release the TSC button,
then press and release the
front brake lever 5 times within
5 seconds.

Page 10
Step 1: Parts List and Bike Preparation
Page 9
Notes:

Page 11
Step 1: Parts List and Bike Preparation
Page 10
Notes:

Page 12
Step 1: Parts List and Bike Preparation
Version 3.3 6/18/18
This manual suits for next models
1
Other ClearWater Lights Motorcycle Accessories manuals
ClearWater Lights
ClearWater Lights Glenda User manual

ClearWater Lights
ClearWater Lights Glenda User manual
ClearWater Lights
ClearWater Lights BMW K1600GT User manual

ClearWater Lights
ClearWater Lights BMW G310R User manual
ClearWater Lights
ClearWater Lights CANopener User manual

ClearWater Lights
ClearWater Lights Glenda User manual
ClearWater Lights
ClearWater Lights Krista User manual
ClearWater Lights
ClearWater Lights Dixie User manual
ClearWater Lights
ClearWater Lights Darla User manual

ClearWater Lights
ClearWater Lights Krista User manual


