manuals.online logo
Brands
  1. Home
  2. •
  3. Brands
  4. •
  5. CLIMAQUA
  6. •
  7. Outdoor Fountain
  8. •
  9. CLIMAQUA AVA WALL User manual

CLIMAQUA AVA WALL User manual

DEUTSCH
Sicherheitshinweis
Den Schieferbrunnen auf gerader, nicht spritzwasserempndlichen Fläche
aufstellen.
Bei Temperatur von unter 3°C das Wasser komplett abpumpen und Brunnen
trocknen. Den Brunnen nicht direkt extremer Witterung aussetzen. Den
Brunnen vor Fremdpartikeln (Dreck, Blätter, etc.) schützen.
Montage
• Netzkabel ohne Adapter von oben durch das Rohr im Tank und unten
durch Kabelausgang schieben.
• Schliessen Sie Schlauch und Lichtkabel der Pumpe an.
• Achten Sie darauf, dass der Transformer der Pumpe ausserhalb des
Wassertanks liegt und nie in den Kontakt mit dem Wasser gerät.
• Den Tank mit Wasser füllen (55 Liter).
• Setzen Sie die Pumpe in Betrieb und regulieren Sie wenn nötig den
Wasserdruck am Wasserdruckregler.
• Der Stecker muss vor jeder Manipulation am Gerät aus der Steckdose
gezogen werden.
Aufbau- und Pegeanleitung zur Pumpe
Pumpe nie trocken laufen lassen. Nie beschädigtes Netzkabel verwenden
oder reparieren. Pumpe sofort austauschen wenn sie beschädigt ist. Vor der
Reinigung oder irgend welchen Manipulationen immer Stecker herausziehen.
Der Stecker darf nie mit Wasser in Berührung kommen. Die Pumpe muss alle
3 bis 4 Monate gereinigt werden. Dazu können die Frontpartie und der Rotor
entfernt werden. Die Wassermenge kann am Regulator der Pumpe eingestellt
werden. Das CLIMAQUA® 3LED (Beleuchtung) kann mühelos mit einem
Schraubenzieher ersetzt werden. Den Brunnen nie auf wasserempndliche
Möbel/Boden/Umgebung stellen. Der Hersteller übernimmt keine Haftung
bei Nichteinhalten dieser Vorschrift.
Herzlichen Dank und viel Freude mit Ihrem neuen CLIMAQUA®Brunnen!
FRANÇAIS
Instruction de sécurité
Placer la fontaine sur une surface droite et résistante à l’eau.
Lorsque la température descend en-dessous de 3° C, pomper la totalité de
l’eau et faire sécher la fontaine. Ne pas exposer la fontaine directement à des
conditions météorologiques extrêmes. Protéger la fontaine contre les particules
étrangères (saleté, feuilles, etc.).
Montage
• Enler le cordon d’alimentation sans l’adaptateur par le haut, à travers le
tube dans le réservoir et en bas, à travers la sortie du câble.
• Fixer le tuyau et le connecteur LED avec la pompe.
• Contrôler que la prise de la pompe reste à l’extérieur du bac et ne soit
jamais en contact avec l’eau.
• Remplir le bac avec de l’eau (55 litres).
• Mettre la pompe en marche et régler sa pression si nécessaire.
• Toujours enlever la prise de courant avant toute manipulation.
Instructions de montage et entretien de la pompe
La pompe ne doit jamais marcher au sec. Ne jamais utiliser ou réparer un
câble abîmé. Remplacer immédiatement la pompe si elle est cassée. Toujours
enlever la prise de courant avant le nettoyage ou toute manipulation. La prise
ne doit jamais être en contact avec l’eau. La pompe doit être nettoyée tous les
3 à 4 mois. Pour cela, enlever la plaque frontale et le rotor. Le CLIMAQUA®
3LED peut être remplacé facilement avec un tournevis. La quantité d’eau
peut être réglée par le régulateur de la pompe. Ne jamais poser la fontaine
sur meubles/terrain/objets sensibles à l’eau. Le fabricant décline toute
responsabilité en cas de non-respect de cette consigne.
Merci pour votre achat et votre intérêt pour CLIMAQUA®!
ITALIANO
Istruzioni di sicurezza
Posizionare la fontana d’ardesia su di una supercie orizzontale e resistente
all’acqua.
Con temperature inferiori ai 3°C, pompare tutta l’acqua e svuotare la fontana.
Non esporre la fontana all’azione diretta di intemperie atmosferiche estreme.
Proteggere la fontana da elementi estranei (sporcizia, foglie, ecc.).
• Inserire il cavo di alimentazione senza adattatore dall’alto, attraverso il
tubo
nel serbatoio e far passare l’estremità del cavo verso il basso.
• Fissare il tubo e il cavo leggero della pompa.
• Controllare che la spina della pompa rimanga al di fuori del contenitore
d’acqua e non venga mai a contatto con l’acqua.
• Il serbatoio si riempie d’acqua (55 litri).
Stecker und Schalter vom Wasser fern halten
Gardez la prise et le régulateur hors de l’eau
Tenere la spina e l’erogatore fuori dall’acqua
Keep plug and switch out of the water
BEDIENUNGSANLEITUNG
INSTRUCTIONS
ISTRUZIONI
INSTRUCTIONS
12x
55l
AVA / LIV WALL
• Far funzionare la pompa e regolarne la pressione per mezzo del
regolatore di usso.
• Prima di qualsiasi intervento o manutenzione sulla fontana, staccare
sempre la spina dalla presa di corrente.
Istruzioni per il montaggio e la manutenzione della pompa
La pompa non deve mai funzionare a secco, cioè senza acqua. Non tentare
mai di riparare il cavo se danneggiato. Sostituire immediatamente una
pompa rota. Prima della pulizia o di qualsiasi operazione di manutenzione o
manipolazione della pompa staccare sempre la spina dalla presa di corrente.
La spina non deve mai venire a contatto con l’acqua. La pompa deve venir
pulita almeno ogni 3-4 mesi. Il usso dell’acqua può venir regolato tramite
l’apposita regolazione nella pompa. Compila più acqua nel serbatoio no
a quando la pompa è completamente sommerso. Il CLIMAQUA® 3LED
(l’illuminazione) può esser facilmente sostituito con un cacciavite. Non postare
la fontana su mobili/terra/dintorni sensibile all’acqua. Il produttore non si
assume alcuna responsabilità per il mancato rispetto di queste istruzioni.
Tante grazie e molta gioia colla Suo nuovo fontana CLIMAQUA®!
ENGLISH
Safety Information
Place the slate fountain on an even, splash-proof surface.
At temperatures of under 3°C, pump out the water completely and dry the
fountain. Do not expose the fountain directly to extreme weather conditions.
Keep the fountain protected from foreign particles (dirt, leaves, etc.).
Assembly
• Push the power cable (without the adapter) through the tube in the tank
from above and slide it through the cable hole at the bottom.
• Connect the tube and the LED connector to the pump.
• Ensure that the plug for the pump is outside the water tank and never
comes into contact with water.
• Fill the tank with water (55 liters).
• Turn the pump on and adjust the water pressure with the regulator if
necessary.
• The plug must be removed from the socket before making any
adjustments to the device.
Pump Installation and Maintenance Instructions
Never let the pump run dry. Never use with a damaged or repaired electrical
cable. Replace a damaged pump immediately. Always pull the plug out before
cleaning or making any adjustments. The plug must never come into contact
with water. The pump must be cleaned every 3 to 4 months. The front part and
rotor can be removed for this purpose. The amount of water can be adjusted
with the regulator on the pump. The CLIMAQUA® 3LED can easily be replaced
with an screw driver. Do not place the fountain on water-sensitive furniture/
grounds/objects. The manufacturer accepts no liability if this rule is not
observed.
Thank you – and have fun with your CLIMAQUA®water feature!
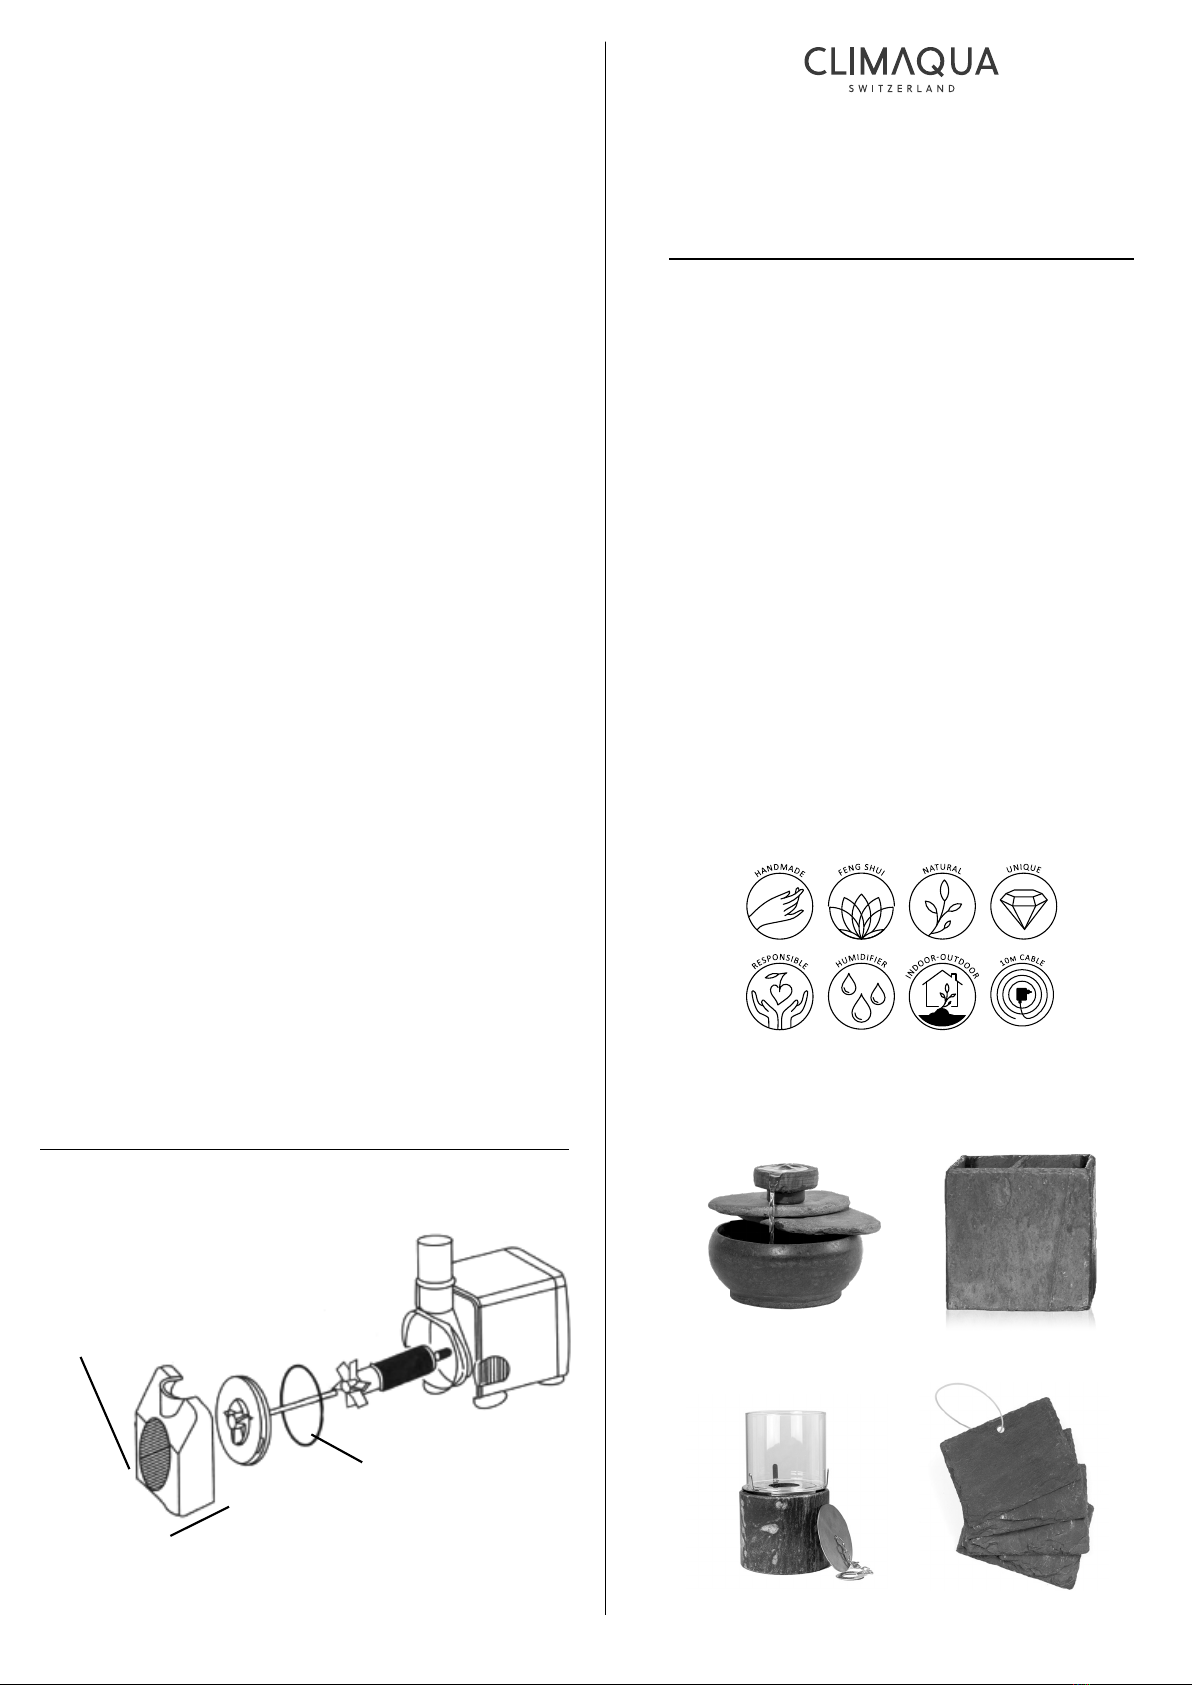
Wasserdruckregler und Frontpartie
réglage de la pression d’eau et plaque frontale
regolazione del usso d’acqua e coperchio
water pressure regulator and front part
Rotor reinigen
nettoyer le rotor
pulire il rotore
clean the rotor
Vorsichtig von Hand öffnen
ouvrir soignesement à la main
aprire a mano con attenzione
carefully open by hand
<
DYNCO AG CH-3065 Bolligen www.dynco.ch
ÖFFNEN DER PUMPE
OUVRIR LA POMPE
APRIRE LA POMPA
OPEN THE PUMP
CLIMAQUA® Produkte sind Unikate und werden aus
natürlichen Materialien von Hand gefertigt.
Besuchen Sie unsere Webseite, um mehr über die
CLIMAQUA® Welt zu erfahren. Dort zeigen wir Ihnen weitere
FLAMES, sowie auch das ganze Sortiment
an FOUNTAINS, PLANTERS und BOUTIQUE.
Les produits CLIMAQUA® sont uniques et fabriqués à la
main à partie de matériaux naturels.
Pour plus d’informations sur l’univers de CLIMAQUA®,
nous vous invitons à visiter notre site internet.
Vous y trouverez d’autres FLAMES et l’ensemble de
l’assortiment de FOUNTAINS, PLANTERS et BOUTIQUE.
I prodoi CLIMAQUA® sono esemplari unici prodoe
a mano e con soli materiali naturali. Visiti il nostro sito
per saperne di più sull’universo CLIMAQUA®.
Potrà trovare molti altri modelli di FLAMES, oltre che l’intero
assortimento FOUNTAINS, PLANTERS et BOUTIQUE.
CLIMAQUA® products are unique pieces, made by hand out
of natural materials. Visit the website and discover
the world of CLIMAQUA®. You’ll find out the complete range
of FLAMES and learn about the large program of
the FOUNTAINS, PLANTERS and BOUTIQUE.
WE DESIGN FOR
LIVING WITH NATURE
FOUNTAINS PLANTERS
FLAMES BOUTIQUE
CLIMAQUA.SWISS

This manual suits for next models

5

Other CLIMAQUA Outdoor Fountain manuals

CLIMAQUA MODUM S User manual

CLIMAQUA

CLIMAQUA MODUM S User manual

CLIMAQUA SUMI User manual

CLIMAQUA

CLIMAQUA SUMI User manual

CLIMAQUA KERMO 10619 User manual

CLIMAQUA

CLIMAQUA KERMO 10619 User manual

CLIMAQUA ONI User manual

CLIMAQUA

CLIMAQUA ONI User manual

CLIMAQUA AVA S User manual

CLIMAQUA

CLIMAQUA AVA S User manual

CLIMAQUA LIV M User manual

CLIMAQUA

CLIMAQUA LIV M User manual

CLIMAQUA SHANTI User manual

CLIMAQUA

CLIMAQUA SHANTI User manual

CLIMAQUA AVA L User manual

CLIMAQUA

CLIMAQUA AVA L User manual

CLIMAQUA SIERRA User manual

CLIMAQUA

CLIMAQUA SIERRA User manual

CLIMAQUA DUBAI L User manual

CLIMAQUA

CLIMAQUA DUBAI L User manual

CLIMAQUA SUMI Quick guide

CLIMAQUA

CLIMAQUA SUMI Quick guide

CLIMAQUA KUBO User manual

CLIMAQUA

CLIMAQUA KUBO User manual

CLIMAQUA TAIPEI XL User manual

CLIMAQUA

CLIMAQUA TAIPEI XL User manual

CLIMAQUA MODUM M User manual

CLIMAQUA

CLIMAQUA MODUM M User manual

CLIMAQUA DUBAI S User manual

CLIMAQUA

CLIMAQUA DUBAI S User manual

CLIMAQUA CHI User manual

CLIMAQUA

CLIMAQUA CHI User manual

CLIMAQUA SIERRA User manual

CLIMAQUA

CLIMAQUA SIERRA User manual

CLIMAQUA HELIOS L User manual

CLIMAQUA

CLIMAQUA HELIOS L User manual

CLIMAQUA LIV S User manual

CLIMAQUA

CLIMAQUA LIV S User manual

CLIMAQUA SWAN User manual

CLIMAQUA

CLIMAQUA SWAN User manual

CLIMAQUA EDEN WIDE User manual

CLIMAQUA

CLIMAQUA EDEN WIDE User manual

CLIMAQUA SPUTNIK User manual

CLIMAQUA

CLIMAQUA SPUTNIK User manual

CLIMAQUA VIDA 11 Set User manual

CLIMAQUA

CLIMAQUA VIDA 11 Set User manual

CLIMAQUA VIDA 60 User manual

CLIMAQUA

CLIMAQUA VIDA 60 User manual

Popular Outdoor Fountain manuals by other brands

Campania International FT-52 quick start guide

Campania International

Campania International FT-52 quick start guide

Jula Axley 000-438 operating instructions

Jula

Jula Axley 000-438 operating instructions

RHS ROSEMOOR manual

RHS

RHS ROSEMOOR manual

Kelkay Easy Fountain 45011L quick start guide

Kelkay

Kelkay Easy Fountain 45011L quick start guide

Elkay ECDFPW Installation & use manual

Elkay

Elkay ECDFPW Installation & use manual

Campania International Portico Assembly instructions

Campania International

Campania International Portico Assembly instructions

Oase Air Flo operating instructions

Oase

Oase Air Flo operating instructions

AAFIRST WFT6 installation instructions

AAFIRST

AAFIRST WFT6 installation instructions

Smart Solar WISHING WELL 1170534 manual

Smart Solar

Smart Solar WISHING WELL 1170534 manual

Henri Studio 5705F7 Assembly instructions

Henri Studio

Henri Studio 5705F7 Assembly instructions

Campania International Estancia FT-155 Assembly instructions

Campania International

Campania International Estancia FT-155 Assembly instructions

Blumfeldt Waterbirds manual

Blumfeldt

Blumfeldt Waterbirds manual

Garden Treasures FOU-492783 manual

Garden Treasures

Garden Treasures FOU-492783 manual

Frontgate 154855 Assembly instructions

Frontgate

Frontgate 154855 Assembly instructions

Sunnydaze Decor GSI-968 Assembly

Sunnydaze Decor

Sunnydaze Decor GSI-968 Assembly

Britex DIWR installation guide

Britex

Britex DIWR installation guide

Polaris WaterStar owner's manual

Polaris

Polaris WaterStar owner's manual

HoMedics enviraScape ITALIAN GARDENS WFL-ITL Instruction manual and  warranty information

HoMedics

HoMedics enviraScape ITALIAN GARDENS WFL-ITL Instruction manual and warranty information

manuals.online logo
manuals.online logoBrands
  • About & Mission
  • Contact us
  • Privacy Policy
  • Terms and Conditions

Copyright 2025 Manuals.Online. All Rights Reserved.