7
EN
Technical Data
Type Volt Hz Watt
6269 220-240 50/60 1500-1800
Before the first use
• Read these operating instructions carefully before
using the appliance for the first time.
• Remove all packaging elements and stickers, but not
the rating plate.
• Place the sandwich maker on a dry, flat, nonslip surface.
• Clean the baking tins with a damp cloth.
• Grease the baking tins the first time. Otherwise, grea-
sing won´t be necessary thanks to the non-sticking coat.
• Production residues may cause some smoke the first time
you use the unit.Therefore, ensure a good ventilation.
• Due to this possible production residues, the first
sandwiches are not for human consumption. Prepare
a sandwich without filling.
EC Label / Safety information
The appliance meets the requirements
of the applicable EC directives.
The appliance is designed for indoor
domestic use only.
The baking tins will be hot during the
process, avoid the contact with metal
pieces. Risk of burn!
• Do not leave the appliance unattended during the
process.
• Do not overload the appliance.
• Do not use pointed objects such as knives or metal
forks to remove the crispy cones from the appliance.
This could damage the non-stick surface. Use wood
or heat resistant plastic cutlery.
• Risk of burns! Bite carefully in the ready-made sand-
wiches. Ingredients like cheese or tomato will be very hot.
ATTENTION! Always unplug the
appliance when not in use and before
cleaning!
Operation
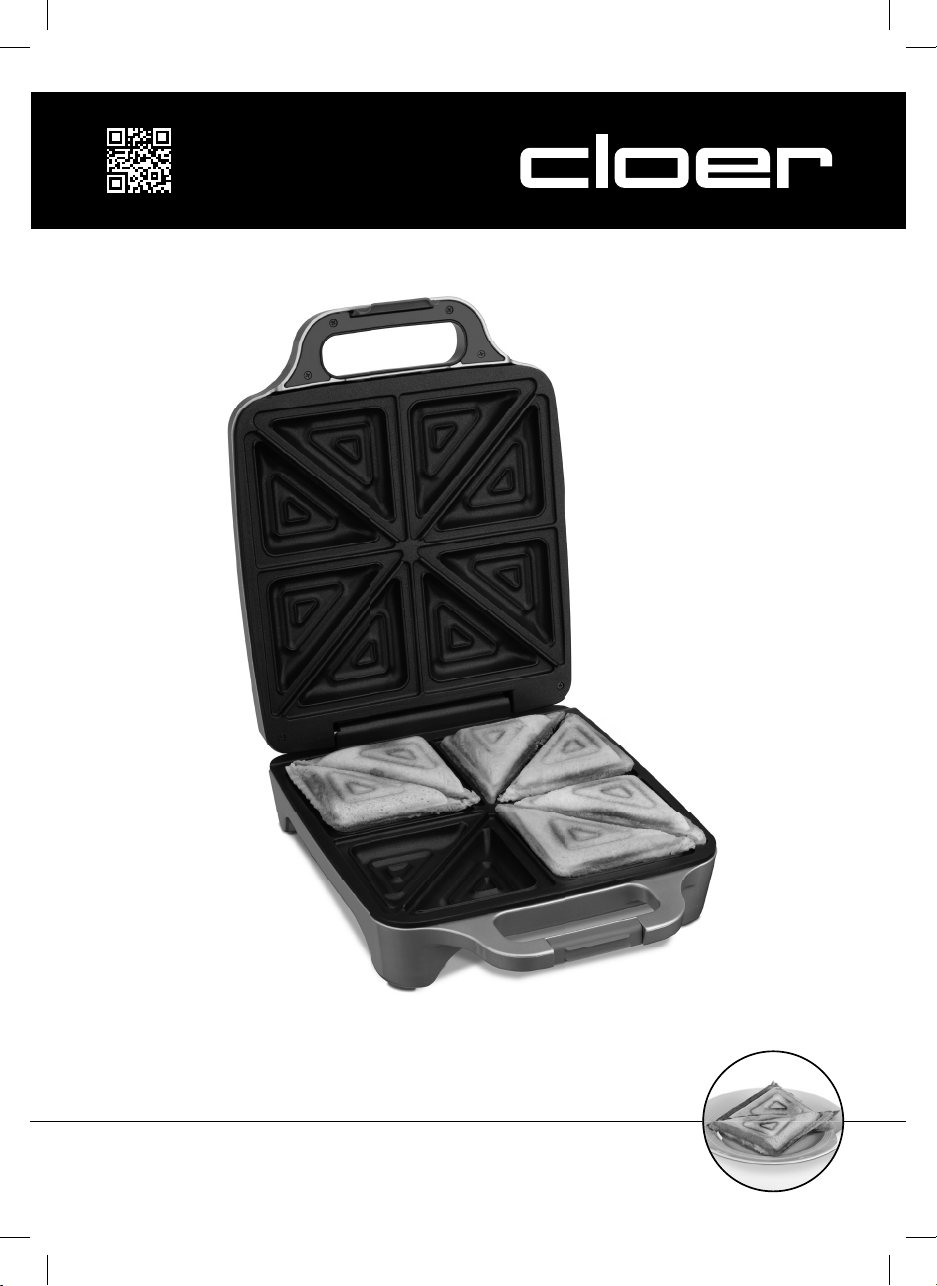
• The sandwich maker is prepared to make 4 sand-
wiches diagonally split at the same time, so you will
need 8 toast slices.
• Note: the toast slice (American Toast) should be big
enough to seal the bread crust in the baking tin.
• Note: the sandwich maker has been designed for
sandwiches with a thick filling. Thin sandwiches may
not be regularly toasted if the upper toast slice does
not reach the baking tin.
• You can use any type of bread as long as it fits in the
baking tins.
• Prepare the sandwich filling before and place all the
ingredients ready to hand.
• Plug the appliance into the wall socket.
• CAUTION! Appliance will become hot. Only touch
the appliance by the grips
• The red light will turn on and the appliance will start
heating.
• It will be ready when the green light turns on.
• Place the toast slices on the baking area.
• Fill the toast slices quickly with the desired ingredients.
• Place the upper toast slices.
• You can prepare the complete sandwich before in or-
der to avoid risk of burn.
• Close carefully the cover until the locking bracket is
snapped.
• Do not close the sandwich maker by force. If the
sandwich maker can not be closed, that means the
sandwiches have too much filling.
• Let the sandwiches toast at least 3 minutes depen-
ding on the bread, the filling and the personal taste.
• This sandwich maker toasts both sides and seal the
sandwiches.
• You can repeat the process as many times as desired.
• Note: During the process both lights will be on to
maintain the temperature.
• Note: Do not use a big amount or exclusively liquid
ingredients like sauces or creams, since they could
spill and make the bread mushy. Always use them
with solid ingredients.
• Unplug the appliance when you are done with the
process.
• Trick: Coat the external part of the toast slices with
butter and they will have a crispy and golden-brown
appearance.
Fort the most creatives:
• To create sandwiches, your fantasy should not have limits.
• We suggest a list of possible ingredients: salami, ham,
tuna, leftovers from the Sunday roast… Also, fruits
or vegetables like: tomatoes, peppers, asparagus,
cucumber, onion, mushroom, pineapple, peach, apri-
cot, mandarin, banana and cheese in all its forms: sli-
ces, grated or crushed. Tender, easy-to-melt cheeses
are the best to gratinate
• You can use the spices depending on personal taste
Cleaning
• Please unplug the appliance before cleaning.
• Let the appliance cool.
• The baking tins have a non-stick coat; therefore, they
can be only slightly cleaned.
• Use a paper towel or a damp cloth to clean the appli-
ance while still warm.
• Do not immerse the appliance in water
• The appliance is not dishwasher safe.
• Wipe the coat with a damp cloth
• Do not use harsh cleansers or scrubbing sponges
• Tip: Place two absorbent paper towels between the ba-
king surfaces and close the appliance.