Copernicus Tech Tub2 FTT699 User manual

FTT699, FTT700, FTT700-USB - Version A- Released July 16, 2021 - Copernicus Educational Products Inc.
WARNING
For assistance, please contact us:
1-800-267-8494
Email [email protected]om
Have your packing slip ready for reference
®
2
Tech Tub - 6 Device Setup
FTT699
FTT700
FTT700-USB
Please Recycle
Assembly Guide
FTT699, FTT700,
FTT700-USB, _2021_A
Check out our other products online at
www.copernicused.com

FTT699, FTT700, FTT700-USB - Version A- Released July 16, 2021 - Copernicus Educational Products Inc.
2
We do not inherit the
earth from our ancestors,
we borrow it from our
children.
NORTH AMERICAN
PROVERB
Change is the end result
of all true learning.
LEO BUSCAGLIA
What you leave behind is
not what is engraved in
stone monuments, but
what is woven into the
lives of others.
PERICLES
Education is the most
powerful weapon which
you can use to change the
world.
NELSON MANDELA
®
2
Tech Tub - 6 Device Setup
For assistance, please contact us:
1-800-267-8494
Email [email protected]om
Have your packing slip ready for reference
Dear Educator,
Thank you for purchasing the . We hope it meets all your expectations and you and your students
®
2
Tech Tub
enjoy using it in your school.
If you have any questions, concerns or ideas on how we can improve please let us know by contacting our
Customer Solutions Ninjas at 1-800-267-8494 or info@copernicused.com.
Happy teaching,
Kaylyn Belcourt
President
Register your Product
Registering your warranty ensures we have all the information we need to make any future warranty claims quick and
easy. Please visit www.copernicused.com/warranty and complete the form within 10 business days from product
assembly. By registering your product, you will be entered into a draw to win Copernicus product.
Make a Warranty Claim
We offer a Lifetime Warranty on almost everything we make. Please call 1-800-267-8494 or email
[email protected]om to start your warranty claim. Proof of purchase will be required upon warranty claim (i.e. copy
of invoice).
Lifetime
All Components
Warranty
FTT699
FTT700
FTT700-USB
Assembly Guide
FTT699, FTT700,
FTT700-USB, _2021_A
Check out our other products online at
www.copernicused.com

FTT699, FTT700, FTT700-USB - Version A- Released July 16, 2021 - Copernicus Educational Products Inc.
3
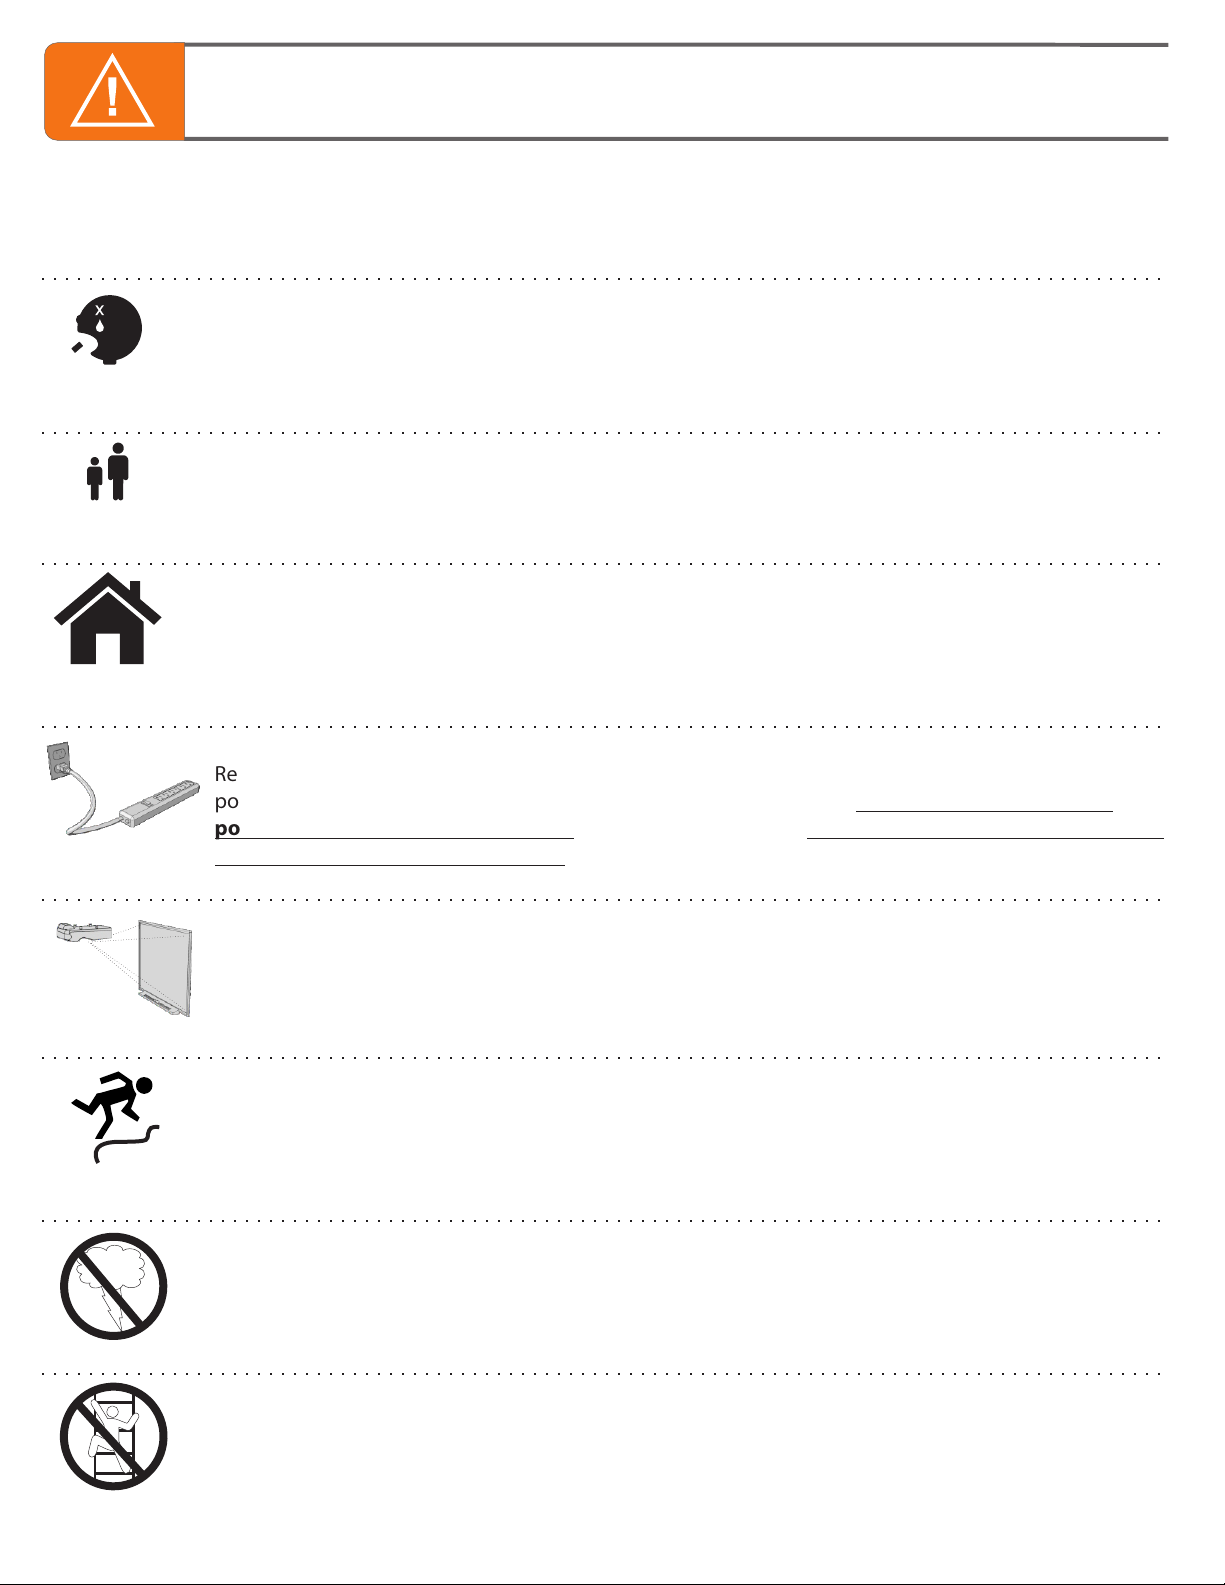
Warning! Hazard Risks!
This product is to be used under the supervision of an adult.
Indoor Use
Only
This product is intended for indoor use only. To reduce the risk of fire or electric shock, do not expose
this product to rain or moisture. The internal components are not sealed from the environment.
Read your power strip electrical specifications. Only plug in devices that are approved for use with this
power strip. Connect the supplied power strip directly to a wall outlet. Do not connect to another
power strip or use an extension cord. Unplug when not in use. Do not leave this product plugged in
for more than 72 consecutive hours. Turn off power strip before unplugging.
Power Strip
Specifications
Do not install or use the electrical components of this unit during a lightning storm.
Electrical Shock
In its unassembled state, this product contains parts that can be hazardous to small children. This
product should be assembled by an adult.
Small
Parts
Ensure that any cables extending across the floor to your product are properly bundled and marked to
avoid tripping or falling which may lead to personal injury.
Cable Trip
Hazard
Climb Hazard
Do not climb on, hang from or suspend objects from any components of your product unless otherwise
specified.
Read the electrical specifications of any electronic equipment you are using with your Copernicus
products. Failure to read these specifications and follow their instructions could result in damage to your
equipment or personal injury.
Electronic
Equipment
Adult
Supervision
Please read the warnings below for important safety information regarding your product. Failure to
read these warnings or to follow the instructions below could result in personal injury or damage to
your product that could void your warranty.

FTT699, FTT700, FTT700-USB - Version A- Released July 16, 2021 - Copernicus Educational Products Inc.
4
Tips for Assembly
Customer Service - FAQ’s
?
?
?
Need Tech Support?
Have a Question?
www.copernicused.com
Check out some of our
other great products!
For missing parts and other issues regarding this product:
Please call Copernicus Customer Service, where we will be happy to help.
1-800-267-8494. Monday - Friday 8:30am - 4:30 pm EST.
OR
Email our Tech Support Service at [email protected]om
This symbol denotes a 2 Person Task. For safety, please ensure that there are the
suggested number of people working on steps displaying this symbol.
Watch for this symbol throughout the Assembly Guide. Wherever you see it, pay close
attention. The symbol denotes a step needing extra attention to ensure it is done
correctly.
The star symbol highlights an advisory note.
!
Watch for These Helpful Symbols
Before You Begin
As You Assemble the Unit
Lay out and identify all of the included parts.
The hardware has been packed according to step.
Read the assembly guide over once to familiarize yourself with them.
Please note that in its unassembled state, this product contains parts that can be
hazardous to small children. This product should be assembled by an adult.
Follow the steps in sequence.
Before beginning each step, find the part(s) that you need for that step.
Pay attention to the labels on the parts; they are there to help direct you at certain stages.
The title of each step states what you will be doing. Review the text and the pictures as you build the unit.
2-Person Task
!
Email our Tech Support Service

FTT699, FTT700, FTT700-USB - Version A- Released July 16, 2021 - Copernicus Educational Products Inc.
5
+
Additional tools required:
Before beginning, you should have:
®
2
Tech Tub - 6 Device Setup
FTT700
Adjustable wrench x1
8mm or 5/16”,
10mm or 7/16”
Wrench
OR
Screwdriver
Back Foot Anchor Pin
x2
A
M4 x 15mm
x4
D
C
E
F
M5 Lock Nut
x2
M5 Square Nut
x2
M5 Screw
x2
BM5 Washer
x2
Hardware
Actual Size
FTT700
5mm Driver
Allen Key
x1
Front Pin Bracket
(23275)
x1
Keys
x2
®
2
6 Device Tech Tub
Main Body
x1
6-Outlet Power Strip
x1
(255153)
In FTT700
Power Tray
x1
(23262)
Power Strip Mounting Plate
x1
(23275)
Hook & Loop
Straps
x6
Not to Scale
Shelf
x6
(23261)
Device Positioning Rail
x6
(23271)

FTT699, FTT700, FTT700-USB - Version A- Released July 16, 2021 - Copernicus Educational Products Inc.
6
+
Additional tools required:
Before beginning, you should have:
®
2
Tech Tub - 6 Devices with Larger Adapters
FTT699
Adjustable wrench x1
8mm or 5/16”,
10mm or 7/16”
Wrench
OR
Screwdriver
Back Foot Anchor Pin
x2
A
M4 x 15mm
x4
D
C
E
F
M5 Lock Nut
x2
M5 Square Nut
x2
M5 Screw
x2
BM5 Washer
x2
Hardware
Actual Size
FTT699
5mm Driver
Allen Key
x1
Front Pin Bracket
(23275)
x1
Keys
x2
®
2
6 Device Tech Tub
Main Body
x1
6-Outlet Power Strip
x1
(255153)
In FTT699
Power Tray
x1
(23262)
Power Strip Mounting Plate
x1
(23275)
Hook & Loop
Straps
x6
Not to Scale
Shelf
x6
(23261)
Device Positioning Rail
x6
(23271)
Adapter extension
cables
x6

FTT699, FTT700, FTT700-USB - Version A- Released July 16, 2021 - Copernicus Educational Products Inc.
7
+
Additional tools required:
Screwdriver
Adjustable wrench x1
8mm or 5/16”,
10mm or 7/16”
Wrench
OR
Before beginning, you should have:
FTT700-C
®
2
6 Device Tech Tub
Main Body
x1
In FTT700-C
Hook & Loop
Straps
x6
Power Tray
x1
(23262)
Shelf
x6
(23261)
Device Positioning Rail
x6
(23271)
Not to Scale
Hardware
Actual Size
5mm Driver
Allen Key
x1
Front Pin Bracket
(23275)
x1
Keys
x2
Power Cord
x1
Power Adapter
(255146)
x1
10 Port USB
Hub
(255144)
x1
®
2
Tech Tub - 6 Device Setup
FTT700-USB
Back Foot Anchor Pin
x2
A
M4 x 15mm
x4
D
C
E
F
M5 Lock Nut
x2
M5 Square Nut
x2
M5 Screw
x2
BM5 Washer
x2

FTT699, FTT700, FTT700-USB - Version A- Released July 16, 2021 - Copernicus Educational Products Inc.
8
®
2
Tech Tub - Trolley Setup
FTT-706
STOP!
®
2
If you purchased the Tech Tub Trolley
®
2
you will need to mount your Tech Tub onto
the Trolley Frame first, before proceeding with this
assembly guide. Please look inside the Trolley
Frame box for the assembly guide that explains
how to do this.
®
2
If you have not purchased the Tech Tub Trolley,
please proceed to the next page to continue
®
2
setting up your Tech Tub .

FTT699, FTT700, FTT700-USB - Version A- Released July 16, 2021 - Copernicus Educational Products Inc.
9
Install Device Positioning Rail into all shelves
1
2
Ensure nut is inserted fully into slot in shelf
Install nuts into one shelf
FTT700
ONLY
1Shelf
x6
Device Positioning Rail
x6
You will need: (Not to Scale)
Shelf
x1
You will need: (Not to Scale)
Actual Size:
Press snaps into these holes in shelf
EM5 Square Nut
x2
This part helps keep smaller devices away from the cable management area.
If your devices are wider than 8.66in (220mm), please skip this step.
Device positioning rail can be installed or uninstalled at any time.

FTT699, FTT700, FTT700-USB - Version A- Released July 16, 2021 - Copernicus Educational Products Inc.
10
1
2
2
Install shelf with nuts into tub
1
FTT700
ONLY
3Shelf
(with M5 square nuts installed from previous step )
x1
You will need: (Not to Scale)Actual Size:
Install shelf in middle position (aligned with holes for screws)
1
2
2
1
Fasten shelf to tub using screws (both sides)
4
Install remaining shelves
Shelf
x5
You will need: (Not to Scale)
Install two shelves below middle shelf, leaving two empty slots between each shelf
Install remaining three shelves above middle shelf, leaving two empty slots between each shelf
FM5 Screw
x2

FTT699, FTT700, FTT700-USB - Version A- Released July 16, 2021 - Copernicus Educational Products Inc.
11
1
FTT700
ONLY
5
Install Power Strip Mounting Bracket onto Power Tray
Insert side with two pegs into keyholes
1Slide back till you hear a CLICK!
2
You will need: (Not to Scale) Power Tray
x1
(23262)
Power Strip Mounting Plate
x1
(23275)
FTT700
ONLY
Please Note:
Steps 5-9 are for Power Strip setup (FTT699 or FTT700)
Steps 10&11 are for USB Hub setup (FTT700-C)
1
FTT700
ONLY Model Specific Instructions

FTT699, FTT700, FTT700-USB - Version A- Released July 16, 2021 - Copernicus Educational Products Inc.
12
6
Install Power Strip in Power Tray
Loop power cable under power strip as shown
1
Fit power cable between ribs and Power Strip Mounting Plate
2
Fit 4 keyholes on Power Strip over 4
pegs on Power Strip Mounting Plate
4
Slide Power Strip back to secure it
5
You will need: (Not to Scale) 6-Outlet Power Strip
x1
(25515)
Route power cable around hook and out through back of Power Tray
3
FTT700
ONLY
HOOK
1
2
3

FTT699, FTT700, FTT700-USB - Version A- Released July 16, 2021 - Copernicus Educational Products Inc.
13
For power adapters
like this proceed
to the next step
7
Wrap device power cable around power adapter leaving 20” of cable free
FTT700
ONLY
WALL OUTLET POWER CABLE
Wrap wall outlet power cable around power adapter leaving 6” of cable free
THIS LINE IS 10” LONG
USE IT TO MEASURE
OUT 20” OF CABLE
THIS LINE IS 6” LONG
USE IT TO MEASURE
OUT YOUR CABLES
1
2
3
Power adapter cable management
Secure cables around adapter using provided hook and loop straps
Hook & Loop
Straps
x6
You will need: (Not to Scale)
DEVICE POWER CABLE
Repeat above steps for all remaining power adapters
!
Do not pull cable too tight
!

14
OR
Power Brick Adapter
Wall Plug Power Adapter
(including USB Power Adapters)
Plug in first power adapter (start at back of the Power Tray)
Plug first power adapter into power strip
1
2Run cable to front of tray, leaving excess cable hanging out
8A
FTT700
ONLY
If your power adapter is too
wide to fit on the power strip
please proceed to
STEP 9.
FTT699, FTT700, FTT700-USB - Version A- Released July 16, 2021 - Copernicus Educational Products Inc.

FTT699, FTT700, FTT700-USB - Version A- Released July 16, 2021 - Copernicus Educational Products Inc.
15
8B
OR
Plug in remaining power adapters
Power Brick Adapter
Plug remaining power adapters into power strip
1
2Run cables to front of tray, leaving excess cable hanging out
FTT700
ONLY
Wall Plug Power Adapter
(including USB Power Adapters)

16
Plug in power adapter to extension cords, and plug in extension cords to power strip
9
FTT699
ONLY
Adapter extension
cables
x6
Follow this step
for larger power adapters
that wont fit on the
6 outlet power strip
x6 x6
Route device charging cables to front of Power Tray as shown
!
If your power adapter is too
wide to fit on the power strip
but you did not order a FTT699
please contact customer service
to order these extension cords.
Copernicus Customer Service:
1-800-267-8494. Monday - Friday 8:30am - 4:30 pm EST.
Email our Tech Support Service at [email protected]om
FTT699, FTT700, FTT700-USB - Version A- Released July 16, 2021 - Copernicus Educational Products Inc.

FTT699, FTT700, FTT700-USB - Version A- Released July 16, 2021 - Copernicus Educational Products Inc.
17
3
Wind excess USB Hub power cable around Power Adapter
1
HOOK
Setup USB Hub
2
Place USB Hub and Power Adapter into Power Tray
Do not pull cable
too tight
!
USB Hub Power Cable
Route power cable around hook and out through back of Power Tray
4
Connect USB Hub to power adapter
10
FTT700-C
ONLY
You will need: (Not to Scale) Power Adapter
x1
10 Port USB Hub
x1

FTT699, FTT700, FTT700-USB - Version A- Released July 16, 2021 - Copernicus Educational Products Inc.
18
Plug in USB cables
Plug USB cables into USB Hub
1
2Run USB cables to front of tray, leaving excess cable hanging out
11
FTT700-C
ONLY

FTT699, FTT700, FTT700-USB - Version A- Released July 16, 2021 - Copernicus Educational Products Inc.
19
Position Power Tray for Cable Management
1
The rest of this assembly guide applies for FTT700, 700-C and FTT699
12
Feed Power Strip power cable through hole in back of tub
2Partially slide Tray back into tub (leave a gap as shown below)

FTT699, FTT700, FTT700-USB - Version A- Released July 16, 2021 - Copernicus Educational Products Inc.
20
Push cable through first green clip
1
2Push cable through second green clip
Feed first cable into cable management clip on top shelf
13A
The process is the same for USB cables
Tuck excess cable
into front area
of power tray
This manual suits for next models
2
Other Copernicus Batteries Charger manuals

Copernicus
Copernicus Tech Tub2 FTT706 User manual

Copernicus
Copernicus Tech Tub2 FTT1000 User manual

Copernicus
Copernicus Tech Tub Premium User manual

Copernicus
Copernicus FTT706 User manual

Copernicus
Copernicus Tech Tub2 User manual

Copernicus
Copernicus Tech Tub2 User manual

Copernicus
Copernicus Tech Tub TEC601C User manual