manuals.online logo
Brands
  1. Home
  2. •
  3. Brands
  4. •
  5. Courtyard Creations
  6. •
  7. Indoor Furnishing
  8. •
  9. Courtyard Creations TGS59LH-WM User manual

Courtyard Creations TGS59LH-WM User manual

ASSEMBLY INSTRUCTIONS
TGS59LH-WM
ATTENTION: THIS PRODUCT IS NOT FOR COMMERCIAL USE
INTENDED FOR RESIDENTIAL USE ONLY.
Attention:
Make sure that each bolt needed for all steps
matches the corresponding figure to ensure proper
assembly.
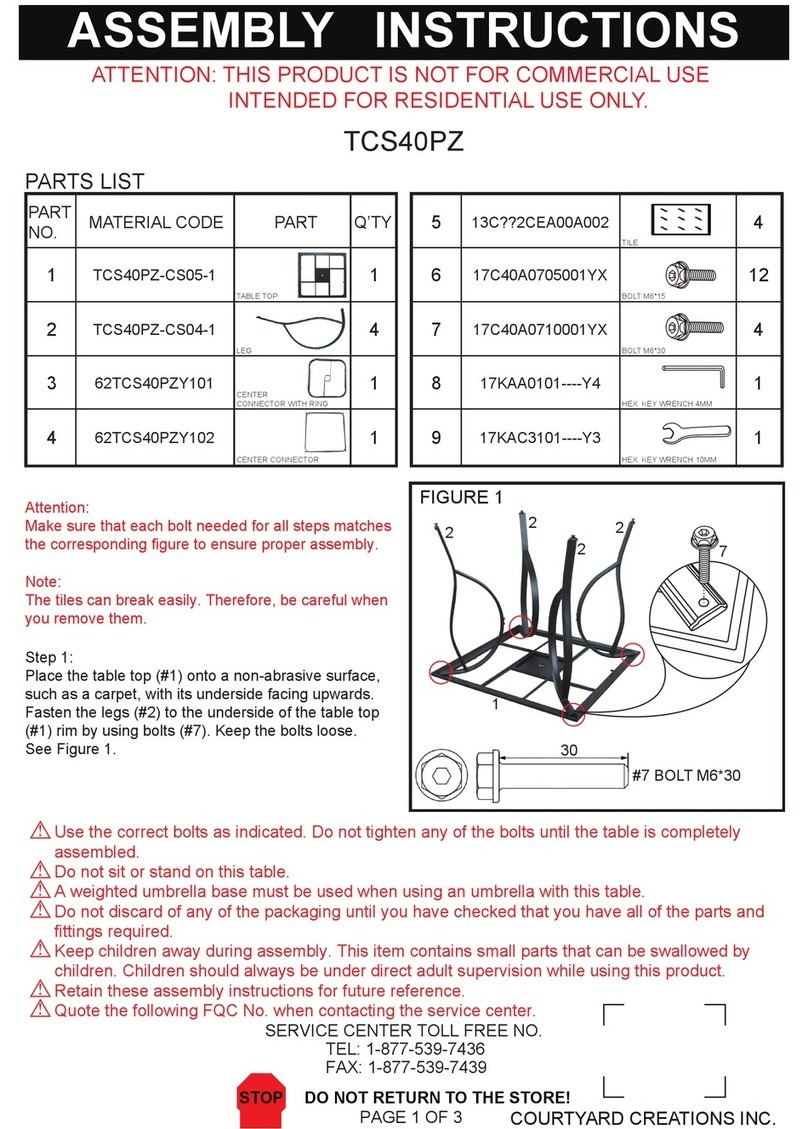
Step 1:
Place the table top (#1) onto a non-abrasive
surface, such as a carpet, with its underside facing
upwards. Fasten the legs (#2) to the underside of
the table top (#1) rim by using bolts (#8) and
washers (#10). Keep the bolts loose. See Figure 1.
FIGURE 1
TGS59LH-CS01
TGS59LH-CS02
TGS59LH-CS03
TGS59LH-CS04
TGS59LH-CS05
17XAA116
TGS59LH-CS06
17FA05040301-Y4
18000337006
18000337001
17KAA0201----Y4
17KAA0101----Y4
TGS59LH-CS07
TGS59LH-CS08
1809010256
SHORT CANOPY SUPPORT BRACE
LONGER CANOPY SUPPORT BRACE
CANOPY FRAME CONNECTOR
CONNECTOR
BOLT M6*20
WASHER d6.5*D13*1.0
BOLT CAP M6
HEX.KEY WRENCH 6MM
HEX.KEY WRENCH 4MM
SMALL CANOPY
PLASTIC CORNER PROTECTOR
LARGE CANOPY
BOLT CAP M6
PARTS LIST
PART
NO. MATERIAL CODE PART Q’TY
1 1
4
4
4
4
2
4
2
3
4
5
6
7
9
10
11
12
14
13
15
16
17
1
1
1
4
1
17C02A0708001Y4 8
8
24
24
TABLE TOP
LEG
SERVICE CENTER TOLL FREE NO.
TEL: 1-877-539-7436
FAX: 1-877-539-7439
COURTYARD CREATIONS INC.
SUPPORT
STOP DON’T RETURN TO STORE!
PAGE 1 OF 6
1
2
2
11 11
88
10 10 2
2
Use the correct bolts as indicated. Do not tighten any of the bolts until the table is completely assembled.
Do not sit or stand on this table.
Do not discard of any of the packaging until you have checked that you have all of the parts and fittings required.
Keep children away during assembly. This item contains small parts that can be swallowed by children.
Children should always be under direct adult supervision while using this product.
Retain these assembly instructions for future reference.
Quote the following FQC NO. when contacting the service center.
!
!
!
!
!
!
17C01A0706001Y4 BOLT M6*16
8 24
Warning:
It is recommended that 2 people assemble this
product.
16 #8 BOLT M6*16
Step 2:
Fasten the connectors (#7) to the legs (#2) and
table top (#1) by using bolts (#8) and washers
(#10). Keep the bolts loose. See Figure 2.
Step 3:
Fasten the supports (#3) to the legs (#2) by using
bolts (#9). Make sure that all of the bolts have
been tightened completely and cover them with
bolts caps (#11 and #12). See Figure 3.
FIGURE 2
FIGURE 3
STOP DON’T RETURN TO STORE!
PAGE 2 OF 6
8
811
10
10
11
2
2
2
2
1
7
7
7
7
3
2
2
2
2
333
99
12 12
#9 BOLT M6*20
20
16 #8 BOLT M6*16
STOP DON’T RETURN TO STORE!
PAGE 3 OF 6
Step 4:
Insert the longer canopy
support braces (#5) into the
canopy frame connector (#6).
The spring buttons attached
on the longer canopy support
braces (#5) should come
completely through the holes
on the canopy frame connector
(#6). See Figure 4 – Step 1.
Step 5:
Place the large canopy (#15)
onto the assembled canopy
frame. Then, insert the ends
of the longer canopy support
braces (#5) into the pockets
of the large canopy (#15).
See Figure 4 – Step 2 and
Step 3.
FIGURE 4
5
5
5
5
6
15
6
15
STEP 1
STEP 2
STEP 3
6
5
55
5
STOP DON’T RETURN TO STORE!
PAGE 4 OF 6
6
4
44
4
Step 6:
Insert the short canopy support
braces (#4) into the canopy
frame connector (#6). The spring
buttons attached on the short
canopy support braces (#4)
should come completely through
the holes on the canopy frame
connector (#6).
See Figure 5 – Step 1.
Step 7:
Place the small canopy (#16)
onto the assembled canopy
frame. Then, insert the ends of
the short canopy support braces
(#4) into the pockets of the
small canopy (#16).
See Figure 5 – Step 2 and
Step 3.
STEP 1
STEP 2
STEP 3
6
4
44
4
16
4
16
FIGURE 5
STOP DON’T RETURN TO STORE!
PAGE 5 OF 6
Step 8:
Insert the small canopy assembly
into the large canopy assembly.
The spring buttons attached on
the short canopy support braces
(#4) should come completely
through the holes on the longer
canopy support braces (#5).
See Figure 6.
FIGURE 6
FIGURE 7
STEP 1
STEP 2
Step 9:
Insert the canopy assembly into
the supports (#3). The spring
buttons attached on the supports
(#3) should come completely
through the holes on the longer
canopy support braces (#5).
See Figure 7.
3
5
4
5
3333
STOP DON’T RETURN TO STORE!
PAGE 6 OF 6
Cleaning and Maintenance
• Wash frame and fabric parts with mild soap and water, rinse thoroughly, and dry completely. Do
not use bleach, acid, or other solvents on the frame or fabric parts.
• Wash glass with mild soap and water, rinse thoroughly, and dry completely. Tempered glass has
been used for increased strength and safety of your table.
•When moving this table, lift. Do not drag this table.
• Inspect and tighten all bolts and fasteners on a regular basis to ensure the proper performance
and safety of your table.
• In order to prolong the life and beauty of your table, we recommend that it be stored in a dry and
protected area during off season periods.
READ THESE INSTRUCTIONS COMPLETELY BEFORE STARTING ASSEMBLY
SEPARATE AND IDENTIFY ALL PARTS, MAKING SURE THAT YOU
HAVE ALL OF THEPARTSLISTED.
IF YOU DO NOTLOCATE ALL OF THE PARTS LISTED, INSPECT THE
PACKING MATERIAL FOR SMALL PARTSTHAT MAYHAVEBECOME
SEPARATED DURING SHIPMENT.
IF YOU EXPERIENCEANY DIFFICULTYDURING ASSEMBLYOR IF ANY
PARTS ARE MISSING OR DAMAGED,CALL THE HELP LINE AT 1-877-539-7436
BEFORERETURNING THIS ITEM TO THESTORE.
PROVIDE THEFOLLOWING INFORMATION WHEN CALLING:
1-MODEL NUMBER OF THEPRODUCT.
2-PARTNUMBER AND MATERIAL CODE OF THE PARTFROM THE PARTS LIST
MOST PROBLEMSCAN BERESOLVED WITHOUT RETURNING THIS
PRODUCT TO THERETAILER.
The store where you made your purchase
does not stock parts for this item.
If you need parts,
whether they are missing or damaged,
STOP!
MissingAPart?
No Need To Go Back To
The Store
Call us between 9:00 AM and 4:30 PM
Eastern Time Monday through Friday
Call Toll Free:
TEL: 1-877-539-7436
FAX: 1-877-539-7439
FIGURE 8
9
12 12
9
17
2
22
2
2
17 17 17
17
Step 10:
This gazebo table can also be
used as a regular table. Loosen
the bolts and remove the canopy
support and canopy. Then,
position the plastic corner
protectors (#17) onthe top of
table legs where the bolts were
just removed. Secure the plastic
corner protectors (#17) in place
by tightening all of the bolts and
covering them with bolts caps.

Other Courtyard Creations Indoor Furnishing manuals

Courtyard Creations TCS41CK-WM User manual

Courtyard Creations

Courtyard Creations TCS41CK-WM User manual

Courtyard Creations KTS816C-WM User manual

Courtyard Creations

Courtyard Creations KTS816C-WM User manual

Courtyard Creations KLS777X-WM User manual

Courtyard Creations

Courtyard Creations KLS777X-WM User manual

Courtyard Creations KSS100X-WM User manual

Courtyard Creations

Courtyard Creations KSS100X-WM User manual

Courtyard Creations KTS889K User manual

Courtyard Creations

Courtyard Creations KTS889K User manual

Courtyard Creations TGS23FG-WM User manual

Courtyard Creations

Courtyard Creations TGS23FG-WM User manual

Courtyard Creations TCS18SK User manual

Courtyard Creations

Courtyard Creations TCS18SK User manual

Courtyard Creations KTS6917 User manual

Courtyard Creations

Courtyard Creations KTS6917 User manual

Courtyard Creations TGS38HS User manual

Courtyard Creations

Courtyard Creations TGS38HS User manual

Courtyard Creations TLS65TP User manual

Courtyard Creations

Courtyard Creations TLS65TP User manual

Courtyard Creations KLS780W-WM User manual

Courtyard Creations

Courtyard Creations KLS780W-WM User manual

Courtyard Creations TMS28JT User manual

Courtyard Creations

Courtyard Creations TMS28JT User manual

Courtyard Creations TCS73SC User manual

Courtyard Creations

Courtyard Creations TCS73SC User manual

Courtyard Creations KTS794T User manual

Courtyard Creations

Courtyard Creations KTS794T User manual

Courtyard Creations TMS21LE User manual

Courtyard Creations

Courtyard Creations TMS21LE User manual

Courtyard Creations TRS41PC User manual

Courtyard Creations

Courtyard Creations TRS41PC User manual

Courtyard Creations TGS38SW User manual

Courtyard Creations

Courtyard Creations TGS38SW User manual

Courtyard Creations RTS869K User manual

Courtyard Creations

Courtyard Creations RTS869K User manual

Courtyard Creations RUS4239 User manual

Courtyard Creations

Courtyard Creations RUS4239 User manual

Courtyard Creations TGS40SF-WM User manual

Courtyard Creations

Courtyard Creations TGS40SF-WM User manual

Courtyard Creations TMS54GM User manual

Courtyard Creations

Courtyard Creations TMS54GM User manual

Courtyard Creations RTS009P User manual

Courtyard Creations

Courtyard Creations RTS009P User manual

Courtyard Creations KTS794N User manual

Courtyard Creations

Courtyard Creations KTS794N User manual

Courtyard Creations TMS21LF User manual

Courtyard Creations

Courtyard Creations TMS21LF User manual

Popular Indoor Furnishing manuals by other brands

Regency LWMS3015 Assembly instructions

Regency

Regency LWMS3015 Assembly instructions

Furniture of America CM7751C Assembly instructions

Furniture of America

Furniture of America CM7751C Assembly instructions

Safavieh Furniture Estella CNS5731 manual

Safavieh Furniture

Safavieh Furniture Estella CNS5731 manual

PLACES OF STYLE Ovalfuss Assembly instruction

PLACES OF STYLE

PLACES OF STYLE Ovalfuss Assembly instruction

Trasman 1138 Bo1 Assembly manual

Trasman

Trasman 1138 Bo1 Assembly manual

Costway JV10856 manual

Costway

Costway JV10856 manual

moss DESIGN Caisson Credenza Assembly instructions

moss DESIGN

moss DESIGN Caisson Credenza Assembly instructions

Aquaglide FULL DECK 15.0 owner's manual

Aquaglide

Aquaglide FULL DECK 15.0 owner's manual

AREBOS AR-HE-SW30 user manual

AREBOS

AREBOS AR-HE-SW30 user manual

Till-Hilft Fulda 87005.330 Assembly instructions

Till-Hilft

Till-Hilft Fulda 87005.330 Assembly instructions

Twoey Outside 2010 quick start guide

Twoey Outside

Twoey Outside 2010 quick start guide

Hettich Easys 200 operating instructions

Hettich

Hettich Easys 200 operating instructions

The bedboss RELAX 404 Series owner's manual

The bedboss

The bedboss RELAX 404 Series owner's manual

Oeseder Möbelindustrie Bern 991 720 Assembly instructions

Oeseder Möbelindustrie

Oeseder Möbelindustrie Bern 991 720 Assembly instructions

Costway HW68469 user manual

Costway

Costway HW68469 user manual

Next ALIX A27743 Assembly instructions

Next

Next ALIX A27743 Assembly instructions

BROSA Hans Assembly guide

BROSA

BROSA Hans Assembly guide

Prodigg MINIKA PBA015T-FUR installation manual

Prodigg

Prodigg MINIKA PBA015T-FUR installation manual

manuals.online logo
manuals.online logoBrands
  • About & Mission
  • Contact us
  • Privacy Policy
  • Terms and Conditions

Copyright 2025 Manuals.Online. All Rights Reserved.