REMOTE CONTROL
Switch the CTOUCH interactive
display power on or off
Volume down Volume up
To confirm or enter a sub-menu or toggle between
options during MENU operation.
Use Arrow buttons to navigate in on-screen menu.
Return to previous menu
or exit the on-screen menu
Display or exit the setting menu screen
Zoom in on Windows / OS
Zoom out on Windows / OS
Show the most-recently used Apps
NOTES:
• This operation manual provides
a description based on operating
functions with the remote control.
• In different mode, some buttons may
have different function.
Switch the CTOUCH interactive
display power on or off Display or exit input source menu
To confirm or enter a sub-menu or toggle
between options during MENU operation.
Use Arrow buttons to navigate in on-screen menu.
Display desktop (Home page) on the screen
Display or exit the setting menu screen
Mute the sound
Freeze the current picture
Volume down
Return to previous menu or exit the on-screen menu
Turn off the picture on the CTOUCH interactive
diaplay and listen to the program audio only.
Volume up
Take a screenshot and store the data onto your
connected USB storage device.
If there is no USB storage, the screenshotwill be
stored on the built-in storage.
Set the built-in WiFi
System settings
Ethernet setting
Reset internal router by hardware.
Password is required for this operation
and is the same password as to access
the Lock menu. (the default password
is 0000)
Internal routing setting
IP settings
Proxy sett ings
Input the default UserName: admin.
Skip the default password setting as
there is no default password and then
press the login button.
Change the UserName and
Password: Select Management and
then Password.
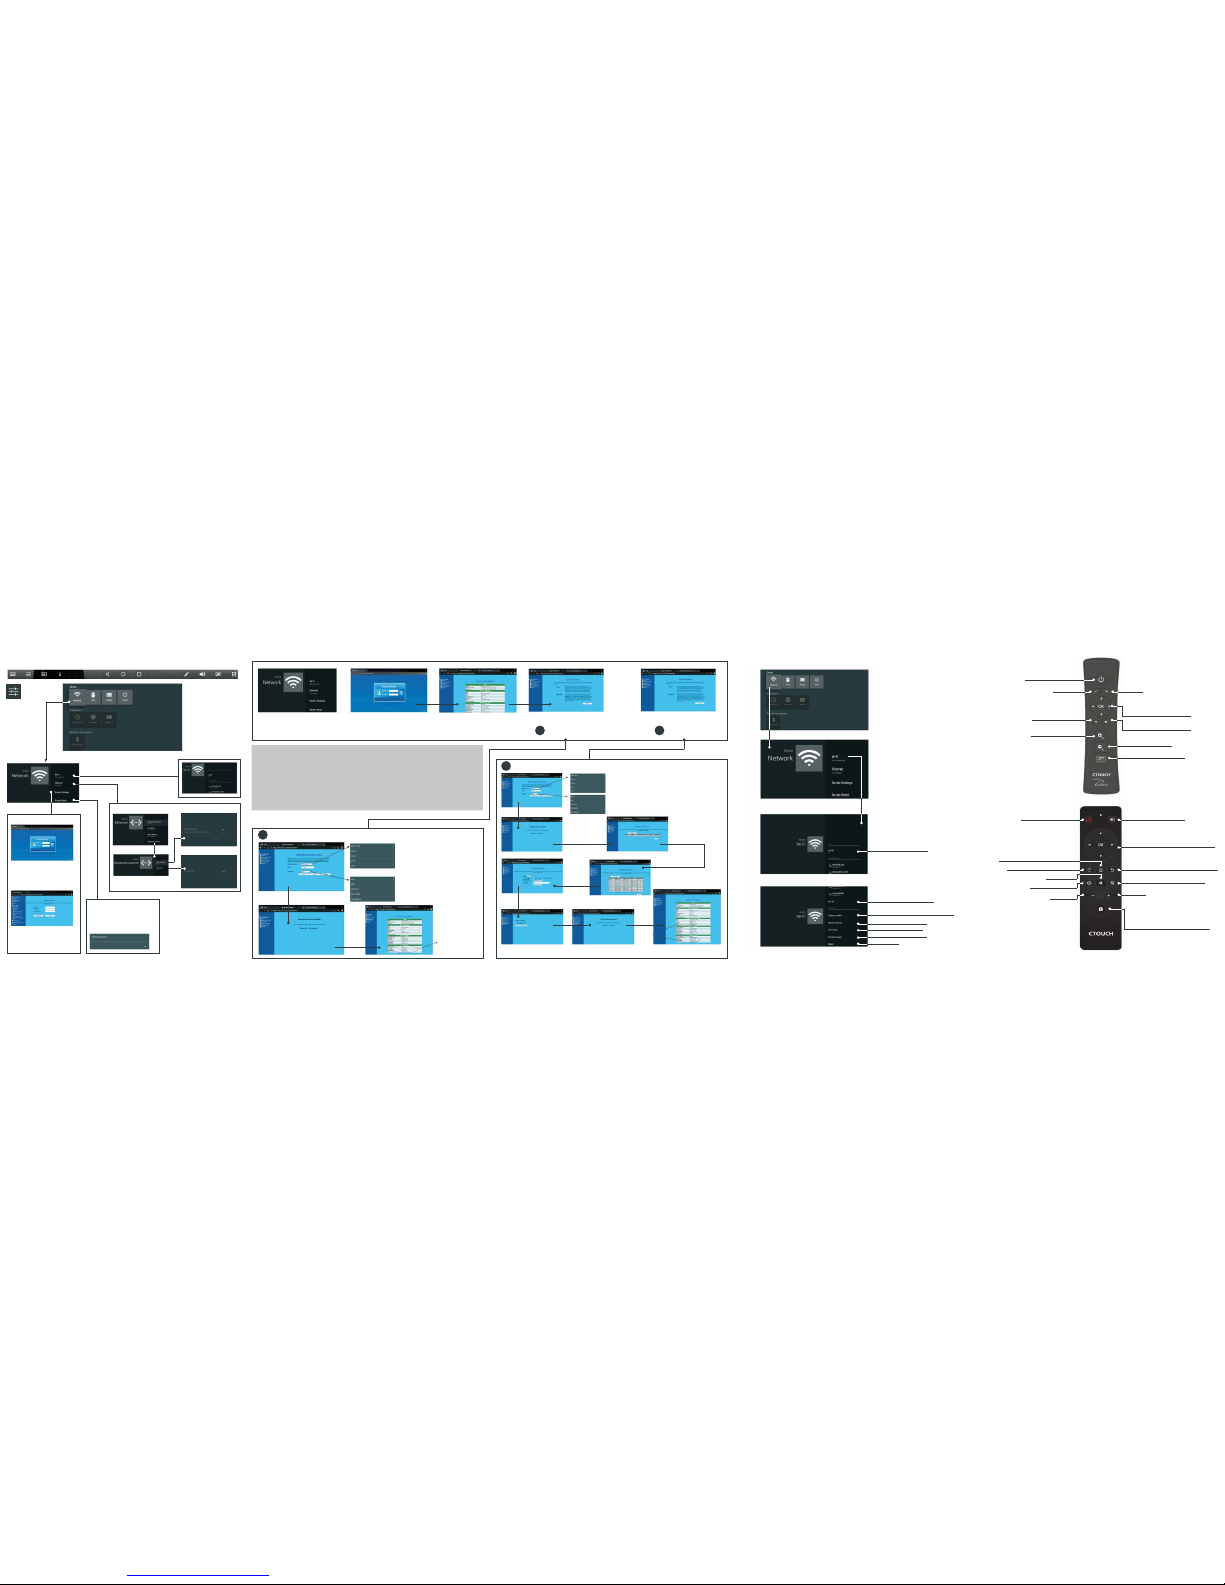
NETWORK SETTINGS
WIRED NETWORK SETTING (INTERNAL ROUTER)
THERE ARE 2 WAYS TO SET UP A WIRED NETWORK: EASY SET WIZARD AND ADVANCED MODE.
Input the default UserName: admin. Skip the
default password setting as there is no default
password and then press the login button. Select Easy Set Wizard
Select GAT EW AY
Select GAT EW AY Select WIRELESS ISP
Select WIRELESS ISP
OR
There are five methods to connect with a network, choose your preferred one. RECOMMENDED TO SELECT THE DHCP CLIENT
CONNECTION.
DHCP CLIENT: Automatically obtain IP information from your
ISP. If your ISP doesn’t providea designated IP
for you, then choose DHCP Client.
STATICIP: If all Internet IP information is provided by
your ISP, then choose Static IP.
PPPOE: Ethernet Point to Protocol.Your ISP will
provide you with Login ID andpassword.
Usually this option is applicable to DSL service.
PPTP: Point to Point Tunneling Protocol. Your
ISP will provide you with Login ID and
password.
L2TP: Layer 2 Tunneling Protocol. Your ISP will
provide you with Login ID and password.
Usually this option is applicable to DSL
service.
Password setting format
WiFi password of internal router in the
CTOUCH interactive display (Password should
be set at least 8 characters)
Password setting format
WiFi password of internal router in the
CTOUCH interactive display (Password should
be set at least 8 characters)
If you get an IP
address the setting
is succesfull/you
succesfully set the
internet connection.
Successfully connected
to return
Select Site Survey Confirm Site Survey
Select your
desired WiFi
signal
Input password
Connect
Get IP adress, setting successfully
WIRELESS NETWORK SETTING (BUILT-IN WIFI CARD)
Turn on or off the built-in WiFi
Display all of the WiFi sites avaible
Connect to WPS (WiFi Protected Setup) router
Add a new network manually
Scanning WiFi direct device
Setting Portable WiFi hotspot
Setting Mcast