Custom Engineering s'print User manual

DPT100-B/I/BT
User Manual
Portable thermal printer
s’print
www.custom.biz

DPT100-B/I/BT
All rights reserved. Total or partial reproduction of this manual in whatever form, whether by printed or electronic
means,isforbidden.Whileguaranteeingthattheinformationcontainedinithasbeencarefullychecked,CUSTOM
ENGINEERINGSPAandother entities utilizedin the realizationof this manualbear no responsibilityfor how the
manual is used.
Information regarding any errors found in it or suggestions on how it could be improved are appreciated. Since
productsaresubjectto continuous checkand improvement, CUSTOMENGINEERING SPAreservestheright to
make changes in information contained in this manual without prior notification.
COD.DOME-DPT100-B Rev.3.50
Copyright©2001 CUSTOMENGINEERINGSPA–Italy
CUSTOMENGINEERINGSPA
Str. Berettine2 - 43010Fontevivo (PARMA) -Italy
Tel. : +39 0521-680111 - Fax : +39 0521-610701
http:www.custom.biz
CustomerServiceDepartment:

DPT100-B/I/BT
2
14
3
6
7
5
PRINTER COMPONENTS
A. DPT100-B – Front external view
1- Printer base
2- Cover
3- Paper holder
4- Printing mechanism
5- Multi-function + ON key
6- Paper exit slot
7- Infrared device

DPT100-B/I/BT
2
1
B. DPT100-B – Under view
1- Serial connector and battery recharger
2- Battery compartment

TABLE OF CONTENTS
iDPT100-B/I/BT
INTRODUCTION
MANUALCONTENTS ...................................................................................................................................... 1
EXPLANATORYNOTESUSEDINTHISMANUAL........................................................................................... 1
GENERALSAFETYINFORMATION ................................................................................................................ 1
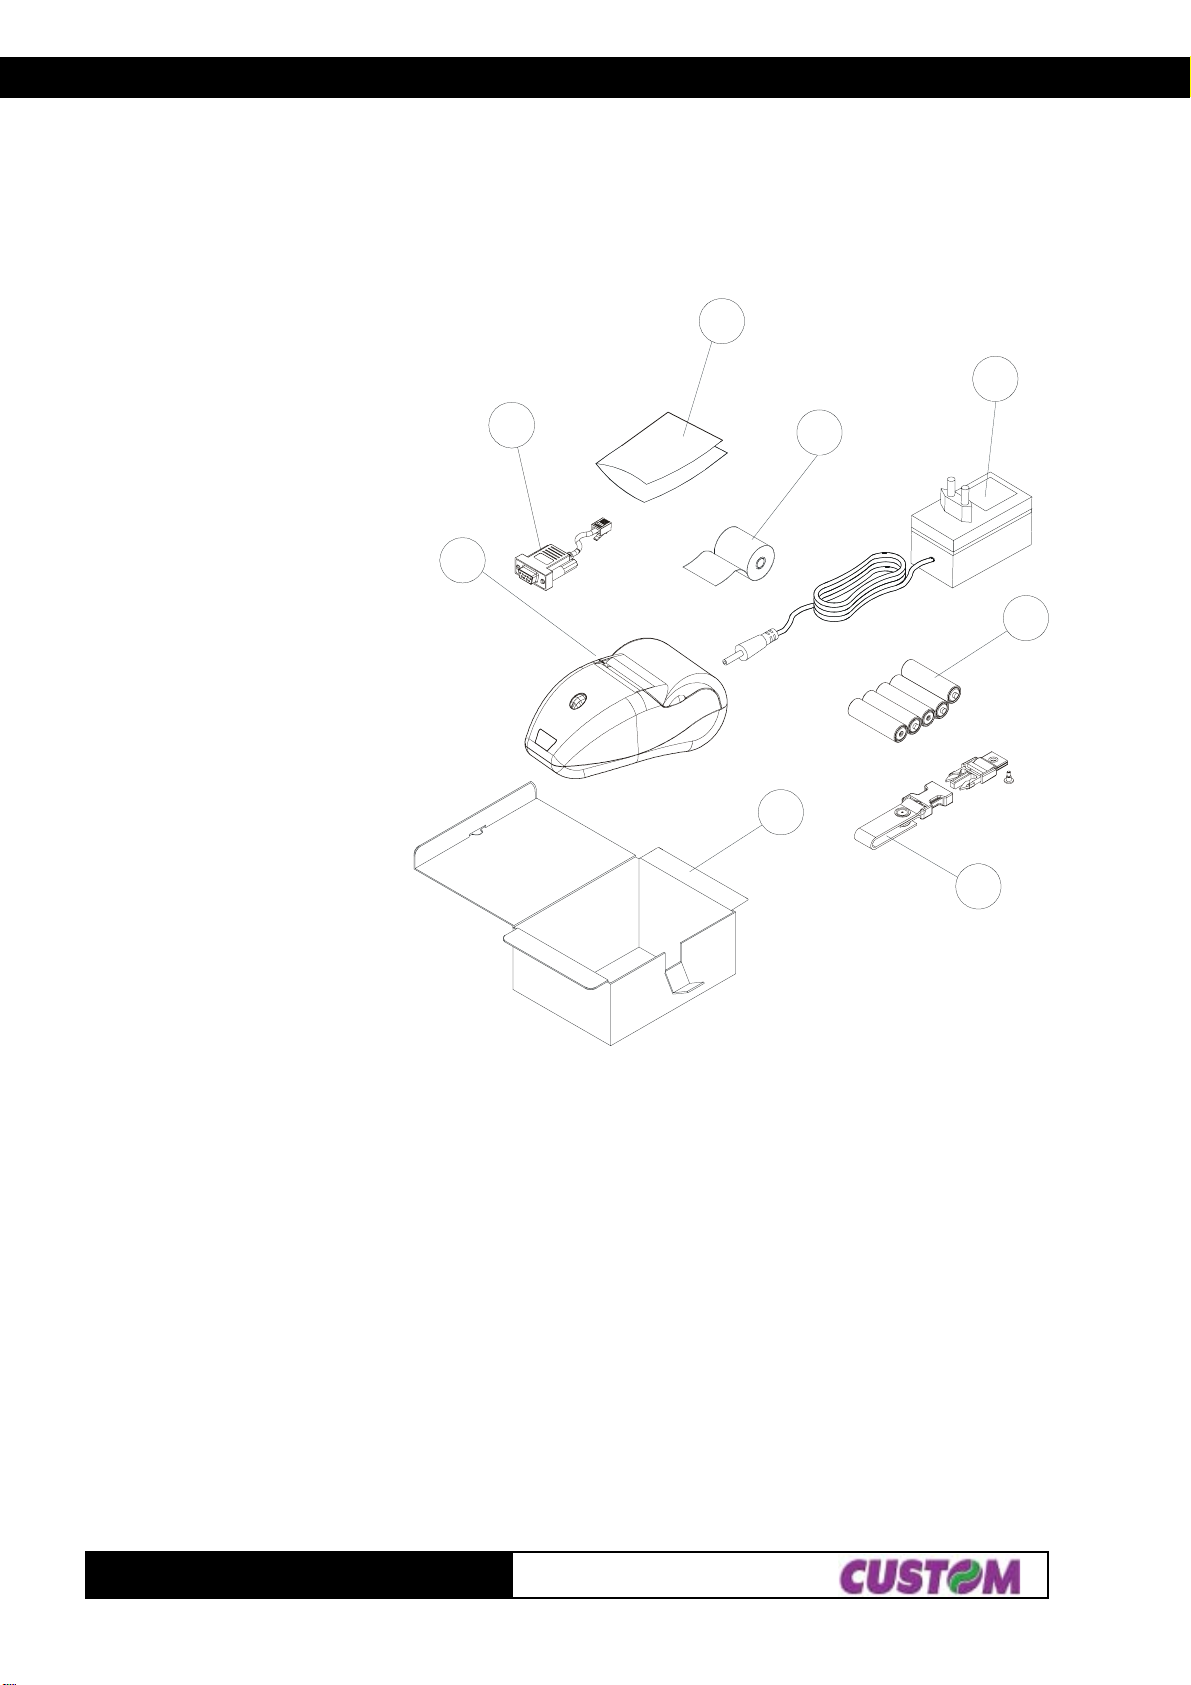
UNPACKINGTHEPRINTER ........................................................................................................................... 2
PRINTERFEATURES ...................................................................................................................................... 2
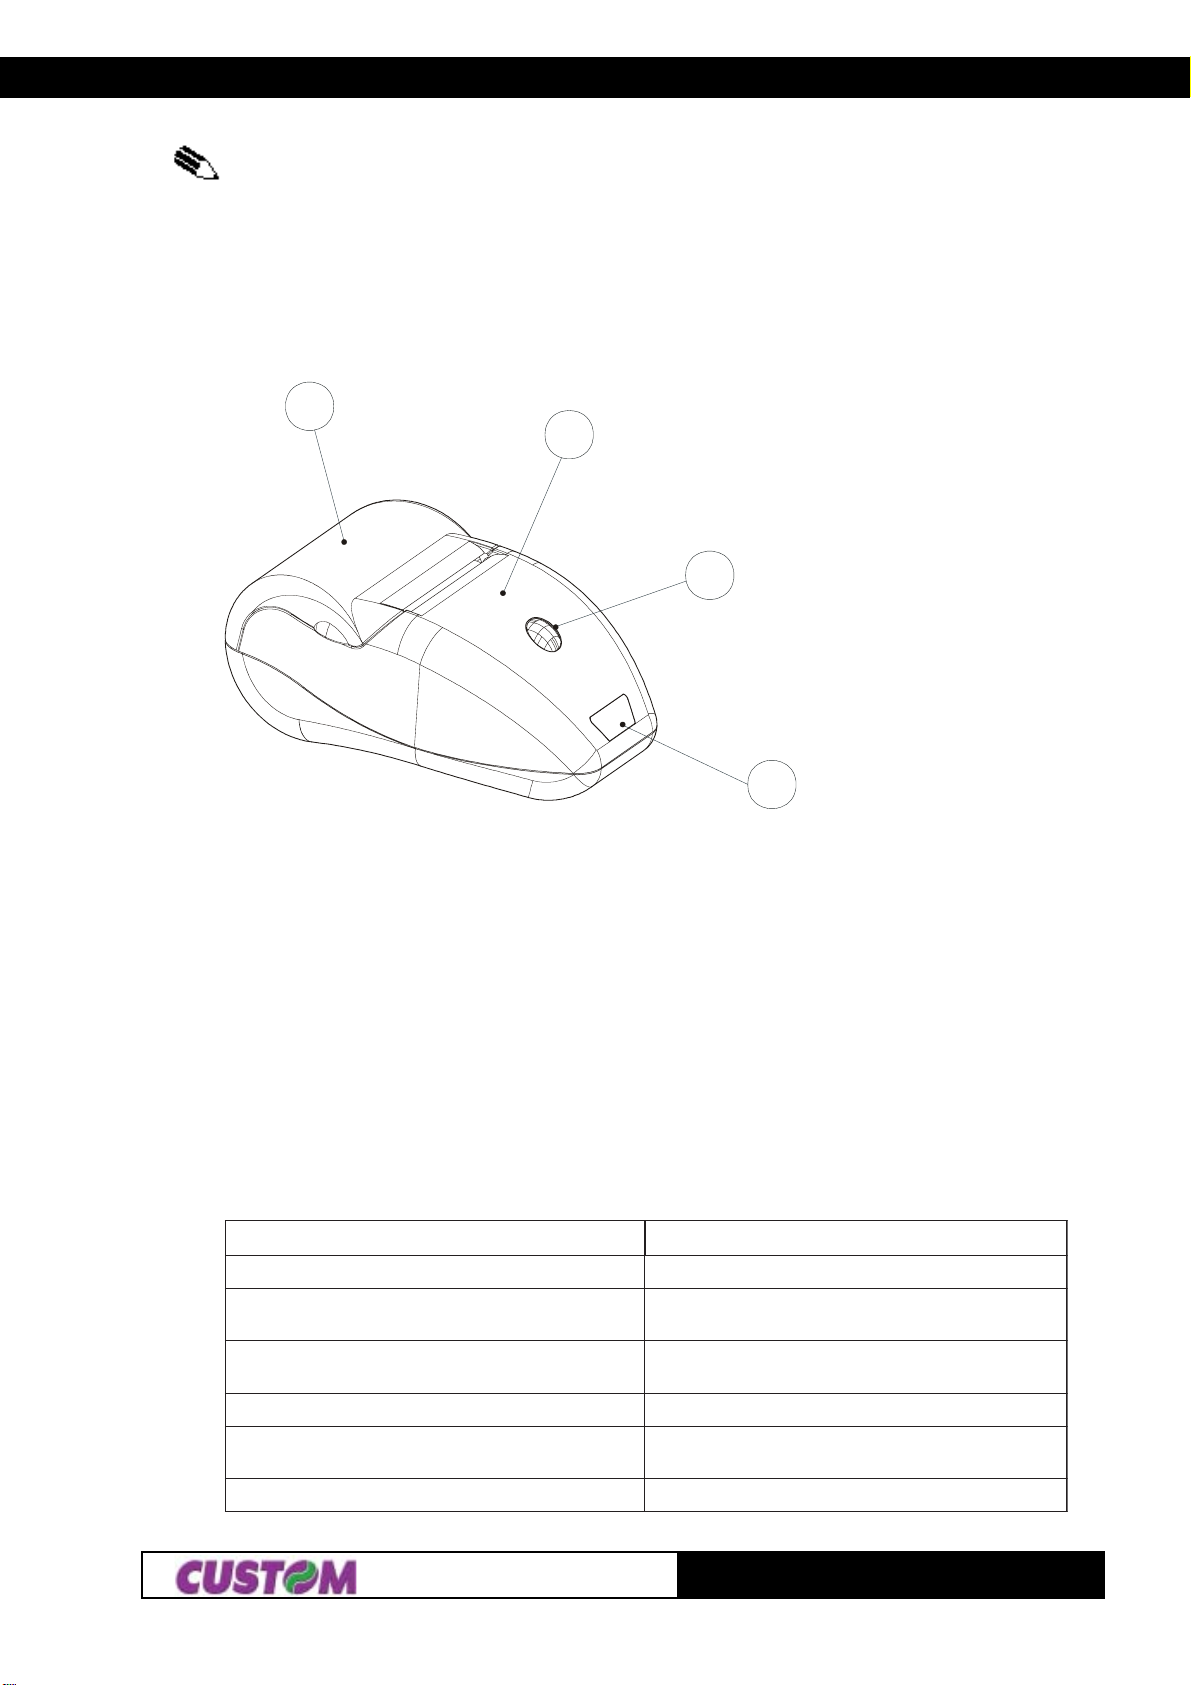
PRINTERDESCRIPTION ................................................................................................................................. 3
1. INSTALLATION AND USE
1.1CONNECTIONS ..................................................................................................................................... 1-1
1.1.1 Battery recharger ............................................................................................................................ 1-1
1.1.2Turningthe printer On andOff.......................................................................................................... 1-1
1.2BATTERIES ............................................................................................................................................ 1-2
1.2.1Rechargingbatteries ....................................................................................................................... 1-2
1.2.2Informationregardingbatteryuse..................................................................................................... 1-3
1.2.3Replacingbatteries.......................................................................................................................... 1-3
1.2.4Disposing of batteries...................................................................................................................... 1-5
1.3CONFIGURATION ................................................................................................................................... 1-5
1.3.1ConfigurationMod.DPT100-B/I........................................................................................................ 1-5
1.3.2ConfigurationMod.DPT100-BT........................................................................................................ 1-6
1.4HEXADECIMALDUMP............................................................................................................................ 1-8
1.5SIXLOAD................................................................................................................................................. 1-8
1.6MAINTENANCE ...................................................................................................................................... 1-9
1.6.1Changingthe paper roll.................................................................................................................... 1-9
1.6.2 Cleaning .........................................................................................................................................1-10
2. INTERFACES
2.1 RS232 SERIAL ....................................................................................................................................... 2-1
2.2INFRAREDBIDIRECTIONALSERIAL...................................................................................................... 2-3
2.2.1StandardMode ................................................................................................................................ 2-4
2.2.2InfraRedcommunicationprotocol..................................................................................................... 2-4
2.2.3 Printing instructions ........................................................................................................................ 2-5
2.3IrDAPROTOCOLOVERVIEW................................................................................................................. 2-5
2.3.1IrDADataprotocols supported ......................................................................................................... 2-7
2.3.1.1 Physical signal layer (PHY) ..................................................................................................... 2-7
2.3.1.2IrLAP ....................................................................................................................................... 2-8
2.3.1.3IrLMP....................................................................................................................................... 2-8
2.3.1.4LinkManagement-InformationAccessService ......................................................................... 2-9
2.3.1.5IrCOMM ................................................................................................................................... 2-9
2.3.1.5.13-Wire Raw and IrLPTin detail ............................................................................................... 2-9
2.3.1.5.2How3-WireRawandIrLPTdiffer ............................................................................................ 2-9
2.3.1.5.3 IAS entry and hint bits...........................................................................................................2-10
2.3.1.5.4 Basic link operation...............................................................................................................2-10
2.4BLUETOOTHPROTOCOLOVERVIEW(ONLYMOD.DPT100-BT) ........................................................2-10
2.4.1Protocols supported .......................................................................................................................2-10
2.4.1.1Serial Port Profile ....................................................................................................................2-11
2.4.1.2Object PushProfile .................................................................................................................2-11
3.PRINTERFUNCTIONS
3.1CONTROLCHARACTERS ...................................................................................................................... 3-1

TABLE OF CONTENTS
iiDPT100-B/I/BT
4.TECHNICALSPECIFICATIONS
4.1TECHNICALSPECIFICATIONS .............................................................................................................. 4-1
4.2ADAPTOR SPECIFICATIONS ................................................................................................................ 4-4
4.3DIMENSIONS ......................................................................................................................................... 4-5
5. CHARACTER FONTS
5.1 CHARACTER SETS............................................................................................................................... 5-1
APPENDIXA- ACCESSORIES AND SPARE PARTS
A.1TICKETALIGNMENT .............................................................................................................................. A-1
A.1.1Ticket alignment.............................................................................................................................. A-1
A.1.2Alignment Description ..................................................................................................................... A-2
A.2ACCESSORIES ...................................................................................................................................... A-3
A.2.1 Belt coupler .................................................................................................................................... A-3
A.3 SPARE PARTS....................................................................................................................................... A-3

INTRODUCTION
1DPT100-B/I/BT
MANUAL ORGANIZATION
In addition to the Introduction which includes a description of the explanatory notes used in the manual,
general safety information, how to unpack the printer and a brief description of the printer including its basic
features, this manual is organized as follows:
Chapter 1: Contains the information required for correct printer installation and its proper use, as well as
interface specifications
Chapter 2: Contains information on interface specifications
Chapter 3: Contains a description of the printer command set
Chapter 4: Contains Technical Specifications of the printer
Chapter 5: Contains the character sets (fonts) used by the printer
SYMBOL USED IN THIS MANUAL
NOTE. Gives important information or suggestions relative to the use of the printer.
WARNING
Information marked with this symbol must be carefully followed to guard against damaging the
printer.
DANGER
Information marked with this symbol must be carefully followed to guard against operator injury or
damage.
GENERAL SAFETY INFORMATION
•Read and keep the instructions which follow.
•Before cleaning the printer, disconnect the power supply and make sure that the printer is off.
•Clean the printer with a damp cloth. Do not use liquid or spray products.
•Do not operate the printer near water.
•Only use approved accessories and batteries. Do not connect to products that are not compatible.
•Use the type of electrical power supply indicated on the printer label. If in doubt, contact your retailer.
•When deciding where to place the printer, make sure it is positioned where its cables will not be
damaged.
•Do not introduce foreign objects of any kind into the printer as they could cause a short circuit and could
jeopardize printer functioning.
•Do not spill liquids onto the printer.
•Do not carry out technical operations on the printer, with the exception of the scheduled maintenance
procedures specifically indicated in the user manual.
•Disconnect the printer from the electricity supply and have it repaired by a specialized technician when:
A. The feed connector has been damaged.
B. Liquid has seeped inside of the printer.
C. The printer has been exposed to rain or water.
D. The printer is not functioning normally despite the fact that all instructions in the users manual
have been followed.
E. The printer has been dropped and its outer casing damaged.
F. Printer performance is poor.
G. The printer is not functioning.

INTRODUCTION
DPT100-B/I/BT 2
6
7
8
1
5
4
3
2
s’print
UNPACKING THE PRINTER
Remove the printer from its carton being careful not to damage the packing material so that it may be re-used
if the printer is to be transported in the future.
Make sure that all the components illustrated in fig. 1 are present and that there are no signs of damage. If
there are, contact Customer Service.
1. Warning sheet
2. Cable
3. Paper roll
4. Adaptor / Battery recharger
5. Batteries (5 pcs.)
6. Belt coupler
7. Printer
8. Box
PRINTER FEATURES
The new s’ print portable thermal printer offers an innovative alternative to impact-based systems, with a
range of interface options (RS232 serial, R232+IRDA, RS232+Bluetooth® wireless technology). The printer is
powered using batteries.
The battery version (with RS232+IRDA interface) is primarily intended for the automatic identification and
mobile telephony market, combined with portable terminals without printer; the infrared bidirectional interface
with which it is equipped makes cable connection—so “inconvenient” for portable devices—unnecessary.
The BT version is powered by batteries (5 rechargeable AA penlight batteries), and communicates through
RS232 serial interface and Bluetooth® wireless technology. s’print-BT is a light weight and slim printer. By
means of the Bluetooth®wireless technology it is capable to print wireless at high speed without any
alignment. The ideal and best match of s’print-BT is together with PDAs, mobile phones, laptop computers,
and automatic ID devices.
The supported Bluetooth®technology profiles are SPP (Serial Port Profile) that provides RS232 serial cable
emulation, and OPP (Object Push Profile) enabling the print-out of vCard format objects (business cards).
It is important to note that s’ print is the first Custom printer designed with “sixload” easy paper load,
making it simpler and more convenient to use.
It has a 203 dpi thermal print mechanism that utilizes 57.5mm-wide paper rolls and can print up to 24 o 40(1)
charaters per line.
(Fig. 1)

INTRODUCTION
3DPT100-B/I/BT
4
1
2
3
(1)NOTE: The 40 column version is downloadable on the Support/Download/Firmware section from
www.custom.it web site.
PRINTER DESCRIPTION
The printers consists of a ABS-V0 casing (1) equipped with a cover (2) under which is housed the paper roll and
print mechanism. On the front is the multi-function key (3) and red LED (4).
•Multi-function key. This key is used to access a variety of printer options depending on how long it is
held down. If the printer is off (red LED off), when this key is pressed power is turned on (blinking red
LED). To turn the printer off the key is pressed two times (the LED begins to blink faster) and if it is not
pressed again within three seconds the printer shuts off.
During the power-up phase, if the key is held down for at least three seconds, the printer enters the
configuration mode and prints out a printer setup report. When the print-out is complete, the printer
remains in stand-by to receive characters from the serial interface that are printed out in hexadecimal
code.
If the key is pressed, the printer by-passes the setup mode and terminates the hexadecimal dump
function. Pressing the key quickly will exit the configuration mode, while if it is held down for at least a
second, it is possible to make changes in the individual parameters.
•The red LED displays printer operating status and this check is performed “on-line”. Table 1 lists
operating statuses and the LED signals connected to them:
sutatsDELnoitpircseD
ffosyawlAfforetnirP
nosyawlA noretnirP-tluafon
gnigrahcerseirettabhtiw
gniknilbwolsyreV)sdnoceseerhtyreveknilbeno( nOretnirP-tluafon
gnigrahcertonseirettabhtiw
gniknilbwolS)dnocesyreveknilbeno(egassemtuOrepaP
gniknilbtsaF)dnocesflahyreveknilbeno( egatlovyrettab,gnitaehrevodaeh(rorreelbatteseR
)rorre
)dnocesrepsknilbneves(gniknilbtsafyreV ffognittuhsfossecorpnI
(Fig. 2)
(Tab.1)

INTRODUCTION
DPT100-B/I/BT 4
Blankpage

1. INSTALLATION AND USE
11- DPT100-B/I/BT
2
1
DC IN
1.1 CONNECTIONS
1.1.1 Battery Recharger
For the Battery Recharger/Power Supply and serial connection, the printer is equipped with a connecting cable
(fig. 1.2) that comes packed with the printer and has a double connection system. On one side is a 9-pin
female connector (fig. 1.2.A) for the serial port; on the other side of the same connector is a RJ11 connector
(fig. 1.2.B) and a jack (fig. 1.2.C) for connection to the battery recharger.
The printer is equipped with a rechargeable battery pack, located in the battery compartment (2), self-sufficient
for printing. To recharge the batteries, use the connection cable (fig. 1.2) that comes packed with the printer
and following the instructions reported in the 1.2.1 paragraph.
1.1.2 Turning the printer On and Off
How to turn the printer On
• by briefly pressing the multi-function key
• by sending a characters set on the serial line—it is better to send characters that are not read as
printer controls (ex. 0x0E)
• with the battery recharger connected
How to turn the printer Off (1)
• by briefly pressing the multi-function key
• by sending the character ESC 0 over the serial line
• following a given period of inactivity as specified in setup (see sec. 1.3)
(1) NOTE: If the printer is connected to the battery recharger and it recharging the batteries it’s not
possible to turn off the printer. It must wait that the operation in terminated.
(Fig.1.2.A)
(Fig.1.1)
(Fig.1.2.C)
(Fig.1.2.B)

1. INSTALLATION AND USE
21-
DPT100-B/I/BT
START
END
Printer on
error
Transmits status
command
Time out = 10 sec.
RTS is high ?
Time out = 0?
Received characters
from serial
No
Yes
Yes
No
No
Yes
Printer
on
Turning the printer On and Off using software commands
If the printer is off, sending a characters set on the serial line will turn it on (2)(3). Follow the instructions shown
in the diagram below:
(2) NOTE
It’s not possible to turn
on the printer sending one
or more characters through
the infrared device.
(3) NOTE
The printer start up will not
occur before 200-250 msec.
This delay is caused by
internal component.
1.2 BATTERIES
1.2.1 Recharging batteries
Appearing in the printer set up print out (see sec. 1.3) is the parameter HEAD VOLT that gives the battery
charge level.
To recharge the batteries(4), use the cable packed with the printer and proceed as follows:
•connect the battery recharger jack to the cable jack (vedi fig. 1.4) and plug the battery recharger into the
electrical mains;
•connect the cable RJ11 connector to the RJ11 connector located under the printer (see fig. 1.4). For a com-
plete recharge, we recommend that the batteries be left to charge for two hours;
(Fig.1.3)
(Fig.1.4)

1. INSTALLATION AND USE
31- DPT100-B/I/BT
(4) NOTE: During the recharge operation it’s not possible turning the printer off.
WARNING
Incorrect battery recharge voltage (different from that given in tab.1.2) could seriously damage
the printer.
Tables 1.1 and 1.2 provide specifications for the battery recharger
NIPLANGISTUO/NINOITPIRCSED
1CIRV+REWOPegrahceryrettaB
2DNGREWOPlangisdnuorG
tnerrucegrahcerxaM A6.0
egatlovegrahcerxaM V63-V21
1.2.2 Information regarding battery use
•Please note that the new NiMH battery reaches maximum performance levels only after having been
completely discharged and recharged at least two or three times.
•Never use battery rechargers and/or batteries that are damaged or worn.
•Battery life varies greatly depending, for example, on print density and the text to be printed.
•Recharge times vary depending on depletion levels, type of battery and battery recharger used. Batteries
may be recharged and discharged hundreds of times, but they do wear out over time. When battery life (both
print and stand-by) is noticeably shorter than usual, it is time to buy a new battery.
•Only utilize batteries that conform to specifications and only recharge them using battery rechargers
approved by CUSTOM ENGINEERING SPA.
•When the battery recharger is not in use, unplug it from the electrical mains. If not used, even a completely-
charged battery will automatically discharge over time.
•NiMH batteries last longer if you remember to completely discharge them every so often.
•Extreme temperatures can affect battery charge levels—leave them to cool or warm as required.
1.2.3 Replacing batteries
Instead of the rechargeable battery pack supplied with the printer, 5 AAALKALINE penlight batteries may be
used(5)(6).
(5) Note: if batteries other than those supplied with the printer are used, the Battery parameter in setup
must modified and the settings changed to Alkaline if Alkaline batteries are used, or the to closest
reference value for other types of batteries (see sec. 1.3).
(6) Note: if Alkaline batteries are used it doesn’t make the recharge.
To replace batteries, proceed as follows:
•remove the cover on the battery compartment (1) by unscrewing the screws (2) and, using a flat-head
screwdriver, pry open at points A and B (see fig.1.5).
(Tab.1.2)
(Tab.1.1)

1. INSTALLATION AND USE
41-
DPT100-B/I/BT
1
2
2
B
1
AA
•remove the battery pack (2) by lifting the battery removal tape (1) (see fig. 1.6).
•insert the 5 batteries(7) inside the compartment following the layout indicated in fig. 1.7 and re-position the
battery removal tape;
(7) Note: when inserting the batteries, make sure the + and – signs are positioned correctly.
•reclose the battery compartment by tightening the fastening screws.
(Fig.1.5)
(Fig.1.6)
(Fig.1.7)

1. INSTALLATION AND USE
51- DPT100-B/I/BT
1.2.4 Disposing of batteries
•Thecrossed-out wheeled bin symbol indicatesthat the disposingof
batteries must not be run through the normal cycle of waste disposal.
•Batteries must be recycled or disposed of properly.
Donot throw batteries away aspart of normal refuse disposal.
•Dono throw batteries intoopenflame!
1.3CONFIGURATION
1.3.1 Configuration Mod. DPT100-B/I
Theprinter set upprint out(see fig. 1.9)includes a rangeof information, andamong theseshould be pointed
out the HEAD VOLT parameter that indicates the battery charge level, i.e., the print head battery voltage.
Theprinter’sconfigurableparametersare:
•Interface:RS232D,Infrared(8).
•IR Protocol(9):Enable, DisableD.
•Baud Rate: 38400,19200,9600D, 4800, 2400,1200, 600.
•Data length: 7, 8Dbits/car.
•Parity:NoneD,evenor odd.
•Handshaking:XON/XOFFDorHardware(10).
•Autofeed:CRdeactivatedDor CR activated.
•Battery: 1000 mAh, 1100 mAh, 1200 mAh, 1300 mAh, 1400 mAh, 1500 mAh, 1600 mAh, 1700 mAh,
1800 mAh, 1850 mAhD ,Alkaline(11).
•Standby: 1min, 5minD, 10 min, 30 min(12), 1 h, 2h, None.
•Alignment:DisabledD, Enabled.
•Print density: -2, -1, 0D, +1, +2.
Please note: the parameters marked with the symbol Drepresentthedefault values.
(8) Note: If the Interface parameter is set in infrared and flow control is required, any time
a transmission is effected a time break of one time and a half the byte transmission is needed
(Fig.1.9)
* SETUP DEFAULT *
HEADTEMP. [°C] =22.5
BATTTEMP. [°C] = 25.0
HEAD VOLT [V] = 6.3
Interface :RS232
IRProtocol :Enable
BaudRate :9600bps
Datalength :8bits/chr
Parity :None
Handshaking :Xon/Xoff
Autofeed :CRdisabled
Battery :1600mAh
Standby :5MIN
Alignment :Disable
PrintDensity :0
[PUSH] ENTERSET-UP
[FASTPUSH]EXITSET-UP
(Fig.1.8)

1. INSTALLATION AND USE
61-
DPT100-B/I/BT
(forexample1.5msecat9600 bps).ThereasonisforHalfDuplextypeof infrared linecommunication.
As a result the Busy condition check must be waited when transmitting data to the printer.
If said condition would slow down print-out, it is alternatively possible to transmit the bytes to be
printed in fixed length blocks (for example 16 bytes at a time) and to wait for the necessary time to
receive a likely XON/XOFF.
(9) Note: The “IR Protocol” parameter is present only if interface is set in“Infrared”.
(10) Note: It is not possible to modify the "flow control" parameter if interface is set in infrared
because it is automatically set in XON/XOFF.
(11) Note: This parameter regulates battery recharge time. If set to Alkaline, battery recharge is
disabled. If another type of battery other than those supplied with the printer is used, select the
closest appropriate charge value from the list.
(12) Note:Thisparameterregulates theperiodofinactivityafterwhichtheprinter shutsoffautomatically
toavoid battery discharge.
Each time the key is pressed quickly, the parameter will change and the current value will be printed out. Once
the desired value has been attained, hold the key down for at least a second to pass to the next parameter, and
so on. Printing out of a new printer set up report indicates that set up is complete.
1.3.2 Configuration Mod. DPT100-BT
Printer operating status is indicated in the configuration print-out in which, next to the name of the components
displayed(seefigure 1.10), the followinginformationis given:
• under TEST the message OK appears if the BlueTooth communication and module are functioning
and NOT OK if faulty.
• under NAMEis given thename that identifythe printer froma BlueTooth wirelessremote device.
• under PIN is given the passcode used to connect to the printer if some Bluetooth wireless devices
request it.
• under ADDR is given the BlueTooth device local address; this is a fixed number assigned by the
manufacturer.
• underHEAD TEMPERATUREis given thetemperatureof the head.
• underBATTERYTEMPERATUREisgiventhe temperature ofthe battery.
• under HEAD VOLTAGEisgiven the battery charge level,i.e., the printhead battery voltage.

1. INSTALLATION AND USE
71- DPT100-B/I/BT
(13) Note: These parameters listed in the setup, are present only from the Firmware BlueTooth release 1.02
(FW ); in the previously version are not reported.
(14) Note : In the printer label version (s’print-LP1 model) this parameter is not indicated because the
alignment is always enabled.
The printer’s configurable parameters are :
•Interface: BlueTooth D, RS232.
•Name ID(15):NO IDD, #0, #1, #2, #3, #4, #5, #6, #7, #8, #9.
•Authentication (16):Enabled, DisabledD.
•Object Push Profile (13) (17):Enabled, DisabledD.
•Baud Rate (18):38400, 19200, 9600D, 4800, 2400, 1200, 600.
•Data length (18):7, 8Dbits/car.
•Parity (18):NoneD, Even or Odd.
•Hanshaking (18):XON/XOFFDor Hardware.
•Autofeed : CR DisabledDor CR Enabled.
•Battery: 1000 mAh, 1100 mAh, 1200 mAh, 1300 mAh, 1400 mAh, 1500 mAh, 1600 mAh, 1700 mAh,
1800 mAh, 1850 mAhD , Alkaline.
•Standby: 1min, 5minD, 10 min, 30 min, 1 h, 2h, None.
•Print mode: NormalD, Reverse.
•Alignment (14):DisabledD, Enabled.
•Print Density: -2, -1, 0D, +1, +2.
Please note: The parameters marked with the symbol Drepresent the default values.
If Bluetooth interface is enabled, it’s better do not send data on RS232 line, because data
could overlap Bluetooth wireless line.
(Fig.1.10)
SETUP DEFAULT :
Test = OK
NAME = S’print-BT
PIN = 12345
ADDR = 00:0E:6D:CE:39:8D(13)
HEAD TEMP. [°C] = 27.5
BATT TEMP. [°C] = 25
HEAD VOLT [V] = 6.2
Interface : Bluetooth
Name ID : NO ID
Authenticat : Enabled
Obj Push Pr : Enabled(13)
Autofeed : CR Disabled
Battery : 1700 mAh
Standby : 5 MIN
Print mode : Normal
Alignment : Disabled(14)
Print Density: 0
[PUSH] ENTER SETUP
[FAST PUSH] EXIT SETUP

1. INSTALLATION AND USE
81-
DPT100-B/I/BT
(15) NOTE: The Name ID is used to diversify one printers from another that have the same name,
inside the same area. The index will be added at the end of the name (example: S’print-BT #1). It’s
possible that some BlueTooth wireless remote device don’t update immediately printer name, but only at
the beginning of new connection. This happened because most of remote devices create a relation
table between Bluetooth device address (that is passed on every access) and the identification
name. So the method of research of remote devices is sensibly faster, but it involves that the printer
name (or others devices BlueTooth) is update only sometimes, for the most part it happened at the
beginning of new connection.
(16) NOTE: The authentication is used to enable the password entry, from the host at every connection,
for printing. If someone is enabled to use the printer (and consequently to know the link key), can
execute an operation of “pairing”. When the printer is “paired” with the host, it’s possible to access to
printing service without re-enter the password.
(17) NOTE: The Object Push Profile provides facilities for exchanging business card between client and
server, for pulling business card from a server, and for pushing a limited range of objects onto a server;
for example, a virtual business card wich fit the vCard object format.
(18) NOTE: This parameter is present only if RS232 interface is set.
The “ Name”, “ PIN”, “ Name ID” and the “Authentication” values become actives only turning off and
then turning on the printer; reset commands or reset after set up don’t get actives those setting.
1.4 HEXADECIMAL DUMP
This function is used to display the characters received from the communications port; after the reception of
each 6 characters from the communications port, the printer prints out both the hexadecimal code received as
well as the corresponding ASCII code.
Shown below is an example of a Hexadecimal Dump:
48 65 78 61 64 65 Hexade
63 69 6D 61 6C 20 cimal
64 75 6D 70 20 66 dump f
75 6E 63 74 69 6F unctio
6E 20 30 31 32 33 n 0123
34 35 36 37 38 39 456789
61 62 63 64 65 66 abcdef
67 68 69 6A 6B 6C ghijkl
6D 6E 6F 70 71 72 mnopqr
73 74 75 76 77 78 stuvwx
79 7A yz
1.5 SIXLOAD
The printer has been designed with an easy paper load system to improve handling and simplify use.
This easy paper loading system is called “sixload” because when the paper is loaded into the printer, it looks
like the number “6” (the roll on the bottom with the edge lifted).

1. INSTALLATION AND USE
91- DPT100-B/I/BT
1.6 MAINTENANCE
1.6.1 Changing the paper roll
To change the roll of paper, proceed as follows:
1) Open the printer cover (see fig. 1.12) levering on the cover lateral projections and position the paper roll
so that it unrolls in the direction shown in figure 1.13;
(Fig.1.11)
(Fig.1.12)
(Fig.1.13)

1. INSTALLATION AND USE
101-
DPT100-B/I/BT
alcohol, solvent
(Fig.1.16)
2) Pull up on the edge of the paper and close the cover (fig. 1.14);
3) Tear off the paper. The printer is now ready (fig.1.15).
1.6.2 Cleaning
To clean the printer, use a vacuum cleaner or soft cloth.
Before cleaning the printer, unplug its electrical cord and make sure that the printer is off.
Do not use alcohol, solvents or hard-bristled brushes.
Do not let water or other liquids seep into the printer.
(Fig.1.14)
(Fig.1.15)
Other manuals for s'print
1
This manual suits for next models
3
Table of contents
Other Custom Engineering Printer manuals

Custom Engineering
Custom Engineering TG1260 series User manual

Custom Engineering
Custom Engineering KPM150-H User manual

Custom Engineering
Custom Engineering MT002-1 User manual

Custom Engineering
Custom Engineering KUBE II ETH User manual

Custom Engineering
Custom Engineering My3-BT3B User manual

Custom Engineering
Custom Engineering s'print User manual

Custom Engineering
Custom Engineering TP 2000 User manual

Custom Engineering
Custom Engineering KPM150-H User manual

Custom Engineering
Custom Engineering Ticket Gaming TG35 User manual

Custom Engineering
Custom Engineering KPM 216H II User manual