CYP CSC-V102P User manual

CSC-V102P
4K UHD+HDMI to HDMI Scaler
with EDID Management
Operation Manual
Operation Manual


DISCLAIMERS
The information in this manual has been carefully checked and
is believed to be accurate. Cypress Technology assumes no
responsibility for any infringements of patents or other rights of third
parties which may result from its use.
Cypress Technology assumes no responsibility for any inaccuracies
that may be contained in this document. Cypress also makes no
commitment to update or to keep current the information contained
in this document.
Cypress Technology reserves the right to make improvements to this
document and/or product at any time and without notice.
COPYRIGHT NOTICE
No part of this document may be reproduced, transmitted,
transcribed, stored in a retrieval system, or any of its part translated
into any language or computer le, in any form or by any means—
electronic, mechanical, magnetic, optical, chemical, manual, or
otherwise—without express written permission and consent from
Cypress Technology.
© Copyright 2018 by Cypress Technology.
All Rights Reserved.
TRADEMARK ACKNOWLEDGMENTS
All products or service names mentioned in this document may be
trademarks of the companies with which they are associated.

SAFETY PRECAUTIONS
Please read all instructions before attempting to unpack, install or
operate this equipment and before connecting the power supply.
Please keep the following in mind as you unpack and install this
equipment:
• Always follow basic safety precautions to reduce the risk of re,
electrical shock and injury to persons.
• To prevent re or shock hazard, do not expose the unit to rain,
moisture or install this product near water.
• Never spill liquid of any kind on or into this product.
• Never push an object of any kind into this product through any
openings or empty slots in the unit, as you may damage parts
inside the unit.
• Do not attach the power supply cabling to building surfaces.
• Use only the supplied power supply unit (PSU). Do not use the PSU
if it is damaged.
• Do not allow anything to rest on the power cabling or allow any
weight to be placed upon it or any person walk on it.
• To protect the unit from overheating, do not block any vents or
openings in the unit housing that provide ventilation and allow for
sufcient space for air to circulate around the unit.
REVISION HISTORY
VERSION NO. DATE SUMMARY OF CHANGE
RDV1 26/02/18 Preliminary release
VS1 21/03/18 Final technical review
VS2 19/04/18 Updated section 6.3

CONTENTS
1. Introduction......................................................1
2. Applications.....................................................1
3. Package Contents ..........................................1
4. System Requirements......................................2
5. Features............................................................2
6. Operation Controls and Functions.................3
6.1 Front Panel ................................................. 3
6.2 Rear Panel.................................................. 4
6.3 OSD Menu.................................................. 5
6.4 EDID Management ................................. 12
7. Connection Diagram ....................................13
8. Specications ................................................14
8.1 Technical Specications ........................ 14
8.2 Video Specications............................... 15
9. Acronyms .......................................................16

1
1. INTRODUCTION
This HDMI to HDMI scaler with EDID management is designed
to convert sources between 4K and 1080p to enable greater
compatibility with the native resolutions of available displays. 4K
sources may be scaled to 1080p, or bypassed, and 1080p sources
may be scaled to 4K, or bypassed, all while maintaining the original
frame rates. Additionally, a variety of output color space options are
available, including RGB, YUV (4:4:4, 8-bit) and YUV (4:2:0, 8-bit).
Advanced and robust EDID management provides detailed control
over your video environment. 10 basic test patterns are also included
which can be output at 16 different video resolution timings, useful for
verifying the HDMI signal path in your system. The included automated
pattern and timing test features provide an easy way to test the
capabilities of a connected display by cycling through selected
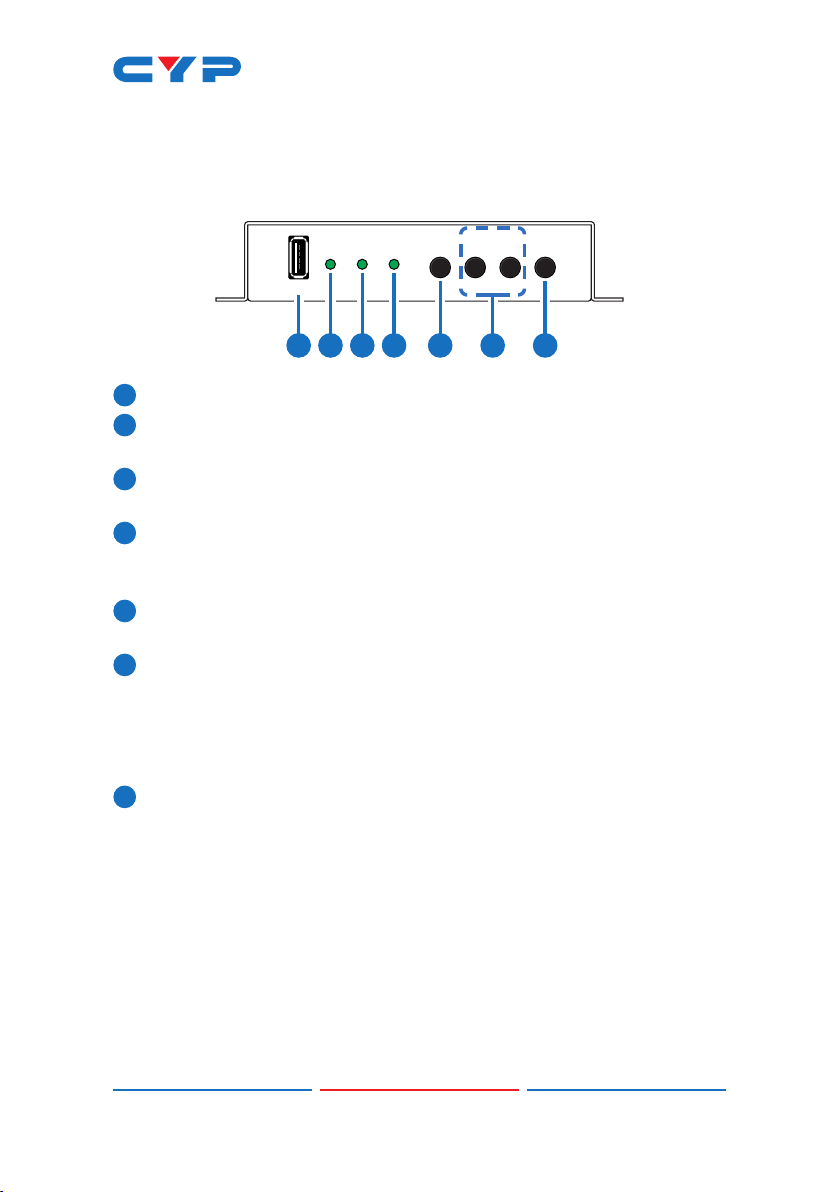
resolutions or patterns. This unit has a comprehensive OSD menu and is
controllable using front panel controls.
2. APPLICATIONS
• Entertainment Rooms & Home Theaters
• Showrooms & Demo Rooms
• On-site equipment testing
• Production testing
• R&D design and testing
3. PACKAGE CONTENTS
• 1×4K UHD HDMI to HDMI Scaler
• 1×5V/2.6A DC Power Adapter
• 1×Shockproof Feet (Set of 4)
• 1×Operation Manual

2
4. SYSTEM REQUIREMENTS
• HDMI input source equipment such as a media player, video game
console or set-top box.
• HDMI receiving equipment such as an HDTV, monitor, or audio
amplier.
• The use of “Premium High Speed HDMI” cables is highly
recommended.
5. FEATURES
• HDMI with HDR, 3D & 4K@60Hz support, DVI 1.0 compatible
• HDCP 2.2 and HDCP 1.x compliant
• 1 HDMI input and output
• Supports up to 4K UHD (18Gbps, 4K@50/60Hz 4:4:4, 8-bit) video
signals
• Supports Deep Color up to 16-bit at 1080p60
• Supports current 10-bit and 12-bit HDR (High Dynamic Range)
formats in bypass mode
• Selectable scaling or bypass for 1080p/4K sources (all other
resolutions are passed without scaling)
• Color space conversion options for 4K output
• Includes 10 test patterns for on-site display testing
• Automated multi-timing and pattern testing function
• Advanced EDID management
• Compact design
• Controllable via front-panel buttons with OSD

3
6. OPERATION CONTROLS AND FUNCTIONS
6.1 Front Panel
TEST
SERV.
POWER4K2K SYNC MENU PATTERN ENTER
-
+
1 65 72 3 4
1SERV. This port is reserved for rmware and EDID update use only.
2POWER: This LED will illuminate to indicate the unit is on and
receiving power.
34K2K: This LED will illuminate to indicate that the HDMI input
contains 4K video.
4SYNC: This LED will illuminate to indicate that a live source has
been detected on the input port. When no source is detected the
LED will remain off.
5MENU: Press to enter the OSD menu, or to back out from menu
items.
6 −/+ & Test Pattern: When the OSD menu is in use, press these
buttons to move up and down or adjust selections within OSD
menus.
Note: Press and hold both buttons simultaneously for 3 seconds to
activate Test Pattern mode.
7ENTER: Press to conrm a selection or to go deeper into a menu
item.

4
6.2 Rear Panel
DC 5V
HDMI OUTHDMI IN
1 2 3
1HDMI IN: Connect to HDMI source equipment such as a media
player, game console or set-top box.
Note: If no valid HDMI input source is detected, the unit will output
a blue 720p60 signal to allow continued access to the OSD menu.
2HDMI OUT: Connect to an HDMI TV, monitor or amplier for digital
video and audio output.
3DC 5V: Plug the 5V DC power adapter into the unit and connect it
to an AC wall outlet for power.

5
6.3 OSD Menu
All functions of this unit are controlled by using the OSD (On Screen
Display) which is activated by pressing the Menu button on the front
of the unit. Use the + (PLUS), − (MINUS), and ENTER buttons to navigate
the OSD menu. Press the Menu button to back out from any menu
item and then press it again to close the menu.
The individual functions of the OSD will be introduced in the following
section. Items marked in BOLD are the factory default settings.
MAIN MENU STRUCTURE
Output
EDID
HDCP
OSD
Test Pattern
Information
Firmware Update
Load EDID
Factory Setting
OUTPUT
2ND LEVEL 3RD LEVEL DESCRIPTION
Input 1080p PASS THROUGH Set the preferred
method to handle
upscaling or bypassing
1080p sources.
Auto
Up 4K2K (YUV420)
Up 4K2K
Input 4K2K PASS THROUGH Set the preferred
method to handle
down-scaling, color
space converting, or
bypassing 4K sources.
Auto
Down 1080p
Fix RGB
Fix YUV420
YUV42x to RGB
Fix 8 Bits

6
OUTPUT
2ND LEVEL 3RD LEVEL DESCRIPTION
Up 4K2K Video Gain
(Only available when
“Input 1080p” is not set
to PASS THROUGH.)
Level 1 (Weak) Set the level of video
gain processing to
apply to 1080p sources
when scaled to 4K.
Level 2
LEVEL 3
Level 4
Level 5
Level 6 (Strong)
EDID
2ND LEVEL 3RD LEVEL DESCRIPTION
EDID External HDMI Select the EDID to send
to the connected HDMI
input.
After making a
selection, you will be
asked to re-conrm your
selection before it takes
effect.
INTERNAL 1080P (2CH)
Internal 1080p (8CH)
Internal 4K2K (3G-2CH)
Internal 4K2K (3G-8CH)
Internal 4K2K (6G-2CH)
Internal 4K2K (6G-8CH)
User EDID 1
User EDID 2
User EDID 3
HDCP
2ND LEVEL 3RD LEVEL DESCRIPTION
HDCP HDCP Support Off Select the HDCP
handling behavior of
the unit.
Refer To Source
REFER TO DISPLAY

7
OSD
2ND LEVEL 3RD LEVEL DESCRIPTION
Display Information Off Enable or disable the
source/sink Information
Display that shows when
the source changes.
ON
OSD Timeout Off Set the OSD menu’s
timeout period.
Note: This does not
change the display
length of the OSD
Information Display.
5 Sec
10 Sec
15 Sec
20 Sec
25 Sec
30 Sec
35 Sec
40 SEC
TEST PATTERN
2ND LEVEL 3RD LEVEL DESCRIPTION
Mode OFF Set the test pattern
mode.
“On” outputs the
selected pattern at the
set resolution.
“Auto Pattern” will
automatically switch
between all patterns at
the set resolution.
“Auto Timing” will
display the set pattern
while automatically
switching between all
selected resolutions.
On
Auto Pattern
Auto Timing

8
TEST PATTERN
2ND LEVEL 3RD LEVEL DESCRIPTION
Pattern
(Only available when
“Mode” is set to ON.)
WHITE COLOR Select the test pattern
to display.
Red Color
Green Color
Blue Color
Magenta Color
Yellow Color
Cyan Color
Color Bar
Ramp
Toggle
Resolution
(Only available when
“Mode” is set to ON.)
720×480p@60 Select the resolution
and refresh rate to
output.
Note: This setting is
not used when “Auto
Timing” is active. Please
refer to the “Auto Timing
Select” menu.
720×576p@50
1280×720p@50
1280×720P@60
1920×1080p@50
1920×1080p@60
3840×2160p@24
3840×2160p@25
3840×2160p@30
4096×2160p@24
4096×2160p@25
4096×2160p@30
3840×2160p@50
3840×2160p@60
4096×2160p@50
4096×2160p@60

9
TEST PATTERN
2ND LEVEL 3RD LEVEL DESCRIPTION
HDCP
(Only available when
“Mode” is set to ON.)
OFF Enable or disable the
use of HDCP while
outputting a test
pattern.
Note: The version of
HDCP used depends
on the capability of the
connected display.
On
Switch Time 10 SEC Set the length of time
between pattern or
resolution changes
when the “Auto
Pattern” or “Auto
Timing” modes are
active.
20 Sec
30 Sec
40 Sec
50 Sec
1 Min
2 Min
3 Min
5 Min
Auto Timing Select 720×480P@60 Select or de-select the
resolutions to use when
“Auto Timing” mode is
active.
Multiple selections are
possible by changing
the YES/NO setting next
to each resolution in the
list.
720×576p@50
1280×720p@50
1280×720P@60
1920×1080p@50
720×480P@60
720×576p@50
1280×720p@50
1280×720P@60
1920×1080p@50
1920×1080P@60
3840×2160p@24
3840×2160p@25

10
TEST PATTERN
2ND LEVEL 3RD LEVEL DESCRIPTION
Auto Timing Select
(Cont.)
3840×2160p@30
4096×2160p@24
4096×2160p@25
4096×2160p@30
3840×2160p@50
3840×2160p@60
4096×2160p@50
4096×2160p@60
INFORMATION
2ND LEVEL 3RD LEVEL DESCRIPTION
Resolution Input
[Informational Display]
Displays the current
system information
concerning resolution,
HDCP, and rmware
version.
Resolution Output
HDCP Output
Firmware Version
FIRMWARE UPDATE
2ND LEVEL 3RD LEVEL DESCRIPTION
Are You Sure? NO To update the rmware,
place a USB stick
containing the new
rmware into the USB
port and select “YES”.
After the rmware
update has completed,
the unit will reboot.
Yes

11
LOAD EDID
2ND LEVEL 3RD LEVEL DESCRIPTION
Are You Sure? NO Allows updating the
currently selected USER
EDID. (Refer to Section
6.4.)
Yes
FACTORY SETTING
2ND LEVEL 3RD LEVEL DESCRIPTION
Are You Sure? NO Selecting “Yes” will
return the unit to its
factory default settings.
Yes

12
6.4 EDID Management
• EDID Selection
The current EDID may be changed by entering the EDID menu in
the OSD and selecting and changing to a new EDID. After selecting
a new EDID, the unit will ask for conrmation to enact the change.
There are 6 pre-dened Internal EDIDs, an External EDID which passes
the EDID from the connected display, and 3 User EDIDs which are
updatable.
The 6 Internal EDIDs are:
EDID Video Max Denition Audio Max Denition
Internal 1080p 2CH 1080p@60Hz LPCM 2.0
Internal 1080p 8CH 1080p@60Hz LPCM 7.1 & Bitstream
Internal 4K2K (3G-2CH) 4K@30Hz LPCM 2.0
Internal 4K2K (3G-8CH) 4K@30Hz LPCM 7.1 & Bitstream
Internal 4K2K (6G-2CH) 4K@60Hz, 4:4:4, 8-bit LPCM 2.0
Internal 4K2K (6G-8CH) 4K@60Hz, 4:4:4, 8-bit LPCM 7.1 & Bitstream
• User EDIDs
Each User EDID may be replaced by uploading a new EDID le from a
USB thumb drive plugged into the USB slot on the unit.
(1) Load EDID: Previously saved EDID les (*.bin format) can be
uploaded into the unit by inserting a USB thumb drive containing
the new EDID le in the root directory, selecting “Load EDID” from
the User OSD menu, selecting “YES” from the conrmation prompt,
and then pressing the ENTER button. If the EDID was copied
successfully the OSD will display a “Copy OK” message
(2) Factory Setting: To return the User EDIDs to their default value,
please perform a factory reset on the unit.
Note: The lename of the EDID le determines which User EDID is
updated. “UserEDID_1.bin” will update User EDID 1, “UserEDID_2.bin”
will update User EDID 2, and “UserEDID_3.bin” will update User EDID 3.
Only one EDID should be on the USB thumb drive at a time. Updating
more than one EDID simultaneously is not supported.

13
7. CONNECTION DIAGRAM
DC 5V
HDMI OUTHDMI IN
Media Player
Power Supply
HDMI Output
HDMI Input
UHDTV

14
8. SPECIFICATIONS
8.1 Technical Specications
HDMI Bandwidth 600MHz/18Gbps
Input Port 1×HDMI
Output Port 1×HDMI
Control Interface 1×USB (Type-A)
Power Supply 5V/2.6A DC
(US/EU standards, CE/FCC/UL certied)
ESD Protection Human Body Model:
±8kV (Air Discharge)
±4kV (Contact Discharge)
Dimensions 108mm×25mm×75mm (W×H×D)
[Case Only]
128mm×29mm×75mm (W×H×D)
[All Inclusive]
Weight 300g
Chassis Material Metal
Silkscreen Color Black
Operating Temperature 0 ˚C–40 ˚C/32 ˚F–104 ˚F
Storage Temperature -20 ˚C–60 ˚C/-4 ˚F–140 ˚F
Relative Humidity 20–90% RH (Non-condensing)
Power Consumption 5.1W

15
8.2 Video Specications
Resolutions/Timing (Hz)
Support
In Out
640×480p@60/72/75/85
720×400p@70/85
720×480i@59/60
720×480p@59/60
720×576i@50
720×576p@50
800×600p@56/60/72/75/85
848×480p@60
1024×768p@60/70/75/85
1152×864p@70/75/85
1280×720p@23/24/25/29/30/50/59/60
1280×768p@60/60 (RB)/75/85
1280×800p@60/60 (RB)/75/85
1280×960p@60/85
1280×1024p@60/75/85
1360×768p@60
1366×768p@60/60 (RB)
1400×1050p@60/60 (RB)
1440×900p@60/60 (RB)/75
1600×900p@60 (RB)
1600×1200p@50/60/65/70/75/85
1680×1050p@60/60 (RB)
1920×1080p@23/24/25/29/30/50/59/60
1920×1080i@50/59/60
1920×1200p@60 (RB)
Table of contents
Other CYP Media Converter manuals