Cyrusher RANGER User manual

E-BIKE
OWNER’S MANUAL
RANGER ALL-TERRAIN

2
Bike Diagram
Diagram
Bike
OWNERS MANUAL | CYRUSHER RANGER

First Ride
3
OWNERS MANUAL | CYRUSHER RANGER
We know you are excited about getting going but please:
✓Reseat and charge the battery before the first ride
✓Make sure the pedals are tight
✓Make sure the front wheel is installed properly and tight
✓Check to be sure the tires are inflated properly
✓Learn how to use the LCD display
✓Wear a helmet before riding
Please Note: Bike may need further adjustments after assembly
If you have any trouble with setup, please contact us online
https://www.cyrusher.com/pages/contact

1)
Read all of the instructions carefully. Be familiar with the proper operation of all items.
2)
This quick guide is intended to list the steps needed to assemble your bike with some
mechanical skills. It is not a complete manual or training. If you do not feel comfortable or
lack some of the skills to assemble it yourself, reach out to a cyclist friend, a local bike
mechanic or one of our support technicians for guidance.
3)
Our QA mechanics have assembled and tested your bike beforehand.
4)
To assemble your bike, work on a clean area with enough space to maneuver.
5)
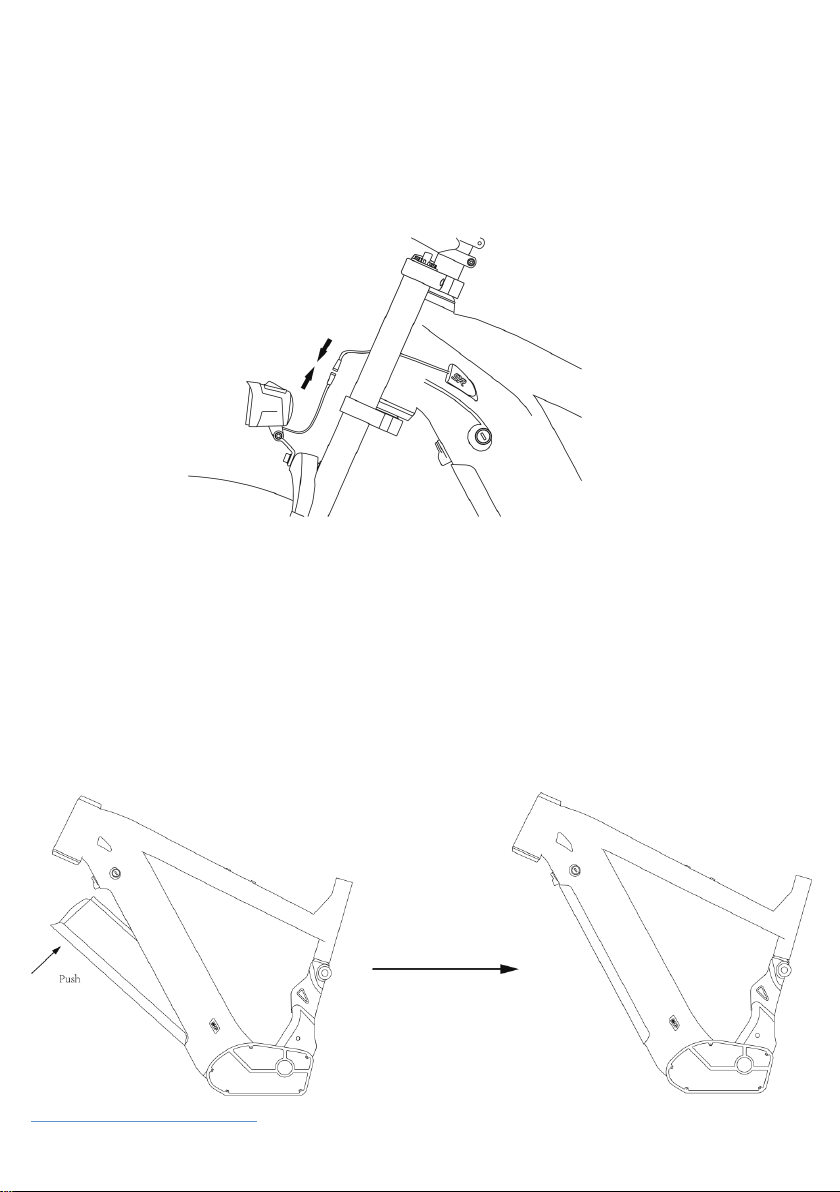
If installed, remove the battery from the bike to start the assembly.
6)
Inspect the bike completely to be sure no damage occurred during shipping.
7)
The kickstand is designed to support the bicycle only. Not the rider mounted.
8)
You can adjust your saddle position and the tilt on your handlebar items for comfort.
9)
Check all screws and parts are tight and properly fixed. We recommend a pre-trip
inspection before your first rides.
1)
Point the headset towards the front of the bike.
2)
Place the handlebar in the handlebar mount being careful with the wires.
3)
Face the mounting brackets on the front end of the mount with the round edges facing
outward.
4)
Insert the screws into the screw holes and tighten alternating sides until secure (4mm allen
wrench with 6NM tight torque).
5)
Verify your front tire lines up with your headset.
6)
Tighten screws on stem end (4mm allen wrench with 6N strength) and top of the stem (5mm
allen wrench with 6-8N strength).
7)
Check all headset items are tight.
Screw 3: Tight torque 6NM
Screw 4: Tight torque 6-8NM
Screw 5: Tight torque 6NM
Assembling
Installing Your Handlebars
4
OWNERS MANUAL | CYRUSHER RANGER

Figure 1
Figure 2
1)
Insert the front wheel between the front fork on the bike. Be sure to align the disk between
the brake caliper as shown in Figure 2.
2)
Now on the outside add the spacer, washer and end nut on each side and hand turn until almost
tight.
3)
Using 5mm allen wrench, tighten each side end nut putting your weight into the wrench.
4)
The End Nut must be very tight, be sure to re-tighten after your first couple rides,
its tight torque shall be 15-18NM.
Brake Caliper and Brake disk on left side of bike
Tight torque: 15-18NM
Installing Your Front Wheel
5
OWNERS MANUAL | CYRUSHER RANGER

1)
Warning: Incorrect installation will cause damage. Please read the instructions and watch
our videos if needed.
2)
Identify the Left and Right markings on the pedals. They can only be installed in their
respective side.
a.
L is for the Left Pedal and it goes on the Left Crank Arm.
b.
R is for the Right pedal and it goes on the Right Crank Arm (Chain Side).
3)
Sitting on your bike the pedals go on the Left and Right side respectively.
4)
Keep the pedal Horizontal while hand screwing to get the thread started. Then Use your
15mm wrench to tighten them.
5)
Both pedals tighten towards the front of the bike. The left pedal is reverse threaded to allow this.
6)
The pedals need to be very tight, be sure to retighten after your first couple rides.
Rear Front
Both pedals tighten
towards the front
Wrench icon made by Gregor Cresnar from www.flaticon.com
Use your 15mm
w
rench to properl
y
tighten the pedals
Right Pedal /
Chain Side
Left Pedal /
Key Side
Installing Your Pedals
6
OWNERS MANUAL | CYRUSHER RANGER

Installing Your Headlight
Battery
7
OWNERS MANUAL | CYRUSHER RANGER
1) Place the headlight with its bracket in front of the fork gantry. Push the screw provided on the
headlight through the installing hole on the fork gantry. Tighten the fixing nut onto the screw.
(You might need to secure the fixing nut tightly so the screw doesn’t turn).
2) Connect the headlight cable with the wire coming out from the downtube.
To Install the Battery
1) Turn the key counterclockwise to release the lock.
2) Seat the bottom of the battery into the receptacle first and push the upper side of the battery
into the frame tightly until it gets locked with a clatter sound. Seat your battery securely, turn the
key clockwise to lock the battery. Remove the key from the lock before each riding.

8
OWNERS MANUAL | CYRUSHER RANGER
To Remove the Battery
1) Turn off the LCD display.
2) The battery is secured with a double-lock mechanism. Use the key to release the first lock.
3) Keep your left hand holding the battery. Use your right hand to turn the lock switch under the
downtube counterclockwise and the battery will drop off. When the lock is released, hold the
battery with both hands and take it off from the bike.
Note: Please hold the battery tight with one hand at least as it will drop off when the lock is
released.

Display
9
OWNERS MANUAL | CYRUSHER RANGER
Function overview and Functional areas
1. Functional overview
The display offers a variety of features to suit your riding needs, including:
●
Battery level indicator
●
Pedal assist (PAS) level indicator
●
Speed (current speed, maximum speed, average speed)
●
Mileage display (single and total mileage)
●
Walk boost mode
●
Light ON/OFF
●
Error code indicator
2. Functional areas
Figure 4 functional area distribution interface
3. Button definition
The display is equipped with buttons on the corresponding operating unit: power on/off ,
plus ,
minus
and toggle . Light and horn button is on a separate button set.
Battery level
Light ON/OFF
Odometer
Tr
ip odometer
Max speed
Average speed
Error code
PAS level
Value and unit
Speed
Walk boost
Speed
unit
mph/kmh

10
OWNERS MANUAL | CYRUSHER RANGER
Routine operation
1.Power on/off
Long press to power on/off the display. When the display is off, it will not use the battery
power and the leakage current is less than 1uA.
The display will automatically shut off if it is not used for more than 5 minute
2.Turning on/off lights and horn
Press the to turn on the lights and the display backlight becomes dim. Press again to turn
off the lights and the backlight restore brightness. Press to turn on the horn.
3.Display interface switching
When the display is powered on, it will show the Current Speed (MPH) and Odometer (mile)
by default. Short press
to switch between Odometer (mile), Trip Odometer(mile), Maximum
Speed (MPH), and Average Speed(MPH).
Odometer Trip Odometer
Average speed Maximum Speed
Figure 5-1 Display Interface Switching

11
OWNERS MANUAL | CYRUSHER RANGER
4.Walk boost mode
Long Press and hold , the electric bicycle enters the walk boost mode. The electric bicycle will
walk at a fixed speed of 6 km per hour and the display shows . Release the button to stop
the power output immediately and restore to the state before walk boost.
Figure 5-2 Helping to implement the display screen
The walk boost mode can only be used when pushing the electric bicycle, please do not
use it while riding.
5.PAS level selection
Press
/
to switch PAS level of electric bicycle, thus changing the motor output power.
Figure 5-4 PAS level display interface
6.Battery level display
The Battery level is shown as 5 bars. When the battery is full charged, all of the 5 bars lighten
up. When the battery is fully depleted, the bar will begin to flash, warning the user to charge
the battery as soon as possible.
Full power Four bars power Three bars power Two bars power One bar power
Empty power flashing
Figure 5-5 Battery Level Display Interface

Before Riding
12
OWNERS MANUAL | CYRUSHER RANGER
1)
Read all instructions carefully, be familiar with the proper operation of all items. Check for
detailed information and guidance on our product page.
2)
Warning: Basic electric precautions should always be followed to avoid issues or malfunction.
3)
Charge your battery fully in preparation for your first ride.
4)
Push the battery pack into the downtube tightly until it gets locked with a clatter sound. Seat your
battery securely and remove the key from the lock.
5)
Check all the tires, tightness of fasteners and brakes before every riding.
7.Error code display
If there is a fault occurs in the electronic system of the electric bicycle, the display will
automatically show an error code, see Schedule 1 for a detailed definition of the error code.
Figure 5-6 Error Code Display
When the error code appears on the display, please troubleshoot the problem in time,
the electric bicycle will not be able to drive normally after the problem occurs.

Charging
13
OWNERS MANUAL | CYRUSHER RANGER
There are two ways to charge your battery.
1. Charge the battery ON the bike
1)
Find the Charge Port at the bottom of the downtube.
2)
Pull out the cover to show the charge port and insert the charger output plug into the
port. Connect the input plug to the power supply.
2. Charge the battery OFF the bike
1)
Take off the battery from your bike.
2)
Place the battery in a clean and flat place in room temperature.
3)
Insert the charger output plug into the charge port. Connect the input plug to the power supply.
4)
There is a capacity indicator at the top of the battery. Press the button beside to check the charge
status. Green means sufficient of charge. Yellow means less than 90%. Red means less than 10%.
Notes of Charging:
1)
Charging time varies from 8 to 10 hours. Never charge a battery for more than 12 hours at a time.
2)
The small LED light on the charger in RED indicates it is in charge; The small LED light on the
charger in GREEN indicates it is fully charged.
3)
Insufficient charging will not influence the battery lifecycle. AVOIDING deep discharge is helpful to
protect the battery and extend its lifecycle.
4)
If the battery will not be used for a long period, take it off from the bike and discharge its capacity to
60%-80% for stock. Disconnect it from the charger and place it in a dry, ventilated place without
direct sunlight. In order to maintain a long lifecycle, it is recommended to charge the battery
every two months even when it is in static without use.
5)
Pay attention to check whether the surface temperature of the battery case rises too high during
charging. It is FORBIDDEN to cover the battery during charging.
6)
Due to high temperature in summer time, it is NOT advisable to charge it immediately after riding. In
winter, it is FORBIDDEN to charge the battery in environment below 0℃. You are recommended to
charge it in room temperature.

Error Codes
Trouble shooting
14
OWNERS MANUAL | CYRUSHER RANGER
E001 Open Throttle Fault
T
hrottle has not returned to the start position on start-up. Check to see if the throttle can
r
eturn to the start position or if there is something blocking the throttle unit.
E005 Throttle Fault
T
hrottle may be damaged. Check the throttle or throttle cable for damage.
E006
L
ow Voltage Protection
T
he battery voltage is too low to operate. Incorrect battery was used on the bike. The
b
attery is in sleep mode or not functioning correctly.
E007
O
ver Voltage Protection
T
he battery voltage is too high to operate. Incorrect battery was used on the bike.
Che
ck to be sure that the correct battery is being used on the bike
E008
M
otor Hall Signal Fault
A
t least one of the motor’s hall sensor wires have been disconnected or damaged.
D
isconnect and reconnect the motor cable.
E009
M
otor Phase Line Fault
A
t least one of the motor’s phase wires has been disconnected or damaged. Or phase
li
ne connector fault.
E010
H
igh Temperature Fault
T
he controller has reached the highest allowable temperature.
A
llow the controller to cool down before using the e-bike again.
E011
M
otor High Temperature
P
rotection
A
llow the motor to cool down and check if it recovers.
E012
Cu
rrent Sensor Fault
T
he controller’s current sensor has become disconnected or damaged. Contact
te
chnical support.
E014
M
otor Temperature Sensor
F
ault
T
he motor temperature sensor fault. Contact technical support.
E015
C
ontroller Temperature
S
ensor Fault
T
he controller temperature sensor fault. Contact technical support.
E021
M
otor Speed Sensor Fault
The motor speed sensor has become disconnected or damaged. Check if motor cable
l
oose. Disconnect and re-connect the cable. If doesn’t recover, contact technical
support.
E025
T
orque Signal Fault
T
orque sensor –torque signal fault. Contact technical support.
E026
S
peed Signal Fault
T
orque sensor –speed signal fault. Contact technical support.
E030
Co
mmunication Fault
P
oor connection between the controller and the display. Check all cable connectors.
Che
ck for corrosion damage.

Solutions
15
OWNERS MANUAL | CYRUSHER RANGER
SYMPTOMS CAUSES SOLUTIONS
Throttle and pedal assist not
working
Battery off Turn on battery
Battery installation Reseat battery
LCD display not on Turn on LCD display
Discharged battery Charge battery
Brake sensors engaged Inspect brake lever
Reduced speed Low battery power Charge battery
Reduced battery range
Low battery power Charge battery
Low tire pressure Inspect tire
Heavy load on bike Adjust bike load
Driving on rough terrain Adjust route
Using throttle only Include pedal assist
Battery does not charge
Charger not properly
connected Inspect connections
Battery temperature Read the user manual for best
practices
Damaged charger Replace charger
Issue with battery Contact Support Team
E-bike making strange noises
Loose hardware Tune-up and inspection needed
Issue on drivetrain Maintenance needed
Issue with motor Contact Support Team

16
OWNERS MANUAL | CYRUSHER RANGER
Table of contents