D-Link DAP-1610 User manual

DAP-1610
User Manual
AC1200 Wi-Fi Range Extender
Version 1.01 | 2019/12/19

iD-Link DAP-1610 User Manual
D-Link reserves the right to revise this publication and to make changes in the content hereof without obligation to notify any
person or organization of such revisions or changes.
Manual Revisions
Trademarks
D-Link and the D-Link logo are trademarks or registered trademarks of D-Link Corporation or its subsidiaries in the United States or other countries.
All other company or product names mentioned herein are trademarks or registered trademarks of their respective companies.
Apple®, Apple logo®, Safari®, iPhone®, iPad®, iPod touch® and Macintosh® are trademarks of Apple Inc., registered in the U.S. and other countries.
App StoreSM is a service mark of Apple Inc.
Chrome™ browser, Google Play™ and Android™ are trademarks of Google Inc.
Internet Explorer®, Windows® and the Windows logo are trademarks of the Microsoft group of companies.
Copyright © 2019 by D-Link Corporation. All rights reserved. This publication may not be reproduced, in whole or in part, without prior expressed
written permission from D-Link Corporation.
Revision Date Description
1.00 September 22, 2017 • Initial release
1.01 December 19, 2019 • Minor changes
Preface
Power Usage
This device is an Energy Related Product (ErP) with High Network Availability (HiNA), and automatically switches to a power-saving Network
Standby mode within 1 minute of no packets being transmitted. If it is not needed during certain periods of time, it can be unplugged to save
energy.
Network Standby: 3.54 watts

iiD-Link DAP-1610 User Manual
Table of Contents
Preface................................................................................. i
Product Overview.............................................................. 1
Package Contents......................................................................... 1
System Requirements................................................................. 2
Introduction ................................................................................... 3
Features.................................................................................... 3
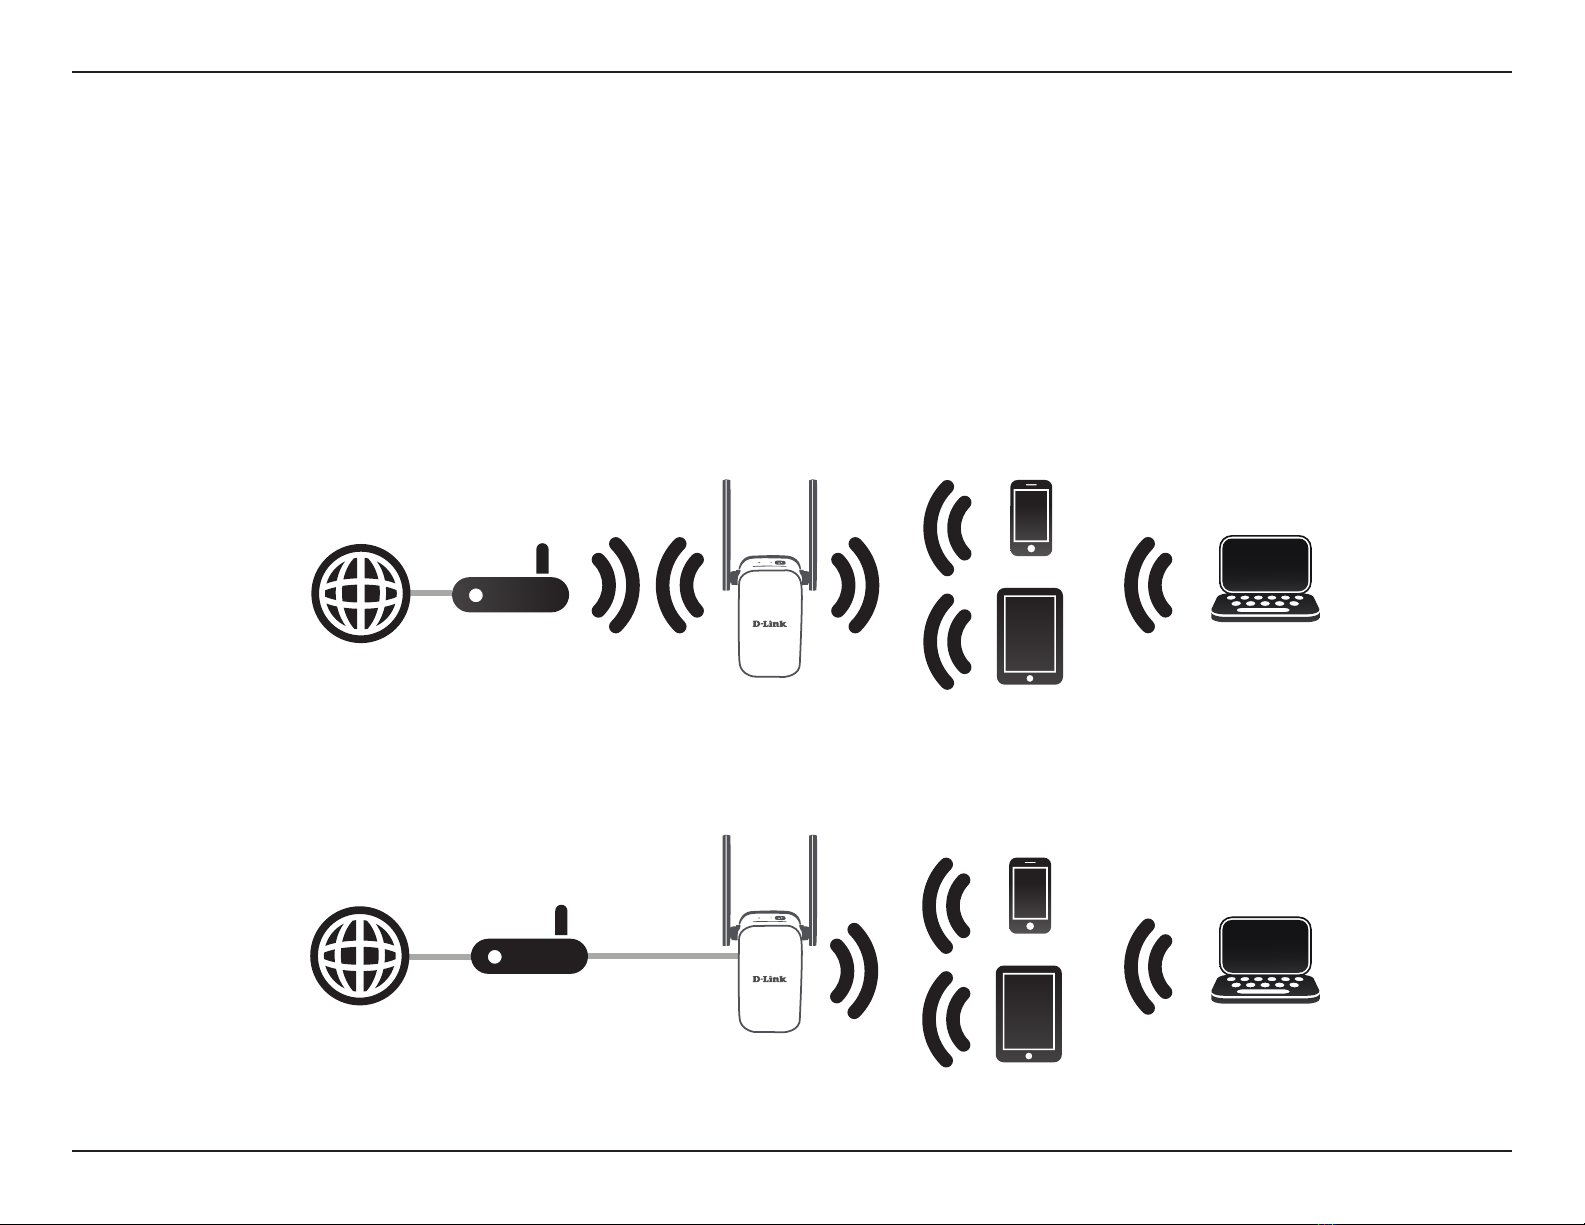
What is a Wireless Extender? ............................................ 4
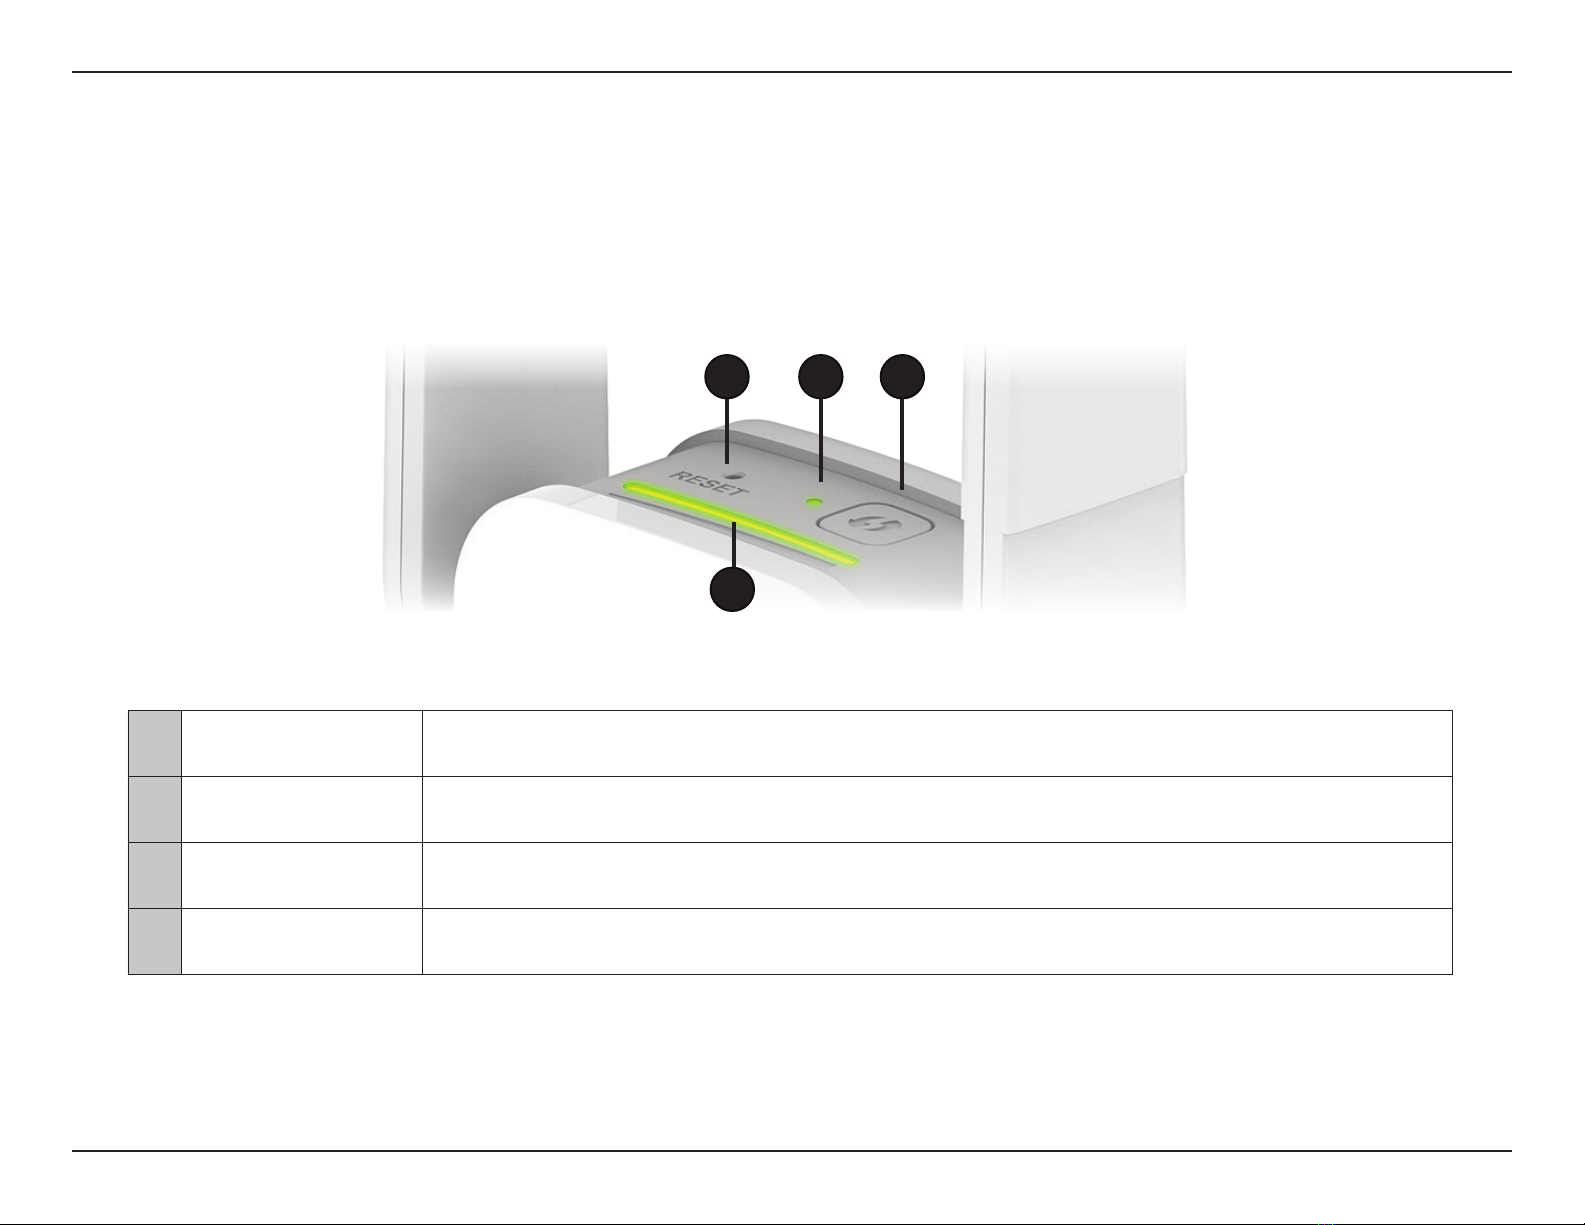
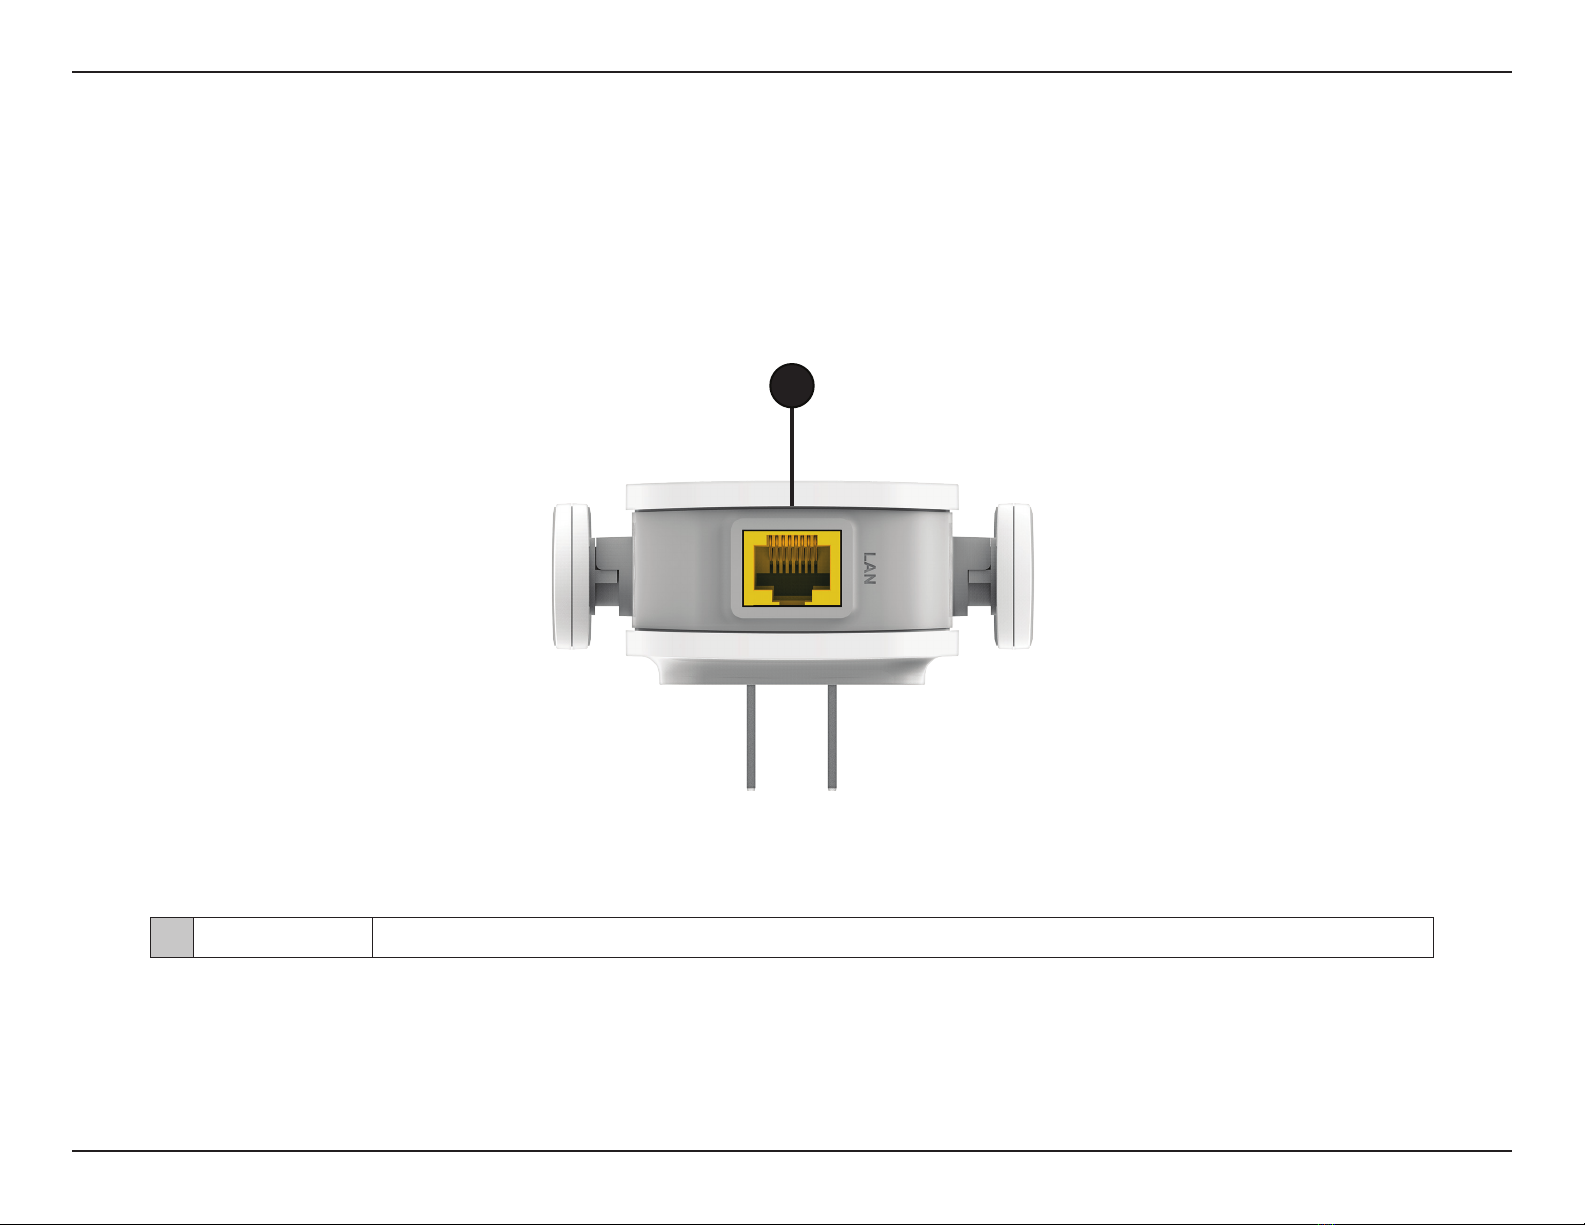
Hardware Overview..................................................................... 5
Top ............................................................................................. 5
Bottom...................................................................................... 6
Back............................................................................................ 8
Installation ......................................................................... 9
Wireless Installation Considerations...................................... 9
Antenna Setup.............................................................................10
Hardware Setup ..........................................................................11
Getting Started................................................................12
WPS-PBC Conguration ...........................................................13
Optimize Extender Location...................................................14
QRS Mobile App Setup.............................................................15
Web-based Setup.......................................................................20
Setup Wizard ................................................................................21
Connecting Your Device via WPS..................................22
WPS Successful ...............................................................23
WPS Unsuccessful..........................................................23
Extend an Existing Network............................................24
Add Wireless to Your Wired Network...........................27
Congure Administrator Password ..............................29
Save Your Conguration...................................................30
Conguration...................................................................31
Home ..............................................................................................31
Settings ..........................................................................................33
Extender Settings ...............................................................33
Network Settings ................................................................35
Autoconguration (SLAAC/DHCPv6)......................36
Static IPv6 .........................................................................37
Link-local Only ................................................................38
Management................................................................................39
Admin .....................................................................................39
System ....................................................................................40
Upgrade .................................................................................41
Statistics .................................................................................42
Connecting Wireless Clients to the Extended Network 43
WPS Button...................................................................................43
Windows® 8...................................................................................44
WPA/WPA2 ............................................................................44
Windows® 7...................................................................................46
WPA/WPA2 ............................................................................46
Windows Vista®............................................................................49
WPA/WPA2 ............................................................................50
Troubleshooting ..............................................................52
Table of Contents

iiiD-Link DAP-1610 User Manual
Table of Contents
Wireless Basics .................................................................54
Tips...................................................................................................55
Technical Specications ..................................................56
GPL Code Statement........................................................57
Safety Statements ...........................................................58

1D-Link DAP-1610 User Manual
Section 1 - Product Overview
Package Contents
Wi-Fi Conguration Note
If any of the above items are missing, please contact your reseller.
DAP-1610 AC1200 Wi-Fi Range Extender
Wi-Fi Conguration Card
Quick Installation Guide

2D-Link DAP-1610 User Manual
Section 1 - Product Overview
Network Requirements
• A wireless router with an active Internet connection.
• IEEE 802.11ac, 802.11n, 802.11g, 802.11b, or 802.11a
wireless clients/devices
Web-based Conguration
Utility Requirements
A Computer or Mobile Device with the following:
• Windows®, Apple® Mac OS®, or Linux-based operating system
• Wireless adapter or Wi-Fi functionality
• An Apple® iPhone®, iPod touch®, iPad®, or Android™ mobile
device
Browser Requirements:
• Internet Explorer® 9 or later
• Firefox® 20.0 or later
• Safari® 5.1 or later
• Google Chrome™ 25.0 or later
System Requirements

3D-Link DAP-1610 User Manual
Section 1 - Product Overview
Introduction
Features
Easily Extend Your Existing Network
The DAP-1610 AC1200 Wi-Fi Range Extender lets you easily extend a secure wireless network with a press of a button. Connect the
DAP-1610 to a router via Wi-Fi or Ethernet and share your high-speed Internet access in more places throughout your home or small
oce.
High-speed Wireless Performance With Wireless 802.11ac Technology
Thanks to the latest Wireless AC technology, the DAP-1610 provides a wireless connection at up to 1200 Mbps* with other 802.11ac
wireless devices. This feature lets you participate in real-time activities online, such as video streaming, online gaming, and real-time
audio with smooth performance.
Simple Setup
All it takes is a press of a button to connect compatible WPS devices to the DAP-1610. Its easy-to-use web interface lets you quickly
and easily connect the DAP-1610 to an uplink router, congure the extended wireless network, and manage the administrative
settings. The setup wizard will even guide you through the setup process, getting your extended wireless network up and running
in no time. Alternatively, connect an Ethernet cable to your existing network infrastructure to quickly and easily create a wireless
network.
Compatibility
The DAP-1610 is fully compatible with now only the latest 802.11ac standard, but is also backwards compatible with IEEE 802.11n/g/
b/a wireless devices, so you can use your existing devices without sacricing performance.
Latest Wireless Network Security and Encryption
The DAP-1610 supports wireless security features to prevent unauthorized access from the wireless network. Support for WPA/
WPA2 standards ensure that you’ll be able to use the best possible encryption methods with your compatible wireless devices.
* Maximum wireless signal rate derived from standard IEEE specications. Actual data throughput will vary. Network conditions and environmental factors, including volume
of network trac, building materials and construction, and network overhead may lower actual data throughput rate. Environmental conditions will adversely aect wireless
signal range.

4D-Link DAP-1610 User Manual
Section 1 - Product Overview
What is a Wireless Extender?
The DAP-1610 acts as a repeater to extend the range of an existing wireless network to provide a better signal for parts of your
home or oce that may have poor or no reception. Your existing wireless signal will be re-broadcast by the DAP-1610, allowing
you to reach the farthest corners of your home or oce. The extended network can simply use the same network credentials as the
existing network, or you can specify a dierent network name and password, giving you the exibility to control network access.
You may also use the DAP-1610 as a wireless access point by connecting an Ethernet cable.
Extend Your Wireless Network using Wi-Fi
Create a Wireless Network using Ethernet
Router
Internet DAP-1610
Extender
Wireless Devices
Router
Internet DAP-1610
Access Point
Wireless Devices
Computer
Computer

5D-Link DAP-1610 User Manual
Section 1 - Product Overview
Hardware Overview
Top
1 2 3
4
1Reset Button Use an unfolded paperclip to press and hold the reset button on the bottom of DAP-1610 until the
status LED turns red, to reset the device back to factory default settings.
2Status/WPS LED This LED indicates the current status of the DAP-1610.
Refer to “Status/WPS LED Indicator” on page 7 for more information.
3WPS Button Press to establish a connection with another WPS compatible device.
Refer to “WPS Button” on page 43 for more information.
4Signal Indicator LED The more lit green bars on the Signal Indicator LED, the better the wireless signal to the host network.
For more information refer to “Optimize Extender Location”on page 14.

6D-Link DAP-1610 User Manual
Section 1 - Product Overview
Hardware Overview
Bottom
1
1 LAN Connect an Ethernet cable if you are adding wireless to an existing wired network.

7D-Link DAP-1610 User Manual
Section 1 - Product Overview
LED Indicator Color Status Description
Power/Status
Green Solid The DAP-1610 is receiving power and connected to a host network.
Blinking WPS mode is active and ready to add a wireless device.
Red Solid The DAP-1610 is booting or an error has occurred.
Amber Blinking The DAP-1610 is not connected to a host network.
None O Device is not receiving power. Check the power outlet.
Status/WPS LED Indicator

8D-Link DAP-1610 User Manual
Section 2 - Installation
You may locate the Wi-Fi name (SSID) and password for your DAP-1610. This information is printed on the specication sticker on
the back of the device. You will need this information to connect your computer or mobile device to the default network (SSID) of
your DAP-1610. This information is also provided on the Wi-Fi conguration card.
Hardware Overview
Back

9D-Link DAP-1610 User Manual
Section 2 - Installation
Installation
Wireless Installation Considerations
The DAP-1610 lets you extend your existing wireless network’s coverage as long as it is within range of the uplink network. Keep in
mind that the DAP-1610’s extension network’s range may be limited by the number, thickness and location of walls, ceilings, or other
objects that the wireless signals must pass through.Typical ranges vary depending on the types of materials and background RF (radio
frequency) noise in your home or business. The key to maximizing wireless range is to follow these basic guidelines:
1. Keep the number of walls and ceilings between the D-Link extender and other network devices to a
minimum - each wall or ceiling can reduce your adapter’s range from 3-90 feet (1-30 meters.) Position your
devices so that the number of walls or ceilings is minimized.
2. Be aware of the direct line between network devices. A wall that is 1.5 feet thick (0.5 meters), at a 45-degree
angle appears to be almost 3 feet (1 meter) thick. At a 2-degree angle it looks over 42 feet (14 meters) thick!
Position devices so that the signal will travel straight through a wall or ceiling (instead of at an angle) for
better reception.
3. Building materials make a dierence. A solid metal door or aluminum studs may have a negative eect on
range. Try to position extenders, access points, wireless routers, and computers so that the signal passes
through drywall or open doorways. Materials and objects such as glass, steel, metal, walls with insulation,
water (sh tanks), mirrors, le cabinets, brick, and concrete will degrade your wireless signal.
4. Keep your product away (at least 3-6 feet or 1-2 meters) from electrical devices or appliances that generate RF
noise.
5. If you are using 2.4 GHz cordless phones or X-10 (wireless products such as ceiling fans, lights, and home
security systems), your wireless connection may degrade dramatically or drop completely. Make sure your 2.4
GHz phone base is as far away from your wireless devices as possible. The base transmits a signal even if the
phone is not in use.

10D-Link DAP-1610 User Manual
Section 2 - Installation
Antenna Setup
The DAP-1610 is designed to give you the fastest, most stable network connection possible. In order to maximize performance, fully
extend the antennas to provide optimal wireless coverage. Keep the extender in an open area for better wireless coverage.

11D-Link DAP-1610 User Manual
Section 2 - Installation
Plug the DAP-1610 into a wall outlet, and wait until the Status/WPS LED is blinking amber.
Outlet
Ethernet
Outlet
Ethernet
Hardware Setup

12D-Link DAP-1610 User Manual
Section 3 - Conguration
There are several conguration tools you can use to set up your DAP-1610.
• WPS PBC -To easily extend an existing wireless network refer to“WPS-PBC Conguration”on page 13 for setup instructions.
• QRS Mobile App - Use your Android device or iPhone, iPad, or iPod touch to congure your extender. Refer to “QRS
Mobile App Setup” on page 15 for setup instructions.
• D-Link Setup Wizard - This wizard will launch when you log into the Extender’s web conguration utility for the rst
time. Refer to ”Setup Wizard” on page 21 for setup instructions.
• Manual Conguration - Advanced users who wish to manually setup extender or adjust its settings may refer to
“Conguration” on page 31 for more information.
Getting Started

13D-Link DAP-1610 User Manual
Section 3 - Conguration
WPS-PBC Conguration
Step 1 - Initiate WPS Mode
While the Status/WPS LED is blinking amber. Push the WPS button on the source
wireless router or AP, and then push the WPS button on the DAP-1610. The
Status/WPS LED will start to ash green. Please allow up to two minutes for the
process to nish. The Status/WPS LED will turn solid green when the DAP-1610
has connected successfully to the source wireless router or access point.
Step 2 - Connecting Devices to the DAP-1610
The DAP-1610 is now ready to share the extended Wi-Fi network with your
PCs and mobile devices. You may use the WPS method to connect devices to
the extension networks created by the DAP-1610 using the following network
names (SSID). The password(s) will be the same as the wireless network you are
extending.
• (Your router’s SSID)
To connect to a wireless router or access point and extend the Wi-Fi network in your home, rst make sure the source router or
Access Point features a WPS Button or has a virtual WPS Button.

14D-Link DAP-1610 User Manual
Section 3 - Conguration
The Status/WPS LED will turn solid green when the DAP-1610 has connected successfully to a wireless network and is extending
that network. If the Smart Signal LED has a single amber bar after the connection process has nished, the DAP-1610 has
established a poor quality connection. The more lit bars on the Signal Indicator LED, the better the wireless signal. To improve the
connection quality, the DAP-1610 should be relocated closer to the source wireless router. If the extender has been congured as an
Access Point and is connected via Ethernet cable to an uplink network, the Smart Signal LED will not be lit.
Optimize Extender Location
Best
Good
Ok
Poor

15D-Link DAP-1610 User Manual
Section 2 - Installation
QRS Mobile App Setup
The DAP-1610 can be set up from your iPhone, iPod touch, iPad, or Android smartphone or tablet device using the QRS Mobile app.
Step 2
Once your app is installed, you may now congure your extender. Connect to the
router wirelessly by going to your wireless utility on your device. Scan for the Wi-
Fi name (SSID) as listed on the supplied conguration card. Select and then enter
your Wi-Fi password.
Step 3
Once wirelessly connected to the extender, launch the QRS Mobile app from the
Home screen of your device.
Note: The following steps show the iOS interface of the QRS Mobile app. If you are
using an Android device, the appearance may be dierent to that of the screenshots,
but the process is the same.
Step 1
Search for the free QRS Mobile App on the Apple App Store or Google Play.
Note: The screenshots may be dierent depending on your mobile device’s OS version.

16D-Link DAP-1610 User Manual
Section 3 - Conguration
Click Start to continue.
Click Next to continue.
Other manuals for DAP-1610
6
Table of contents
Other D-Link Extender manuals

D-Link
D-Link DHP-W306AV User manual

D-Link
D-Link DAP-1610 User manual

D-Link
D-Link DAP-1320 User manual

D-Link
D-Link DHP-W310 User manual

D-Link
D-Link DAP-1530 User manual

D-Link
D-Link DRA-2060 Manual

D-Link
D-Link DAP-1325/E User manual

D-Link
D-Link DCH-M225 User manual

D-Link
D-Link DAP-1650 User manual

D-Link
D-Link EXO AC2000 User manual

D-Link
D-Link DAP-1950 User manual

D-Link
D-Link DAP-1955 User manual

D-Link
D-Link DAP-1620B1 User manual

D-Link
D-Link DWL-G800AP User manual

D-Link
D-Link AC750 User manual

D-Link
D-Link DAP-1320 User manual

D-Link
D-Link DHP-W310AV User manual

D-Link
D-Link DAP-1900 User manual

D-Link
D-Link DAP-1320 Assembly instructions

D-Link
D-Link DHP-W311AV User manual