Daalderop Combi User manual

Montage-instructie / asseMbly instructions /
instructions de Montage / Montageanleitung
coMbi installatieset / coMbi installation Kit /
set d’installation coMbi / KoMbiVentil-einbauset
07.98.92.033 Handleiding Combi Installatieset_NMRS.indd 1 5-7-10 16:29

Inleiding en Montage Montage-instructie Combi installatieset
NL
Inleiding en Montage Montage-instructie Combi installatieset
inleiding
Met de Combi installatieset kunt u niet alleen kokend water, maar ook warm water uit uw kokend
water apparaat tappen. In deze montage-instructie vindt u de aanwijzingen voor het correct
aansluiten en veilig gebruiken van de Combi installatieset. Indien u de Combi installatieset niet
volgens de montage-instructies aansluit, vervalt de garantie. De fabrikant is niet aansprakelijk voor
schade die het gevolg is van een niet vakkundig uitgevoerde montage of één die voortvloeit uit
het niet correct naleven van de voorschriften.
inhoud Van de VerpaKKing
Controleer de inhoud van de verpakking.
1x Mengventiel
1x Kokend water t-stuk
1x Buis 15mm
1x Buis 12mm
1x Kniekoppeling 15x12mm
2x Pakkingring
2x Verlengslang
1x Knelverloop 15-12mm
1x Knelverloop 15-10mm
Montage coMbi installatieset
Volg onderstaande vijf stappen indien uw kokend water apparaat reeds geïnstalleerd is
1. Haal de stekker van het kokend water apparaat uit de wandcontactdoos
2. Draai de kokend water kraan open, totdat er koud water uit de kraan stroomt. De installatie
is nu koud en veilig.
3. Draai de hoofdkraan dicht, waardoor uw watertoevoer nu is afgesloten.
4. Draai de kokend water kraan open, waardoor u de druk van het systeem haalt. Als u de
inlaatcombinatie niet verplaatst, kunt u ook alleen de kraan van de inlaatcombinatie sluiten.
5. Verwijder de koud water slang van uw inlaatcombinatie.
A
B
C
H
D
E
F
G
I
2x
1x
1x
1x
1x 1x
2x 1x
1x
BEF
AD C
G HI
guur 1
07.98.92.033 Handleiding Combi Installatieset_NMRS.indd 2 5-7-10 16:29

NL
Montage-instructie Combi installatieset Montage
Bevestiging
1. Bepaal of u de 90-graden (guur 2a, volg stap 2a) of de in-lijn (guur 2b, volg stap 2b)
opstelling wilt gebruiken in uw keukenkast (afhankelijk van de beschikbare ruimte). Beide
opstellingen kunnen ook verticaal gespiegeld worden toegepast.
2a. Monteer de kniekoppeling 15x12mm met behulp van de buis 15mm op de
inlaatcombinatie . Monteer vervolg de buis 12 mm op de kniekoppeling 15x12 mm .
2b. Monteer de buis 12 mm met behulp van het knelverloop 15x12mm op de
inlaatcombinatie
3. Monteer het mengventiel op de buis 12mm .
4. Installeer uw kraan indien deze niet reeds geïnstalleerd is. Volg hiervoor de handleiding
van uw kraan.
5. Verbind de ‘binnendraad’ aansluiting van het kokend water t-stuk met de kokendwater-
slang van uw kraan . Gebruik hiervoor één van de twee meegeleverde
pakkingringen .
B
E
D
F
A
H
1
2
C
1
3
E
D
D
2
250 mm
300 mm
1
E
D
C
A
B
min. 400 mm
230 mm
1
A
B
D
H
Buitendraad
Binnendraad
B
guur 2a
guur 3
guur 2b
07.98.92.033 Handleiding Combi Installatieset_NMRS.indd 3 5-7-10 16:29

NL
7. Sluit de kokendwaterslang van het kokend water apparaat aan op de ‘buitendraad’
aansluiting van het kokend water t-stuk . Gebruik hiervoor één van de twee meegeleverde
pakkingringen .
8. Sluit de koudwaterslang van het kokend waterapparaat aan op de onderste aansluiting
van het mengventiel .
6. Bevestig het kokend water t-stuk op het mengventiel zoals aangegeven in guur 4.
guur 5
Montage Montage-instructie Combi installatieset
B
A
B
A
F
4
7
7
6
BA
3
2
7
5
1
3
4
6
guur 4
guur 5
07.98.92.033 Handleiding Combi Installatieset_NMRS.indd 4 5-7-10 16:29

NL
9. Verbind de bovenste aansluiting van het mengventiel met de warm water toevoer van
uw kraan .
10. Nadat u de kraan , het kokend water apparaat , de Combi installatieset en eventueel
de lterset heeft geïnstalleerd, draait u de hoofdkraan en de kraan op de inlaatcombinatie
open.
11. Vul nu de boiler met water, door de kokend waterkraan open te zetten. Op het moment dat
er water uit de kraan komt, is de boiler gevuld.
12. Steek de stekker in een geaarde wandcontactdoos. Het kokend water apparaat zal nu het
water verwarmen.
13. Indien na 4 minuten, tijdens het opwarmen, geen expansiewater via de inlaatcombinatie
wegloopt, schakel dan onmiddellijk de spanning uit en open de kokend waterkraan om de
waterdruk weg te nemen.
14. Het duurt ongeveer 15 minuten om het kokend water apparaat volledig op te warmen.
15. Voordat u het kokend water apparaat in gebruik neemt, dient u hem 3 maal in 1 uur op te
warmen en leeg te tappen.
Montage-instructie Combi installatieset Montage
A
5
7
7
7
7
1
2
2
2
1
07.98.92.033 Handleiding Combi Installatieset_NMRS.indd 5 5-7-10 16:29

NL
garantie
De Combi installatieset wordt gegarandeerd op materiaal- en /of constructiefouten. Deze garantie is geldig
onder de hierna vermelde duur en voorwaarden.
Garantieverlening
De zorg voor de uitvoering van de garantie berust bij de verkopende partij waar de Combi installatieset is
aangeschaft. Garantieduur is geldend vanaf de aankoopdatum, die vermeld staat op de factuur.
Garantieduur: 2 jaar garantie.
De garantie is niet van toepassing op:
• arbeidsloon • administratiekosten • verzendkosten • voorrijkosten • transportschade.
Garantievoorwaarden
1. De aankoopnota, met vermelding van de aankoopdatum moet worden overlegd.
2. De garantie geldt alleen voor materiaal- en constructiefouten (dit ter beoordeling door de leverancier).
3. De Combi installatieset dient uitsluitend volgens de montage- en gebruiksinstructie te zijn geïnstalleerd,
gebruikt en onderhouden.
4. De Combi installatieset mag alleen onder de in de montage- en gebruiksinstructie vermelde
omstandigheden en gebruikscondities zijn toegepast.
5. De Combi installatieset mag geen wijzigingen in de constructie hebben ondergaan. Gevolgen van
putcorrosie veroorzaakt door niet voldoende aarden van kraan en spoelbak vallen niet onder de
garantie.
6. Garantie is enkel van toepassing als de kwaliteit van het leidingwater voldoet aan de volgende
voorwaarden:
• pH 7 < pH < 9,5 • geleidbaarheid < 125 mS/m • Fe < 0,2 mg/l
• waterhardheid < 12° dH* • Cl<150 mg/l
*) Tussen 12° dH en 15° dH is de garantie alleen geldig bij plaatsing van een ontkalkings- en
onthardingslter. Het aankoopbewijs van deze lters moet bij een garantieaanvraag overlegd te worden.
7. De leverancier aanvaardt geen claims ten gevolge van secundaire schade zoals bedrijfs-, water- en
brandschade.
8. Reparatie, herstel of vervanging van onderdelen onder de garantie leidt niet tot verlenging van de
garantieperiode van de Combi installatieset zelf.
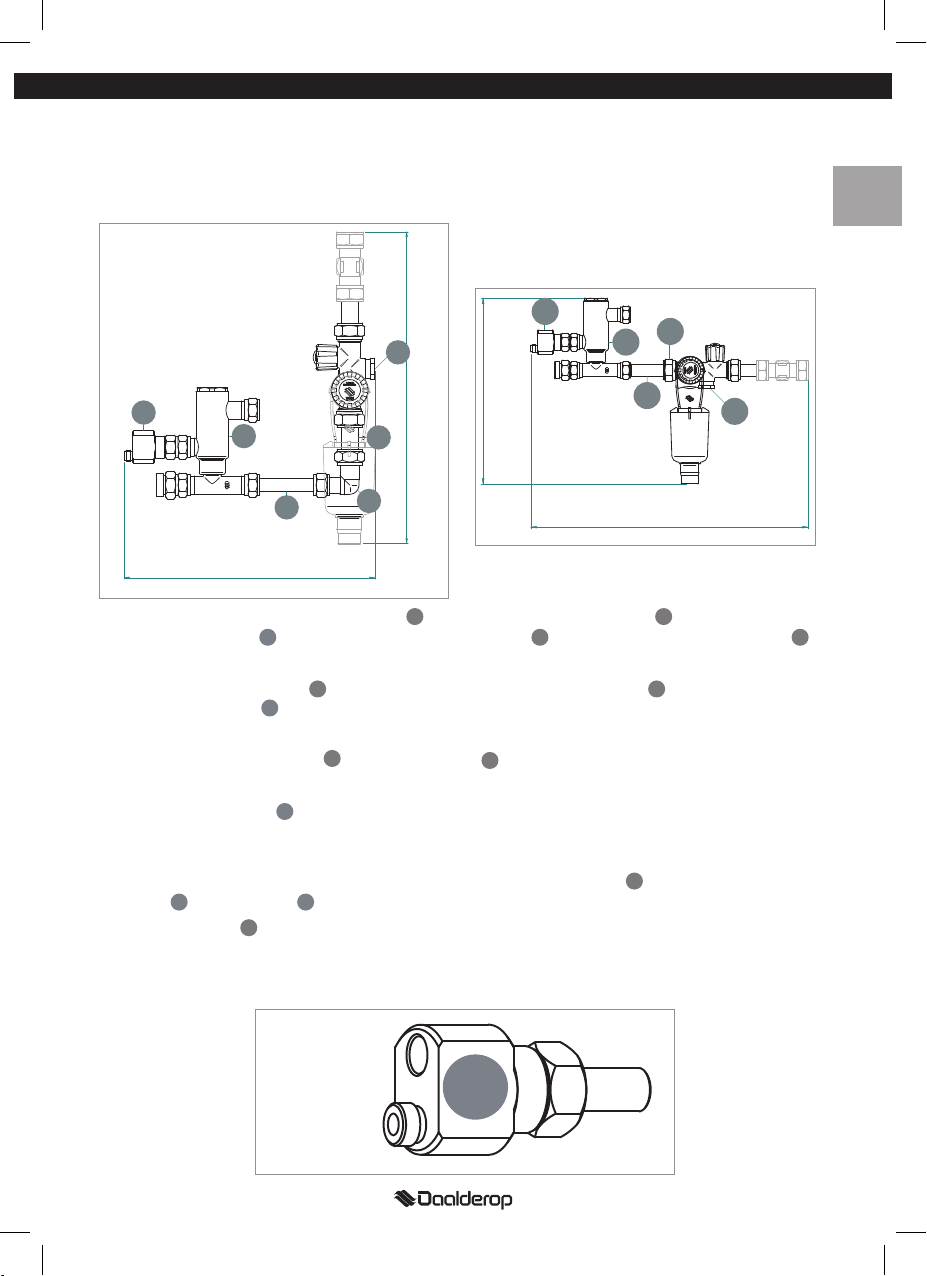
onderhoud
De Combi installatieset behoeft normaliter geen onderhoud. Het kan echter, in gebieden met kalkrijk
water, voorkomen dat kalkafzetting de doorstroming (kokend of mengwater) of temperatuur (mengwater)
beïnvloedt. Indien dit het geval is, kan de installatieset worden gedemonteerd en met citroenzuurhoudend
ontkalkingsmiddel ontkalkt.
Onderhoud en garantie Montage-instructie Combi installatieset
Daalderop BV Lingewei 2 Bedrijvenpark Medel 2702 Postbus 7 4000 AA Tiel Nederland
Tel. +31 (0)344 636 500 Fax +31 (0)344 620 901 E-mail: info@daalderop.nl www.daalderop.nl
07.98.92.033 Handleiding Combi Installatieset_NMRS.indd 6 5-7-10 16:29

EN
introduction
Using the Combi-installation kit, you can drain both boiling water as well as warm water from your
boiling water unit.
These assembly instructions give you the proper directions for the correct connection and safe use
of the Combi installation kit. If the Combi installation kit is not connected according to the assembly
instructions, the warranty is voided. The manufacturer is not liable for damages resulting from an
unprofessionally executed assembly or one resulting from incorrect adherence to the directions.
pacKaging contents
1. Check the packaging contents.
1x Mixing valve
1x Boiling water T-piece
1x 15 mm pipe
1x 12mm pipe
1x 15x12 mm knee joint
2x Washer
2x Extension hose
1x Reducer 15x12mm
1x Reducer 15x10mm
coMbi installation Kit asseMbly
Follow these ve steps if your boiling water unit has already been installed
1. Unplug the boiling water unit from the wall outlet.
2. Turn the boiling water tap open until cold water ows from the tap. The installation is now
cold and safe.
3. Turn the shut off valve, so that your water supply is now closed off
4. Turn the boiling water tap open, to remove the pressure of the system. If you do not change
the position of the safety valve assembly, you could also close the tap of the safety valve
assembly.
5. Disconnect the cold water hose from your safety valve assembly.
Onderhoud en garantie Montage-instructie Combi installatieset
Daalderop BV Lingewei 2 Bedrijvenpark Medel 2702 Postbus 7 4000 AA Tiel Nederland
Tel. +31 (0)344 636 500 Fax +31 (0)344 620 901 E-mail: info@daalderop.nl www.daalderop.nl
A
B
C
H
D
E
F
G
I
2x
1x
1x
1x
1x 1x
2x 1x
1x
BEF
AD C
G HI
Figure 1
Assembly instructions Combi installation kit Introduction and Assembly
07.98.92.033 Handleiding Combi Installatieset_NMRS.indd 7 5-7-10 16:29

EN
Mounting
1. Decide whether you want to use the 90 degree arrangement (gure 2a, follow step 2a) or
the inline arrangement (gure 2b, follow step 2b) in your kitchen cabinet (dependent on the
available room). Both arrangements can also be applied mirrored vertically.
2a. Mount the 15x12mm knee joint onto the safety valve assembly , by means of the 15 mm
pipe . Next mount the 12 mm pipe onto the 15x12 mm knee joint .
2b. Mount the 12 mm pipe onto the safety valve assembly , by means of the 12x15 mm
reducer .
3. Mount the mixing valve onto the 12 mm pipe .
4. Install your tap if this has not already been installed. Follow the instruction manual of
your tap for this.
5. Connect the ‘female thread’ coupling of the boiling water T-piece with the boiling water
hose of your tap using one of the two sealing rings .
Assembly Assembly instructions Combi installation kit
B
E
D
F
A
H
1
2
C
1
3
E
D
D
2
250 mm
300 mm
1
E
D
C
A
B
min. 400 mm
230 mm
1
A
B
D
H
Female Thread
Male Thread
B
Figure 2a
Figure 3
Figure 2b
07.98.92.033 Handleiding Combi Installatieset_NMRS.indd 8 5-7-10 16:29

EN
Assembly Assembly instructions Combi installation kit
7. Connect the boiling water hose of the boiling water unit to ‘the male thread’ coupling
of the boiling water T-piece using one of the two sealing rings .
8. Connect the cold water hose of the boiling water unit to the bottommost coupling of
the mixing valve .
9. Connect the uppermost coupling of the mixing valve with the warm water supply of
your tap .
6. Fasten the boiling water T-piece B onto the mixing valve as indicated in gure 4.
Figure 5
Assembly instructions Combi installation kit Assembly
B
B
A
F
4
7
7
6
A
5
2
BA
3
2
7
5
1
3
4
6
Figure 4
Figure 5
07.98.92.033 Handleiding Combi Installatieset_NMRS.indd 9 5-7-10 16:29

EN
10. After having installed the tap , the boiling water unit , the Combi installation kit and if
necessary the lter set, turn the main valve on the safety valve assembly open.
11. Fill the boiler with water by opening the boiling water tap. The moment that water comes
out of the tap, the boiler is lled.
12. Insert the plug into an earthed wall outlet. The boiling water unit will now heat the
water.
13. If after 4 minutes, during heating, no expansion water leaks from through the safety valve
assembly , immediately switch the power off and open the boiling water tap to remove
the water pressure.
14. It takes about 15 minutes to fully heat the boiling water unit .
15. Before you put the boiling water unit into use, you should ush the heater for 3 minutes,
3 times over 1 hour.
Assembly Assembly instructions Combi installation kit
7
7
7
7
1
2
1
Itho UK Ltd. 10 Faraday Court First Avenue Centrum 100 Burton on Trent Staffordshire DE14 2WX United Kingdom
Tel. +44 (0)1159 375179 E-mail: info@daalderop.co.uk www.daalderop.co.uk
07.98.92.033 Handleiding Combi Installatieset_NMRS.indd 10 5-7-10 16:29

EN
Assembly Assembly instructions Combi installation kit
Assembly instructions Combi installation kit Maintenance and Warranty
warranty
The group installation is warranted by the manufacturer to be free from material and/or
manufacturing defects. This warranty is valid for the period and subject to the terms and
conditions stated below.
Warranty claims handling
The responsibility for implementing warranty lies with the accredited installer or kitchen
specialist business from whom the appliance was acquired. Warranty will be valid as from the
date of purchase shown on the invoice.
Warranty Period: 2 years
The warranty does not apply to:
• labour • call-out charges • handling • shipping • damage
Warranty terms and conditions
1. The purchase bill bearing the purchase date should accompany the guarantee application.
2. The guarantee applies only to material and manufacturing defects; this shall be at the discretion of
Daalderop BV.
3. The group installation set requires to be installed, used and maintained exclusively in accordance
with the installation and user manuals.
4. The group installation set may only be employed under the circumstances and conditions of use set
out in the installation and user manuals.
5. The group installation set must not have undergone any modications in its make-up.
6. Warranty will be honoured if and only if the quality of the cold mains water meets the
following requirements:
• pH 7 < pH < 9.5 • conductivity < 125 mS/m • Fe < 0.2 mg/l
• water hardness < 12° dH* • Cl<150 mg/l
*) Between 12° dH and 15° dH the guarantee will only apply if a descaling and water softening lter is
installed. The proof of purchase of these lters must be submitted when requesting a guarantee.
7. The manufacturer will not accept any claims for consequential losses such as loss of prot or
losses due to water and/or re damage.
8. Repairs, reinstatement or replacement of parts under warranty will not give rise to any
extension of the warranty period of the appliance itself.
Maintenance
The Combi installation kit normally requires no maintenance. In areas with hard water however, it may occur
that calcication inuences the ow (boiling or mixing water) or temperature (mixing water). If that is the
case, the installation kit may be disassembled and decalcied using a citric acid containing decalcier.
Itho UK Ltd. 10 Faraday Court First Avenue Centrum 100 Burton on Trent Staffordshire DE14 2WX United Kingdom
Tel. +44 (0)1159 375179 E-mail: [email protected] www.daalderop.co.uk
07.98.92.033 Handleiding Combi Installatieset_NMRS.indd 11 5-7-10 16:29

introduction
Le set d’installation Combi vous permet de soutirer de l’eau chaude à très chaude de votre
appareil.
Ces instructions de montage vous indiquent précisément comment raccorder correctement et
utiliser en toute sécurité le set d’installation Combi. Si vous ne raccordez pas le set d’installation
Combi conformément aux instructions de montage, la garantie sera caduque. Le constructeur
n’est pas responsable des dégâts résultant d’un montage non professionnel ou découlant du non-
respect des prescriptions.
contenu de l’eMballage
1. Vériez le contenu de l’emballage.
1x vanne mélangeuse
1x pièce en T eau chaude
1x tube de 15 mm
1x tube de 12 mm
1x coude 15x12 mm
2x rondelle
2x rallonge
1x réduction à compression 15-12 mm
1x réduction à compression 15-10 mm
Montage du set d'installation coMbi
Suivez les cinq étapes mentionnées ci-dessous si votre appareil de production d’eau chaude
est déjà installé
1. Retirez la che de votre appareil de production d’eau chaude de la prise murale.
2. Ouvrez le robinet d’eau chaude jusqu’à avoir de l’eau froide. L’installation est désormais
froide et sûre.
3. Fermez le robinet principal an de couper l’alimentation en eau.
4. Ouvrez le robinet d’eau chaude pour faire chuter la pression du système. Si vous ne changez
pas le groupe de sécurité de place, vous pouvez simplement fermer le robinet du groupe de
sécurité.
5. Retirez le tuyau d’eau froide de votre groupe de sécurité.
FR
Introduction et Montage Instructions de montage du set d'installation Combi
A
B
C
H
D
E
F
G
I
2x
1x
1x
1x
1x 1x
2x 1x
1x
BEF
AD C
G HI
gure 1
07.98.92.033 Handleiding Combi Installatieset_NMRS.indd 12 5-7-10 16:29

FR
Introduction et Montage Instructions de montage du set d'installation Combi
Instructions de montage du set d'installation Combi Montage
Fixation
1. Déterminez la disposition que vous souhaitez utiliser : à 90 degrés (gure 2a, suivre l’étape
2a) ou en ligne (gure 2b, suivre l’étape 2b) dans votre armoire de cuisine (en fonction
de l’espace disponible). Les deux dispositions peuvent aussi être appliquées en symétrie
verticale.
2a. Montez le coude 15x12 mm à l’aide du tube de 15 mm sur le groupe de sécurité .
Montez ensuite le tube de 12 mm sur le coude 15x12 mm .
2b. Montez le tube de 12 mm à l’aide de la réduction à compression 15x12 mm sur le
groupe de sécurité .
3. Montez la vanne mélangeuse sur le tube de 12 mm .
4. Installez votre robinet s’il n’est pas déjà installé. Suivez à cet effet le manuel de votre
robinet.
5. Reliez le raccord à ‘let intérieur’ de la pièce en T eau chaude au exible d’alimentation
d’eau chaude de votre robinet . Utilisez à cet effet une des deux rondelles jointes.
B
E
D
F
A
H
1
2
C
1
3
E
D
D
2
250 mm
300 mm
1
E
D
C
A
B
min. 400 mm
230 mm
1
A
B
D
H
Filet intérieur
Filet extérieur
B
gure 2a
gure 2b
gure 3
07.98.92.033 Handleiding Combi Installatieset_NMRS.indd 13 5-7-10 16:29

FR
7. Raccordez le tube d’eau chaude de l’appareil de production d’eau chaude au
raccord à ‘let extérieur’ de la pièce en T eau chaude . Utilisez à cet effet une des deux
rondelles jointes.
8. Raccordez le tube d’eau froide de l’appareil de production d’eau chaude au raccord
inférieur de la vanne mélangeuse .
9. Raccordez le raccord supérieur de la vanne mélangeuse à l’alimentation d’eau
chaude de votre robinet .
6. Fixez la pièce en T eau chaude sur la vanne mélangeuse comme indiqué à la gure 4.
gure 5
Montage Instructions de montage du set d'installation Combi
B
A
B
A
F
4
7
7
6
A
5
2
BA
3
2
7
5
1
3
4
6
gure 4
gure 5
07.98.92.033 Handleiding Combi Installatieset_NMRS.indd 14 5-7-10 16:29

FR
Montage Instructions de montage du set d'installation Combi
Instructions de montage du set d'installation Combi Montage
10. Après avoir installé le robinet , l’appareil de production d’eau chaude , le set
d’installation Combi et éventuellement le set de ltration, ouvrez le robinet principal et le
robinet du groupe de sécurité.
11. Remplissez maintenant le boiler d’eau en ouvrant le robinet d’eau chaude. Dès que l’eau sort
du robinet, le boiler est rempli.
12. Enchez la prise dans une prise murale avec prise de terre. L’appareil de production d’eau
chaude chauffera maintenant l’eau.
13. Si, après 4 minutes de chauffe, il n’y a pas d’eau d’expansion qui goutte via le groupe de
sécurité , coupez immédiatement la tension et ouvrez le robinet d’eau chaude pour
supprimer la pression d’eau.
14. Il faut environ 15 minutes pour réchauffer complètement l’appareil de production d’eau
chaude .
15. Avant d'utiliser l’appareil de production d’eau chaude , vous devez le réchauffer et le vider
3 fois 1 heure.
7
7
7
7
1
2
07.98.92.033 Handleiding Combi Installatieset_NMRS.indd 15 5-7-10 16:29

FR
garantie
Le set d'installation Combi est garanti contre les défauts de matériel et/ou de construction. Cette garantie est
valable pour la durée et les conditions mentionnées ci-après.
Attribution de la garantie
Le respect de l'exécution de la garantie incombe au vendeur où le set d'installation Combi a été acheté. La
garantie est valable à partir de la date d’achat mentionnée sur la facture.
Durée de la garantie : 2 ans de garantie.
Cette garantie ne s’applique pas sur :
• le salaire • les frais d'administration • les frais d'envoi
• les frais de déplacement • les dommages dus au transport.
Conditions de garantie
1. La note d'achat, avec mention de la date d'achat, doit être présentée.
2. La garantie est valable uniquement pour les défauts de conception et de fabrication (à la seule
appréciation du fournisseur).
3. Le set d'installation combi doit être installé, utilisé et entretenu exclusivement selon les instructions de
montage et d'utilisation.
4. Le set d'installation combi ne peut être utilisé que dans les conditions visées dans les instructions de
montage et d'utilisation.
5. Le set d'installation Combi ne peut avoir subi aucune modication dans sa construction. Les
conséquences liées à la corrosion causée par une mise à la terre insufsante du robinet et de l'évier ne
sont pas couvertes par la garantie.
6. La garantie n'est d'application que si la qualité des conduites est conforme aux conditions suivantes :
• pH 7 < pH < 9,5 • conductibilité < 125 mS/m • Fe < 0,2 mg/l
• dureté de l'eau < 12° dH* • Cl<150 mg/l
*) Entre 12° dH et 15° dH, la garantie n'est valable qu'avec placement d'un ltre de détartrage et
d'adoucisseur. La preuve d'achat de ces ltre doit être présentée lors de tout appel à la garantie.
7. Le fournisseur n'accepte aucune réclamation résultant de dommages secondaires comme les dommages
professionnels, les dégâts des eaux et des incendies.
8. Toute réparation ou remplacement de pièces sous garantie n’entraîne pas une prolongation de la
période de garantie du set d'installation Combi même.
entretien
Le set d’installation Combi ne nécessite normalement aucun entretien. Toutefois, il se peut que, dans les
régions où l’eau est très calcaire, un dépôt de calcaire inuence le débit (eau chaude ou eau mitigée) ou la
température (eau mitigée). Le cas échéant, le set d’installation peut être démonté et décalcarisé à l’aide d’un
agent détartrant à base d’acide citrique.
Entretien et Garantie Instructions de montage du set d'installation Combi
Ariston Thermo Group Avenue W.A. Mozart 1A B-1620 Drogenbos
Tel. +32 (2)333.48.00 Fax +32 (2)333.48.49 E-mail: [email protected] www.ariston.be
07.98.92.033 Handleiding Combi Installatieset_NMRS.indd 16 5-7-10 16:29

DE
1x Mischventil
1x T-Stück für Heißwasseranschluss
1x Rohrstück, 15 mm
1x Rohrstück, 12 mm
1x Kniestück, 15 x 12 mm
2x Dichtringe
2x Verlängerungsschläuche
1x Klemmverschraubung 15 - 12 mm
1x Klemmverschraubung 15 - 10 mm
einführung
Mit Hilfe des Kombiventils können Sie aus Ihrem Heißwasserboiler nicht nur kochendes Wasser,
sondern auch warmes Wasser entnehmen.
Diese Montageanleitung enthält für Sie die richtigen Anweisungen für einen korrekten Anschluss
und sicheren Gebrauch des Kombiventils. Bei Anschluss des Kombiventils nicht nach den in dieser
Montageanleitung aufgeführten Anweisungen verfällt Ihr Garantieanspruch. Der Hersteller haftet
nicht für Schäden, die sich aus einer unfachmännisch ausgeführten Montage ergeben oder die auf
eine Nichtbeachtung der gültigen Vorschriften zurückzuführen sind.
VerpacKungsinhalt
1. Überprüfen Sie den Inhalt der Verpackung auf Vollständigkeit.
Montage des KoMbiVentil-einbausets
Gehen Sie bei einem schon fertig installierten Heißwasserboiler nach den folgenden 5
Schritten vor:
1. Ziehen Sie den Stecker des Heißwasserboilers aus der Steckdose.
2. Öffnen Sie den Wasserhahn des Heißwasserboilers, bis nur noch kaltes Wasser herausströmt.
Die Installationsleitungen sind nun kalt und ermöglichen somit eine sichere Montage.
3. Schließen Sie den Haupthahn, um die Wasserzuleitung abzusperren.
4. Öffnen Sie den Wasserhahn des Heißwasserboilers, um den verbliebenen Druck aus dem
System herauszulassen. Wenn Sie nicht den Einbauort des Sicherheitsventils verändern
wollen, dann brauchen Sie nur den Absperrhahn des Sicherheitsventils zu schließen.
5. Bauen Sie die Kaltwasserzufuhr Ihres Sicherheitsventils aus.
Montageanleitung für Kombiventil-Einbauset Einführung und Montage
Entretien et Garantie Instructions de montage du set d'installation Combi
Ariston Thermo Group Avenue W.A. Mozart 1A B-1620 Drogenbos
Tel. +32 (2)333.48.00 Fax +32 (2)333.48.49 E-mail: info@ariston.be www.ariston.be
A
B
C
H
D
E
F
G
I
2x
1x
1x
1x
1x 1x
2x 1x
1x
BEF
AD C
G HI
Abb. 1
07.98.92.033 Handleiding Combi Installatieset_NMRS.indd 17 5-7-10 16:29

DE
Befestigung
1. Legen Sie fest, ob Sie je nach verfügbarem Platz in Ihrem Unterbauschrank eine 90°-Montage
(Abbildung 2a für Montageschritt 2a) oder eine Reihenmontage (Abbildung 2b für
Montageschritt 2b) ausführen möchten. Beide Montageanordnungen lassen sich auch in
vertikaler Spiegelung ausführen.
2a. Montieren Sie das Kniestück (15 x 12 mm) zusammen mit Rohrstück (15 mm) an das
Sicherheitsventil . Danach montieren Sie Rohrstück (12 mm) an Kniestück (15 x 12
mm).
2b. Dann Rohrstück (12 mm) mit Klemmverschraubung (15 x 12 mm) an Sicherheitsventil
montieren.
3. Mischventil an Rohrstück (12 mm) montieren.
4. Installieren Sie jetzt Ihren Wasserhahn , falls nicht schon geschehen. Befolgen Sie dafür
die Montageanleitung für Ihren Wasserhahn.
5. Stellen Sie die Verbindung zwischen Innengewindeanschluss von T-Stück für
Heißwasseranschluss und Heißwasseranschluss Ihres Wasserhahns her. Verwenden
Sie dafür einen der beiden mitgelieferten Dichtringe .
Montage Montageanleitung für Kombiventil-Einbauset
B
E
D
F
A
H
1
2
C
1
3
E
D
D
2
250 mm
300 mm
1
E
D
C
A
B
min. 400 mm
230 mm
1
A
B
D
H
Innengewinde-
anschluss
Außengewinde-
anschluss
B
Abb. 2b
Abb. 3
Abb. 2a
07.98.92.033 Handleiding Combi Installatieset_NMRS.indd 18 5-7-10 16:29

DE
Montageanleitung für Kombiventil-Einbauset Montage
Montage Montageanleitung für Kombiventil-Einbauset
7. Schließen Sie dann Heißwasserschlauch vom Heißwasserboiler am
Außengewindeanschluss des T-Stücks für Heißwasseranschluss an. Verwenden Sie dafür
einen der beiden mitgelieferten Dichtringe .
8. Nun den Kaltwasserschlauch des Heißwasserboilers an den untersten Anschluss vom
Mischventil anschließen.
9. Schließen Sie jetzt den obersten Anschluss vom Mischventil an den Heißwasseranschlusses
Ihres Wasserhahns an.
6. Befestigen Sie laut Abbildung 4 das T-Stück für Heißwasseranschluss am Mischventil .
Abb. 5
B
A
B
A
F
4
7
7
6
A
5
2
BA
3
2
7
5
1
3
4
6
Abb. 4
Abb. 5
07.98.92.033 Handleiding Combi Installatieset_NMRS.indd 19 5-7-10 16:29

DE
10. Nachdem Sie Wasserhahn , Heißwasserboiler , das Kombiventil und eventuell noch
einen Filtersatz installiert haben, können Sie jetzt wieder den Haupthahn und den Hahn des
Sicherheitsventils öffnen.
11. Lassen Sie nun wieder Wasser in den Heißwasserboiler strömen, indem Sie den Wasserhahn
öffnen. Sobald Wasser aus dem Wasserhahn strömt, ist der Heißwasserboiler wieder mit
Wasser gefüllt
12. Stecken Sie den Gerätestecker des Heißwasserboilers wieder in eine geerdete Steckdose ein.
Der Heißwasserboiler wärmt jetzt wieder das Wasser auf.
13. Wenn innerhalb der Aufwärmphase nach 4 Minuten kein Expansionswasser über
das Sicherheitsventil ausläuft, dann müssen Sie sofort wieder die Spannung des
Heißwasserboilers ausschalten und den Heißwasserhahn öffnen.
14. Die Aufwärmung des Heißwasserboilers nimmt ca. 15 Minuten in Anspruch.
15. Vor Gebrauch des Heißwasserboilers müssen Sie ihn dreimal innerhalb einer Stunde
gründlich durchspülen.
Montage Montageanleitung für Kombiventil-Einbauset
7
7
7
1
2
Daalderop BV Lingewei 2 Bedrijvenpark Medel 2702 Postbus 7 4000 AA Tiel Niederlande
Tel. +31 (0)344 636 500 Fax +31 (0)344 620 901 E-mail: info@daalderop.nl www.daalderop.nl
07.98.92.033 Handleiding Combi Installatieset_NMRS.indd 20 5-7-10 16:29
Table of contents
Languages: