manuals.online logo
Brands
  1. Home
  2. •
  3. Brands
  4. •
  5. tado°
  6. •
  7. Boiler Supplies
  8. •
  9. tado° Elexia User manual

tado° Elexia User manual

Popular Boiler Supplies manuals by other brands

Beretta B23 manual

Beretta

Beretta B23 manual

Fröling Lambdatronic S 3200 Service manual

Fröling

Fröling Lambdatronic S 3200 Service manual

CleaverBrooks Hawk 1000 Operation manual

CleaverBrooks

CleaverBrooks Hawk 1000 Operation manual

eta eHACK operating instructions

eta

eta eHACK operating instructions

Trane BAYAIR30CNVENT Installer's guide

Trane

Trane BAYAIR30CNVENT Installer's guide

Ecotermal 6 MRT Assembly and operation manual

Ecotermal

Ecotermal 6 MRT Assembly and operation manual

IBC P-175 manual

IBC

IBC P-175 manual

Bosch Worcester 7 716 192 566 installation instructions

Bosch

Bosch Worcester 7 716 192 566 installation instructions

Riello ITRF 11 quick start guide

Riello

Riello ITRF 11 quick start guide

Taco LTA-2 instruction sheet

Taco

Taco LTA-2 instruction sheet

Miura CONNECT installation manual

Miura

Miura CONNECT installation manual

Tekmar Boiler Control 275 Installation & operation manual

Tekmar

Tekmar Boiler Control 275 Installation & operation manual

PAW HeatBloC K36 Installation and operation instructions

PAW

PAW HeatBloC K36 Installation and operation instructions

TriangleTube PSRKIT84 manual

TriangleTube

TriangleTube PSRKIT84 manual

Bosch Worcester installation instructions

Bosch

Bosch Worcester installation instructions

TriangleTube PSRKIT36 instructions

TriangleTube

TriangleTube PSRKIT36 instructions

De Dietrich Thermique AD252 Assembly instructions

De Dietrich Thermique

De Dietrich Thermique AD252 Assembly instructions

Bryan Boilers CFS-15-20-20D Specification sheet

Bryan Boilers

Bryan Boilers CFS-15-20-20D Specification sheet

manuals.online logo
manuals.online logoBrands
  • About & Mission
  • Contact us
  • Privacy Policy
  • Terms and Conditions

Copyright 2025 Manuals.Online. All Rights Reserved.




Installation Instructions Elexia
These are your installation instructions to connect your tado° Extension Kit to your boiler. Please follow the instructions                 
carefully and only confirm the successful installation once you have finished all the steps for all devices.

If you have any questions regarding the use or installation of tado° please consult our Help Center at www.tado.com/support

 
Version 4.3

For support please visit: www.tado.com/support 


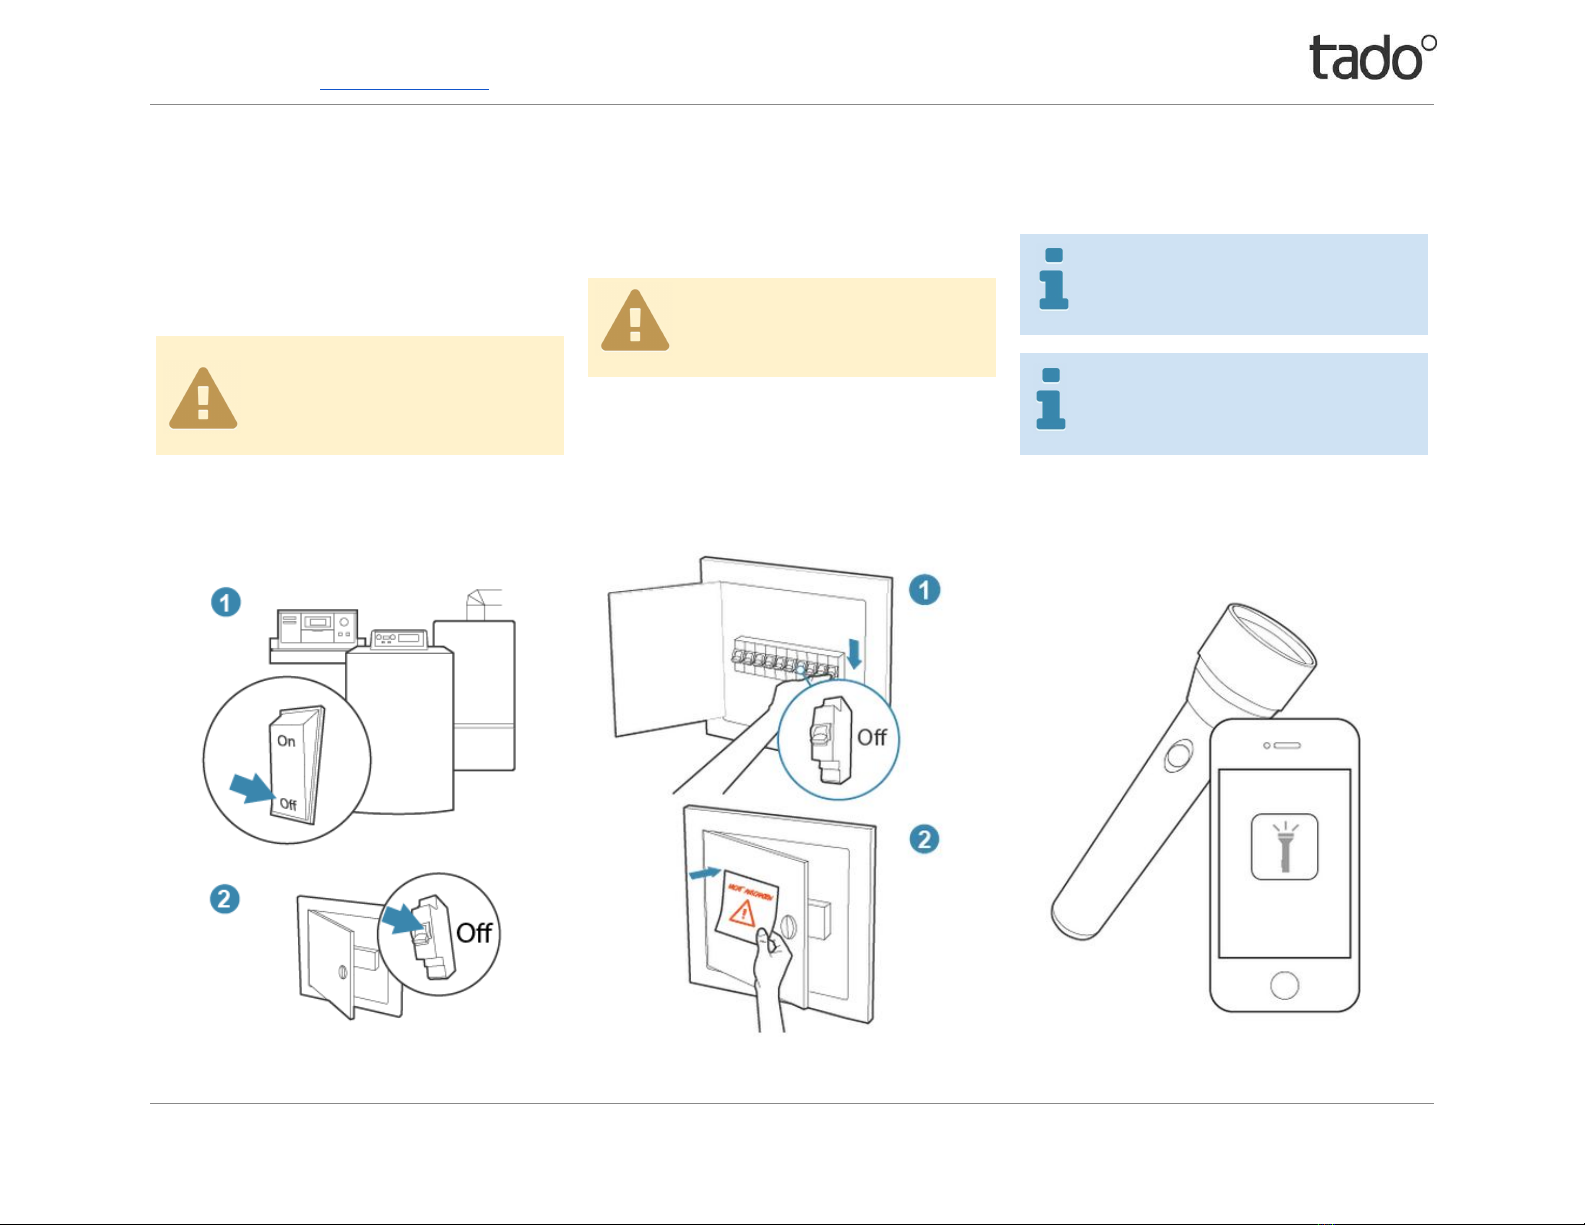
Switching off your boiler and corresponding circuit breaker
Make sure that you take steps to ensure that the power          
supply to your boiler is completely switched off and        
remains switched off during the installation process. In       
addition it is compulsory to remove the breaker/fuse that        
your boiler is connected to, or turn of the corresponding         
switch in your circuit breaker box.
If you are not 100% sure which is the        
correct switch/breaker/fuse then you   
must remove all breakers/fuses or turn     
off the main power switch in your circuit       
breaker box.

Please leave a message at the circuit breaker box such         
to inform everyone not to turn anything back on.
Please make sure that all residents of the       
home are aware that you are going to turn        
off and that you are the only one who is         
allowed to switch it on again.


Please be aware that your desktop computer      
and lighting will turn off when you switch off        
the mains power circuit breaker switch.

To provide safe lighting for the installation you       
can use the flashlight function of your      
smartphone or a torch.




 

1

For support please visit: www.tado.com/support 


Open your boiler to get access to its control unit
Access the boiler control by opening the boiler. Since every boiler has a different opening method, take a look at our examples below to get an idea how your boiler can be                               
opened. All wiring connection terminals are found on the control unit. You will be looking for the place where lots of wires connect to the boiler. Look for the terminal where a room                                
thermostat can be connected. The installation manual of your boiler very often helps.





2

For support please visit: www.tado.com/support 


Make sure the power is off
Use the voltage tester to check if there is still power on           
any wiring terminal.
If there is any light it means that there is still power on the             
wiring. Before continuing, switch off the circuit breaker.
If there is no light, power is off and it is safe to proceed.





3

For support please visit: www.tado.com/support 


Documenting the wiring of the existing setup
As soon as you have removed the cover please take detailed photos of the existing wiring with the cables still attached. Try your best to make the terminal numbering legible.

This step is very important, you will definitely       
need this information in the future. Should      
you need help, it will be difficult for our        
Technical Support Team to assist you     
without the photos of all of the current       
wiring.

You will need these photos to restore      
your old system if you move house in       
order to take your tado° with you. Please       
save them in a place where you will find        
them again in this case.



 

4

For support please visit: www.tado.com/support 


Identifying the terminal block to connect to
Please identify the terminal block labeled C



 

5

For support please visit: www.tado.com/support 


Connecting the tado° cable
Please take the cable provided with the tado° Extension Kit. Use the cable to connect              
your boiler with the tado° Extension Kit.

Please connect the cable as follows to the boiler:
Connect the Blue wire to the terminal labelled N.
Connect the Brown wire to the terminal labelled PH.
Connect the Black wire to the left terminal of the “Thermostat D’Ambiance”.
Connect the Grey wire to the right terminal of the “Thermostat D’Ambiance”.


If there is a bridge between any two of the terminals you connect to, please remove               
it. It is not needed anymore.







6

For support please visit: www.tado.com/support 



Preparing the labels
Using only a pen, add the wire colors to the labels as           
shown on the right.
Write into the blank areas of the labels as shown below.          
Please double check your work.

Please attach the labels to the cables as shown in the          
image. Matching the cable colors with the colors written        
on the stickers is mandatory. Please double check your        
work now.

Write “Blue” on the label N.
Write “Brown” on the label L.
Write “Black” on the label 1.
Write “Grey” on the label 4.



 

7

For support please visit: www.tado.com/support 


Leading the cable out and closing the boiler
Carefully thread the tado° cable out of you boiler. Please check that there are no sharp               
edges that could damage or trap the cable.
Carefully close the boiler and its control panel by reversing the sequence in which you              
opened it.


 

8

For support please visit: www.tado.com/support 


Selecting the location for the tado° Extension Kit
The following steps describe how to mount the tado° Extension Kit on the wall.


Please do not mount the tado° Extension Kit to the boiler itself.



 

9