Daewoo AVS1401 User manual

1
DAB+ /FM Clock Radio

2
IMPORTANT SAFEGUARDS
When using electrical appliances, basic safety precautions should always
be followed. These instructions should be saved for future reference:
•Read and familiarise yourself with all operating instructions before using
this DAB Radio.
•Before plugging your unit into the mains, visually check that the unit is
intact and has not suffered any transit damage.
•Check that the voltage indicated on the data plate corresponds with that
of the local network before connecting the appliance to the mains power
supply.
•Always use this appliance on a solid, level, non-flammable surface.
•Ensure that there is clearance of at least 100mm (4 Inches) minimum
around the Radio for sufficient ventilation.
•Ensure that the ventilation openings are not covered with items, such as
newspapers, table-cloths, curtains, etc.
•No naked flame sources, such as lighted candles, should be placed on the
Radio.
•Do not position the Radio close to sources of heat such as radiators,
heaters, other electronic equipment, etc.
•The Radio shall not be exposed to dripping or splashing and that no
objects filled with liquids, such as vases, shall be placed on the apparatus.
•Do not immerse this appliance or its supply in water or any other liquids.
•Do not leave the appliance unattended during use.
•Do not leave the appliance unattended whilst connected to the mains
supply.
•Always remove the mains supply from the mains socket when the Radio is
not in use, the mains supply must be accessible at all times.
•Close supervision is required when using this appliance near children.
•Never leave this appliance within reach of children.
•This appliance can be used by children aged from 8 years and above and
persons with reduced physical, sensory or mental capabilities or lack of
experience and knowledge if they have been given supervision or
instruction concerning use of the appliance in a safe way and understand

3
the hazards involved. Children shall not play with the appliance. Cleaning
and user maintenance shall not be made by children without supervision.
•Children of less than 3 years should be kept away unless continuously
supervised.
•Do not use this appliance outdoors.
•It is imperative to unplug the power supply after the appliance has been
used, before it is cleaned and whilst being repaired.
•Unplug after each use. Grasp the supply, not the cord.
•Repairs to electrical appliances should only be performed by qualified
personnel. Improper repairs may place the user at serious risk.
•Do not operate this appliance with a damaged plug or cord, after a
malfunction or after being dropped or damaged in any way.
•Regular, periodic checks should be carried out on the mains supply to
ensure no damage is evident. Should there be any signs of damage the
product should not be used.
•If the power cable is damaged, it should only be replaced by the
manufacturer or a suitable qualified after-sales-service in order to avoid a
hazard
•Do not allow the power cable to hang over sharp edges or come in
contact with hot surfaces.
•Do not run the power cable under carpets, rugs, etc.
•This product is intended for household use only and should not be used
for industrial purposes.
•Do not use any accessories or attachments with this appliance other than
those supplied or recommended by supplier.
•Do not use this product for anything other than its intended use.
•Do not push objects into any openings as damage to the product and/or
electric shock may occur.

4
Description of Parts
1. ON/OFF –Press to switch on and off the radio. (Pressing briefly whilst on enters standby mode)
2. INFO/MENU –Press to Display Radio Station Information; Press and hold to enter system settings
3. MODE –Press to select DAB or FM mode.
4. PRESET –Press to select Radio Presets.
5. SCAN –Press Once to Scan the DAB or FM Radio Band.
6. TUNE- - Press to manually tune down the DAB or FM Radio bands.
7. VOLUME- - Press to lower the volume level.
8. TUNE+ - Press to manually tune up the DAB or FM Radio bands.
9. VOLUME+ - Press to increase the volume level.
10. SELECT/SNOOZE –Press to select items in ‘MENU’ or to operate Snooze mode after the alarm.
11. LCD Display
12. LOUDSPEAKER
1
2
3
4
5
6
7
8
9
10
11
12

5
Description of Parts –General
Before the first time you use your DAB-FM Clock Radio
Please read these operating instructions thoroughly and keep them in a safe place for future reference.
Remove all packing materials and discard responsibly.
Operating Instructions
•Insert the Small DC Power Plug (15) of the Mains Adaptor (16) into DC Power Socket (14) on the rear
panel of the Radio.
•Insert the Mains Adaptor (16) into the nearest mains socket.
Operating Instructions –Using the DAB Radio
Listening to the DAB Radio
1. Ensure the Aerial (13) is fully extended.
2. Press ON/OFF button (1) to power up the radio.
3. The radio will automatically scan the airwaves for DAB stations if it is being used for the first time.
4. Press the MODE button (3) until ‘DAB’ is displayed at the top of the LCD display (11).
5. Press the TUNE controls (6 & 8) to find the desired DAB radio station. Once the station has been
found press the SELECT/SNOOZE button (10) to select the station.
6. Adjust the volume using the VOLUME controls (7 & 9).
Saving up to 10 DAB radio stations using the preset function
1. Tune the radio into the desired station as above.
2. Press and hold the PRESET button (4) to enter Preset mode.
3. Press the TUNE controls (6 & 8) to select the desired preset number and press the SELECT/SNOOZE
button (10), the radio will store the station you have tuned into the preset number selected.
NB If the preset has no radio station stored in it the LCD Display (11) will show “Preset Store
<X:(Empty)>”(Note: the letter ‘X’ is the preset number).
4. Repeat the above three steps to save more stations in the presets.
13. Aerial
14. DC Power Socket
15. Small DC Power Plug
16. Mains Adaptor
13
15
14
16

6
Recalling a preset DAB radio station
1. To recall a preset Radio Station, briefly press the PRESET button (4) to enter the preset recall mode.
2. Press the TUNE controls (6 & 8) to scroll through the DAB radio stations saved in the presets.
Once the LCD Display (11) shows the desired preset press the SELECT/SNOOZE button (10) to select
the chosen radio station preset.
NB If the preset has no radio station stored in it the LCD Display (6) will show “Preset Recall
<X:(Empty)>”. (Note: the letter ‘X’ is the preset number).
Selecting DAB Radio Information on the LCD Display
Press the INFO/MENU (2) button to select the various DAB radio station related information such as:
a) Signal Strength - Displays a signal bar with the current station signal strength.
b) PTY (program type) - Shows the type and description of the program provided by the radio station, i.e. Rock
Music, Pop Music, Classical, Country, etc.
c) Name/Type of Broadcaster.
d) Channel and Frequency - Displays the station's transmission channel number and frequency.
e) Bit Error Rate (BER) - Provides details of signal error rate.
f) Bit Rate –shows the bit rate of the transmission (in kbps).
g) Time –Shows the current time.
h) Date –Shows the current date.
i) Dynamic Label Segment (DLS) - Displays scrolling text information supplied by the broadcaster.
Updating the DAB stations using the scan button.
It may be necessary to retune your DAB radio in order to receive new stations being broadcast in your
area or if a broadcaster has made any changes to an existing station and you can no longer receive it.
To update your DAB stations, press the SCAN button (5) and the DAB radio band will be updated. Any
stations saved in the presets may need to be re-programmed after the scan has finished.
NB Re-scanning may be required if the radio is moved to a new location i.e. after moving house.
Operating Instructions –Using the FM Radio
Listening to the FM Radio
1. Ensure the Radio Aerial (13) is fully extended.
2. Press the ON/OFF button (1) to power up the radio.
3. Press the MODE button (3) until ‘FM’ is displayed at the top of the LCD display (11).
4. Tune the radio into the desired station using the TUNE controls (6 & 8). NB the radio tunes in
0.05MHz steps. Note: holding down the TUNE controls (6 & 8) will continually tune along the FM
radio band.
5. Adjust the volume using the VOLUME controls (7 & 9).
Saving up to 10 FM radio stations using the preset function
5. Tune the radio into the desired station using the TUNE controls (6 & 8) as above.
6. Press and hold the PRESET button (4) to enter preset store mode.
7. Press the TUNE controls (6 & 8) to select the desired preset number and press the
SELECT/SNOOZE button (10), the radio will now store the station you have tuned to in the preset
number chosen.
NB If the preset has no radio station stored in it the LCD Display (6) will show “Preset Store
<X:(Empty)>”. (Note: the letter ‘X’ is the preset number).

7
Recalling an FM preset radio station
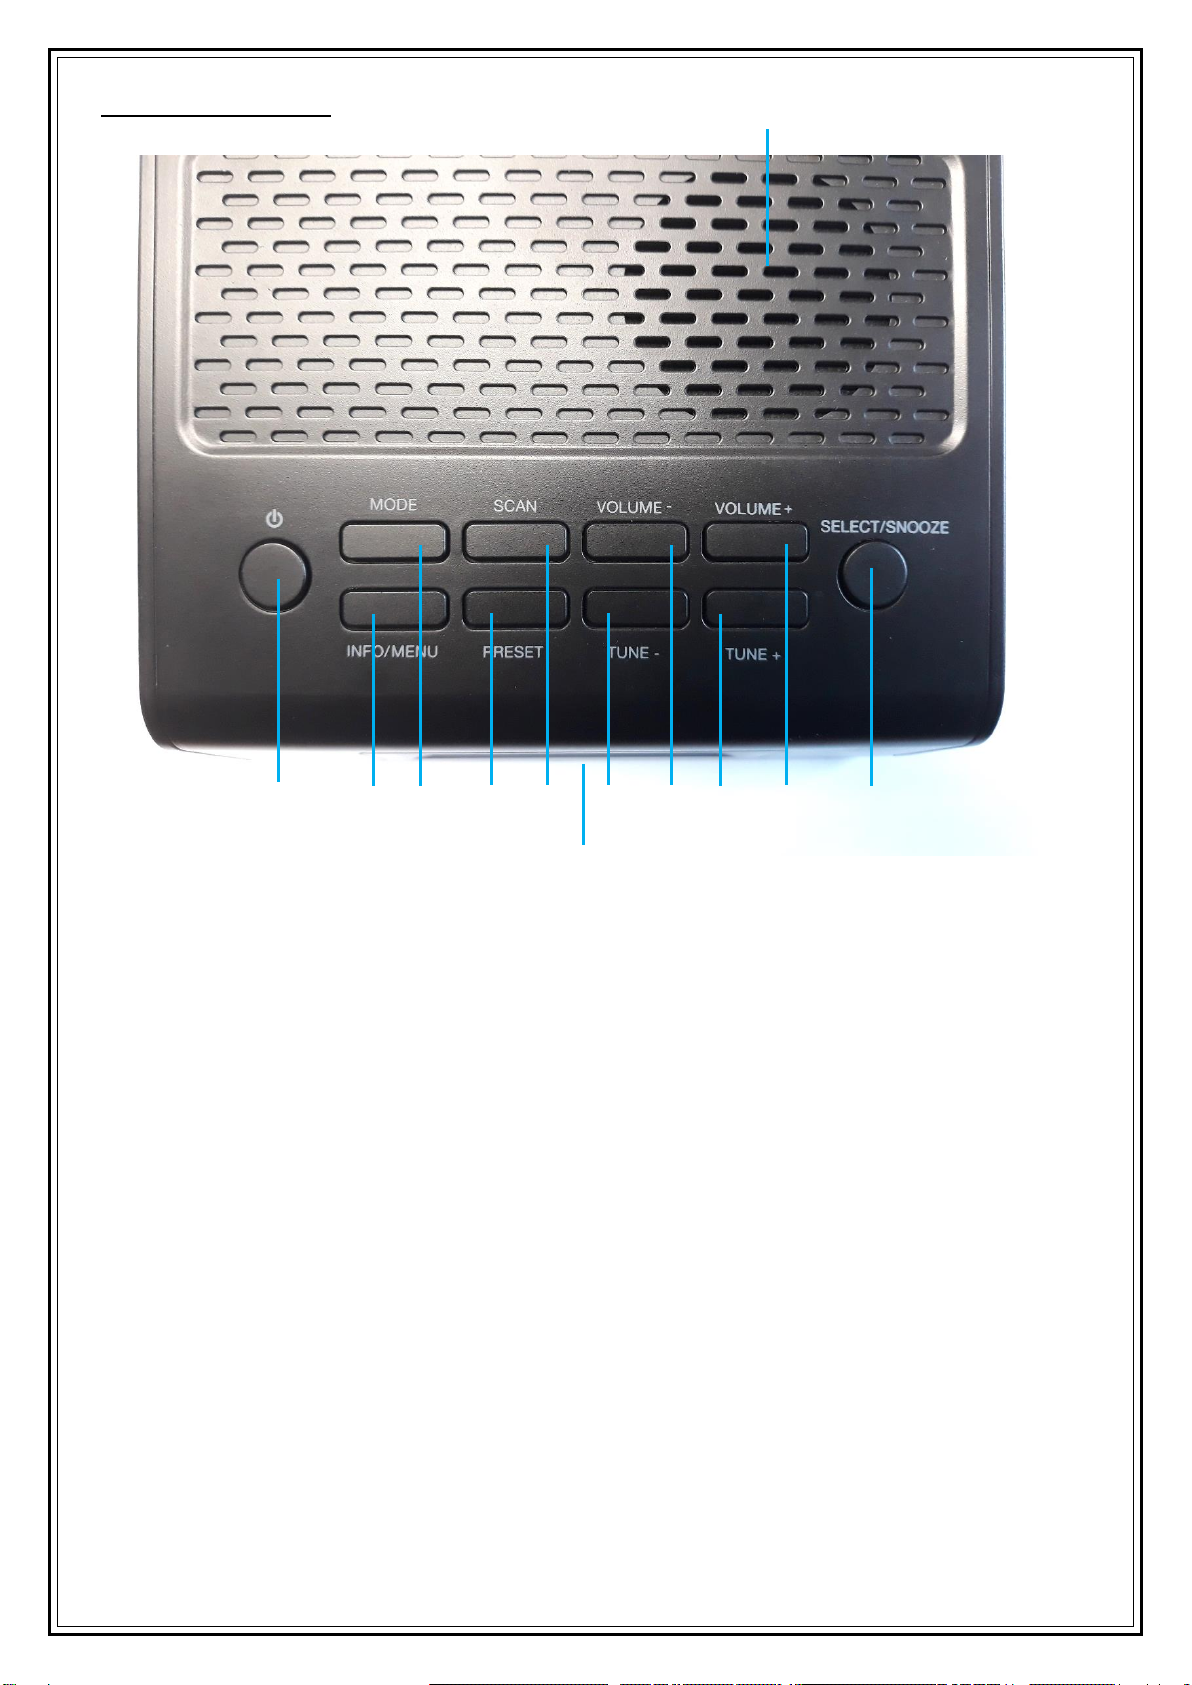
1. To recall preset Radio Stations, briefly press the PRESET button (4) to recall previously stored radio
stations. “Preset Recall” will be shown on the LCD Display (11).
2. Press the TUNE controls (6 & 8) to scroll through the FM radio station presets.
Once the LCD Display (11) shows the desired preset station press the SELECT/SNOOZE button (10)
to select the desired radio station.
NB If the preset has no radio station stored in it the LCD Display (6) will show “Preset Recall
<X:(Empty)>”. (Note: the letter ‘X’ is the preset number).
Saving up to 10 FM preset stations automatically
1. Press the SCAN button (5) for 2 secs, the radio will automatically search the frequency range-
starting at 87.5MHz upwards, when a station of sufficient strength has been found the radio will
stop scanning and save it into the presets.
2. Recall the presets using the process above.
Selecting FM Radio Information on the LCD Display
NB the bottom line of the LCD display (11) will show the radio station name or frequency, radio
station information is shown on the lower line on the LCD Display (11)
Press the INFO/MENU (2) button to select the various FM radio station related information as
below:
a) PTY (program type) - Shows the type and description of the program provided by the radio station, i.e. Rock
Music, Pop Music, Classical, Country, etc.
b) Radio Station Name.
c) Stereo or Mono audio mode.
d) Time –Shows the current time.
e) Date –Shows the current date.
f) Radio Text –Displays scrolling text information supplied by the broadcaster.
Operating Instructions –Using the Alarm Function
1. Press the ON/OFF button (1) to power up the radio.
2. Press and hold the INFO/MENU button (2) until “<Full scan >”(“<Scan setting>” if using the FM
band) appears on the LCD Display (11).
3. Press the TUNE+ button (8) until “<System >”is shown on the LCD Display (11) –press the
SELECT/SNOOZE button (10).
4. Press the TUNE+ button (8) until “<Alarm >”is shown on the LCD Display (11) –press the
SELECT/SNOOZE button (10) to select setting the alarm. ”Alarm 1 Setup”will be shown on the
LCD Display (11).
5. Press the TUNE buttons (6 & 8) to select Alarm 1 or Alarm 2, NB “Alarm 2 Setup” will be shown on
the LCD Display (11) if alarm 2 is selected. Press the SELECT/SNOOZE button (10) to select the
desired alarm. The alarm hour digits will now flash.
6. Press the TUNE buttons (6 & 8) to set the alarm hour, press the SELECT/SNOOZE button (10) to set
the alarm hour. The alarm minute digits will now flash.
7. Press the TUNE buttons (6 & 8) to set the alarm minutes, press the SELECT/SNOOZE button (10) to
set the alarm minutes. The alarm Duration time will now flash.
8. Press the TUNE buttons (6 & 8) to set the alarm Duration time, select from 15, 30, 45, 60, 90 or
120 minutes, press the SELECT/SNOOZE button (10) to set the Duration time. The alarm Source
will now flash.

8
9. Press the TUNE buttons (6 & 8) to select from Buzzer, DAB or FM radio as a wake-up source, press
the SELECT/SNOOZE button (10) to set the alarm source:
a. If Buzzer is the wake-up source selected, press the TUNE buttons (6 & 8) to select when you
require the alarm to sound: Daily, Once, Weekends or Weekdays. Press SELECT/SNOOZE (10)
to select the option.
b. If DAB or FM wake up source is selected, press the TUNE buttons (6 & 8) to select from the
‘Last listened’ radio station or one of the radios presets. Press SELECT/SNOOZE (10) to select
the option. Next select when you require the alarm to sound: Daily, Once, Weekends or
Weekdays. Press SELECT/SNOOZE (10) to select the option.
10. Set the alarm volume using the TUNE buttons (6 & 8), press SELECT/SNOOZE (10) to confirm
settings.
11. Finally use the TUNE buttons (6 & 8) to select Alarm ‘On’ or ‘Off’, press SELECT/SNOOZE (10) to
confirm settings. The display will show “Alarm Saved” on the LCD Display (11)
12. The alarm icons will show on the LED display (11) when the clock radio is in standby mode.
Silencing the alarm
Press the ON/OFF button (1) to cancel the alarm.
Snooze
After the alarm sounds, press the SELECT/SNOOZE button (10) can be pressed to snooze the
alarm. The alarm will be silent for a further 5 minutes before sounding again.
Sleep Timer
The sleep timer allows you to listen to music for a set time before the radio turns itself off
automatically.
1. Press the ON/OFF button (1) to power up the radio.
2. Press and hold the INFO/MENU button (2) until “<Full scan >” (“<Scan setting>” if using the FM
band) appears on the LCD Display (11).
3. Press the TUNE+ button (8) until “<System >” is shown on the LCD Display (11) –press the
SELECT/SNOOZE button (10).
4. Press the TUNE+ button (8) until “<Sleep >” is shown on the LCD Display (11) –press the
SELECT/SNOOZE button (10) to select setting the Sleep mode. Press the TUNE controls (6 & 8) to
select between OFF-90-60-45-30-15 minutes, –press the SELECT/SNOOZE button (10) to confirm
selection.
5. The radio will play for the selected time and then go into Standby mode.
6. To cancel the sleep timer, repeat steps above and select OFF.
Menu
Press and hold the INFO/MENU button (2) to enter the system menu. Press the TUNE controls (6 &
8) to select one of the menu options, –press the SELECT/SNOOZE button (10) to confirm selection.
Full Scan –Select for full re-scan of the DAB waveband.
Manual tune –Select for manual tuning of stations.
DRC* –Select from high, low or off
Prune –use Prune to delete a station with no signal after a scan.
System –Sleep, Alarm, Time, Backlight, Inactive Standby, Factory Reset, Software (SW) version.
*Dynamic Range Compression (DRC) reduces the volume of louder sounds and boosts volume of
quieter sounds. This can be useful whilst listening to audio at lower volume levels.

9
Care and Use of your DAB Clock Radio
•Always disconnect the DAB Clock Radio from the mains power supply before cleaning.
•Clean outside of the DAB Clock Radio with a clean damp cloth. Never clean with harsh or abrasive
cleaners.
•Do not submerge the DAB Clock Radio or its Power Supply in water or any other liquids.
Technical Specification
Model Number
AVS1401
Mains Adaptor
Input: AC 100-240V ~ 50/60Hz 0.15A.
Output: DC 5V @1A
Audio Output Power
1W
No of Speaker Units
1
Unpacked Weight
Approx. 335 gs
Dimensions (Approx.)
Approx. 155 (w) x 135 (d) x 50 (h) mm
Operating Temperature Range
0°C to + 40°C
FM Frequency Range
87.5 - 108MHz
DAB Frequency Range
174 - 240MHZ
This product conforms to Radio Equipment Directive 2014/53/EU

10
GUARANTEE
This product is guaranteed for twenty-four months from the date of original
purchase. If any defect should occur due to faulty materials or workmanship, please
return it to the store it was purchased from.
You will need to have your receipt of purchase to hand. The guarantee is subject to
the following provisions:
•
It is only valid within the boundaries of the country of purchase.
•
The product must be correctly installed and operated in accordance with the
instructions contained in the
User Manual.
•
The product must be used solely for domestic purposes.
•
The guarantee will berendered invalid if the product is re-sold or has been
damaged by inexpert repair.
•
The manufacturer disclaims any liability for incidental or consequential damages.
•
The guarantee is in addition to, anddoes not diminish, your statutory or legal
rights.
Daewoo Electricals is a registered trademark.
Produced and imported under licence by ESG Ltd
Manchester M3 1JS www.esgltd.com
Waste electrical products should not be disposed of with household waste. Please
recycle where facilities exist. Check with your Local Authority or retailer for recycling
advice.
Table of contents
Other Daewoo Radio manuals

Daewoo
Daewoo DRP-140 User manual

Daewoo
Daewoo Compact Wooden User manual

Daewoo
Daewoo DRP-18 User manual

Daewoo
Daewoo DRP-104 User manual

Daewoo
Daewoo AVS1322 User manual

Daewoo
Daewoo AVS1323 User manual

Daewoo
Daewoo AVS1324G User manual

Daewoo
Daewoo AVS1400 User manual

Daewoo
Daewoo DCR-48 User manual

Daewoo
Daewoo DRP-100 User manual