Daktronics OMNISPORT 2000 User manual

ED13584
Rev 8 19 August 2013
Page 1 of 8
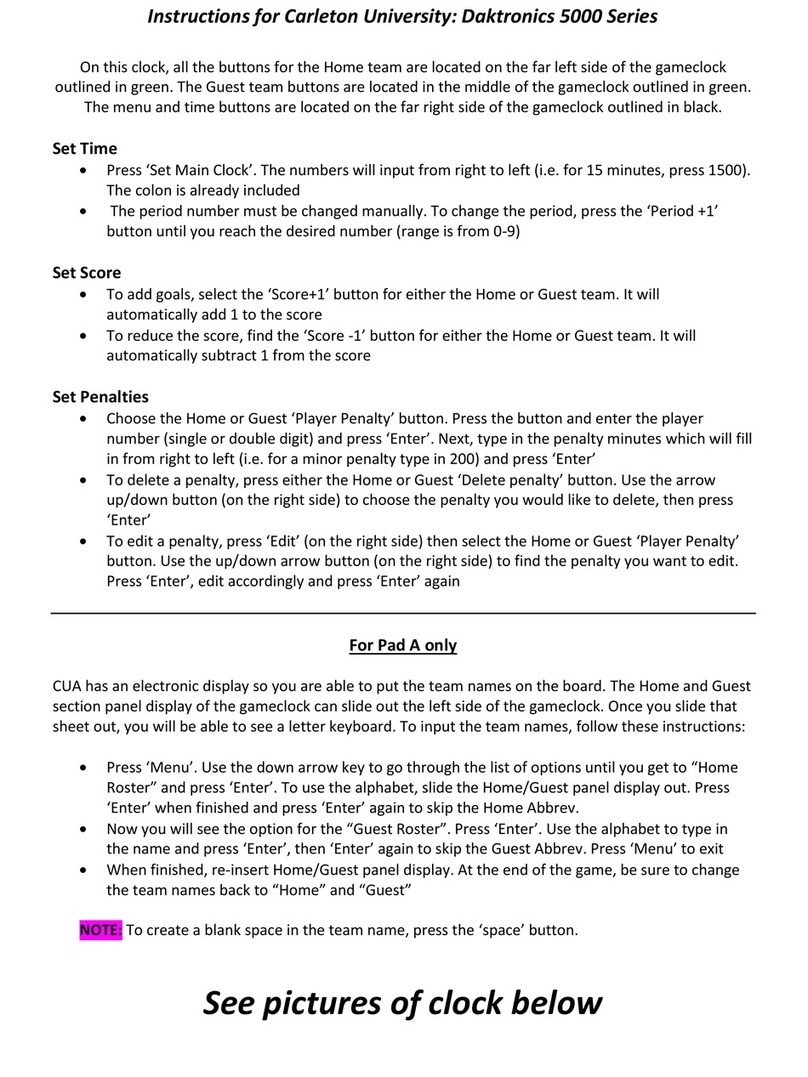
201 Daktronics Drive PO Box 5128, Brookings, SD 57006-5128
Tel: 1-800-DAKTRONICS (1-800-325-8766) Fax: 605-697-4700
Web: www.daktronics.com/support
OMNISPORT®2000 SWIMMING QUICK REFERENCE
Before
Race
1. Confirm that the timer is reset.
Look at the right LCD, line 1. If the running time is not
00:00.0, press [RESET]>[ENTER].
2. Set the timer to the correct event and heat. The right LCD,
line 2 displays E:(event) H:(heat) R:(round) L:(total lengths).
Press [EVENT/HEAT] and type in the correct event and heat
numbers. If using a programmed event order, press [NEXT
EVENT], [HEAT +1] or [HEAT –1]
3. Verify the correct number of lengths for the current event and
heat.
Look on the right LCD, line 2. If not correct, press
[LENGTHS] and type in the correct number.
During
Race
1. Timer Starts.
Typically started automatically from the horn start.
(Optional: [START] for manual start).
2. Turn off any unused lanes.
Press [LANE ON/OFF] to turn the desired lanes off. Press
again to turn on.
3. Watch the lengths complete counter and lane status for each
individual lane.
With touchpads at the near end only, the timer will show the
lane status on line 1 of the left two LCDs and line 2 will show
the lengths completed for that lane.
With touchpads at both ends, press [] and [] to scroll forward
or backward through these three views:
Page 1 Near end status on line 1 and far-end status on line 2.
Page 2 Near end status on line 1 with lengths complete on line 2.
Page 3 Lengths complete on line 1 with far-end status on line 2.
If a lane has an extra touch and the arming delay is
counting for that lane, press [SPLIT ARM (1-10)]. This
removes the last touch and arm the lane for the next split.
If a lane has an extra touch:
press [- TOUCH]>[(1-10)]>[ENTER]
If a lane is missing a touch:
press [+ TOUCH]>[(1-10)]>[ENTER]
If the finish of the race is about to happen and the lane
status is not “*”, either press [FINISH ARM (1-10)] for the
appropriate lane(s), or [FINISH ARM ALL]>[ENTER].
After
Race
1. Confirm that all lanes with an athlete have finished.
Look at the left two LCDs to verify that the final touch has
been received.
2. DQ any disqualified athletes.
Press [DQ], [(1-10)] and [ENTER] for each appropriate lane.
3. Print out the results with backup times.
Press [STORE/PRINT] and review the printout.
4. Edit the race results (for advanced operators only).
Press [EDIT] to get into this function. See the OmniSport
2000 operator’s manual for complete instructions.
5. If any of the results were modified, print out the results again.
Press [STORE/PRINT].
6. Reset the timer and get ready for the next event.
Press [RESET]>[ENTER]. The scoreboard will continue to
display the results of the last race until the start of
the next race.
Lane Status Indicators:
(Blank)
Lane is Off.
-
Timer is Reset.
99-1
(counting
down)
Arming delay. When there are numbers
counting down, the timer will ignore any
touchpad presses.
+
Lane is armed for split time.
*
Lane is armed for finish (last length).
o
Race is over for this lane.
?
There is a problem with the lane module.
Printout Time Label Descriptions
+
Plus touch
-
Minus touch
B (1-3)
Buttons 1 through 3
R
Relay take-off platform trigger
*
Discrepancy between touchpad and backup
B or BK
Backup time
E
Edited time
M
Manual time
F
Early relay exchange
R (1-3)
Relay exchange 1 through 3
Special Timer Operations
Action
Always Ready Start
If a start was missed because the timer was not reset, or if the
timer was reset following a valid start you can still recover the
race. It is important that this is completed before the timer
receives the first touches.
After the timer has been reset, press [EDIT]. The timer prompts
you for the time of day that the start was received. The time
displayed on the LCD will be the time of day from the last start
received. If this is not the desired start time, you will find all of
the start times received printed on the log printout. Type in the
correct start time of day and press [ENTER].
Setting the arming delay
The arming delay is the amount of time after a start or split that
the timer will ignore touchpad presses. This is primarily used in
relays to allow a finished athlete time to exit the pool without
adding a touch to the timer. The arming delay for each
touchpad is displayed on the LCDs under the appropriate lane
number.
Press [MENU]>[4]>[2]>[5] and then use the numeric keypad to
enter an arming delay of 0-99 seconds followed by [ENTER]. To
return to the main swimming screen, press [MENU].
Test screen for the lane modules.
Press [MENU]>[5> [2] to show the lane module test screen. To
return to the main swimming screen press [MENU].
Entering Home, Guest 1, Guest 2, and Guest 3 scores.
Press [MENU]>[2]>[1] and then enter in the team scores using
the numeric keypad followed by [ENTER]. To return to the main
swimming screen, press [MENU].
Printing an Event Order.
Press [MENU]>[3]>[2], [ENTER]. To return to the main swimming
screen, press [MENU].
Printer Paper Specifications
The OmniSport 2000 uses standard thermal calculator rolls of
paper. They are 2-1/4" x 155'. Some rolls are 165' long; just tear
off 10' of paper before inserting the roll into the printer.
ED13584
Rev 8 19 August 2013
Page 2 of 8
201 Daktronics Drive PO Box 5128, Brookings, SD 57006-5128
Tel: 1-800-DAKTRONICS (1-800-325-8766) Fax: 605-697-4700
Web: www.daktronics.com/support
[1] SCBD MENU
[11] SCBD ON/OFF
[12] DIMMING
[13] TIME OF DAY
[2] EDIT MENU
[21] TEAM SCORE
[22] EVENT ORDER
[221] EDIT ORDER
[222] INSERT EVENT
[223] DELETE EVENT
[224] CLEAR ORDER
[3] PRINT MENU
[31] RACE RESULTS
[32] EVENT ORDER
[33] SETTINGS
[4] SETUP MENU
[41] POOL
[411] # OF LANES
[412] LANE ORDER
[413] LENGTH
[414] LANE LABEL
[42] TIMER
[421] START IN
[422] LM INPUT
[423] PRIMARY TIME
[424] FLAG TIME
[425] ARMING DELAY
[426] PRECISION
[427] RELAY TAKE-OFF
[428] BEEPER VOLUME
[43] SCOREBOARD
[431] NUMERIC
[4311] # OF LINES
[4312] SPLIT HOLD TIME
[4313] FIN PAGE TIME
[4314] RESULTS ORDER
[4315] SUBTRACTIVE
[4316]SHOW DQ
[4317]SHOW START
[432] RTD/MATRIX
[4321] # OF LINES
[4322] SPLIT HOLD TIME
[4323] FIN PAGE TIME
[4324] RESULTS ORDER
[4325] SUBTRACTIVE
[4326] SHOW DQ
[4327] SHOW START
[4328] SHOW PLACE
[4329] RTD OFFSET
[44] COMM PORTS
[441] SCBD OUTPUTS
[442] RTD PORT
[443] RESULTS PORT
[45] PRINTER
[451] RACE LOG
[452] RESULTS
[453] BACKUPS
[454] SPLITS
[455] NUMBER OF COPIES
[456] INTENSITY
[46] TIME OF DAY
[47] NETWORK
[471] NETWORK ENABLE
[472] IP ADDRESS
[473] SUBNET MASK
[474] GATEWAY ADDRES
[475] RTD PORT #
[476] MAC ADDRESS
[477] NETWK PRO/MMR
[5] TEST MENU
[51] BATTERY
[52] LANE MODULES
[53] SCOREBOARD
[531] CYCLE ON/OFF
[532] DRIVER ADDRESS
[533] DIGIT NUMBER
PREMEET SET-UP
1. Place touchpads into the pool.
Verify that the brackets are adjusted correctly.
2. Horn start
Place the horn start in the desired start location.
3. Speakers
Mount the lane and auxiliary speakers in their desired locations.
4. OmniSport 2000
Place the OmniSport 2000 on the timing table (do not plug power in at this time).
5. Lay out the deck cabling.
Inspect the cabling and connectors for corrosion and damage. Clean with the brush provided in
the maintenance kit as needed.
6. Connect the deck cabling:
includes start cables, speaker
cables, lane modules (on-
deck), deck extensions
(on-deck), cables to wall plates
(in-deck), push buttons and
touchpads.
Squeeze a small amount of silicone, supplied in the maintenance kit, up into the neck of the
silicone tube. Insert the male pins of the banana connectors into the neck of the tube to coat the
connectors with a small amount of silicone. Connect the cables together. For the dual banana
cables, make sure the GND tab on the male plug lines up with the black connector on the
female jack. It is not necessary to silicone the connectors that plug directly into the horn start or
the OmniSport 2000.
7. Connect the scoreboard.
Verify that power is turned on to the scoreboard and that signal is connected to the OmniSport
2000 J2 port (if not using radio control).
8. Connect the results computer.
Connect the results computer to the OmniSport 2000 J6 port using a straight through 9-pin male
DB to 9-pin female DB cable.
9. Connect power to console.
Plug the transformer into AC power and into the back of the OmniSport 2000 J13 port.
10. Turn on the OmniSport 2000.
Turn the power switch on the OmniSport 2000 on. Enter the date and time.
11. Print the timer settings.
Print the timer settings by pressing [MENU]>[3]>[3]>[ENTER]. Verify that the timer is configured
correctly for the upcoming meet and pool set-up.
12. Test the system.
Run the system through at least one test race by starting with the horn start and finishing with
all of the push buttons and touchpads. Also verify that all of the speakers are functional.
OmniSport 2000 Swimming Menu Navigation
Two methods for navigating through the OmniSport 2000 menus:
The first method allows the operator to step through each of the menu levels. To use this method, press [MENU] and then use [], [],
[], and [] to scroll through the menus. Press [ENTER] to select the menu displayed on the LCD.
The second method is to go directly to a menu. Press [MENU] followed by the one to four digit number from the list below and the LCD
will prompt you for the desired setting or action in that menu. For example, “425”will prompt you to enter a new Arming Delay.
After you are done navigating through the menus, press [MENU] to return to the meet in progress.
Other manuals for OMNISPORT 2000
1
Other Daktronics Controllers manuals

Daktronics
Daktronics All Sport 1600 Series User manual

Daktronics
Daktronics All Sport 5000 User manual

Daktronics
Daktronics ALL-SPORT 5000 Manual

Daktronics
Daktronics ALL SPORT 100 User manual

Daktronics
Daktronics SPORTSOUND SSR-200 GEN II User manual

Daktronics
Daktronics VF-24 Series User manual

Daktronics
Daktronics 5000 Series User manual

Daktronics
Daktronics FLR 1500 User manual

Daktronics
Daktronics Venus 7000 User manual

Daktronics
Daktronics VS-5000 Series User manual