manuals.online logo
Brands
  1. Home
  2. •
  3. Brands
  4. •
  5. Dancover
  6. •
  7. Outdoor Furnishing
  8. •
  9. Dancover PA152005 User manual

Dancover PA152005 User manual

28-11-2019
for
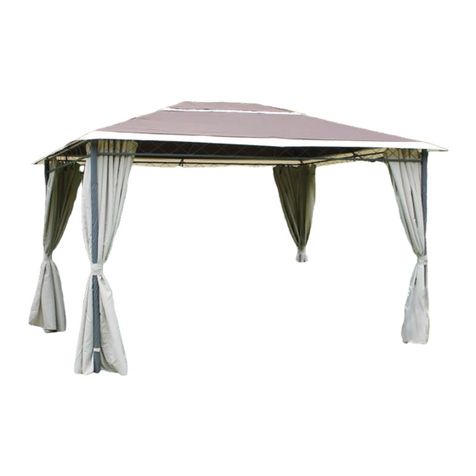
Gazebo
2,95x2,95x2,7m
Manual
PRODUCT SIZE(LxWxH):295x295x270cm
PLEASEREADCAREFULLYBEFOREASSEMBLY
Assembly Instructions
CONTENTS
11
FreeToolFreeTool
Assembly and Maintenance Advice
1. For safety purposes, we strongly recommend that this product is assembled by at least
two people.
2. Some components have sharp metal edges. Please be careful when handling metal
components. Please wear gloves, shoes and safety goggles during assembly.
3. Lay all of the components on a soft carpet or blanket to avoid any scratches or damages.
4. DO NOT climb or stand on the roof. Heavy articles should not be leaned against
the greenhouse.
5. Keep the roof and gutter clear of snow, dirt & leaves. Allowing snow to build up on
the roof may damage the product.
6. Unlike steel, if the paint finish is scratched this will not harm the aluminium underneath.
7. When your product needs cleaning, use a mild detergent solution and rinse with cold
clean water. Do not use acetone, abrasive cleaners or strong detergents to clean
the panels.
Tools Provided:
Tools Required when Assembly (Not Provided)
Assembly at least by two Persons
Rubber is not provided if you choose polycarbonate sheet as glazing panel.
Important:
2
2. Base anchor brackets are included as standard with expanding bolts to ensure a secure
fixing into concrete or paving. Alternatively, you can use the brackets to fix into a
timber base with wood screws (not provided).
Expansion bolt
in concrete
3. Our unique frame connectors make much stronger joints than conventional greenhouses.
4. The strong two part eaves beam includes an integral gutter. Downpipes are also included
as standard so you can collect rainwater.
Steel bar/Lawn land
Functions and Features:
1. Compared with traditional greenhouses this new product features many significant
improvements. The hollow box profile aluminium framing is much stronger than other
greenhouses and it can withstand much greater pressure.
3
6. Remove approximately 2 inches of film from all sheet edges before installing and remove
all film immediately after the construction is completed. Please ensure that the side
with the white film faces outwards.
Automatic Opener
Manual Opener
5. Manual window handles are included as standard with the roof vents. If required,
automatic roof vent openers are available as an inexpensive optional extra.
7. POWERED SCREWDRIVER RECOMMENDED
This quality greenhouse features self-tapping screws to provide strong joints. As the name
suggests, the screws tap their own thread. Driving in self-tapping screws requires more
force than conventional screws. A powered screwdriver is therefore recommended.
4
PART NO QTY
L01A 4
1
1
L04A
L04B
3
L05A
L08A 4
4
L09A
4
L07A
L23A 4
4
Ø4X14D
Z02
175
M4.2X16
Z01
J01 4
J02 4
W26 8
4
W03
W08 2
W21 4
4
W22
1
W23
1
W24
W05 14
J06 4
J07 4
J08 4
L25 4
244
M5X12
S01
26
M5X12
S02
8
M4.2X16
Z03
M8
M01 2
W06 2
S03 14
M8X60
L03B 4
4
L03C
PART NO QTY
4
L05E
1
L05F
PART NO QTY
4
L03D
4
L05C
2
L05B
2
L02E
1
L24
L03A 9
PART NO QTY
L19A 4
L19B 2
L20 2
B8
8
W07
WindowX2
L11 2
L15A 2
DOOR
PART NO QTY
L16 2
L18A 2
L18B 2
1
A8
L18C
1
L18D
L17 2
W06 2
PA152000
PC/Glass
5
PA RT NO QTY
Y 10 2
Y 11 4
Y5 12
Y5
Y5
Y5
Y1
Y3
Y4
Y2
Y5 Y5
Y5
Y5
Y5
Y5
Y5
Y5
Y5
Y1
Y1
Y1
Y3
Y3
Y3
Y4
Y4
Y4
Y6
Y6
Y7
Y7
Y10
Y10
Y11Y11
Y11Y11
4
4
Y2
Y1
Y3
Y4
4
4
Y6 2
Y7 2
PA RT NO QTY
126M
J11
PA RT NO QTY
79M
J11
Rubber for walls & roof
(Provided for glass only)
Rubber for walls only
(Provided for glass only)
PA152000
Insert Connector B & W07 into each end
of frame profiles L19A & L19B & L20,
and then fix them with screws Z01.
Before fixing with screws, please mark them
with a pencil at distance about 20mm from
each end, and make sure there is no gaps
between each profile.
PART NO QTY
L19A 2
L19B 1
6
Y10 1
L20 1
10
M4.2X16
Z01
L19A
L19A
L19B
L20
Y10
W07
BW07
W07
W07
B
B
B
W07
B
Z01
20MM
20MM
20MM
B4
4
W07
0 1 2 3
Window
Z01
L19B
322.2
W06
W06 1
W06
322.2
Fix W06 in the middle of L19B,
322.2mm from the ends.
Screws position
Screws position
If glass is chosen, please seal it with rubber(J11) provided.
Rubber is not provided if you choose polycarbonate sheet as glazing panel.
PART NO QTY
L11 1
L15A 1
2
M4.2X16
Z01
L11
L15A
1
1
2
2
Z02
Z01
2
4X14D
Z02
Y10
J11
J11
PART NO QTY
2.65M
J11
7
PART NO QTY
L16 2
L18A 2
8
L18B 2
1
A8
4
M5X12
S01
Z01
Z01
0 1 2 3
20MM
30MM 3
L18C
A
Y11
Y11
1
L18D
32
M4.2X16
Z01 L16
L18B
L18A
L18D
A
A
A
A
Left Door
L17 2
L17
Insert Connector A into each end of frame
profiles L16 & L18A & L18B & L18D,
and then fix them with screws Z01.
Before fixing with screws, please mark them
with a pencil at distance about 20/30mm from
each end, and make sure there is no gaps
between each profile.
Y11
Y11
9
Z01
Z01
0 1 2 3
20MM
30MM 3
L16
L18A
L18B
L18C
A
A
A
ARight Door
L17
Insert Connector A into each end of frame
profiles L16 & L18A & L18B & L18C,
and then fix them with screws Z01.
Before fixing with screws, please mark them
with a pencil at distance about 20/30mm from
each end, and make sure there is no gaps
between each profile.
10
PART NO QTY
12.2M
J11
J11 J11
Y11
If glass is chosen, please seal it with rubber(J11) provided.
Rubber is not provided if you choose polycarbonate sheet as glazing panel.
Noted:
ab
Expansion
screw/Concrete
ground
ab
=
ab
ab
=
11
It is essential the dimensions a + b are the same to ensure the base is square.
Steel pegs in soil
Support at the corners only is inadequate.
12
2899MM
2949MM
4100MM
4170.5 MM
Door
352
705705705
352
352
705
705
352
352 352
352
705
705
352
705 705
Expansion bolts assembly
PART NO QTY
S03 14
M8X60
W05 14
PART NO QTY
L08A 4
W26 4
13
J02 4
16
M5X12
S01
L08A
J02 W26
S01
L08A
L08A
L08A
L08A
W26
W26
W26
W26
J02
J02
J02
J02
Insert J02 into each L08A, and then fix them with W26 and S01.
Make sure the angle is Right Angle before tighting up S01.
PART NO QTY
L01A 4
14
4L01A
L01A
L01A
L01A
L01A
L07A
L07A
L07A
L07A
J01
J01
J01
J01
W26
W26 W26
W26
W26
J01
L07A
L07A
L07A
W26 4
S01
S01
48
M5X12
S01
J01 4
Install L01A, connect them with W26,
and fix them with S01.
Insert J01 into L01A, and then connect each L07A;
fix them with W26 & S01.
Make sure the angle is Right Angle before tighting them up.
PART NO QTY
L03A 3
15
4
12
M5X12
S01
Y5
Y5
Y5
Y5
L03A
L03A
L03A
Y5
L07A
L08A
S01
S01
L08A
L08A
L08A L08A
L07A
L01A
L01A
L07A
The last panel
Back Wall Assembly
Insert Panel Y5 into the channel of L01A, and then fix a L03A
onto L08A & L07A using S01. Make sure the other side of Y5 is
completely in the channel of L03A.
Insert another Y5 into the channel of L03A, then fix another L03A
using S01. Do the same for another Y5 & L03A. Lastly, insert
the last Y5 into the channel of L01A & L03A.
Note: If PC panel is chosen, you can fix all the L03A before
inserting all the Y5.
PART NO QTY
L03A 6
16
6
24
M5X12
S01
Y5
L03A
L03A
L07A
L08A
Y5 Y5 Y5
Y6
Y6
2
Y6
L03A
L03A
S01
S01
Side Walls Assembly
Do the same as the back wall assembly,
Y6 is the last panel to slide in.
The last panel
PART NO QTY
1
17
1
2
Y5
Y5
L04A
L04B
L04A
L04B
L05B
L05B
L07A
L08A
L03A
L03A
L05B
L05B
L04A&L04B
L01A
L05B
S01
S01
S01
S01
16
M5X12
S01
2
Y5
Front Wall Assembly
Fix L04A/L04B and Y5 same as the
back wall assembly using S01.
And then fix 1 X L05B to L01A & L04A
and 1 X L05B to L01A & L04B using S01.

Other Dancover Outdoor Furnishing manuals

Dancover Gazebo Martinique User manual

Dancover

Dancover Gazebo Martinique User manual

Dancover AC153020 User manual

Dancover

Dancover AC153020 User manual

Dancover PA152010 User manual

Dancover

Dancover PA152010 User manual

Dancover San Francisco User manual

Dancover

Dancover San Francisco User manual

Dancover JUNO 3x4m User manual

Dancover

Dancover JUNO 3x4m User manual

Dancover PA22100 User manual

Dancover

Dancover PA22100 User manual

Dancover San Pablo User manual

Dancover

Dancover San Pablo User manual

Dancover PA152000 User manual

Dancover

Dancover PA152000 User manual

Dancover Gazebo San Pablo 3x3m User manual

Dancover

Dancover Gazebo San Pablo 3x3m User manual

Dancover Santa Cruz 4x4m User manual

Dancover

Dancover Santa Cruz 4x4m User manual

Dancover Gazebo San Pablo 3x3m User manual

Dancover

Dancover Gazebo San Pablo 3x3m User manual

Dancover Pavillon Antik User manual

Dancover

Dancover Pavillon Antik User manual

Dancover FU19010 User manual

Dancover

Dancover FU19010 User manual

Dancover PA22430 User manual

Dancover

Dancover PA22430 User manual

Dancover PA97060 User manual

Dancover

Dancover PA97060 User manual

Dancover Palermo User manual

Dancover

Dancover Palermo User manual

Dancover Madita User manual

Dancover

Dancover Madita User manual

Dancover Nomado 3x3 m User manual

Dancover

Dancover Nomado 3x3 m User manual

Dancover San Pablo User manual

Dancover

Dancover San Pablo User manual

Dancover Pagoda Marquee UNICO 6x6m User manual

Dancover

Dancover Pagoda Marquee UNICO 6x6m User manual

Dancover Lina User manual

Dancover

Dancover Lina User manual

Dancover Profi PA22310 User manual

Dancover

Dancover Profi PA22310 User manual

Dancover Monaco User manual

Dancover

Dancover Monaco User manual

Dancover Santa Ynez User manual

Dancover

Dancover Santa Ynez User manual

Popular Outdoor Furnishing manuals by other brands

PartySpace Casa Africa PALAPA PARASOL Eco manual

PartySpace

PartySpace Casa Africa PALAPA PARASOL Eco manual

Alice's Garden UOVO WKEGG manual

Alice's Garden

Alice's Garden UOVO WKEGG manual

Pergola kits USA WOOD GABLE ROOF PAVILION Assembly manual

Pergola kits USA

Pergola kits USA WOOD GABLE ROOF PAVILION Assembly manual

Goodiy Cello 6438313255314 instruction manual

Goodiy

Goodiy Cello 6438313255314 instruction manual

deVRIES Wayland 40389 Assembly instructions

deVRIES

deVRIES Wayland 40389 Assembly instructions

Canvas 088-1759-2 Assembly instructions

Canvas

Canvas 088-1759-2 Assembly instructions

Sunjoy A101011800 quick start guide

Sunjoy

Sunjoy A101011800 quick start guide

A&L Furniture Ridgemont Assembly instructions

A&L Furniture

A&L Furniture Ridgemont Assembly instructions

Kozyard KZF606 Assembly manual

Kozyard

Kozyard KZF606 Assembly manual

Hanover TRADDNS9PCSW2-BE manual

Hanover

Hanover TRADDNS9PCSW2-BE manual

Forever Redwood THE SILVERADO MODERN PERGOLA Assembly instructions

Forever Redwood

Forever Redwood THE SILVERADO MODERN PERGOLA Assembly instructions

Safavieh Outdoor PAT7077 manual

Safavieh Outdoor

Safavieh Outdoor PAT7077 manual

Sunjoy A106007421 manual

Sunjoy

Sunjoy A106007421 manual

IKEA STRANDON manual

IKEA

IKEA STRANDON manual

Patio Post SS63002 Assembly instruction

Patio Post

Patio Post SS63002 Assembly instruction

Safavieh Outdoor Hadley Bench PAT5002 Assembly instructions

Safavieh Outdoor

Safavieh Outdoor Hadley Bench PAT5002 Assembly instructions

Sunjoy A111509440 Assembly instructions

Sunjoy

Sunjoy A111509440 Assembly instructions

Dundalk LeisureCraft Tropical Paradise Tiki Bar Assembly instructions

Dundalk LeisureCraft

Dundalk LeisureCraft Tropical Paradise Tiki Bar Assembly instructions

manuals.online logo
manuals.online logoBrands
  • About & Mission
  • Contact us
  • Privacy Policy
  • Terms and Conditions

Copyright 2025 Manuals.Online. All Rights Reserved.