Davey Lighting Original BTC DP7674 User manual
Dockside Wall Light
Instruction Manual
v1.1-04.19 7674/7675
Safety & Installation Instructions
1. If you are in any doubt consult a qualified electrician as to the installation of the fitting. Install in accordance with current
IEE wiring regulations. It is recommended that this fitting is installed by a qualified electrician.
2. Ensure that the electrical supply is OFF. Disconnect the electrical supply at the fuse-board.
3. If removing an existing fitting first, note all wiring connections: record which of the house wires is connected to the live,
neutral and earth terminals.
4. Carefully identify where the supply cable is (and check there are no other cables in the area) to avoid damage to concealed
wiring during installation.
5. Position the light where desired ensuring that there is suitable support adjacent to where you will connect to the house
supply and mark position of fixing holes, before drilling appropriate holes as below.
6. a. Brick or masonry: Drill holes into which the wall plugs tightly fit, then insert wall plugs.
b. Wood: No hole necessary (unless small pilot hole required), screws can be screwed directly into the timber.
c. Plaster/Cavity: Special cavity wall fittings are required, rather than provided fixings. These are widely available from
good hardware or DIY store and should come with their own instructions that must be followed. It may be easier to
relocate the fitting so that you screw directly into a timber joist or beam.
7. Support the fitting so that no strain is applied to the wiring when making the electrical connections. If necessary get a
colleague to help.
8. Electrical connection: this light fitting must be earthed. Make connections following the diagram below using the terminal
block provided. A small flat-head screwdriver is required.
9. Double check all the connections are secure and that no loose strands of wire are left out of the connector. Ensure the lid of
the connector is closed securely after making the connections.
10. Check that no wires are trapped behind or within the fitting and complete the installation, referring to the installation
diagram inside.
11. Fit the correct type and wattage of lamp (or less). Be careful not to overtighten the lamp.
12. Switch on at the fuse-board. Your light fitting is now ready for use.
Other Important Information
Switch off at mains before changing lamp (s). Never fit a lamp of greater wattage than recommended. Ensure children do not
play with the light fitting. Dispose of old lamps carefully. Never leave a fitting without a lamp in position (or someone can
accidently touch the contacts). Adjust fitting only when power to the fitting is off and has been left to cool. If the electrical flex
or electrical components become damaged at any point, power to the fitting should be disconnected immediately and not
operated until the damaged parts are fixed/replaced.
These instructions are provided for your safety in order to prevent the risk of Fire, Electric shock or Injury. It is vitally
important that they are read in their entirety before installing your fitting. Please retain for future reference.
MADE IN BRITAIN
ORIGINALBTC.COM
+44 (0)1993 882 251
UNIT 21 / 22 AVENUE ONE, STATION LANE, WITNEY, OX28 4XZ, ENGLAND
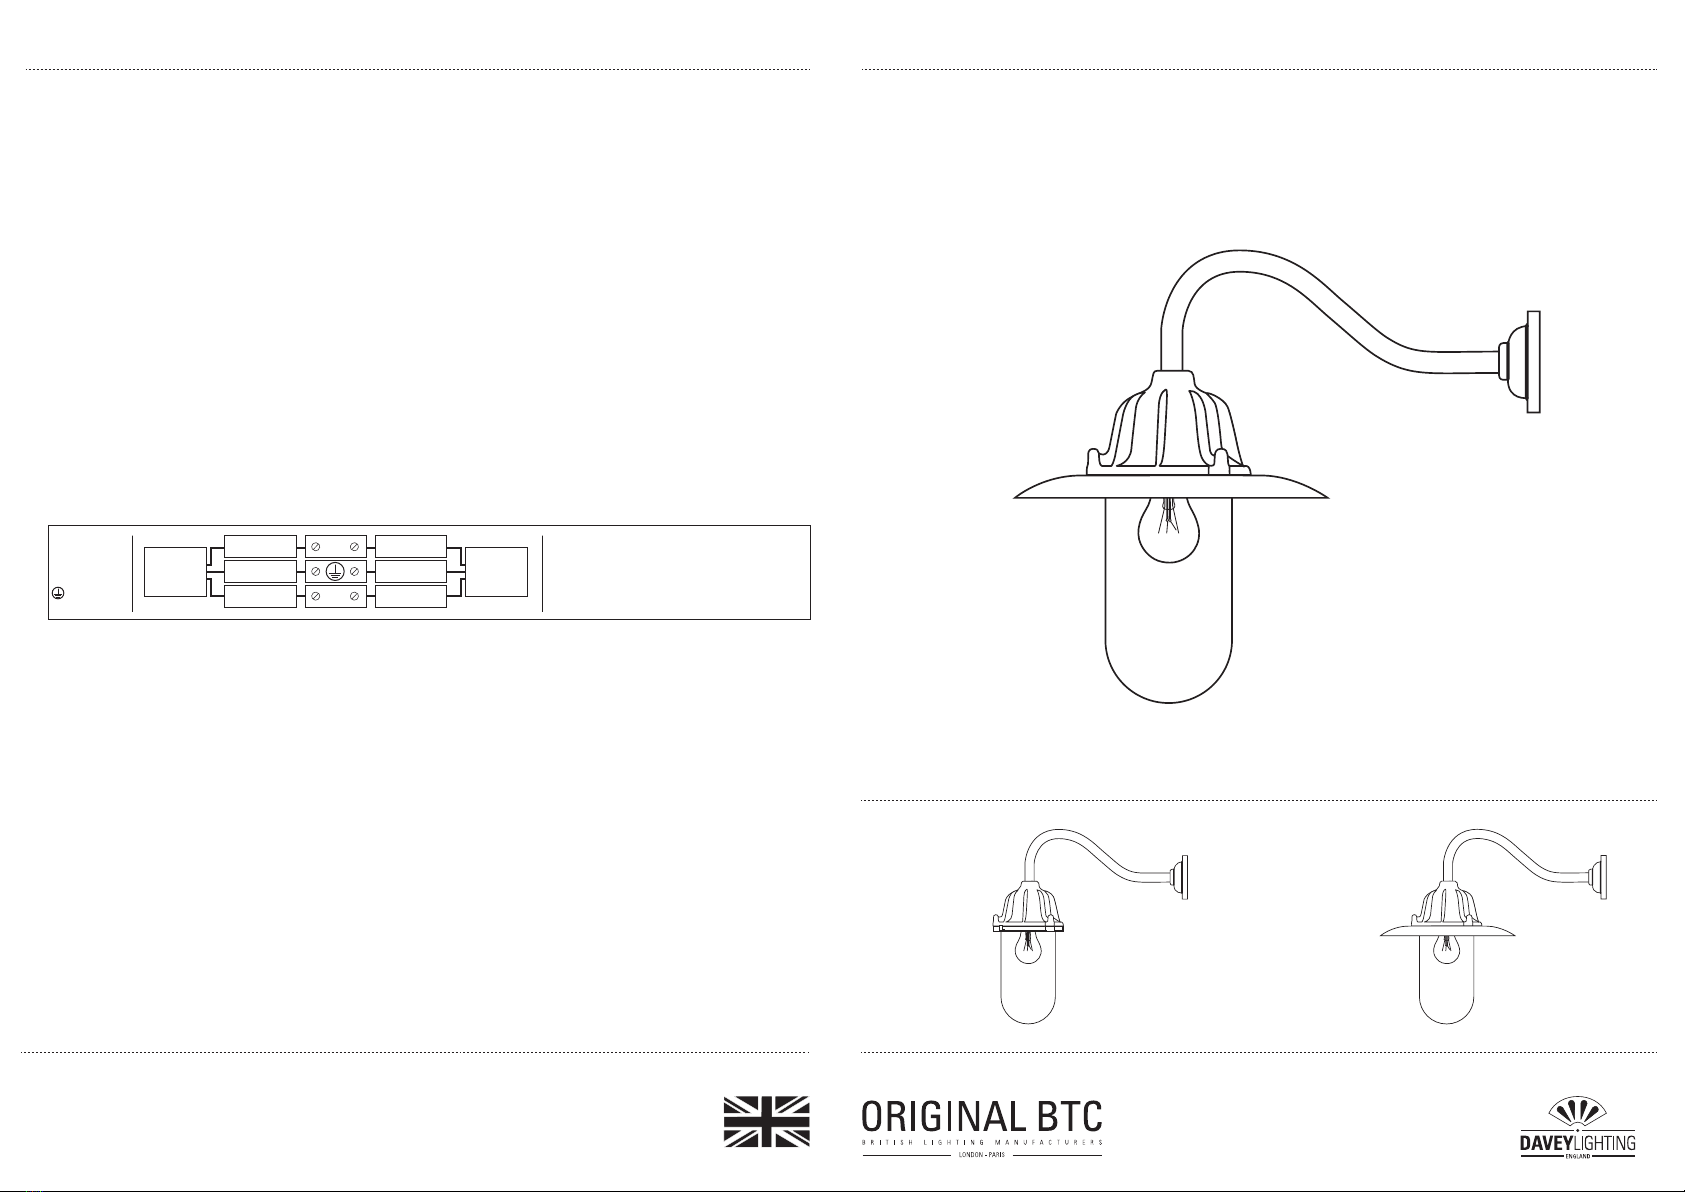
Dockside Wall Light
DP7674
L
N
Live
KEY
Neutral
Earth
L =
N =
=
*Mains
Supply
Fitting
*After 2004, wiring installation colours changed:
LIVE Brown replaces Red
EARTH Green/Yellow sleeving
NEUTRAL Blue replaces Black
BROWN
GRN/YEL
BLUE
BROWN
GRN/YEL
BLUE
Established in 1990, Original BTC manufactures relaxed, familiar lighting for traditional and contemporary homes.
All products are hand-assembled in Oxford from high quality components, produced in the UK.
Cleaning and Maintenance
Metal finishes should only be cleaned with a soft, dry cloth. Do not use polishes or abrasives. Glass can be cleaned by hand,
using a soft damp cloth with a diluted mild detergent (nonabrasive) or glass cleaner if necessary. Switch off power to the fitting
before cleaning. Spare parts are available for this product, please contact us on the details below.
Dockside Wall Light
DP7675

Dockside Wall Light 7674/7675
PLEASE READ THE INSTRUCTIONS ON THE REVERSE BEFORE YOU BEGIN INSTALLING YOUR LIGHT
230V ac 50Hz Installation DiagramIP54
This traditional style of exterior wall light is popular in both rural and urban locations. Cast in
aluminium alloy and polyester powder coated, the lights longevity is assured. Available in black or
grey and with clear or frosted glass. The light is sold mounted either on a swan neck bracket with
round base dome cover or on a corner fork.
DP7674 Dockside Wall Light
DP7675 Dockside Wall Light
Contents
1 - Bracket arm/Backplate
2 - Pan
3 - Gasket x 2
4 - Reflector (7675 only)
5 - Glass ring
6 - Glass ring screws
7 - Well glass
8 - 2 x Fixing screws
9 - 2 x Rawl plugs
10 - IP44 Terminal housing
Required for Installation
-Screwdriver, flat-head
- Small screwdriver, flat-head
- Drill (if holes are required)
A Fixing Screws B CIP44 Connector Block Main Supply
Key
Install light as described overleaf and then assemble the rest of the light, following the
diagram on the opposite page.
Installation and Assembly Instructions
2
1
5
6
7
3
4
8910 - Ensure the gasket (3) fits into the top of the pan (next to lampholder).
- Insert lamp (not supplied) before positioning glass centrally inside the pan, holding the well
glass (7), so the base rests firmly up against the gasket.
- Place the second gasket beneath the lip of the well glass, before placing reflector over glass and
pushing up toward pan, lining up holes of reflector with holes in pan.
- Secure in place by attaching the glass ring, screwing the 3 glass ring screws (6) through the glass
ring (5).
- Finger-tighten screws (6), tightening evenly on each side, before using a screw driver to fully
secure ring in place- make only quarter-turns, one screw at a time, to ensure even pressure is
applied and take care not to overtighten as this can cause the glass to crack.
If the light is to be installed in an exterior location, it is advised that a thin bead of sealant is applied around
the back plate to prevent water damage.
CABLE
GRIP
TOP
COVER
IP44 Connector block
B
C
A
Apply Silicone around backplate where it
meets wall.
E27 GLS BALL
LAMP GUIDANCE
TYPE* WATTAGE**
BASE SHAPE
INCANDESCENT
CFL
ECO-HALOGEN
LED
100W MAX
20W
70W
18W
* Warm white (2700k) low energy lamps recommended.
** Wattage value provided as a guide to suitable lamps. Lower wattage than stated may be used.
This manual suits for next models
1
Other Davey Lighting Outdoor Light manuals


Popular Outdoor Light manuals by other brands

Trio
Trio BALOUBET 4282102 Series quick start guide

DreamLED
DreamLED Solar Flame Light SFL-200 user manual

Vimar
Vimar LINEA 30397 manual

NERI
NERI LIGHT 801 Series Instruction booklet

HumanTechnik
HumanTechnik lisa operating instructions

B-K lighting
B-K lighting Precision2 DR2 Series installation instructions


HerzBlut
HerzBlut Arco 31850 Instruction and installation manual

Inspire
Inspire Zemio instruction manual

Zafferano
Zafferano Sister Light Assembly instructions

Orlight
Orlight Marine Grade ORLLM96 installation instructions

PRECILUM
PRECILUM TRILOBIT 600 RGB/RGBW/RGBA instruction manual

Fulham
Fulham FireHorse FHEM10WHU General installation guidelines