DEKALA Arches Pro User manual

User Manual
Please carefully read the manual before using and retain it for future reference
(V1.0)
SAC003-PRO-SW
Arches Pro Ambient Lamp

If you need any assistance please feel free to contact us
Instruction VideosDownload App

01
Content
App Control 06
Clock &Display Setting
10
APP Reconnecting 08
Snooze
Ambient Lamp
16
17
14Sleep-aid Setting
Sunrise Alarm Clock Setting 12
Speaker Pairing 18
Wireless Charger 19

This is a versatile smart furnishing piece that combines the functionalities of a sunrise alarm clock, an LED ambient light,
a Hi-Fi speaker, a wireless charging station, a night light table lamp, and a sleep-aid white noise machine.
Designed with aesthetics in mind, it boasts a chic look that energizes you during the day and brings tranquility at night.
The adjustable 3.5-inch display screen can be dimmed to darkness, catering to those who are sensitive to light during
nighttime.
Arches Pro includes two independent sets of alarm clocks, oering a range of nature-inspired alarm sounds for a
pleasant wake-up experience.
To create a serene environment before bedtime, it features a relaxing night light and sleep-inducing white noises with
various optional sounds. Both the sound and light automatically turn o after a preset duration of up to 120 minutes,
ensuring an undisturbed sleep.
The time display system can be switched between the 12-hour clock (also known as the decimal hour system) and the
24-hour clock (also known as military time).
With its immersive Hi-Fi speaker and trending RGB lighting eects, it sets the stage for a lively atmosphere, allowing your
friends and family to enjoy themselves anytime.
General Description
02

Before using this product, it is crucial to read and adhere to these instructions carefully to ensure your
safety and minimize the risks of fire, electric shock, or injury.
1. For home use only: This product is intended for non-commercial use, limited to residential settings, and non-commercial
hospitality establishments like hotels.
2. Stable and non-slip surface: Place the product on a stable, flat, and non-slip surface to prevent accidental falls or
tipping during usage.
3. Avoid humid environments: To prevent water damage and electric shock, do not use this product in humid environ-
ments, such as near bathrooms, showers, or swimming pools.
4. Prevent water damage: Keep water from entering or splashing onto the product to protect its internal components from
damage.
5. Keep the adapter dry: Ensure that the power adapter remains dry at all times during usage to avoid electric shock or
damage to the product.
6. Use original accessories: Only use the original adapter and power cable provided with this product to avoid any
potential damage or malfunction.
7. Not a substitute for sucient sleep: Please note that this product is not intended to substitute for adequate sleep. While
it is designed to assist in waking up more easily, it should not be used to reduce the duration of sleep needed for a healthy
lifestyle.
Safety Instructions
1. Clean the product using a dry and soft cloth.
2. Avoid using abrasive cleaning agents, pads, or solvents such as alcohol or acetone, as they may damage the product's
surface.
3. If the product will not be used for an extended period of time, unplug the power adapter from the socket and store the
product in a safe and dry place where it will not be crushed, banged, or subjected to damage.
Maintenance And Care
03
04
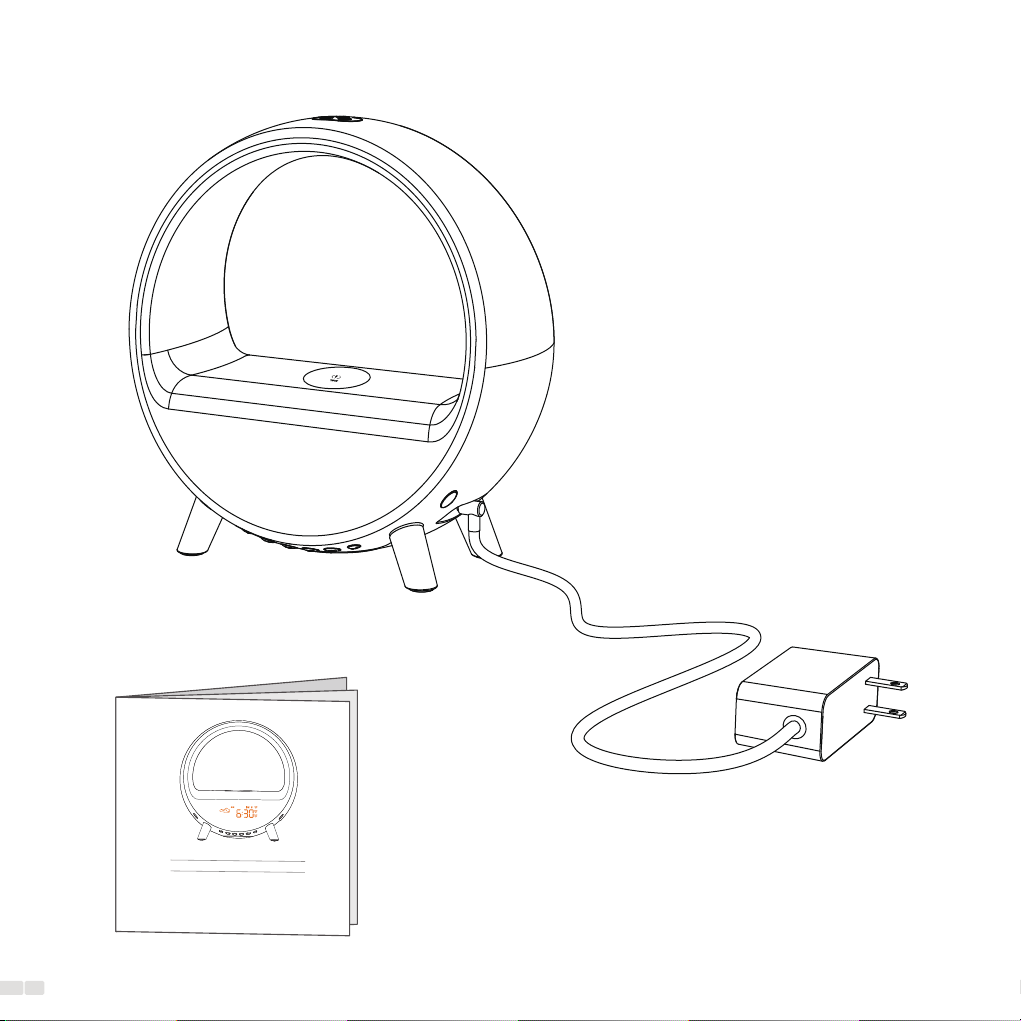
What’s in the box
SAC003-PRO-SW
Arches Pro Ambient Lamp
User Manual
Please read the manual carefully before use and keep it for future reference
(V1.0)
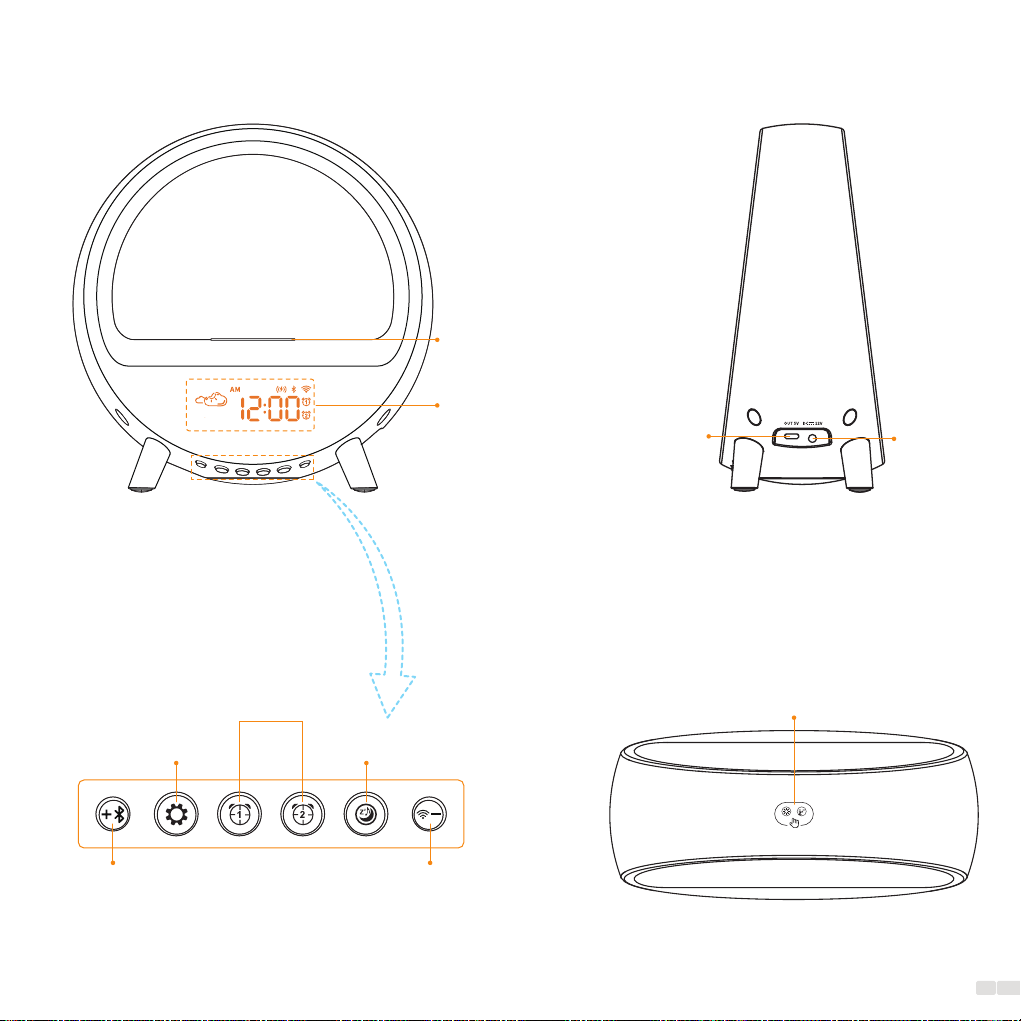
Overview
Front view
Snooze/Ambient Lamp
Top view
Right-side view
Output Input
05
LCD Display
15W Wireless Charger
Button view
WiFi/ Setup -
Sleep Aid
Speaker/ Setup+
Time Setting
Alarm 1/Alarm 2
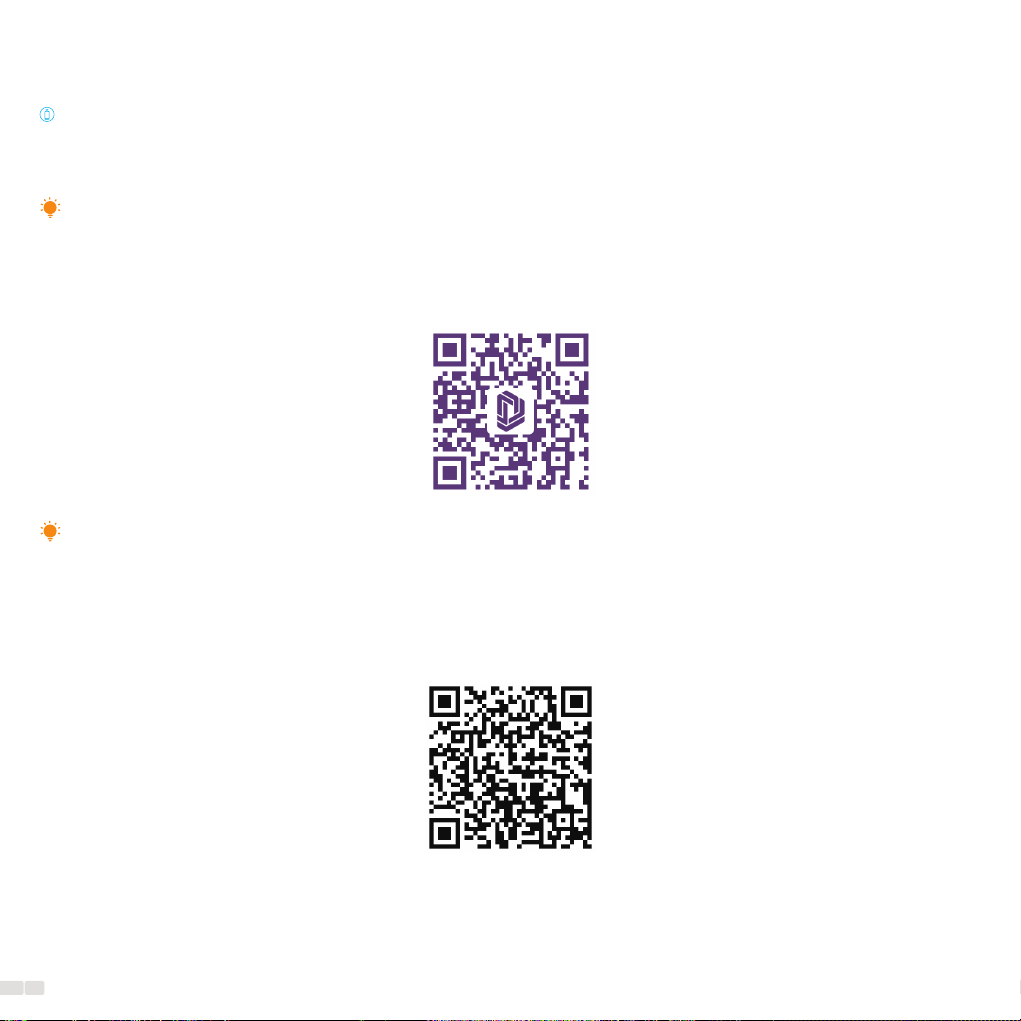
Download and Install Dekala APP
Search for Dekala from App Store/Google Play, or scan the QR code, then download and install it on your mobile
device. Sign up or log in to the APP.
App Control
1. Only Supports 2.4GHz WiFi for the initial connection.
2. In fact, every router provides WIFI in both 2.4G and 5G bands, including your router. You just hide the 2.4G when
setting up.
3. You can scan the QR code to follow the instructions to split your WiFi into dual bands of 2.4GHz and 5GHz.
Note:
1. Our devices support DEKALA APP (recommended), SmartLilfe APP, tuya APP, you can try with any one you want.
2. The role of the APP is to make our product successfully connect to the location of the WIFI and extract the data of the
WIFI location. Don't worry, it can't access your payment and other information. You can check the privacy settings.
Note:
Split WiFi into dual band 2.4GHz &5GHz
06

Connect Dekala Arches to App
1. Enable Bluetooth and allow location access on your mobile device so that the app can detect the wake-up light.
2. Ensure that your mobile device is connected to a 2.4GHz WiFi network. Make sure the wake-up light, mobile device,
and router are in close proximity.
3. Plug in the wake-up light and wait for to start flashing.
4. Tap on "Add Device" to establish a connection with the wake-up light.
5. Select the WiFi network (only 2.4GHz WiFi) and enter the password. Tap "Done" once the device has been successfully
added.
1. Connection established: The WiFi indicator on the LED display will become solid.
2. Once connected through a 2.4GHz WiFi network, you can utilize the Dekala app to control the device using cellular
data or any other network without requiring the initial WiFi connection.
Note:
07

08
APP Reconnecting
There are two ways you can achieve reconnection:
Way 1 :
(1) Long press "WiFi Button " to reset WiFi .
(2) Refer to above instruction to connect Dekala
Arches to App
Way 2 :
(1)Long press product icon on App to remove Device。
(2)Refer to above instruction to connect Dekala Arches to
App
1. Long press to reset WiFi

When you need to reset.
You just need to clear the cache.
09

Setting up all functions follows these basic principles:
1. Press and hold the function key to access the settings for the specific function.
2. Utilize the +/- keys to choose the desired option.
3. Press the function key again to confirm your selection and proceed to the next parameter setting.
4. Repeat steps 2-3 to select and confirm all desired parameters.
Clock &Display Setting
Adjusting the time display brightness:
1. Operation instructions: After completing the time set up, press the setting button to toggle the display contrast.
2. There are four levels of time display brightness: O, Night, Day, and Auto.
Note: The wake-up light cannot enter the time-setting mode when the time is not displayed.
The necessary buttons are as follows: the Setting button and regular buttons .
1. Setting Button: Long-press to access the settings and press to confirm parameters.
2. Buttons: Utilized for selecting parameter values.
Setting Steps:
Long Press" " Set
12H/24H
Set
the hour
Set
the minute
Step 1 Step 2 Step 3 Step 4
O Night Day Auto
10

Time setting process diagram:
2. Set 12H/24H
1. Long press to
start setting
4. Set the minute
3. Set the hour
Confirm
2
Select
1Select
1
Confirm
2
Select
1
Select
1
Confirm
2
Select
1
11
Long Press" "
To set up all functions, please adhere to the following basic principles:
1. Long-press the function key to access the settings for the specific function.
2. Utilize the +/- keys to choose your preferred option.
3. Press the function key again to confirm your selection and proceed to the next parameter setting.
4. Repeat steps 2-3 to select and confirm all desired parameters.
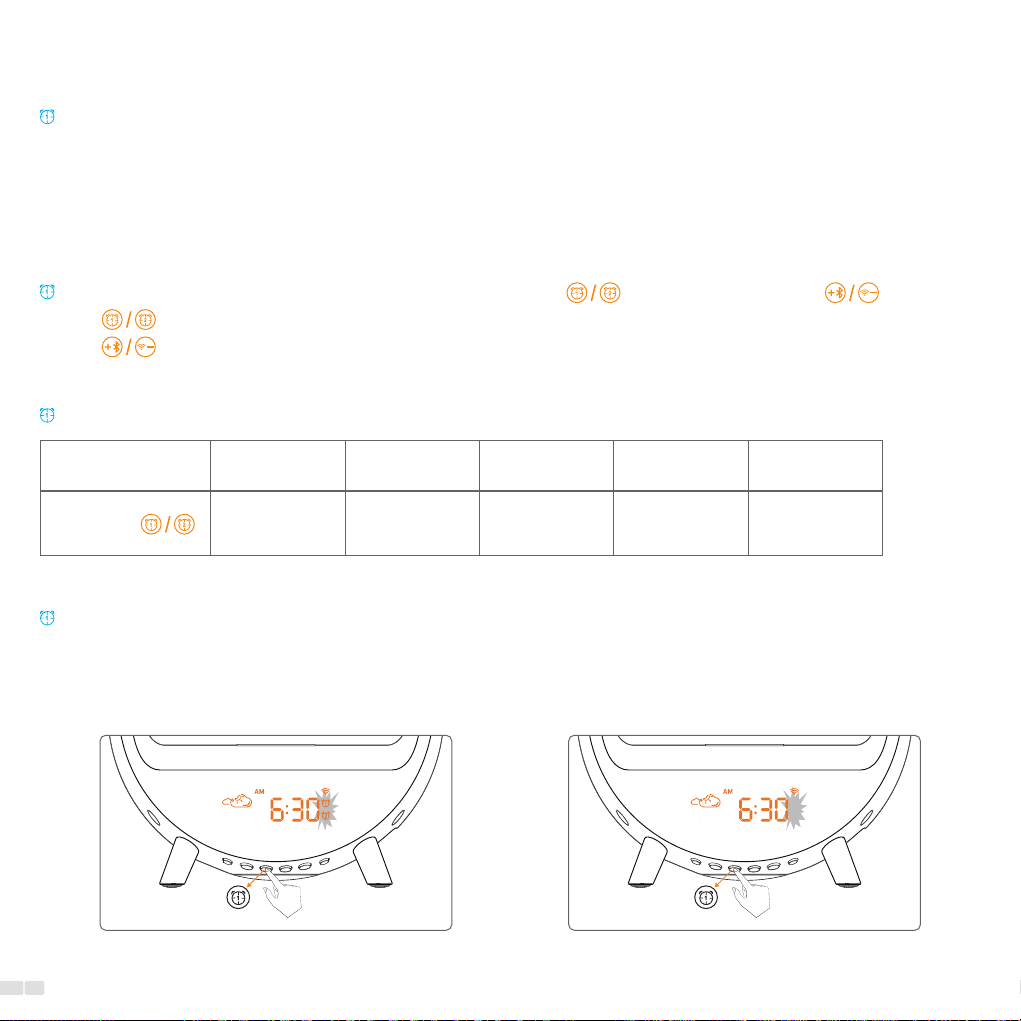
Sunrise Alarm Clock Setting
The necessary buttons for this function are the Alarm button and the regular buttons .
1. Alarm Button: Long-press to access the settings and press to confirm parameters.
2. Buttons: Tap to select parameter values.
Setting Steps:
Set
the hour
Set
the minute
Set
alarm sound
Step 1 Step 2 Step 3 Step 4
Set
alarm volume
Set
sunrise duration
Step 5 Step 6
To switch the alarm on or o, follow these steps:
1. Press either alarm 1 or alarm 2 to toggle the alarm on or o.
2. When the alarm is switched on, the corresponding icon will appear on the display. It will disappear when the alarm is
switched o.
OFF
ON
12

2. Set the hour
1. Long press to
start setting
4. Set alarm sound
3. Set the minute
Sunrise alarm clock process diagram:
Confirm
2
Select
1
Confirm
2
Select
1
6. Set sunrise duration 5. Set alarm volume
Confirm
2
Select
1
Confirm
2
Select
1
Confirm
2
Select
1
*4: When setting alarm sound:
Note:
*5: When setting sunrise duration:
Icon
Sound No alarm sound Alarm sounds
Icon
Duration No wake-up light Light and sound
go o at the same time
5-120 minutes
prior to the alarm time
13

Long Press" "
Setting up all functions follows these basic principles:
1. Long-press the function key to access the settings for that particular function.
2. Utilize the +/- keys to choose the desired option.
3. Press the function key again to confirm your selection and proceed to the next parameter setting.
4. Repeat steps 2-3 to select and confirm all desired parameters.
Sleep-aid Setting
The necessary buttons for this function are the Sleep-aid button and regular buttons .
1. Sleep-aid Button: Long-press to access the settings and press to confirm parameters.
2. Buttons: Utilized for selecting parameter values.
Setting Steps:
Set sleep-aid
duration
Choose
sleep sound
Set volume of
sleep sound
Step 1 Step 2 Step 3 Step 4
Set light of
sleep-aid
Step 5
14
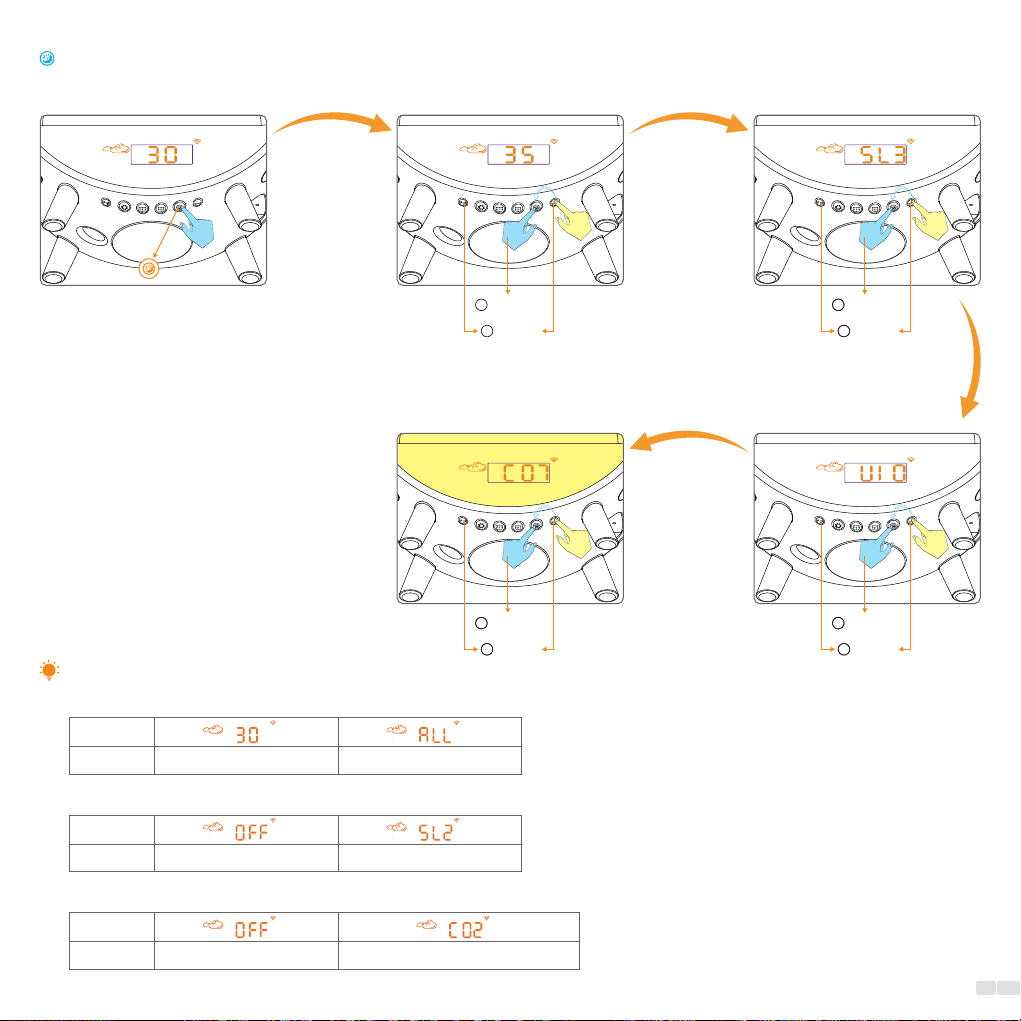
Sleep-aid process diagram:
2. Set sleep-aid duration
1. Long press to
start setting
4. Set volume of
sleep sound
3. Choose sleep sound
5. Set light of sleep-aid
Confirm
2
Select
1
Confirm
2
Select
1
Confirm
2
Select
1
Confirm
2
Select
1
Confirm
2
Select
1
Confirm
2
Select
1
Confirm
2
Select
1
*2: When setting sleep-aid duration:
Note:
Icon
Duration Play 5-120 minutes Play until you stop it
*3: When choose sleep sound:
Icon
Sound No sleep sound Sleep sound
Icon
Duration No sleep-aid light Dierent lighting eects
*5: When setting light of sleep-aid:
15

When the alarm goes o at the set time, you can tap the top of the Wake-up Light to activate the snooze function. This will
temporarily pause both the alarm sound and light. After 9 minutes, the alarm and light will automatically resume. Please
be gentle when tapping the Wake-up Light to avoid any potential damage caused by excessive force.
Snooze
Snooze process diagram:
When the alarm is snoozed, the alarm 1 or alarm 2 icon will flash on the display.
Note:
Alarm goes o
Light and sound
stop for 9 minutes
Tap" Snooze"
Alarm goes o again
9 min
16

Tap to turn on lamp Adjust lamp brightness
Select
Switch Lighting eect Long press to turn o lamp
This product provides 11 vibrant and rich ambient lighting eects that are suitable for various environments. These eects
include sunrise, reading, rainbow, and breathing, among others.
Ambient Lamp
The necessary buttons for this function are the Light button and regular buttons .
1. Light Button: Tap to turn on the ambient lamp or switch between lighting eects. Long-press to turn o the
lamp.
2. Buttons: Utilized to adjust the light brightness.
Ambient lamp process diagram:
17

Speaker Pairing
Pairing Instructions:
1. Enable the function on your smartphone or tablet.
2. Connect the device to a power source to turn it on.
3. Press the Speaker button , and you will hear a "power on" prompt, indicating that the device is now in pairing
mode.
4. Open the Speaker settings on your phone or tablet and search for the device named "Arches Pro." Once found, select
the device to establish a connection and complete the pairing process.
1 . When using Speaker to play music from your smartphone/tablet, please note that the volume can only be adjusted on
your smartphone/tablet.
2 . Connect a new device to bluetooth speaker:
Long pressing the Bluetooth button won't reset the Bluetooth connection. To ensure customer privacy, a new device can
only be connected to this Bluetooth speaker after a phone that has previously been connected to it removes the speaker
from its Bluetooth list. This way, we can ensure the highest level of privacy and security for our users.
Note:
18
Table of contents
Other DEKALA Alarm Clock manuals


