NSK iCare+ User manual

RD 160.iCare+.OPM.ENG.V16 04.27.2020

"Congratulations for purchasing your new iCare+ device"
iCare+ is an innovative system whose function is to ensure the treatment of rotary dental devices (contra-angles,
turbine) and dynamic dental devices. Its benefits are:
- iCare+ insures cleaning-disinfection and lubrication of dynamic dental instruments
- iCare+ allows the treatment of the inner and outer surfaces of different instruments (contra-angles, turbines
etc)
- Complete treatment in less than 17 minutes
- Up to 4 instruments can be treated simultaneously and automatically
- The rotating transmission cleans, disinfects and lubricates contra-angles even more effectively
- Validation and traceability insured by embedded software
- 3 types of treatment are available: full, partial and short

RD 160.iCare+.OPM.ENG.V16 04.27.2020 p. 1
ENG
CHAPTER 1 - INTENDED USE AND USERS
1.1 Intended use
iCare+ is an automated reprocessing device performing the necessary steps of decontamination and maintenance
prior to sterilization. iCare+ is intended:
• To purge, clean, disinfect and lubricate dental handpieces defined as rotating instruments such as straight
handpieces, contra angles and turbines.
• iCare+ should be used only with pre-cleaned dental handpieces.
1.2 Intended users
iCare+ is a Medical Device intended to be used by all Qualified Professionals from the dental field in medical type
environments such as private clinics, hospitals, dental offices and university laboratories.
CHAPTER 2 - SAFETY INSTRUCTIONS
2.1. Safety Symbols
Please read this operating manual as it includes important safety information using the symbols below:
Symbol Description
Warning
This symbol is designed to bring to your attention hazards that could result
in serious injury or
damage to the device if the safety instructions are not correctly followed.
You are asked to read
closely and understand properly each of the sections concerned immediately before using your
iCare+ device.
Caution
This symbol is designed to bring to your attention hazards that could result in light or moderate
injury or damage to the device if the safety instructions are not correctly followed.
Information
Text preceded by this symbol contains useful information for using your iCare+ device.
2.2 General safety instructions
Warning
The manufacturer, installer and importer are only responsible for the device's safety, reliability and
performance if the aforementioned points have been respected
The user is advised to comply with the following instructions:
• Please report any serious incident that may occur in connection with the device and its
consumables to the manufacturer as well as to your national authority
• The device must be used in accordance with the instructions given in this user's manual in terms
of safety precaution and use of the system
• The power supply of the location where iCare+ will be used must comply with IEC
requirements, or with local regulations in force
Warning
iCare+ device has been designed in accordance with current safety standards. Nevertheless, it is
essential to comply with important safety measures in order to avoid any potential incident or even
accident. Therefore, the safety recommendations below have to be taken into consideration.
• Use iCare+ only indoors
• Do not install or use iCare+ near a naked flame due to the risk of explosion
• Do not install or use iCare+ in direct contact with sunlight
• Ensure that the iCare+ device is placed in a well ventilated area
• Store iCare+ at temperature between 0°C and 50°C and humidity rate under 80%

RD 160.iCare+.OPM.ENG.V16 04.27.2020 p. 2
ENG
• Use iCare+ at room temperature (22-40°C)
• Do not place n.cid bottles near a heat source
• Do not turn the device upside down
• Place the device horizontally on a flat surface
• Only use NSK products when operating iCare+ (n.clean as cleaning product, n.cid as
disinfection product, NSK Oil as lubrication product)
• During the installation of iCare+, leave a space of 5 cm free on each side
• Air supply pressure provided to iCare+ is set at 5,5 bar ± 0,5 bar
• Do not remove the bottles (n.clean or n.cid) while iCare+ is in use
• If the iCare+ is not used for a long period, switch it off.
• Only use original NSK components for the maintenance of iCare+. The use of different
components may damage the device
2.3 Safety labels
Adhesive safety labels have been placed on the iCare+ in important locations. These include storage instructions
for the bottles, the device and information about the device's features.
Caution
The adhesive labels described below must be kept intact and should, if necessary, be replaced with
the substitution labels provided with the accessories. In order to avoid damaging these labels, do not
use abrasive products to clean your iCare+.
Table 1 - Safety labels
Picture of the label Description Position
• LA-1
Oil label (for lubrication)
• Internal surface of the top cover
• LA-2:
n.clean label (for cleaning)
• Internal surface of the top cover
• LA-3
n.cid label (for disinfection)
• Internal surface of the top cover
• LA-4
Device identification label with
serial number
• Rear cover of the device
• LA-5
Warning label about risk of injury
due to receptacle needles
• Between the bottle’s receptacles
!

RD 160.iCare+.OPM.ENG.V16 04.27.2020 p. 3
ENG
2.4 Others safety measures
Warning
All the safety measures referenced below must be followed closely in order to prevent the user
being exposed to risks.
• Never handle the power cord with wet hands; risk of electrocution
• NSK does not warrant safety for any power cord other than the one provided in the package.
• Make sure the wall outlet has an earth connection with a differential (breaker)
• Be careful not to spill water into the device; fire risk as a result of short circuit
• Make sure to switch OFF the unit before any cleaning or maintenance action; risk of
electrocution
• Do not attempt to dismantle any part of the device. In case of breakdown, directly contact your
retailer
• Should the device begin to smoke or there is a smell of burning, switch off the iCare+
immediately and contact your retailer
• Do not use the iCare+ with flammable gases
CHAPTER 3 - DESCRIPTION OF THE DEVICE
3.1 Items requested for operation
Picture of the item Description Delivery
• iCare control unit including:
- Top cover
- Front door
- Drawer
- Air filter
- Pressure regulator
• Supplied without liquid and
turbine adaptors
Ref: S102001 iCare+ C2
Turbines: 2 / Contra-angles: 2
Ref: S103001 iCare+ C3
Turbines: 1 / Contra-angles: 3
• USB key including:
- Operating manual
- Installation manual
- I-Care software (Softcare)
• Supplied with control unit
• Pneumatic installation set:
T junction and 2000mm x Ø 6.0mm
• Supplied with control unit
• Power cord
Both EU and UK available
• Supplied with control unit
• n.clean bottle
Cleaning solution, 500ml
• To be ordered separately
Ref: ACL600 (6 bottles)
• n.cid bottle
Disinfectant, 500ml
• To be ordered separately
Ref: ACD600 (6 bottles)
• Lubrication oil
Bottle containing 1000ml
• To be ordered separately
Ref: Z016117

RD 160.iCare+.OPM.ENG.V16 04.27.2020 p. 4
ENG
3.2 Description of the control unit
A Operating fluids lid F Power inlet with on/off switch and fuses
B Front panel G Oil tank
C Door H Receptacle for n.clean bottle
D Drawer collecting operating fluids I Receptacle for n.cid bottle
E Air filter / Pressure regulator J USB port for recording data
Fig.1 – Front view Fig.2 – Rear view
Fig.3 – Operating fluids Fig.4 – USB port
3.3 Description of the front panel – Table 4
1 Start / Stop button 5 Instrument external spray indicator (when lit)
2 Warning indicators: Fluids and safety status 6 Cycle: Mode selection and indicators
3 Cycle progress indicators 7 Selection of external spray / without spray
4 Instrument selection and oil volume setting
E
F

RD 160.iCare+.OPM.ENG.V16 04.27.2020 p. 5
ENG
CHAPTER 4 – INSTALLATION AND SET-UP
Warning
The use of controls, settings or the implementation of procedures other than those specified below
may expose users and patients to danger.
4.1 Unpacking
Warning
Information
Upon receipt of the unit, look for any damage that may have occurred during transportation.
• When unpacking, check the items described section 3.1 are supplied
• If necessary, contact your supplier.
• Keep the original packaging for further use.
• Keep the packaging away from children.
4.2 Location
Warning
Information
Before installing iCare+, choose a suitable location as described below:
• The device should be positioned on a flat, solid and level surface
• The surface must be able to support the weight of the device in conditions of use: 16 kg
• The device should not be placed near a sink or any source that may cause moisture ingress
• The device should be placed in a properly ventilated room
• The device should be kept away from any source of heat
4.3 Installation
4.3.1 Connection to the air system
Insert the air supply tube in the air filter inlet, fixed on the Rear panel of the device: Fig.5. Be sure that the air tube
is attached properly to the filter (see picture below). Connect the common port of the "T-junction" connector to the
air compressor output and connect the output ports to your dental unit and iCare+: Fig.6.
Warning
Information
• Following the norm EN ISO 7494-2, the air quality provided to iCare+ has to be dry, clean and
free from bacteria and contamination
• It is necessary to follow the above-mentioned parameters in order to avoid malfunction or damage
to the unit
• The pressure of the air supply has to be between 5 and 6 bar
• The minimum air flow level required is 50 L/min
Fig.5 – Air Inlet Fig.6 – Air connection
Dental Unit
i-care+
T junction
Air Compressor
Connect output of the
air compressor to the
“T” junction, and
outputs of the “T” to
i-Care+ and dental unit

RD 160.iCare+.OPM.ENG.V16 04.27.2020 p. 6
ENG
Warning
Information
• The pressure of the air supply must not be
under 5 bar or above 6 bar. A pressure sensor detects if
the air pressure is too low or too high and stops the machine. The operator is alerted by an
operating
light indicator positioned on the Control Panel
• Do not fold or deform the air supply tube
• If you experience difficulties during the installation, please contact your retailer
• The air filter has an effective filter size of 5µm
4.3.2 Connecting to the electric network
Insert the power supply cord supplied with the device in the socket located in the rear panel, refer to Fig -2, item F,
and connect the power cord to the electric network. This power cord is a Class I cable.
Warning
Information
• NSK do not warrant the use of other power cords other than the one provided with iCare+
• Connect the external power adapter only to an electrical network whose characteristics correspond
to those indicated on the identification label, refer to Table 1: LA-4.
• The electrical network used to power the unit must comply with the current standards. If necessary,
your electrical system should be checked by a certified electrician.
• A fluctuation in the mains voltage or an electromagnetic field, which does not comply with the
standard, may disrupt the operation of the device.
4.4 Consumables
4.4.1 Insertion of n.clean and n.cid bottles
To insert the consumables, proceed as follows:
• Open the rear lid Fig.7
• Remove the metallic cap from each bottle, in order to avoid damaging the receptacles needles: Fig.8.
• Insert the n.clean bottle upside down inside its receptacle: Fig.9.
• Push the n.clean bottle so that the needle goes through the rubber septum closing the bottle. Do not use
excessive force as you may damage the needle.
• Use the same procedure to insert n.cid bottle: Fig.10.
Fig.7 – Top cover Fig.8 – Bottle cap Fig.9 – n.clean Fig.10 – n.cid
Warning
• Use only n.clean and n.cid bottles supplied by NSK Europe GmbH. Efficiency of the device is
optimized for cleaning and disinfection protocols validated using n.clean and n.cid products. NSK
does not warrant the results from other manufacturers products, which could lead to a failure or
damage of iCare+ and/or of the instruments connected on it.
• Never try to re-fill and re-use bottles. You may damage the iCare+
• To avoid injury caused by the needles, never put your hands inside the bottle receptacles.
• Do not forget to remove the metallic bottle cap prior to installation as you may damage the device

RD 160.iCare+.OPM.ENG.V16 04.27.2020 p. 7
ENG
Information
To avoid confusion when inserting the consumable products, a colour coding is used:
- For n.clean solution, yellow sticker on the bottle and receptacle
-
For the n.cid solution, grey sticker on the bottle and receptacle
4.4.2 Safety warning relating to n-cid and n-clean
Warning
• n.cid liquid and vapour are flammable. Keep away from heat, hot surfaces, sparks, open flames
and other ignition sources. Do not smoke in the presence of n.cid. Keep container tightly closed in
a cool, dry and well-ventilated place. Do not expose to or leave in direct sunshine.
• It is recommended to use protective glasses and gloves during handling of bottles or during
emptying of waste drawer. Avoid any contact with skin and eyes.
• Following eye contact with n.clean, flush eyes with flowing water for several minutes holding
eyelids apart. Remove contact lenses, if present and easy to do.
• Following n.clean ingestion: Rinse mouth and then allow the affected person to drink water.
• n.cid causes serious eye irritation. Following eye contact with n.cid rinse cautiously with water for
several minutes. Remove contact lenses if present and easy to do. Continue rinsing. If eye irritation
persists, seek medical advice/attention
• In case of contact of n.cid with skin, wash off immediately with soap and water. In case of skin
reactions, seek medical advice.
• Following inhalation of n.cid, move affected person into fresh air. In case of irritation of the
airways, seek medical advice.
• Following ingestion of n.cid, rinse mouth with water, and then drink plenty of water. Do not
induce vomiting. Seek medical advice.
4.4.3 Filling the oil tank
The oil is poured directly into the tank. To fill the oil tank, proceed as follows:
• Shake the oil canister well
• Unscrew the oil tank cap Fig.11
• To avoid a spillage hazard, gently pour the oil in to the tank Fig.12
• Fill the tank up to 20 mm from the top edge of the tank. Fig.13
• After filling, replace the oil tank cap.
• Once the tank is filled and the cap properly secured, close the rear top cover.
Fig.11 – Oil tank Fig.12 – Oil filling Fig.13 – Oil limit
Caution
• Always use NSK oil to ensure optimal lubrication
• Using other oil with iCare+ could lead to a failure or damage of the iCare+ and the instruments
connected to it
• After filling the oil tank, ensure the cap is securely closed

RD 160.iCare+.OPM.ENG.V16 04.27.2020 p. 8
ENG
4.5 Validation test
4.5.1 On-site validation
Prior to first use, your installer must perform an installation qualification (IQ), Operational qualification (OQ) and
Performance qualification (PQ).
According to ISO 15883-1, the aim of this procedure is to obtain and document evidence that your device has been
provided and installed in accordance with its specification.
Caution
• The warranty applies only to the extent that the on-site validation of the device has been observed
• Achievement of on-site validation is limited exclusively to professional dental installers who have
been trained and qualified under the control of NSK
• After on-site validation keep a permanent record of the validation report
4.5.2 Periodical validation
Following ISO 15883-1, requalification of your device shall be performed at defined intervals. The defined interval
can be determined by regulatory authorities or by risk analysis. We recommend to perform this periodical
validation every year, in order to validate that the performance of iCare+ is still optimum or:
- If a review of records of routine tests of equipment performance indicates unacceptable deviation from data
determined during the initial validation
- If changes are carried out on the equipment and installation that could affect the performance
- If equipment performance is unacceptable
- If process conditions are changed
Caution
• For periodical validation, only use your authorized supplier or NSK. Validation performed by an
unauthorized person could result in your iCare+ being unsafe for you and your patients.
• Periodical validation is limited exclusively to professional dental installers who have been trained
and qualified under the control of NSK.
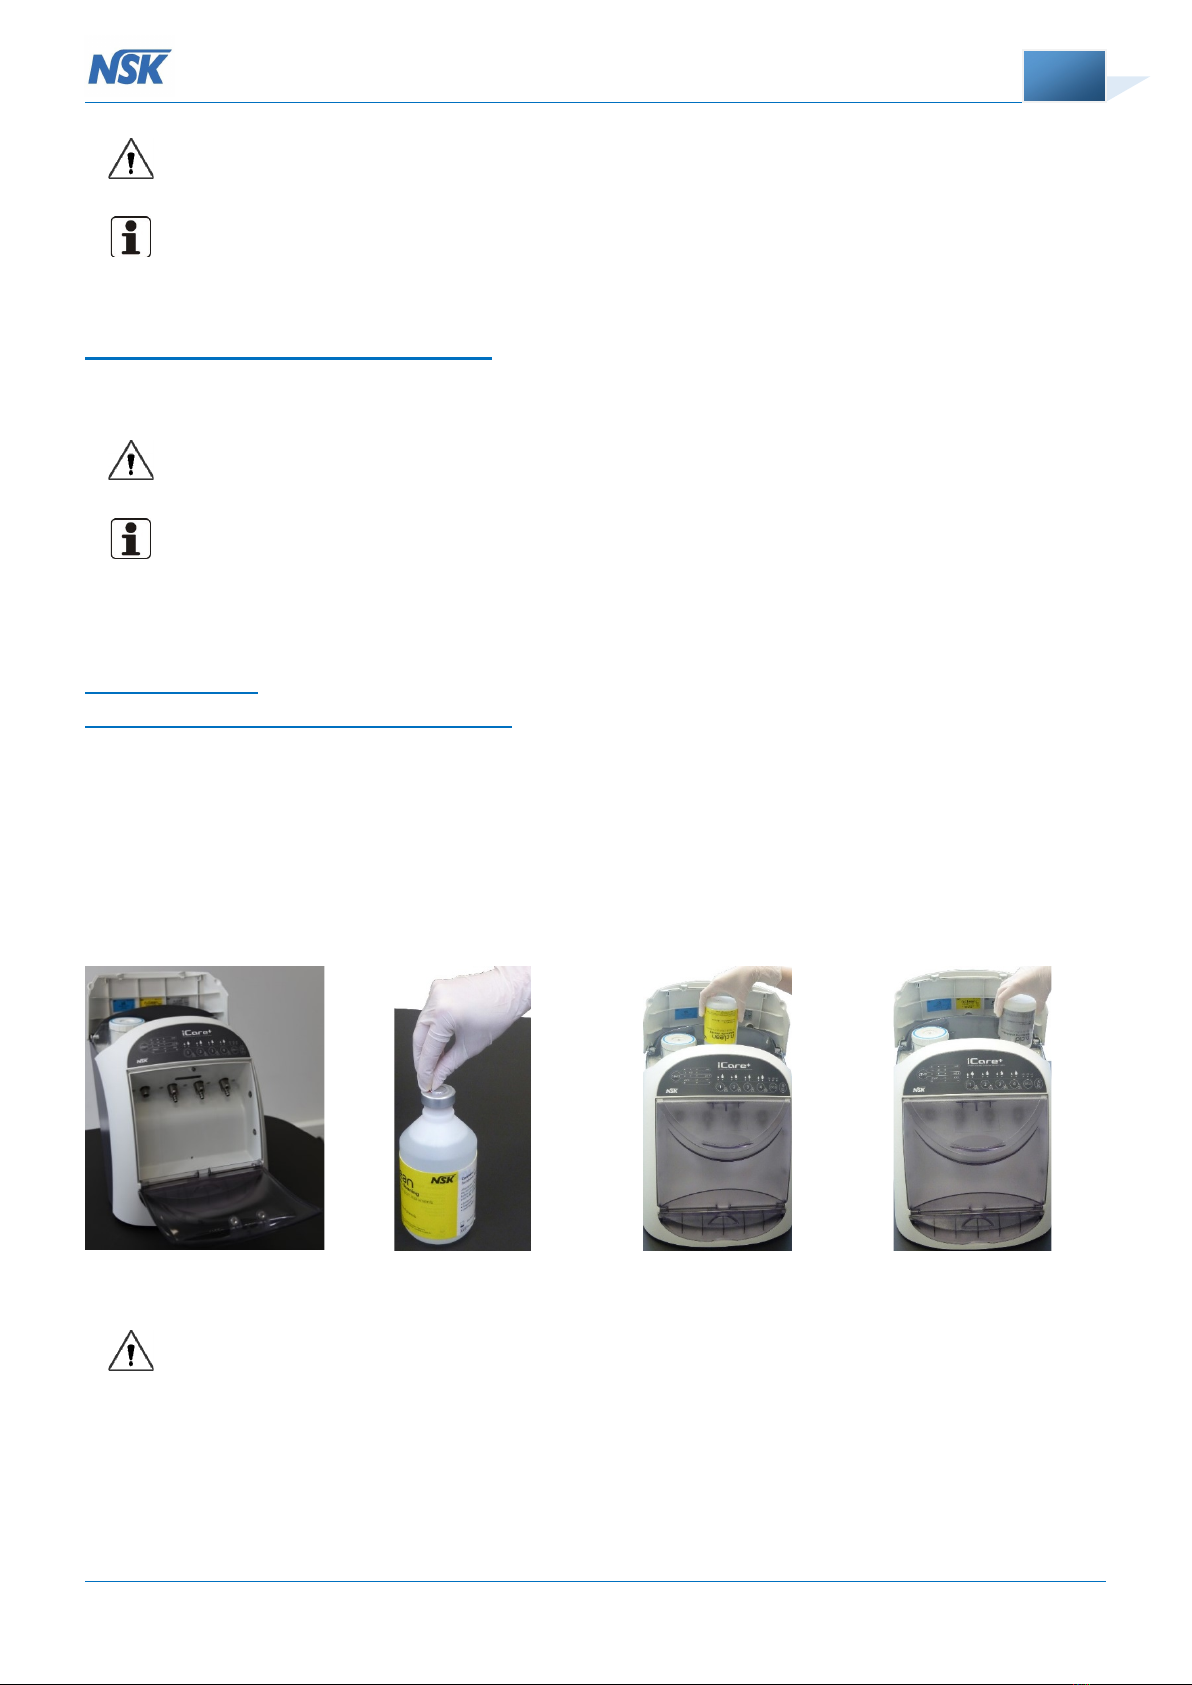
CHAPTER 5 – DAILY USE
The function of the iCare+ is to ensure the cleaning and disinfection of internal and external surfaces of dental
rotary and dynamic instruments, as well as their lubrication. Such items are potentially contaminated with
pathogens and can be a source of infection for humans. Therefore, before being reprocessed using iCare+, these
medical devices require a previous preparation as defined by Robert Koch Institute: RKI.
Caution
Before reprocessing, it is necessary:
• To check the product compatibility with the reprocessing method to be used
• To perform proper preparation as defined below
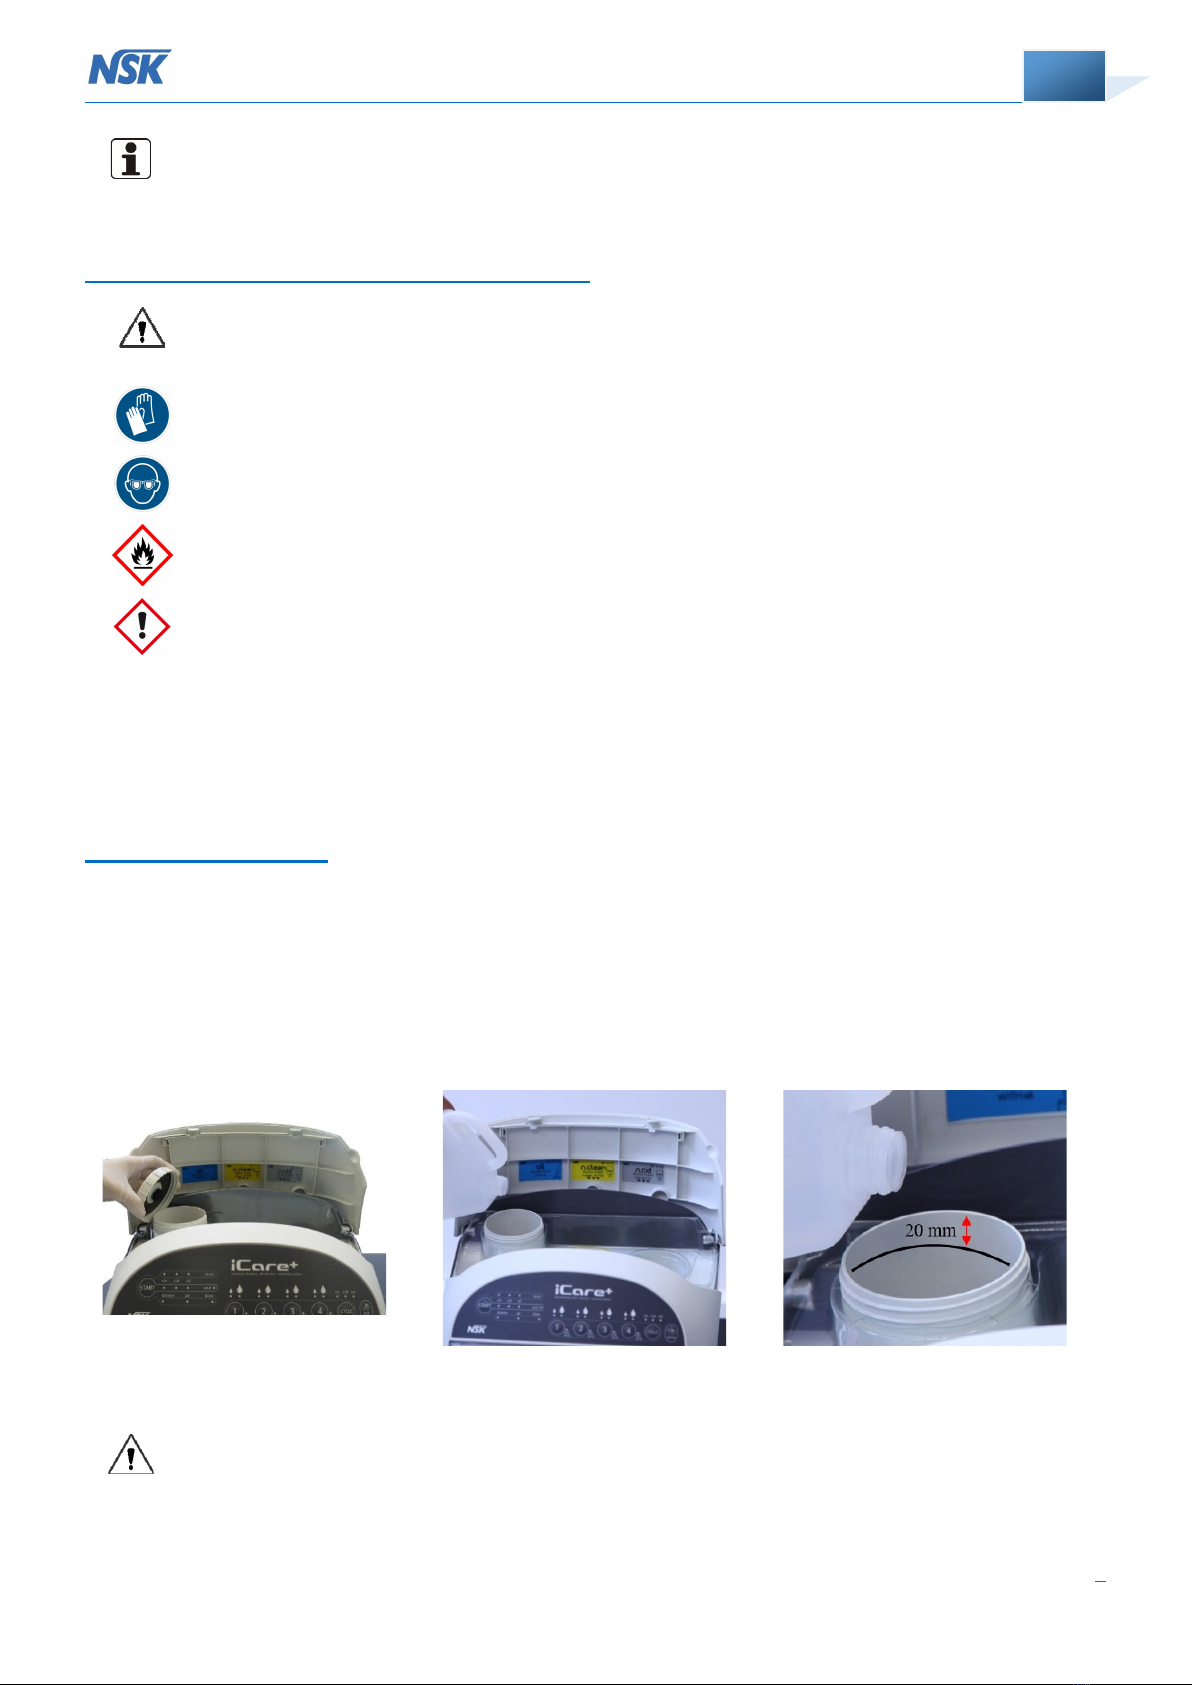
5.1 Preparation
Preparation must be performed in accordance with accepted engineering practice. It must also ensure that the
concerned medical devices pose no risk to health when it is subsequently used, specifically focusing on infections.
Therefore, the following precautions shall be considered:
Warning
• For your safety during reprocessing, you shall minimize the risk of infection wearing protective
gloves, spectacles, as well as mouth and nose protection
• Preparation must be performed within 10 minutes after the end of treatment. If this is not possible,
the handpieces must be pre-treated with a non-protein-fixing cleaning solution, such as IC100 from
Alpro Medical, according to the manufacturer's instructions
• Never immerse NSK handpieces such as contra-angles and turbines inside disinfecting solutions
nor in ultrasonic baths

RD 160.iCare+.OPM.ENG.V16 04.27.2020 p. 9
ENG
5.1.1 Preparation on site
First, debris and residues must be removed from the handpieces promptly after
use flushing working channels. To do so, allow air and / or water to flow inside
the handpiece immediately after treatment of a patient for at least 20 seconds.
As far as possible, blood and tissue must be prevented from drying, sticking
and coagulating to the device. Therefore, wipe off the handpieces immediately
afterwards with an approved disinfectant tissue, for example, Minuten Wipes
from Alpro.
To make all external and internal surfaces accessible, disconnect the
handpieces, contra-angles and highspeed turbines from the coupling, or the
fixed connection turbine from the hose.
Remove instruments such as drill, file or bur from the handpiece chuck system.
If necessary, use tweezers and insert the instruments into disinfecting solution.
Once the onsite preparation of the handpieces is complete, they will should be
safely transported to the reprocessing site, avoiding injuries, contamination and
damage.
5.1.2 Precleaning
Preparation must be performed within 10 minutes after the end of treatment. If
this is not possible, the handpieces must be pre-treated with a non-protein-
fixing cleaning solution, such as IC100 from Alpro Medical, according to the
manufacturer's instructions.
A manual external pre-cleaning has to be performed, under running cold water
using a soft brush for at least 20 seconds to remove visible contamination.
Inspect for cleanliness and repeat external pre-cleaning under running cold
water if necessary.
5.2 Installation of the instruments
With iCare+ device, it is possible to connect 2 kinds of instruments by means of 2 different connectors:
- Air turbine connector for dental turbines.
- E-type connector for dental contra-angles.
• To connect an instrument, start by opening the door
• Do not use the door as a support, do not put anything on the door when open

RD 160.iCare+.OPM.ENG.V16 04.27.2020 p. 10
ENG
5.2.1 Installation of the turbines
To connect a turbine with Midwest 4 holes coupling according to ISO 9168 standard:
• Connect the turbine directly to the turbine connector of the iCare+: Fig.14
• Screw the retaining nut down until it fits securely: Fig.15
• Take care of the turbine connector position, the head should be oriented toward the front of the door
• Close the door.
To connect a turbine with another connection type:
• It is necessary to install the corresponding coupling adaptor Fig.16
• Insert the adaptor and screw the retaining nut down firmly, check the positioning of the coupling’s
connections
• Please refer chapter 10 for the list of available coupling adaptors.
Fig.14 – Connection of a turbine Fig.15 – Screwing the retaining nut Fig.16 – Coupling adaptor
• It is necessary to use specific iCare+ air turbine adaptors. These are especially designed to deliver
the right volume of product required for each instrument.
• NSK does not guarantee correct operation of the device with any other coupling.
5.2.2 Installation of contra-angles
To connect a contra-angle or a hand piece, in accordance with the ISO 3964 standard, simply open the door and
connect the contra-angle on the E-type connector (see Figure 17).
Fig.17 – Connection of a contra angle Fig.18 – iCare+ C3: coupling for 3 contra-angles
• Insert the contra-angle in the connector until you hear a “click” to ensure that the contra-angle will
be well maintained during the different phases of treatment.

RD 160.iCare+.OPM.ENG.V16 04.27.2020 p. 11
ENG
Caution
Before using iCare+:
• Please make sure to remove any bur from the chuck
• Make sure also to remove any support/holder for snap-on caps
• Failure to do so could result in the dirt and liquid inside the instrument not being expelled
5.3 Removal of the instruments
Once the cycle has finished, you will hear a "Beep" sound and the green operating light indicator "end" will be
illuminated.
• Open the door
• Remove the instruments from their couplings as below.
5.3.1 Removal of the turbines
• To remove a standard turbine with Midwest coupling:
- Unscrew the retaining nut
- Remove the turbine by pulling down the instrument
• Removing a turbine with NSK® connection from its adaptor:
- Move up the retaining ring of the adaptor.
- Remove the turbine by pulling it down while keeping the retaining ring in the upright position.
• Removing a turbine with Kavo and Sirona® connection from its adaptor:
- Remove simply the turbine by pulling down on the instrument.
• Removing a with W&H® connection from its adaptor:
- Move the retaining ring of the adaptor up.
- Remove the turbine by pulling it down while keeping the retaining ring in the upright position.
• Removing a turbine with Bien-Air® connection with from its adaptor:
- Press the button on the adapter.
- Remove the turbine by pulling it down while keeping the button pressed.
Fig.19 – NSK Fig.20 – Kavo / Sirona Fig.21 – W&H Fig.22 – Bien Air
5.3.2 Removal of the contra-angles
For removing a contra-angle, in accordance with the ISO 3964 standard, follow the description below:
• Start by opening the door
• Push the release button
• Remove the contra-angle by pulling it down while the release button is pressed.

RD 160.iCare+.OPM.ENG.V16 04.27.2020 p. 12
ENG
5.4 Programming the iCare+ device
5.4.1 Function of the control panel
The Control panel is composed of a series of control buttons and light operating indicators. As shown Fig.23, and
24, the control panel includes 7 operating keys and 25 light indicators as follows:
• (K1) Start-up key
This key is used to start the operating cycle. Pressing and holding this key will abort the cycle
• (K2) to (K5) Instrument keys
These four keys switches enable to select/deselect the instruments to be reprocessed as well as to select the
volume of lubricant to be dispensed
• (K6) Operating cycle key
This key is used to select the reprocessing cycle to be performed as follows:
- Full cycle: Cleaning + Disinfection + Lubrication
- Partial cycle: Cleaning + Lubrication
- Short cycle: Lubrication only
• (K7) Spray key
In conjunction with (K2) to (K5) this key is used to define if the handpiece has an external spray channel or no
spray channel
Fig.23 – Operating Keys
• (1) Cycle status indicators
These indicators show which step of the reprocessing cycle is in progress
• (2) Warning indicators
When lit these six indicators display “Warning information” for:
- Low consumable level: n-id, n-clean, oil
- Safety sensor: drawer, air pressure, door status
• (3) Instrument selection indicators
When lit these indicators show which instruments are selected and the quantity of the lubricant to be delivered
• (4) Spray indicators
In conjunction with (3) these indicators display if the selected handpieces have been defined with an external
spray channel or no spray channel
• (5) Mode indicators
These indicators are used to show the selected reprocessing cycle
Fig.24– Light Indicators

RD 160.iCare+.OPM.ENG.V16 04.27.2020 p. 13
ENG
5.4.2 Setting of the reprocessing mode
After switching on the device using the power switch (refer to Fig.2 / F), and installation of the instruments as
described section 5.2, you can now select the reprocessing mode.
The reprocessing cycle is composed of 3 different phases:
• Cleaning phase: 6 min (for 4 instruments)
• Disinfection phase: 9 min (for 4 instruments)
• Lubrication phase: 1.5 min (for 4 instruments)
The cycle button (K6) selects one of the 3 reprocessing cycles which are available, the cycle indicators (5) are lit
accordingly:
• Full maintenance cycle: Cleaning/Disinfection/Lubrication (by default)
• Partial maintenance cycle: Cleaning/Lubrication (press the button once)
• Short maintenance cycle: Lubrication only, similar function as Care3 plus and iCare, (press the button twice)
• A third press on the Cycle button enables the user to reset the choice of cycle
Fig.25 – Full mode Fig.26– Partial mode Fig.27– Short mode
5.4.3 Selection of the instruments
By default, all instruments are selected. If you have less than 4 instruments, you need to manually select the
instrument to be reprocessed as well as the lubricant oil volume to be dispensed:
• Small drop corresponds to a normal volume (Short cycle)
• Large drop corresponds to a specific volume for certain contra-angles (long cycle for surgical or 1:5 contra-
angle for example)
• Unlit light indicators (3) indicate that the instrument is deselected and then the related instrument position will
not be activated
• By default, low oil volume is selected. Press the button corresponding to the position the instrument is
connected to, press once to select the large volume (large drop indicator) and twice to deselect the instrument
The volumes of the consumables to be dispensed and the sequence of injection of the products are
directly programmed and monitored by the device itself, according to an accurately defined and
validated protocol by a microbiological institute.
Except oil volume, the operating parameters cannot be modified.
5.4.4 Selection of the type of instrument
Your iCare+ enables to reprocess two kinds of instruments:
• Instrument with only one drive channel and without spray
• Instrument with 2 channels: both W/A and drive channels, with internal spray
All the different instruments that can be treated with iCare+ are mentioned in the following table for C3:
Instrument 1 Instrument 2 Instrument 3 Instrument 4
Only drive channel Contra-angle or handpiece with external spray / without spray
W/A and drive channel Turbine /Air scaler Contra-angle or handpiece with internal spray

RD 160.iCare+.OPM.ENG.V16 04.27.2020 p. 14
ENG
By default, instrument standard setting is “internal spray”. As illustrated in Fig. 28, to set external or without spray
instrument:
• Press “Spray” key and the key corresponding to the position of the instrument simultaneously
• To indicate that internal spray is disabled, the corresponding indicator is now illuminated
Fig.28– Without spray setting
If the internal spray is disabled by mistake or the internal spray is blocked, the unit detects it and will alert you. For
instance, this may occur in the following scenarios:
• An instrument has been selected as an “external spray instrument” (but in reality, the instrument has an
internal spray)
• An instrument that has been installed with external spray without using the button “ext W/O”
• An instrument which has been installed which has a blocked internal spray channel
In such a case the iCare+ will alert you to the issue:
• Unit will abort the cycle
• “Air warning Indicator” LED will blink
• Unit will emit an audible alert
• The position of the instrument is shown using blinking indicators (oil indicator and/or ext-WO).
Fig.29– Warning
To restart the unit:
• First open the door
• Remove the instrument (to reduce the remaining pressure)
• Reconnect the instrument
• Then close the door.
If the problem happens again:
• Remove the handpieces
• Push the key “Start” to interrupt the cycle.
• Check the instruments for possible blocked channels.

RD 160.iCare+.OPM.ENG.V16 04.27.2020 p. 15
ENG
5.5 Launching the reprocessing cycle
Once the reprocessing cycle is selected and instruments setting achieved, press the “Start Key” (K1) to launch the
cycle (see Figure 23).
• “Start Key” launches the selected cycle for the selected instruments. If a problem occurs or if you
wish to stop the cycle the “Start Key” stops the unit when pushed and held
• The cycle is then interrupted, the settings and selections are recorded and the device is in standby
mode. Pressing “Start Key” again, allows the reprocessing cycle relaunch from the beginning with
the same settings
• In case the door is open while the unit is in standby mode, the settings and selections are then reset
to default
When reprocessing cycle is launched, the status indicators on the control panel indicate the progress of the cycle
and the treatment chamber is illuminated using the same colour code.
• Yellow indicator = Cleaning phase
• White indicator = Disinfection phase
• Blue indicator = Lubrication phase
• Once the cycle is completed the green indicator is illuminated to inform the user that the instruments are ready
for further steps.
Fig.30– Indicators during cycle in progress
Caution
• When the “oil drop” indicators are switched off, the related instruments are not selected
• Before first use, or after a long period of no use, run the device without instruments
Caution
• In order to facilitate external cleaning, you need to perform pre-cleaning as defined in section 5.1
• Use disinfectant wipes to handle the instruments while connecting them to the unit
• At the end of the cycle, open the door and remove the instrument using a disinfectant wipe
Lubrication phase
Lubrication is a maintenance
step. Lubricants reduce
noise, friction and prevent
wear and accumulation of
wear debris. This step uses a
high pressure air blowing oil
inside the instrument.
Disinfection phase
Disinfection is the reduction
of the number of viable
organisms of the instruments.
The devices operates using
chemical disinfecting agents
which are used to neutralize
the remaining agents.
Purge and Initialisation
High pressure air is used for
removal of elements which
soil the instrument and clog
the internal channels. For
example : oil residue, body
fluids, and metal particles.
Cleaning phase
Cleaning is the removal of
initial contamination. The
purpose of cleaning is to
leave as little residue as
possible, since this can
adversely affect disinfection
Operating cycle

RD 160.iCare+.OPM.ENG.V16 04.27.2020 p. 16
ENG
CHAPTER 6: USER MAINTENANCE
iCare+ requires two different types of maintenance:
• Routine maintenance, periodically performed by the user such as cleaning of the device
• Specific maintenance performed by a dental technician: e.g. annual validation and repair
Caution
Periodical validation and repair are limited exclusively to professional dental installers who have
been trained and qualified under the control of NSK
6.1. General cleaning guidelines
Caution
• Cleaning operations should be performed only after having disconnected the iCare+ from the main
power supply
• Do not smoke in the room where the device is kept
You should clean the iCare+ as recommended below:
• Always use a soft cloth to clean the metallic and plastic parts of the device
• Only use detergents that contain a very low level of alcohol (with no protein fixation agent)
• Never attempt to clean areas that are difficult to access with sharp objects
• Be careful when cleaning the Control panel and never use aggressive detergents
6.2 General maintenance guidelines
Frequency / Number of cycles Operation Reference Section
Every week 50 Cleaning the treatment chamber -- 6.2.1
Every week 50 Cleaning the external parts -- 6.2.2
2-3 times per week 15 Emptying the used products drawer -- 6.2.3
Every week 50 Cleaning the drawer -- 6.2.4
When needed Replacing the O’ring On demand 6.2.6
When blown Replacing the fuse(s) of the supply inlet On demand 6.2.7
When needed Replacing the junction support blister S103106 6.2.5
Each year Annual validation 4.5.2
6.2.1 Cleaning the treatment chamber
As the door is removable, the treatment chamber can be easily cleaned. To do so, proceed as follows:
• Open the door
• If in place, disconnect and remove the instruments
• Pinch the 2 spring-loaded tabs on the door (in red)
• Remove the door to easily access the chamber
• Use a soft cloth or a sponge to clean the chamber
• If necessary, rinse it
• Follow the same procedure to clean the door
• We advise the use alcohol wipes for this part of the device to ensure you remove with
efficacy possible stains
• Once complete replace the door
• Switch on the device and check the proper activation of the door sensor: Fig. 24 (2)

RD 160.iCare+.OPM.ENG.V16 04.27.2020 p. 17
ENG
6.2.2 Cleaning the external parts
Clean the external parts with a soft cloth, as mentioned in the part 6.1. Do not use scouring agents or highly
abrasive products.
6.2.3 Emptying the used products drawer
The drawer should regularly be emptied. Emptying the drawer should be done either:
• After each use
• At the end of the day
• When the warning indicator “drawer full” is illuminated: Fig. 24 (2)
To empty the drawer, proceed as follows:
• Remove the drawer from the device by sliding it forward: Fig: 31
• Remove the clips attaching the lid to the tray Fig: 32 / Fig.33
• Dispose of the used product
Fig.31 – Drawer Fig.32 – Removal of the clips Fig.33 – Tray and lid
Consumable products used in conjunction with iCare for reprocessing such as Oil, n.clean and n.cid
solutions are formulated to be disposed of in the sewage disposal.
Prior to doing so, the soiled fluids should be diluted using water in a 4:1 ratio: 4 volume of water
for 1 volume of soiled fluids
6.2.4. Cleaning the drawer
To avoid depositing residues or to remove them, it is advised to clean the drawer weekly. To proceed, as explained
section 6.2.3, extract the drawer, remove the clips on both sides of the tray and then remove the cover of the
drawer. Then clean it with alcohol wipes.
6.2.5 Replacing the junction support blister
The blister allows the collection of possible drops of consumables during refill/bottle change. It should be replaced
at least once each year.
• Open the back top cover
• Remove the soiled blister
• Then place the new one directly on to the support junction
• Ensure that the new blister has properly sealed
Caution
• When removing the soiled blister, do not empty out the used products in to the iCare+, on the
surface of it or on the floor

RD 160.iCare+.OPM.ENG.V16 04.27.2020 p. 18
ENG
6.2.6. Replacing the O-ring joints on the E-type connector
• Push the O-ring joint
• Remove them from the E-type connector
• Gently insert the new O-rings into the corresponding grooves
• Check the new O-rings are not damaged
6.2.7. Replacing the fuse on the power supply inlet
The fuses need to be changed when blown:
• Press down simultaneously on and pull the two tabs at the end of the
fuse holder in order to unlock it
• Remove the fuses from the holder and replace with new ones using the
correct rating
• Replace the fuses in the fuse holder and insert them in to the housing.
• Push to lock
Caution
For Europe never use other fuses than those described below:
• Voltage: 250VAC • Rating: T 1,6AH 250V
CHAPTER 7: INFORMATION FROM WARNING INDICATORS
As shown in Fig.34, warning indicators inform in real time about abnormal operating conditions.
Fig.34– Warning Indicators
• “W1” n.clean indicator informs the operator that n.clean level is too low. In such a case the device stops.
- It is necessary to replace the bottle with a new one in order to restart the device
- Remove the empty bottle and replace with a new one
- To install a new bottle, refer to section 4.4.1.
• “W2” n.cid indicator informs the operator that n.cid level is too low. Repeat the procedure for n.clean as above.
• “W3” oil indicator informs the operator that oil level is too low. In such a case the device stops.
- It is necessary to refill the oil tank to restart the device
- To refill the oil tank, refer to section 4.4.3.
Other manuals for iCare+
1
Table of contents
Other NSK Dental Equipment manuals
Popular Dental Equipment manuals by other brands

BRASSELER USA
BRASSELER USA EndoSync PLUS Quick operation guide

Dentsply Sirona
Dentsply Sirona DAC Universal operating instructions

Sendoline
Sendoline S5 user manual

iM3
iM3 GS Deluxe START operating manual

Aseptico
Aseptico AEU-25 Operation and maintenance instruction manual

Poldent
Poldent Endostar Provider Instructions for use