Denver TFD-1903DVBT User manual

19"LCD TV WITH DVD & DVB-T
TFD-1903DVBT


DVB-T

Safety Information
The lightening flash with arrowhead symbol, within an equilateral triangle, is
intended to alert the user to the presence of un-insulated “dangerous
voltage” within the products enclosure that may be of sufficient magnitude
to constitute a risk of electric shock to the persons.
The exclamation point within an equilateral triangle is intend to alert the user
to the presence of important operating and maintenance (servicing)
instructions in the literature accompanying the appliance.
Correct disposal of this Product
(Waste Electrical & Electronic Equipment (WEEE)
The crossed out “Wheelie bin” is intended to show that this appliance must not
be placed with ordinary household waste at the end of its useful life. To prevent
possible harm to the environment or human health from uncontrolled waste
disposal, please keep separate from other household waste and recycle it
responsibly to promote the sustainable reuse of material resources.
Household users should contact either the retailer where you purchased the
product, or their local government office for details of where and how you can
take this item for environmentally safe re-cycling.
Business users should contact their supplier and check the terms and conditions
of the purchase contract. This product must not be mixed with other
commercial wastes for disposal
1. THIS LABEL IS ATTACHED TO THE PLACE AS ILLUSTRATED TO INFORM
THAT THE APPARATUS CONTAINS A LASER COMPONENT.
2. THE WARNING LABEL INFORMING OF RADIATION IS PLACED INSIDE
THEn UNIT. AS SHOWN IN THE ILLUSTRATION. TO WARN AGAINST
FURTHER MEASURES ON THE UNIT. THE EQUIPMENT CONTAINS A
LASER RADIATING LASER RAYS ACCORDING THE LIMIT OF LASER
PRODUCT OF CLASS
This unit complines with European safety and electrical interference directives.

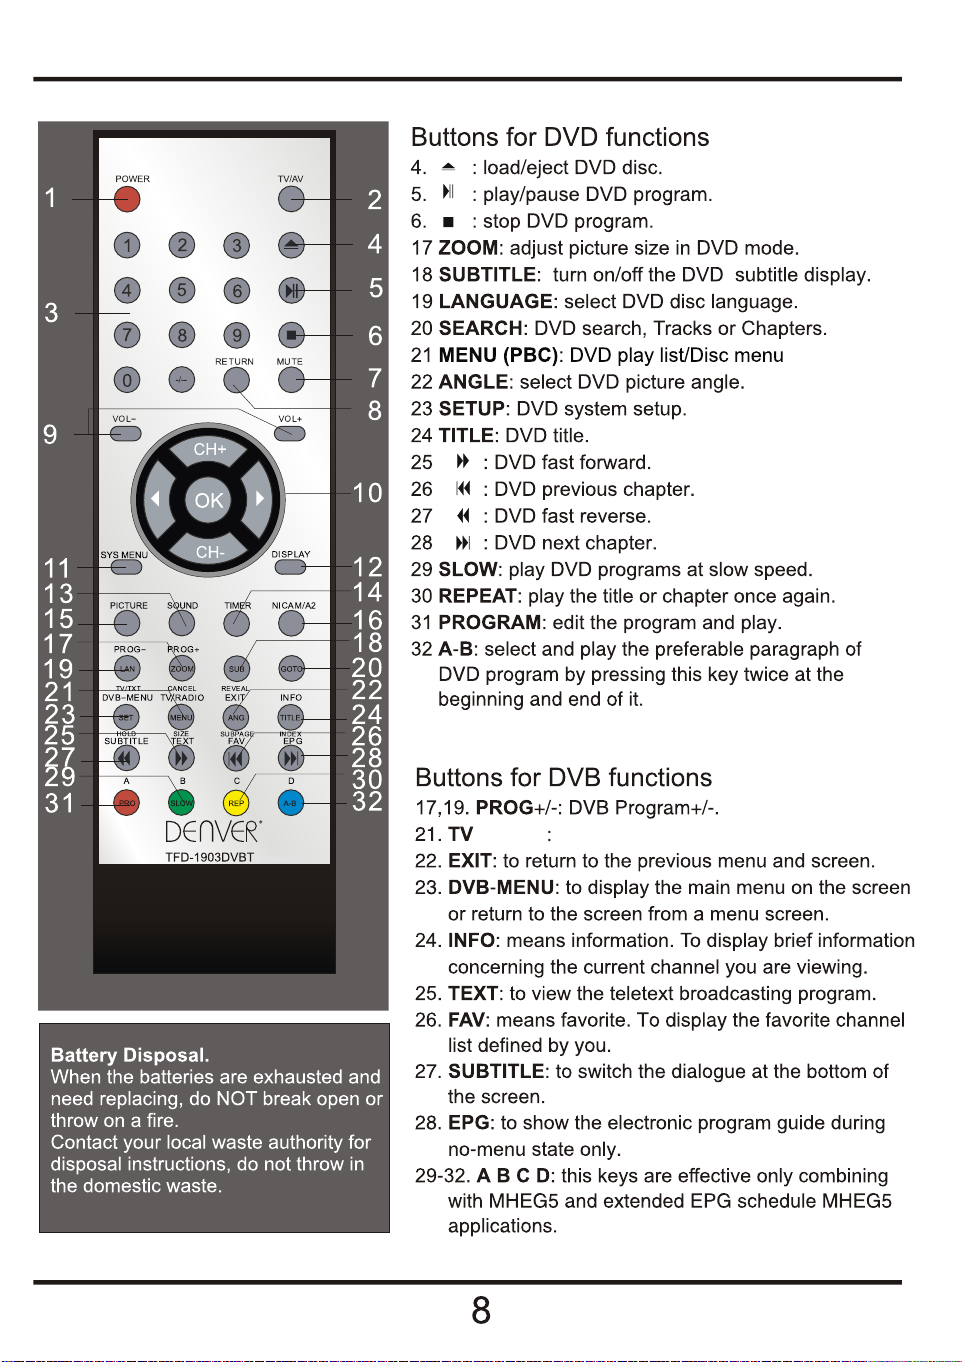
Safety Information cont.
Do not place the Tv on an unstable surface, it may tip over and cause injury or damage
to the LCD screen.
Do not place the tv in a cabinet where airflow is restricted, ensure the ventilation holes
are not covered to prevent overheating. Do NOT cover the DC mains adaptor, this will
feel warm to the touch and must be allowed to radiate the heat.
Do not use the Tv in wet or damp conditions, if water or liquids are allowed to enter the
case, disconnect the power and call the Technical Help line. Do not handle the Tv or
Power adaptor with wet hands.
During an Electrical storm or when going on holiday, disconnect from the mains supply
and aerial (if external or rooftop).
Do not place heavy objects on the mains lead or DC supply lead, do not place where
they can be stepped on, cut or damaged. If the leads do become damaged please call
the Technical Help Line for advice.
Do not drop or damage the Tv. If the casing becomes damaged it may cause a safety
issue, Do not open the case or Power adaptor, you risk a severe electric shock, injury
or death.
Do not drop objects into the Tv ventilation slots or DVD disc slot. Should an object enter
the Tv, contact the Technical Help Line for advice.
Do not place the Tv near heat sources such as radiators or direct sunlight
Cleaning the Tv. Disconnect from the supply before cleaning. Do NOT use petrol
based or chemical cleaning fluids. You may wipe with a soft damp cloth. For stubborn
sticky dirt use a dilute detergent solution..
LCD Screen. Do NOT use chemical solvents on the screen surface, sticky finger
marks must only be removed with a dilute detergent solution. Occasionally one or two
bright dots may be seen on the screen, this is not considered a fault.


3.Front View
1(IR)Infrared Receiver:Receives IR signals from the remote control.
(Power on/Standby)LED Indicator: Press POWER to turn on and off.
The effective receiving range for the signal is within 5-8 metres from the
0
front of the remote control window,and 30 to the left or right side and
0
20 above or below the control window.
2 The functions of the buttons are described as below:
MENU: Press to display the OSD menu, Press again to exit the menu.
CH-/CH+: Press to scan through channels. When pressing and holding down either button
user can scan channels quickly.
They can also be used to move down/up in the OSD menu screen.
VOL-/VOL+: Press to adjust the volume.
they also be used to move left/right in the OSD menu screen.
VOL+ button can be used to skip forward to next menu.
TV/AV: Press to select the source: TV,AV,DVB,DVD,SCART,PC
Power: Turn on/off the TV set.
through the
can
the
Indicator on(Red) Standby mode
Indicator on(Green) Power on mode

4.Rear View
Coax : Output to Audio amplifier (RF encoded)
Power : Connection to Power adaptor.
SCART : Composite video and Audio input from VCR or other devices.
PC Audio : Audio connection from PC.
VGA : PC Monitor display input. Connect to your Pc Mini D15 pin connector.
AV-R,AV-L: Right and Left Audio input from other sources such as Camcorder.
Video : CVBS video input from other sources such as Camcorder.
RF : Tuner / Antenna RF input.


/RADIO change between TV and Radio condition.

TV
AV
DVB
DVD
SCART
PC
Channel
Move Select Exit
Auto Tune
Manual Tune
Fine Tune
Skip
Sound.SYS
Channel Swap
Off
I
1. Connect the Power adaptor to the DC input socket and the Aerial lead to the TV Tuner input.
2. To turn ON, press the “Power Button”.
3. Press the TV/AV button on the TV or Remote Control, the source menu
will display on the screen “as seen on the right”. Use the CH+/- buttons
to select the source, press button to confirm.
4.Press the MENU button on the TV or the SYS MENU button on the
remote control, the screen will display the OSD menu, press the CH+/-
button to select the third menu Channel (see picture below)
press the button to enter the menu, press CH+/- buttons to select the item
“Auto Tune”. Press the button, the TV will start to search from the lowest
frequency upwards. When a station is found it will be stored automatically in
the “First” location, further received stations will be stored in order. When Auto Tune is
completed the TV will display the first station received. In most cases the stations stored will
not be in Channel Order . To move the stations into the correct locations you will need to use
“Channel Swap” see page 13.
Note:when Auto Tune starts, to stop it press SYS MENU, otherwise leave to complete the search.
1.Press the TV/AV button to display the source menu, use the CH+/- buttons to select DVD and
press button to confirm.
2.Insert the disc into the player with the Title Label facing away from you (Shiny side forward),
Most discs will start playing automatically.
1.Connect the TV to the PC using a 15pin VGA lead (not supplied) and Audio to the PC audio socket
2.Press the TV/AV button to display the source menu, use the CH+/- buttons to select PC and
press button to confirm. The TV will now display the signals from the PC. You may need to adjust
the PC to the TV. See page 14
DVB.
See page 27
TV.
DVD.
PC.
6. Basic Installation.

7.OSD menu
Press the SYS MENU button on the remote control, the screen will display the OSD menu,
Picture Mode: select the picture display mode----User, Normal, Soft, Vivid.
You can also use the PICTURE button on the remote control to select.
Brightness: adjust the brightness of the picture.
Contrast: adjust the contrast of the picture.
:
Sharpness: adjust the sharpness of the picture.
Hue: adjust the hue of the picture(only used in the mode of NTSC).
Scale: exchange the 16:10 and 4:3 picture mode.
Note: when you are in the mode of PC, you can only adjust the brightness and contrast .
Saturation Adjusts the Colour depth (contrast)
Picture
Move Select Exit
Picture Mode
Brightness
Contrast
Saturation
Sharpness
Hue
Scale FULL
Soft
7.1 Picture menu
press the CH+/- buttons to select the Main Menu and press the button to enter. To select the
item you want (Picture, Sound, Channel, Function, PC) use the CH+/- buttons and to enter the
selection. Press buttons to select, adjust or enter a sub menu.
Note Items highlighted in the Menu's may be adjusted. Items “greyed” out are not available.

Sound Mode: select the sound mode----User, Normal, Movie, News.
You can also use the SOUND button on the remote control to select.
Volume: adjust the volume of the sound.
You can also use the VOL+/- button on the remote control or TV set to adjust the volume.
Bass: adjust the bass of the sound.
Treble: adjust the treble of the sound.
Balance: adjust the balance of the sound.
Sound
Move Select Exit
Sound Mode
Volume
Bass
Treble
Balance
New
7.2 Sound menu

Auto Tune
140.15MHz VHF L
0
Channel
Move Select Exit
Auto Tune
Manual Tune
Fine Tune
Skip
Sound.SYS
Channel Swap
Off
I
7 3 Channel Menu (The menu is only used in TV mode).
Auto Tune. Press the button, the TV will start to search from the lowest frequency up-
wards. When a station is found it will be stored automatically in the “First” location, further
received stations will be stored in order. When Auto Tune is completed the TV will display
the first station received. In most cases the stations stored will not be in Channel Order i.e.
BBC1 will not be in Location “1”. To move the stations into the correct locations you will
need to use “Channel Swap” see page 13.
Note when Auto Tune starts, to stop it press SYS MENU, otherwise leave to complete the search.
Manual Tune: press button to search forwards, and press button to search backwards. When
a station found, it will be stored automatically.
:
:
Fine Tune : press the button to tune upwards and press button to tune downwards. (normally
fine tune will not be necessary).
Skip Some received channels may be unwanted, they may be noisy or weak stations from another
area, to remove these from the list select “Skip” . When skip is selected for a particular channel,
that channel is “Skipped” when using the CH+/- buttons. You may still select using the
“Numeric” buttons.
Sound SYS This is used to select the “sound system” for the particular country or area.

Channel
Move Select Exit
Channel1
Channel2
Swap
3
4
Channel Swap: press the button to enter the swap menu as the following picture.
Function
Move Select Exit
Language
Blue Back
TXT Language
Color Temp.
DNR
Reset
Timer
English
on
EAST
User
Normal
7.4 Function menu
Use the CH+/- buttons to select “Channel 1”. Use the buttons to Locate BBC1, “it is useful to
have a current copy of a TV guide to hand”. Select “Channel 2”, use the buttons to select “1”.
Then select “Swap” and press to swap the TV will revert to “menu”.Other channels may be
numbered as required.
Language: Selects the OSD Language.
Blue Back. Select On or Off, this turns the background to Blue under no signal conditions.
TXT Language. Selects the Teletext language Chose “West” for normal viewing.
Color Temp. Adjusts the colour temperature. You may select Cool, Warm, Normal or User.
User allows you to set the Red, Green and Blue individually.
Reset. Select “Reset” and press to reset all analog settings to “Factory Default”
DNR:press the button to choose "Normal" or "Strong" to reduce picture interfere.

Timer: press the button to enter the timer menu as the following picture.
Channel
Move Select Exit
CURRENT
TURN OFF
TURN ON
TURN ON PROGRAM
00:00
_ _:_ _
_ _:_ _
1
PC
Move Select Exit
Clock
Phase
H.Position
V.Position
Auto
7.5 PC menu(the menu can only be used in the mode of PC)
You MUST set the Select Current Time by pressing the CH+/- buttons, to select the “HOURS”
press and CH+/- to change the time. Press to select “MINUTES” and CH+/- buttons to set
the time.
To set the “OFF” and “ON” times Select using the CH+/CH- buttons, set the times required as you
did setting the time. If you want the TV to switch to a particular station select “TURN ON
PROGRAMME” using the CH+/- buttons and change using the buttons, the TV will then switch
at the requested time.
Clock: adjust the pixel clock frequency, until the image size is maximized for the screen.
Phase: adjust the phase of the ADC sampling clock relative to the sync signal, until a stable
image is obtained.
H/V. Position: adjust the transverse/vertical position of the screen.
Auto: press the button to setup the parameter of the screen automatically.

8.DVD operation
Press the Power button on the TV or the Remote Control, then press either the DVD button on the
left of the TV or the TV/AV button on the right of the Tv to display the “Source” menu. Using the
CH+/- buttons select DVD, to confirm press V+/-. “NO DISC” will be shown on the screen. If there
is a disc in the player it will display “READ” and start automatically or display the “Menu”.
Place a disc.
Insert a disc with the label side facing AWAY from you. Do not force it in, the mechanism will load
it automatically. (do NOT attempt to put a disc in if another is already in the player). To Eject a
disc press the EJECT button on the Tv or remote control.
.If the disc is a DVD, ROOT MENU will appear on the screen. If it is a SVCD or VCD please press
the Menu (PBC) button to see the menu.
3. When a DVD disc is loaded, press the Arrow buttons to highlight the menu item you want to play.
For SVCD or VCD press the numeric buttons to select the track to play.
4. Press Enter or Play to play the highlighted selection.
5.To return to Menu when playing. When a DVD is playing, press the MENU button to return to the
Root Menu. With SVCD and VCD and PBC is on, press the Menu (PBC) button or the RETURN
button to return to the menu
For SVCD and VCD discs, and PBC is ON, press the Menu (PBC) button once to turn OFF, and
the player will play in sequence mode.
Play
The contents of each disc menu vary according to how the disc was authored and what features
are included. The disc menu will be turned on for you to select, when Menu button is pressed. Also
play and pause can be switched with the Pause button on the remote. Different play modes are
offered, such as menu play, sequence play etc.
Menu Play
1.Compatible with DVD, SVCD or VCD2.0.
2
Title Play
1.Compatible with DVD discs only.
2.During DVD playback, press Title button to display the DVD title content.
3.Press the Arrow buttons to highlight the title you want to choose, and press Enter; also you can
press numeric buttons to choose.
4.The DVD player begins with the chapter 1 of the chosen title.
Sequence Play
1.Compatible with DVD, SVCD, VCD, CD, HD-CD, WMA, Digital audio/JPEG discs.
2.When a SVCD or VCD disc is loaded and PBC is on, once ANGLE button pressed ANGLE
switches off. Then the player can play in sequence playback mode; when ANGLE button pressed
twice, ANGLE switches on.
3.

Program Play
1.Compatible with DVD, SVCD, VCD, CD, HD-CD, WMA, Digital audio/JPEG discs.
2.The Program Playback option allows you to enter the order in which you want chapters or tracks
to play, maximum to 16.
3.Program Menu:
If PBC is on, this operation will turn PBC off while the chapters / tracks plays in programmed
order.
4.According to the highlight, use the Numeric buttons to enter the chapters / tracks in the order
you want them to play. Then press Play or use Arrow buttons to highlight the “PLAY” item and
press Enter. The chapters / tracks will play in the programmed order. You can program
maximum 16 titles / chapters / tracks.
5.According to the Direction Indicator on the menu, you can press Arrow buttons to highlight
where you want to enter.
6.During Program Playback, if program button is repressed, the program order and the contents
will be displayed on the screen, and the Program Playback will be stopped; also you can press
Stop and Play to resume normal playback.
7.Notes:
To clear the program order, use Arrow buttons to highlight the “CLEAR” item,then press Enter.
To modify the program order, use Arrow buttons to highlight the item you are changing and enter
the new chapter / track you want to program directly.
8.The program indicator in the screen, and the playing chapter / track illuminate.

Additional operation
Selecting Tracks
1.Compatible with DVD, SVCD, VCD, CD, HD-CD, WMA, Digital audio/JPEG discs.
2.When playing a DVD disc, press Numeric buttons on the menu or title page to select tracks;
During DVD playback, you can input desired title numbers directly.
3.During sequence playback of a SVCD or VCD disk, press the numeric buttons to select tracks.
(During Program Playback and when the PBC is on, you can only press Prev / Next button to
select)
4.As for CD, HD-CD, discs, press Numeric buttons directly to select tracks.
5.When playing WMA, Digital audio/JPEG discs, press Numeric buttons to select different
tracks on current track list.
Skipping Tracks
1.Compatible with DVD, SVCD, VCD, CD, HD-CD, WMA, Digital audio/JPEG discs.
2.To skip forward to the beginning of the next title / chapter / track on a disc, press Next on the
remote or the right side of the player.
3.To skip backward to the beginning of the preceding title / chapter / track on a
disc, press Prev on the remote or the right side of the player.
Multispeed Fast/Slow Motion Play
1.Compatible with DVD, SVCD, VCD, CD, HD-CD, WMA, Digital audio/JPEG discs.
2.Press the Multispeed Fast/Slow button on the remote during play to search through a disc.
Multispeed Fast/Slow has three speeds:×2,×4,×8,×20. With each consecutive press of the
button, the search speed increases. If you press the button five times, Fast Multispeed
Fast/Slow cycles back to normal play.
3.During DVD play, when Multispeed Fast/Slow gets to the beginning of the next title / chapter, it
resumes normal play; During SVCD or VCD play with PBC on,when Fast Forward Play gets to the
beginning of the next track, it resumes normal play.
Multiphase Slow Motion Play
1.Compatible with DVD, SVCD, VCD, CD, HD-CD, WMA, Digital audio/JPEG discs.
2.Multiphase Slow has five speeds:1/2, 1/3, 1/4, 1/5, 1/6, 1/7 of the normal speed play when press
Slow button consecutively in playing discs.
3.When press Play button or press the slow button seven times, it goes to normal station.]
Freeze Frame
1.Compatible with DVD, SVCD, VCD, CD, HD-CD, WMA, Digital audio/JPEG discs.
2.During CD, HD-CD, WMA or Digital audio disc / JPEG playback, press Pause once to freeze
playback; Press Play button to resume normal playback.

Using the Repeat Feature
1.Compatible with DVD, SVCD, VCD, CD, HD-CD, WMA, Digital audio/JPEG discs.
2.While a disc is playing, press Repeat button once, and the repeat banner appears to show
current repeat mode.
A) ,Press Repeat
button again to turn on repeat mode. Press the button again on the remote to turn to the next
repeat mode. There are three repeat options: Off, Track Repeat, and Disc Repeat.
With each consecutive press of the button, the repeat mode switches. If you press the
button four times, repeat mode cycles back to Off.
b)In DVD playback, press Repeat button again to turn on repeat mode. There are three repeat
options: Off, Chapter Repeat, and Title Repeat. With each consecutive press of the button,
the repeat mode switches. If you press the button four times, repeat mode cycles back to Off.
c)In WMA, Digital audio disc / JPEG playback, press Repeat button again to turn on repeat mode.
There are four repeat options: Off, Track Repeat, Directory Repeat, and Disc Repeat. With each
consecutive press of the button, the repeat mode switches.
If you press the button five times, repeat mode cycles back to Off.
Using the Search Feature
1.Compatible with DVD, SVCD, VCD, CD, HD-CD discs.
2.You can use Search feature to select a title / chapter / track number or go to a specific point in
a title. First, press Search button on the remote controller to bring up the search menu and enter
the edit state; Secondly, press Arrow buttons to highlight the title / chapter / track number or the
time option; Thirdly, use Numeric buttons to enter the title / chapter / track you want to play or
the elapsed time you want to go to in that title; At last, press Enter button to start playback. For
example, entering 01:23:56 will start playback one hour, twenty-three minutes and fifty-six
seconds into the title.
3.Notes
a)This feature does not work in Program Play mode.
b)If PBC is on, it will turn off automatically when Search Playback starts.
C)
Changing the Soundtrack or Language
1.Compatible with DVD SVCD, VCD, CD, HD-CD, WMA, Digital audio/JPEG discs.
2.Press the LANGUAGE button to display current soundtrack.
A)Press the button to switch soundtracks.
b)Press the button again on the remote to turn to next soundtrack.
3.When playing a SVCD or VCD disc, there are five soundtracks: Stereo (L/R), L/L, R/R, L/L Auto
A/D Detect, and R/R Auto A/D Detect. With each consecutive press of the button, the soundtrack
switches. If you press the button six times, soundtrack cycles back to Stereo.
5.When playing a DVD or SVCD disc, press LANGUAGE button to display current language, press
the button again to turn to next language if the disc has different languages.
In SVCD,VCD,CD, HD-CD,WMA, Digital Audio,/JPEG sequence playback mode
When playing WMA, Digital Audio or JPEG discs, the Search feature does not work
4. When playing CD,HD-CD,WMA, or Digital Audio discs, there are three (L/R),L/L and R/R.
Table of contents
Other Denver LCD TV manuals

Denver
Denver TFD-3227M User manual

Denver
Denver TL-2006TP User manual

Denver
Denver DFT-1942 User manual

Denver
Denver DFT-505 User manual

Denver
Denver TFD-1512 User manual

Denver
Denver DFT-2010DVBT User manual

Denver
Denver TFD-2622 User manual

Denver
Denver TFD-2226DVBT User manual

Denver
Denver TFD-1506 User manual

Denver
Denver TFD-1505 User manual

Denver
Denver DFT-3215 User manual

Denver
Denver DFT-1932DVBT User manual

Denver
Denver LDD-2461DVBT User manual

Denver
Denver DFT-3218 User manual

Denver
Denver DFT-2614 User manual

Denver
Denver DFT-506 User manual

Denver
Denver TFD-2211 User manual

Denver
Denver TFD-2470 User manual

Denver
Denver DFT-1912DVBT User manual

Denver
Denver DFT-3218 User manual