manuals.online logo
Brands
  1. Home
  2. •
  3. Brands
  4. •
  5. Dimplex
  6. •
  7. Heater
  8. •
  9. Dimplex B075E User manual

Dimplex B075E User manual

Installation and Operating Instructions
MARK1 Oil Filled Panel
(IP20)
08/53912/0 Issue 1
THESE INSTRUCTIONS SHOULD BE READ CAREFULLY AND RETAINED FOR FUTURE REFERENCE
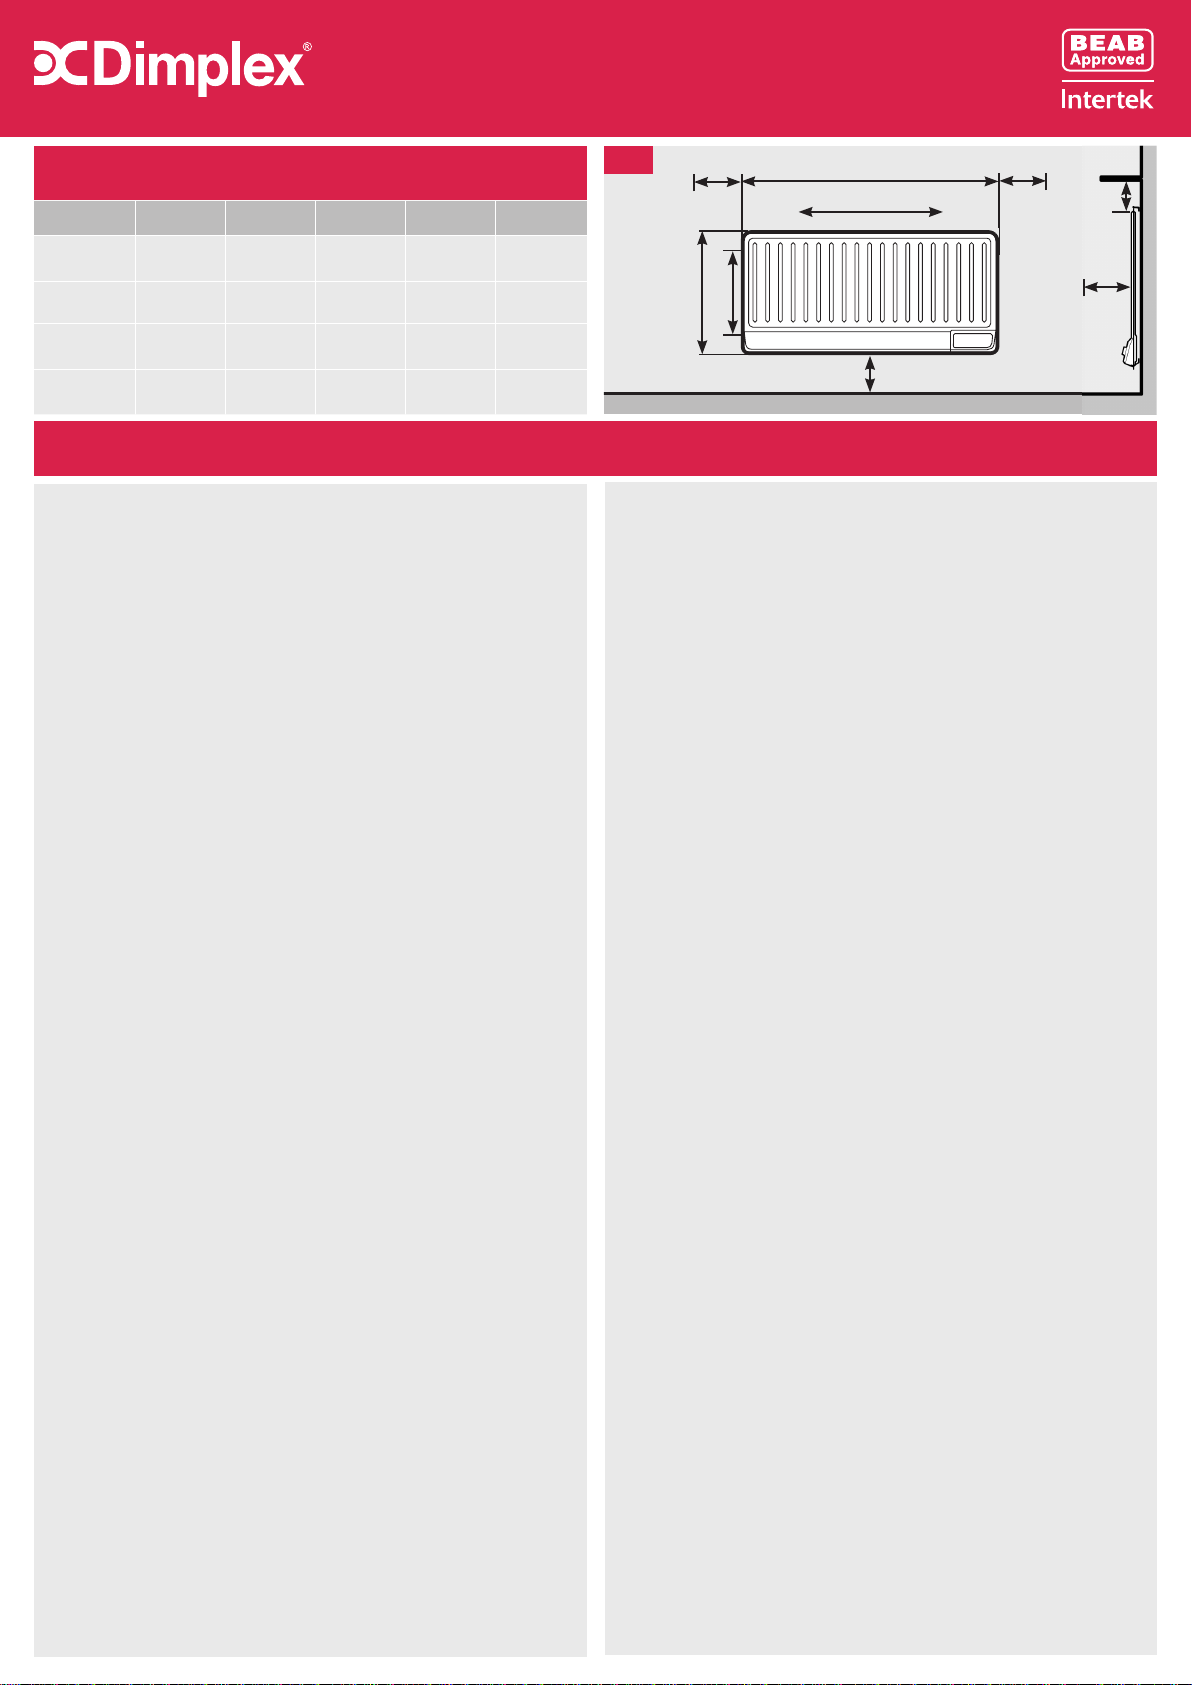
Model(s) Watt A B C D
B075E 750 570mm 659mm 405mm 527mm
C100E 1000 840mm 659mm 675mm 527mm
D150E 1500 1105mm 659mm 940mm 527mm
E200E 2000 1373mm 659mm 1208mm 527mm 75mm (min)
‘A’
‘B’
150mm
(min) 150mm
(min)
305mm
(min)
Shelf
Minimum
front
clearance
300mm
(min)
‘C’
‘D’
Dimensions
IMPORTANTSAFETY ADVICE
This appliance can be used by children aged
from 8 years and above and persons with
reduced physical, sensory or mental capabilities
or lack of experience or knowledge if they
have been given supervision or instruction
concerning the use of the appliance in a safe
way and understand the hazards involved.
Children shall not play with the appliance.
Cleaning and user maintenance shall not be
madebychildrenwithoutsupervision.
Children of less than 3 years should be kept
away unless continuously supervised. Children
aged from 3 years and less than 8 years shall
only switch on/o the appliance provided that
it has been placed or installed in its intended
normal operating position and they have been
given supervision or instruction concerning
the use of the appliance in a safe way and
understand the hazards involved. Children
aged from 3 years and less than 8 years shall
not plug in, regulate and clean the appliance
orperformusermaintenance.
CAUTION: Some parts of this product can
become very hot and cause burns. Particular
attention has to be given where children and
vulnerablepeopleare present.
WARNING: In order to avoid overheating, do
notcovertheheater.
DO NOT use this heater in the immediate
surroundings of a bath, a shower or a swimming
pool.
CAUTION - In order to avoid a hazard due to
inadvertent resetting of the thermal cutout,
this appliance must not be supplied through
an external switching device, such as a timer
or connected to a circuit that is regularly
switchedonandobytheutility
IMPORTANT - If the supply cord is damaged,
it must be replaced by the manufacturer, its
service agent or similarly qualied persons in
ordertoavoida hazard.
This heater is lled with a precise quantity of
special oil. Repairs requiring the opening of
the oil container are only to be made by the
manufacturer or service agent who should be
contactedif thereis anoilleak.
When scrapping the heater, follow the regulations
concerningthedisposalof oil.
DO NOT COVER THE RADIATOR or place
material or gaments on it, or obstruct the air
circulation around the radiator, for example
with the curtains or funiture, as this could cause
overheatingand are risk.
The radiator complies with stringent safety
standards but to ensure ecient operation
SURFACES OF THE RADIATOR WILL BECOME
HOT AND CONTACT WITH THESE AREAS
SHOULDBE AVOIDED.
If young children, the aged or inrm are likely to be left
in the vicinity of the heater, we advise that adequate
precautionsshouldbetaken.Werecommendthataguard
bettedtoensurecontactwiththeheaterisavoidedand
objects cannotbeinserted intothe product.
For further information, please contact our guard
supplier direct on Tel. No. 020 7987 1184, or in
case of diculty or for further advice contact
the Customer Helpline.
DO NOT use the radiator if it has been dropped or
damaged or the mains lead has been damaged,
untilit hasbeenexamined bya qualied engineer.
DO NOT use the radiator if it develops an oil
leak. Unplug the radiator and contact your
supplier or our Customer Help Line.
Fig. 1
This guide is for quick reference only
To view the full manual, please scan this QR code using your
Smartphone or visit the product page at www.dimplex.co.uk
93mm
67mm
Energy Related Product Directive
Type of heat output/ room temperature control
With electronic room temperature control Yes
Electronic room temperature control plus week timer Yes
With open window detection Yes
With adaptive start control Yes
Model Identier(s):
B075E C100E D150E E200E
Nominal heat
output Pnom 0.75 kW 1 kW 1.25 kW 1.5 kW
Height (mm)
659 659 659 659
Width (mm)
570 840 1105 1373
Depth (mm)
50 50 50 50
Minimum heat
output (indicative) Pmin 0.75 kW 1.00 kW 1.25 kW 1.5 kW
Maximum continuous
heat output Pmax,c 0.75 kW 1.00 kW 1.25 kW 1.5 kW
Auxiliary electricity Consumption
At nominal heat output elmax 0.00 0.00 0.00 0.00
Atminimumheatoutput elmin 0.00 0.00 0.00 0.00
In standby mode elSB <0.0005 <0.0005 <0.0005 <0.0005
With open window detection Yes
With adaptive start control Yes
ThisproductcomplieswithLot20oftheEnergyEciency Directive (2015/1188)
General Information
Pleasereadthe instructionsclosely beforerstusingtheproduct.
This heater may be used wall-mounted or freestanding.The necessary wall mounting brackets
are provided with the product as a standard. The feet screws can be bought separately as an
accessory.
It should only be operated when in the upright position as shown - see Fig.1a and Fig.1b. All
models are IP20 rated. Before connecting the heater check that the supply voltage is the same
asthatstatedontheheater.
Wall Mounting
IMPORTANT -The radiator must only be mounted using the kit supplied
WARNING -This product is heavy and care should be taken in installation
Select a suitable position on a wall, near to a mains power outlet. The radiator
should not be mounted closer than 75mm from the oor - see Fig. 2 (to enable
cleaning), or adjacent side walls. Ensure at least 305mm clear space between
the radiator and any overhanging shelf. It should not be mounted closer than 1
metre from the ceiling.
NOTE -The bottom of the radiator must not be less than 75mm from the oor.
To achieve this the top edge of the bottom brackets must be at least 160mm
from the oor - see Fig 2. On this line, mark o the xing centres according to
model - see `C’in the table in Fig. 2 and Fig.3
Place the bottom brackets centrally over these centres with the top row of holes
on the line, and mark the xing hole positions – see Fig. 3.
STEP 3: Drill the holes and t wall plugs. Screw the bottom brackets in position
– see Fig. 3.
STEP 4: MeasuredimensionDin Fig.2 accordingtomodel,fromthetopofthe bottombrackets
and draw a horizontal line. Mark o the xing centres for the top brackets in line with
thebottom brackets.Placeeachtopbracketon thelineandmarkthe xing holes–see
Fig. 4. Drill and plug the wall and x the top brackets in place.
STEP5: Placetheradiatoronthe bottom brackets,then t each securingbrackettothe top of
the radiator and secure it with the self-tapping screw provided – see Fig. 5.
Check that the radiator is securely xed to the wall.
75mm
(min)
‘C’
‘Y’
75mm
(min)
Fig. 2
Fig. 3
Fig. 4 Fig. 5
STEP 1: Check that you have all the necessary components:
(a) 2 x Bottom wall brackets
(b) 2 xTop wall brackets
(c) 2 x Radiator securing brackets
(d) 2 x Self-tapping screws.
STEP 2: Using a straight edge, draw a horizontal line (see‘Y’in Fig. 2) for the bottom brackets
at the required mounting height from the oor.
IMPORTANT: Please register your product without delay. Simply scan this QR code using your smartphone, or go to
https://www.dimplex.co.uk/register.
If you do not have access to the internet, pelase call us on 0344 879 3588
Quick Start Guide
How does the heater control work?
The control allows you to choose when you want heat and at what temperature. When using a timer mode (see below) will display on the home screen to tell
you when the heater is maintaining the temperature displayed.The current time will be displayed when the heater is outside of a timed heating period.
When Manual, Schedule or Frost modes are being used the heater will always maintain the temperature shown on the home screen.
Set the Time
To set the date and time on the heater, press Menu, then press Up three times to highlight the Date & time Icon, press Enter. Use the Down and Up to increase/
decrease the hour, press Enter to conrm. Repeat this process to set the minutes, Day, Month and Year. Press Enter to conrm and return to home screen.
Set the Temperature
The temperature shown on the display is the target room temperature known as Setpoint. This is the temperature that the heater will maintain during the heating
periods. If the room temperature is above this temperature then the heater will not operate. The heater leaves the factory with this temperature set at 21oC which
represents a typical comfortable room temperature. If you require a dierent room temperature then press either Down or Up until the display shows the temperature
you require
Your heater comes pre-programmed with four heating periods.These periods set the time and temperature at which the heater operates in Comfort ON mode.
These four periods are:
• P1: 07:00 – 09:00 21oC
• P2: 10:00 – 12:00 7oC
• P3: 13:00 – 15:00 7oC
• P4: 17:00 – 21:00 21oC
Child Lock
If you need to lock the controls so that the settings cannot be changed then activate the Child Lock. To lock the controls press and hold both the Back button and
Enter button together for 3 seconds. The Lock icon will appear on the screen. To unlock repeat the action by pressing both the Back button and Enter for three
seconds.
Advance
Sometimes you may be at home when you had not planned to be or need to leave when you had planned to have heating on.You can change the way you use
your heating temporarily; this temporary change is achieved using the Advance function.
When a timer has been selected, the Advance function allows you to begin the next period early. If the heater is in a Comfort O period and you want heat - press
the Advance button.TheAdvance icon will be displayed on the screen. If the heater is in the Comfort On and you don’t want heat, press the Advance button
and it will go o until the beginning of the next Comfort On Period.
The controls are located on the top of the heater. The heater is tted with an adjustable electronic controller consisting of a display screen and six touch sensitive
buttons:
DO NOT COVER
4 5 7321 986
1Back Button
2Menu Button
3Advance Button
4Up & Down
5Enter
6Indicator“ON”
7Days of theWeek
8Display Screen
9Indicator“OFF”
Lock
Connectivity
Sound
OpenWindow
Adaptive Start
Manual Mode
Advance
Set Time & Date
Frost Protect
Schedule
Battery power will only be used when there is no power to the unit
Expected battery life is 5 years
Should you need to replace the battery, please use a CR 2032 3V button cell
CONTROLLER BATTERY REPLACEMENT
Recycling
Your Guarantee
For electrical products sold within the European Community. At the end of the electrical product’s useful life it should not be
disposed of with household waste. Please recycle where facilities exist. Check with your Local Authority or retailer for recycling
advice in your country. Batteries should be disposed of or recycled in accordance withWEEE Directive 2012/19/EU. Packaging should
be recycled where possible.
Y
our Product is manufactured by Glen Dimplex UK operating as Glen Dimplex Heating & Ventilation. GDHV designs and manufactures products to ensure
they deliver reliable service for normal use in domestic dwellings and, where specied by us, in light commercial premises.
G
DHV products are individually tested before leaving the factory, Your product comes with a 2 year parts and labour guarantee for repair or replacement
of faulty goods and/or partial refund in the event that a repair or replacement is not available.
Y
our guarantee is provided by Glen Dimplex UK Ltd operating as Glen Dimplex Heating &Ventilation Ltd, Millbrook House, Grange Drive, Southampton
SO30 2DF. Terms and conditions apply.
The GDHV guarantee does not in any way diminish or aect your statutory consumer rights in connection with your product.
If you experience a problem with your product during or after the guarantee period, visit our online help centre:
https://www.dimplex.co.uk/gdhv-help-centre
If you cannot solve your issue online, contact the customer care team on 0344 879 3588
Please note that when you contact us you will need to provide the model and serial number of your product and a description of the fault which has
occurred.
© Glen Dimplex UK Limited. All rights reserved. Material contained in this publication may not be reproduced in whole or in part, without prior permission in writing of Glen Dimplex
Customer Helpline: 0344 879 3588
www. dimplex.co.uk
Glen Dimplex Heating &Ventilation
Millbrook House, Grange Drive, Hedge End, Southampton SO30 2DF
This product complies with the European Safety Standards EN60335:2-30 and the European Standard Electromagnetic Compatibility (EMC) EN55014:1,
EN55014:2, EN61000:3-2 and EN61000:3-3 which cover the essential requirements of EMC Directive 2014/30/EU and the LVD Directive 2014/35/EU.
To view the full guarantee terms and conditions scan this
QR
code using your smartphone or go to
https://www.gdhv.co.uk/guarantee-terms-and-conditions.
Why RegisterYour ProductsWith Us?
Faster Customer Service
Once you have registered your product, our
customerservice teamwilbeable to quickly
access your details when you contact us,
allowing them to help you sooner.
Guarantee Management
Upon registration, you will receive a
conrmation email including a summary of
your product guarantee, a copy of our terms
and conditions and a copy of your proof of
purchase (optional).
Product Recall Notication
If your product is registered you will
automatically be contacted with
applicable safety notications, or in the
unlikely event of a product recall.
Please register your product with us within 28 days of date of purchase to enable us to provide ecient customer service if you need to contact us,
to contact you in the event of a product or safety update, to extend your guarantee where applicable, and, if you choose, to send you additional
information about our products and services.
Register your product at https://www.gdhv.co.uk/register, or if you do not have access to the internet, call us on 0344 879 3588.
On registering you will automatically receive a copy of the terms and conditions of your guarantee, which can also be downloaded at any time from
https://www.gdhv.co.uk/guarantee-terms-and-conditions. If you do not have access to the internet, call us on 0344 879 3588 and we will send them
to you by post.

Other manuals for B075E

3

This manual suits for next models

5

Other Dimplex Heater manuals

Dimplex SRX 070C User manual

Dimplex

Dimplex SRX 070C User manual

Dimplex EvoRad2BTA User manual

Dimplex

Dimplex EvoRad2BTA User manual

Dimplex RD 907 User manual

Dimplex

Dimplex RD 907 User manual

Dimplex 403TSFTIE7 User manual

Dimplex

Dimplex 403TSFTIE7 User manual

Dimplex AC45N User manual

Dimplex

Dimplex AC45N User manual

Dimplex XT12 User manual

Dimplex

Dimplex XT12 User manual

Dimplex IRX50N User manual

Dimplex

Dimplex IRX50N User manual

Dimplex FX 20V User manual

Dimplex

Dimplex FX 20V User manual

Dimplex MH NO Series User manual

Dimplex

Dimplex MH NO Series User manual

Dimplex WFE 3TNB User manual

Dimplex

Dimplex WFE 3TNB User manual

Dimplex ECW 934 User manual

Dimplex

Dimplex ECW 934 User manual

Dimplex WFC 3NB User manual

Dimplex

Dimplex WFC 3NB User manual

Dimplex RFF-800 Series User manual

Dimplex

Dimplex RFF-800 Series User manual

Dimplex XMS718N User manual

Dimplex

Dimplex XMS718N User manual

Dimplex PCH2000TCW User manual

Dimplex

Dimplex PCH2000TCW User manual

Dimplex AC3CN User manual

Dimplex

Dimplex AC3CN User manual

Dimplex DX 422 T User manual

Dimplex

Dimplex DX 422 T User manual

Dimplex EVX050 User manual

Dimplex

Dimplex EVX050 User manual

Dimplex RPX075N User manual

Dimplex

Dimplex RPX075N User manual

Dimplex CFH60 User manual

Dimplex

Dimplex CFH60 User manual

Dimplex SRX 080M User manual

Dimplex

Dimplex SRX 080M User manual

Dimplex DPH1563 User manual

Dimplex

Dimplex DPH1563 User manual

Dimplex RPX Series User manual

Dimplex

Dimplex RPX Series User manual

Dimplex CXD2000H-NA Series User manual

Dimplex

Dimplex CXD2000H-NA Series User manual

Popular Heater manuals by other brands

Plein Air TV-SP 2000 instruction manual

Plein Air

Plein Air TV-SP 2000 instruction manual

S&P COR-IND 1000 F manual

S&P

S&P COR-IND 1000 F manual

air choice OH12 owner's manual

air choice

air choice OH12 owner's manual

Plumbworld PWLPRADC11 Assembly instructions

Plumbworld

Plumbworld PWLPRADC11 Assembly instructions

Strend Pro OH-002 instruction manual

Strend Pro

Strend Pro OH-002 instruction manual

Apollo Greenhouse Small Assembly instructions

Apollo

Apollo Greenhouse Small Assembly instructions

DeLonghi HMP1500 Important instructions

DeLonghi

DeLonghi HMP1500 Important instructions

Elta Electrical Fan Heater instruction manual

Elta

Elta Electrical Fan Heater instruction manual

Adler AD7808 user manual

Adler

Adler AD7808 user manual

Morris MBH-16312 Instructions for use

Morris

Morris MBH-16312 Instructions for use

Seville Classics ULTRASlimline 10222 instruction manual

Seville Classics

Seville Classics ULTRASlimline 10222 instruction manual

osily OSPH1000E Assembly, installation and operation instructions

osily

osily OSPH1000E Assembly, installation and operation instructions

Star Progetti Varma Tec VARMA 301 operating instructions

Star Progetti

Star Progetti Varma Tec VARMA 301 operating instructions

Olsberg CTSC user manual

Olsberg

Olsberg CTSC user manual

BioSmart BIO-1500FTA owner's manual

BioSmart

BioSmart BIO-1500FTA owner's manual

CUR AQUA 433 Series installation instructions

CUR AQUA

CUR AQUA 433 Series installation instructions

Ducasa INOX Installation operation & maintenance

Ducasa

Ducasa INOX Installation operation & maintenance

AIGOSTAR 33IEK Instruction

AIGOSTAR

AIGOSTAR 33IEK Instruction

manuals.online logo
manuals.online logoBrands
  • About & Mission
  • Contact us
  • Privacy Policy
  • Terms and Conditions

Copyright 2025 Manuals.Online. All Rights Reserved.