dji MATRICE 200 series User manual

MATRICE 200 SERIES
M210/M210 RTK
Quick Start Guide
V1.0

2
17
8
15
13
14
16
7
12
6
9
19 20 21
18 22
2
1
5
4
10
23
3
24
25
11
26
27
13
Matrice 210 V2 / Matrice 210 RTK V2
The DJITM MATRICETM 210 V2/Matrice 210 RTK V2 (M210 V2/M210 RTK V2) is a powerful industrial-grade flight platform with world-
class agility and speed, redundant barometers and IMUs for maximum reliability, and smart flight features that make capturing
complex shots easy. The aircraft’s visual sensors* enable enhanced hovering precision even when flying indoors or in environments
where GNSS is unavailable. The built-in AirSense makes you aware of your surrounding airspace to ensure flight safety. Its
airframe design gives it an IP43 Ingress Protection Rating, in accordance with the global IEC 60529 standard. The mechanical
design, along with quick-release landing gears and mounted folding arms, makes it easy to transport, store, and prepare for flight.
The safety beacons on both the top and the bottom of the aircraft allow the aircraft to be identified at night or in low light conditions.
The M210 V2/M210 RTK V2 is compatible with many of DJI’s DGC2.0 connector gimbals, supporting a single upward gimbal or
dual downward gimbals.* It is equipped with many expansion ports to broaden its applications. The M210 RTK V2 has a built- in
DJI D-RTKTM, which provides more accurate heading data for positioning.** An advanced power management system along with
dual batteries ensures power supply and enhances flight safety. Without a payload, the M210 V2 has a flight time of up to 38
minutes with standard batteries (TB55), while the M210 RTK V2 has up to 32 minutes of flight time.*
This manual uses the M210 RTK V2 and ZENMUSETM Z30 and X5S gimbals as an example to demonstrate setup.
Folded
1. FPV Camera
2. Forward Vision System
3. DJIGimbalConnectorv2.0(DGC2.0)I
4. DJIGimbalConnectorv2.0(DGC2.0)II
5. Gimbal Detachment Button
6. Frame Arms
7. Motors
8. Propellers
9. ESCLEDs
10. Transmission Antennas
11. Landing Gears
12. Upward Gimbal MountingPosition
13.
14. Upward Infrared Sensor
15. Aircraft StatusIndicators
16. D-RTK MountingBracket**
17. D-RTK Antennas**
18. Extended Power Port(XT30)
19. USB Mode Switch
20. USB Port
21. Linking Button andIndicator
22. Expansion Ports
23. Battery Removal Button
24. Intelligent FlightBatteries
25. Battery LevelIndicators
26. Power Button
27. Downward Vision System
28. microSD Card Slot
* The Vision and Infrared Sensing Systems are affected by surrounding conditions. Read the Disclaimer and SafetyGuidelines to learn more.
Gimbals can be purchased separately from the official DJI website. When using a single upward gimbal with the M210 V2, an external GPS module connected
through the expansion port is required. Please refer to the user manual for more details about expansion ports, upward gimbals, and downward gimbals.
Please note thatmaximum flight times aremeasured in ideal flight conditions. Actual flight times may vary depending on your environment.
DO NOT disassemble the aircraft shell, otherwise it will not be covered under warranty.
**Please note that this list of items applies to theM210 RTK V2. Although similar, the M210 V2 aircraft does not include the D-RTK antennas andmounting bracket.
When using the M210 RTK V2, more accurate positioning data can be achieved when using a Network RTK service or a DJI D-RTK 2 High-Precision GNSS
Mobile Station for Matrice (purchased separately). If the data transmission signal between the aircraft and the Network RTK server or mobile station is weak, it
is recommended to use post-processed kinematic (PPK) technology.
28
EN
Night flight indicator

3
Cendence S Remote Controller
The CendenceTM S remote controller features DJI’s OCUSYNCTM 2.0 technology for a maximum transmission distance of up to 4.3
mi (7 km).* Equipped with a DJI CrystalSkyTM 7.85 inch ultra-bright monitor, it displays a live HD view directly via the built-in DJI Pilot
app, providing a precise and responsive flying experience. Dual frequency* support makes the HD video downlink more stable. In
Dual Remote Controller Mode, two remote controllers control the aircraft and camera separately, even when they are up to 656 feet
(200 m) apart.
The remote controller works with a WB37 Intelligent Battery, which can be fully charged via the charging port in about 2 hours and
24 minutes with the standard charger, or with the Intelligent Battery Charging Hub in about 1 hour and 11 minutes. The maximum
run time of the remote controller is approximately 4 hours without supplying power to a monitor and with Dual Remote Controller
mode disabled.*
1. HDMI Port
2. USB Port
3. Micro SD Card Slot
4. Micro USB Port
5. Headphone Jack
6. Light-Sensitive Port
7. Power Button
8. Customizable Button (F1)
9. Setting Button
10. Customizable Button (F2)
11. Back Button
12. Battery Release Button
13. WB37 Intelligent Battery
14. Antennas
15. Monitor Mounting Bracket
16. USB Port (Reserved Port)
17. Control Sticks
18. Strap Hook
19. Focal Adjustment Knob
20. Return-to-Home (RTH) Button
21. Power Port
22. EV Setting Button
23. Shutter Setting Button
24. Aperture Setting Button
25. ISO Setting Button
26. Pause Button
27. Power Button
28. Remote Control Display
29. Camera Settings Dial
30. Customizable Button Setting Menu
31. Customizable Buttons (BA-BH)
32. Support Rig
33. Left Lever
34. Left Dial (Gimbal Pitch)
35. Flight Mode Switch
36. Handle Bar
37. USB Port
(forMobileDevice Connection)
38. HDMI A Port (for Video Output)
39. CAN Bus Port (Extension Port)
40. Micro USB Port
41. SDI Port (for Video Output)
42. Right Lever
43. Right Dial (Gimbal Pan)
44. AF Button (Autofocus)
45. Record Button
46. Shutter Button
47. Customizable Buttons (C1-C4)
* The remote controller can reach its maximum transmission distance (FCC) in an unobstructed area with no electro-magnetic interference at an altitude of about
400 feet (120 meters). The actual maximum transmission distance may be less than the distance mentioned above due to interference in the operating
environment, and the actual value will fluctuate according to the strength of interference.
To comply with local regulations, the 5.8 GHz frequency is not available in some countries and regions.
For more information about Dual Remote Controller mode, please refer to the user manual.
Maximum run time is estimated in a lab environment without supplying power to a smart device or monitor, for reference only.
7
8
9
10
11
12
13
1
2
3
6
16
4
15
14
5
17 18
20
29
19
31
22
26
28 30
23
24
27
25
32
21
36
47
47
33
37
38
39 40 41
42
34
43
44
46
35 45
EN

4
Using Matrice 210/Matrice 210 RTK
1. Downloading the DJI Pilot App
Users can access the DJI Pilot app that is built-in to the remote controller’s CrystalSky monitor.
Users can also search for DJI Pilot in Google Play Store or scan the QR code below to download
the app onto yourmobile device, and thenconnect the mobile device to the remote controller.
Inter net
First-time activation requires your DJI account and an internet connection.
DJI Pilot supports Android 4.4 or later.
DJI Pilot App
2. Charging the Batteries
Press the release button and open the corresponding charging port cover.
Insert the Intelligent Flight Battery into the charging port to begin charging.
Be sure to press the release button when removing fully charged batteries.
1 A
2
Using the IN2CH Charging Hub, charging time is
approximately.
TB55: 2 hours and 33 min (two batteries)*
B
Charging Time:
2 hours and 24 min*
B
Using the WCH2 Charging Hub,
charging time is approximately 1
hour and 11 min (onebattery)*
Power Outlet
100~240 V
(50Hz/60Hz)
B
A
*Provided charger
When charging is complete, the LED lights on the Intelligent Flight Battery will turn off, and the LED on the Charging Hub will turn solid green.
When charging is complete, the display on the remote controller will show 100%.
The Charging Hub will sound an alert when the battery has been fully charged. The alert can be turned on or off by toggling the switch under the hub.
Connect the Intelligent Flight Batteries to the aircraft and power them on. If battery temperature is lower than 15°C, the system will auto heat the batteries to
maintain a temperature between 15°and 20°C.
Ensure two Intelligent Flight Batteries are charged and discharged simultaneously to prolong their service life and for a better flight experience.
3. Preparing the Remote Controller
Mounting Monitor and Remote Controller Batteries
CrystalSky monitors and the Cendence S remote controller
use the same batteries.
Put the battery into the Battery Slot, then slide it to the end
until you hear a click.
Press the Battery Release Button before removing the battery.
Press the Battery Level Button once to check the battery level.
Low
High
Mounting the Monitor to the Remote Controller
A
B
Ensure that Part B is
unlocked. Connect Part
B to Part A.
Lock the Mounting
Bracket. Use a coin or the screwdriver
included to adjust the
tightness of the tilt axis.
EN

5
EN
Using the Remote Controller
The Stick Mode is set to Mode 2 by default. In Mode 2, the left stick controls the aircraft’s elevation and heading, and the
right stick controls the aircraft’s forward, backward, and lateral movements. To adjust the FPV camera, press and hold the C2
Button and rotate the left dial.
Left Stick Right Stick FPV Camera
Forward
UP
Down
Turn Left
Turn Right
Backward
For more information about how to connect and use the remote controller, please refer to the user manual.
You can change the stick mode and customize the C1-C4 and BA-BH buttons’ functions in the DJI Pilot app.
4. Preparing the Aircraft
Unfolding the D-RTK Antennas (for M210 RTK V2 only)
Unfold the D-RTK antennas and then turn the knob tightly in the direction indicated by the lock icon .
For the aircraft to take off, the D-RTK antennas must be fully unfolded and securely locked.
Installing the Landing Gears Unfolding theAircraft
Unfold the frame arm, slide the arm lock to the end of the frame
arm, then rotate it about 90°until the silver line lies within the
range of the icon.
Left
Right
2
1
1
3
2

6
Mounting the Propellers
Propellers without
silver rings should be
installed onunmarked
motors.
Press the propeller
down onto the mounting
plate and rotate it in the
direction indicated bythe
lock icon until secure.
Propellers with
silver rings should
be installed on
motors with the
same color marks.
Check that the propellers are secure
before each flight.
Mounting the Gimbal and Camera
Press the Gimbal
Detachment button
to remove the cover.
Align the white and
red dots and insert
the gimbal.
Rotate the gimbal
lock to the locked
position.
Gimbal Connector II GimbalConnector I
Zenmuse XT ZenmuseX4S/X5S/X7/XT2/Z30
Zenmuse Z30 Zenmuse X4S/X5S/X7/XT/XT2
Make sure to press down the gimbal detachment button when rotating the gimbal lock to remove the gimbal and camera. The gimbal lock should be fully rotated when
removing the gimbal for the next installation.
Mounting the Intelligent Flight Batteries
Insert a pair of batteries.
Press once to check the battery level.
Press again and hold until the batteries turn on or off.
High
Only use battery slot B when using one battery to supply power. In this case, the aircraft can only be powered on, but cannot take off. If
for any reason only one battery is available during flight, land the aircraft immediately and replace the batteries as soon as possible.
Make sure to press the Battery Removal button when removing the battery.
Make sure to use the included TB55 batteries. TB50 batteries are not recommended as they may reduce the flight performance.
Low
Configuring the RTK Module (for M210 RTK V2 only)
The M210 RTK V2 aircraft includes D-RTK antennas. Highly accurate positioning data can be obtained when using the M210
RTK V2 with the DJI D-RTK 2 High-Precision GNSS Mobile Station for Matrice or Network RTK service.
1. In the Camera View in the DJI Pilot app, tap on the upper right corner, and then tap RTK. Enable aircraft RTK and
select a service type in settings.
2. If D-RTK 2 is selected, refer to the D-RTK 2 Mobile Station for Matrice user guide for information on configuration.
Contact a DJI authorized dealer for details on the use of Network RTK.
1
2
3
A
B
EN

7
5. Flight
Toggle the Flight
Power on the remote controller,
Launch the DJI
Before taking off, ensure that the Aircraft Status Bar in the
DJI Pilot app reads ‘Ready to Go (GPS)’ or ‘Ready to Go
(Vision)’ if flying indoors.
Mode switch to
P-mode, the safest
flight mode.
monitor, and aircraft. Pilot app.
After the monitor is powered on, wait for a pop-up window that asks for a selection of USB device use, and then select “DJI Pilot”. Otherwise, the app cannot be
connected to the remote controller.
Always set an appropriate RTH altitude before takeoff. Please refer to the Disclaimer and Safety Guidelines for more details.
Manual Takeoff
OR
Manual Landing
Pull left stick down
(slowly) until you touch
the ground.
Hold for a few seconds
to stop the motors.
Combination Stick Command tostart/stop themotors Left stick up
(slowly) to take off
Return-to-Home
Press and hold to initiate the RTH procedure. Press again to cancel.
Rotating propellers can be dangerous. DO NOT start the motors in narrow
spaces or when there are peoplenearby.
Always keep your hands on the remote controller so long as the motor is still
spinning.
After landing, power off the aircraft before turning off the remote controller.
To stop the motors mid-flight, press
the RTH buttonwhilesimultaneously
pulling the left stick to the bottom
inner corner. Stop motors mid-
flight will cause the aircraft to crash.
The motor can only be stopped
mid-flight when the flight controller
detects criticalerror.
It isimportant to understand basic flight guidelines for the safety
of both you and those aroundyou.
Refer to the Disclaimer and Safety Guidelinesfor more
information.
GEO Zones
Learn more:
http://flysafe.dji.com/no-fly
Ready to Go (GPS)
DJI Pilot
App
EN

8
Specifications
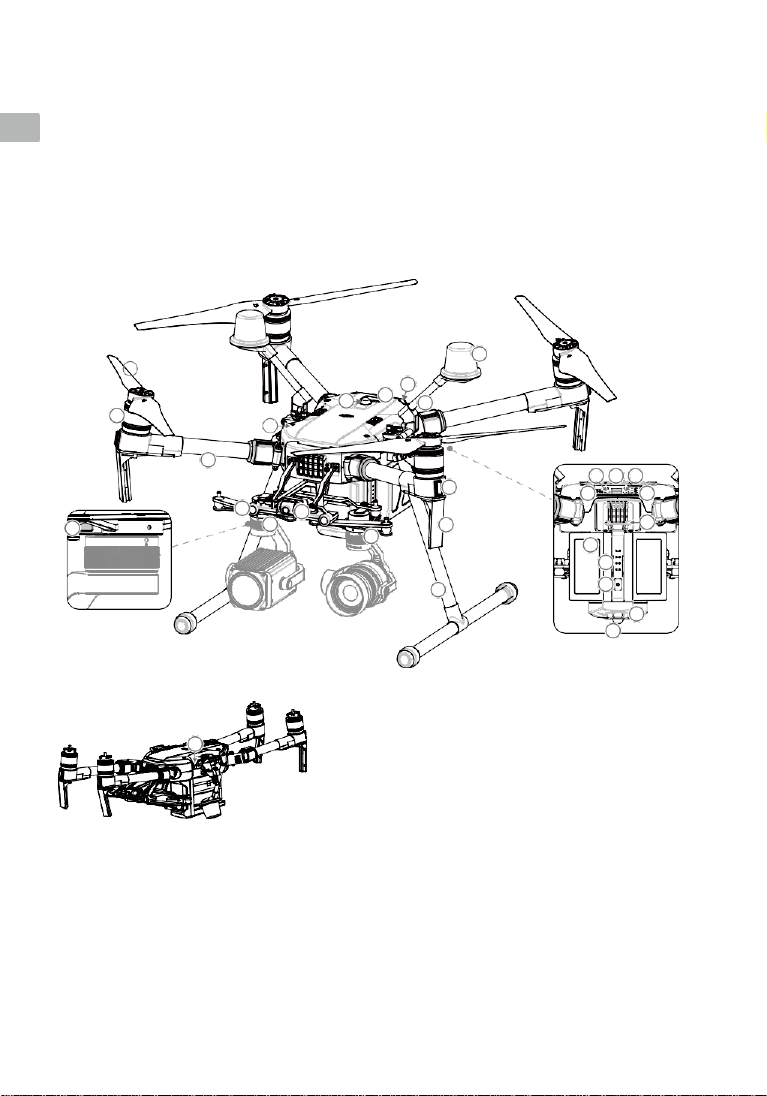
Aircraft (M210 V2 / M210 RTK V2)
Dimensions M210V2:Unfolded,propellersandlandinggearsincluded,883×886×398mm
Folded,propellersandlanding gears excluded, 722×282×242 mm
M210RTKV2:Unfolded,propellersandlandinggearsincluded,883×886×427mm
Folded, propellers andlanding gearsexcluded, 722×282×242mm
DiagonalWheelbase 643mm
MaxTakeoffWeight 6.14kg
OperatingFrequency 2.4000-2.4835 GHz; 5.725-5.850GHz
HoveringAccuracy(P-modewith GPS) Vertical: ±1.64 feet (0.5 m)or ±0.33 feet (0.1 m, Downward Vision System enabled)
Horizontal: ±4.92 feet (1.5 m) or ±0.98 feet (0.3 m, Downward Vision System enabled)
HoveringAccuracy(D-RTK) Vertical: ±0.33 feet (0.1 m); Horizontal: ±0.33 feet (0.1 m)
MaxAngularVelocity Pitch: 300°/s, Yaw:150°/s
Max Pitch Angle (Dual Downward Gimbal/Single Upward Gimbal) S-mode: 30°, P-mode A-mode: 25°
Max Pitch Angle(SingleDownwardGimbal) S-mode:35°;P-mode:30°(ForwardVisionSystemenabled:25°);A-mode:30°
MaxAscentSpeed 16.4 ft/s (5m/s)
MaxDescent Speed(vertical) 9.8 ft/s (3m/s)
MaxSpeed(DualDownwardGimbal/SingleUpwardGimbal) S-mode: 75.6kph(47mph);P-mode/A-mode:61.2kph(38mph)
MaxSpeed(SingleDownwardGimbal) S-mode/A-mode:82.8kph(51.4mph);P-mode:61.2kph(38mph)
MaxServiceCeilingAboveSeaLevel 9842 feet (3000m, with 1760Spropellers)
MaxWindResistance 39.4 ft/s (12m/s)
MaxFlightTime(withTB55batteries) M210 V2: 38 min (no payload), 24 min (takeoff weight: 6.14 kg)
M210RTKV2:32min(nopayload),24min (takeoffweight:6.14 kg)
SupportedDJIGimbals ZenmuseX4S/X5S/X7/XT/XT2/Z30
SupportedGimbalConfigurations Single Downward Gimbal, Dual DownwardGimbals, Single Upward Gimbal
IngressProtectionRating IP43
GNSS M210 V2: GPS+GLONASS; M210 RTK V2: GPS+GLONASS+BeiDou+Galileo
OperatingTemperature -4°to 122°F (-20°to 50°C)
OperatingFrequency 2.4000-2.4835 GHz; 5.725-5.850GHz
Remote Controller (GL900A)
Max Transmitting Distance
(unobstructed, free of interference) FCC: 5 mi (8 km); CE/MIC: 3.1mi (5 km); SRRC: 3.1 mi (5 km)
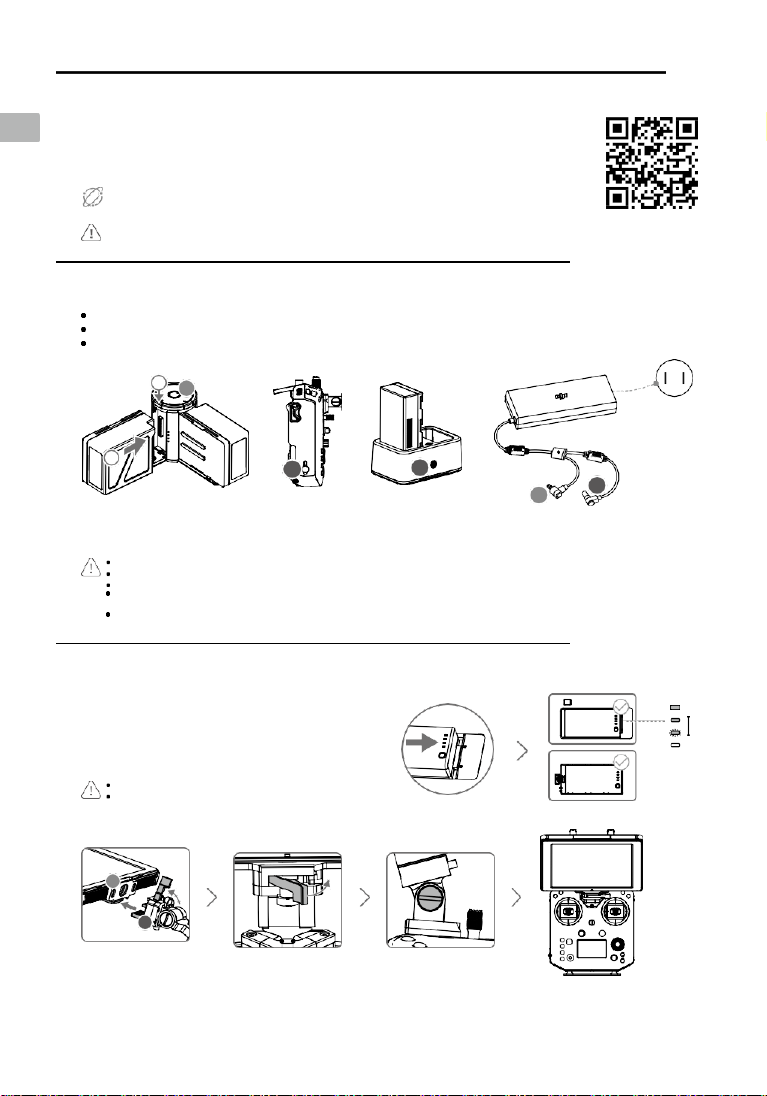
PowerSupply Extended Intelligent Battery (Model: WB37-4920mAh-7.6V)
OutputPower 13W (Without supplying power tomonitor)
USBPowerSupply iOS: 1 A 5.2 V (max); Android: 1.5A 5.2 V (max)
CrystalSkyMonitor DJI CrystalSky 7.85inch, Resolution:2048×1536;
Brightness: 2000 cd/m2; Operating System: Android 5.1; Storage: ROM 64GB
OperatingTemperature -4°to 122°F (-20°to 50°C)
Downward Vision System
VelocityRange <32.8 ft/s (10 m/s) at theheight of 6.56feet (2m)
AltitudeRange <32.8feet(10m)
OperatingRange <32.8feet(10m)
OperatingEnvironment Surfaces with clear patterns and adequatelighting (>15 lux)
UltrasonicSensorOperatingRange 0.33-16.4 feet (0.1-5m)
UltrasonicSensorOperatingEnvironment Non-absorbing material, rigid surfaces (thickindoor carpeting willadverselyaffect performance)
Forward Vision System
ObstacleSensingRange 2.3-98.4 feet (0.7-30m)
FOV Horizontal: 60°; Vertical:54°
OperatingEnvironment Surfaces with clear patterns and adequatelighting (> 15lux)
Upward Infrared Sensing System
ObstacleSensingRange 0-16.4 feet (0-5m)
FOV ±5°
OperatingEnvironment Large, diffuse, and reflective obstacles (reflectivity >10%)
Intelligent Flight Battery (TB55-7660mAh-22.8V)
Capacity 7660mAh
Voltage 22.8 V
BatteryType LiPo 6S
Energy 174.6Wh
Net Weight(SingleOne) Approx. 885g
OperatingTemperature -4°to 122°F (-20°to 50°C)
ChargingTemperature 41°to 104°F (5°to 40°C)
MaxChargingPower 180W
Charger (Model: IN2C180)
Voltage 26.1V
RatedPower 180W
Charging Hub (Model: IN2CH)
InputVoltage 26.1 V
InputCurrent 6.9 A
Download the latest version from
http://www.dji.com/matrice-200-series-v2
※ This content is subject to change without prior notice.
DJI incorporates HDMITM technology.
The terms HDMI and HDMI High-Definition Multimedia Interface, and the
HDMI Logo are trademarks or registered trademarks of HDMI Licensing
LLC in the United States and other countries.
MATRICE and DJI are trademarks of DJI.
Copyright © 2018 DJI All Rights Reserved.
Printed inChina.
EN

FCC/ISEDC ComplianceNotice
This device complies with Part 15 of the FCC Rules and ISEDC licence-exempt RSS standard (s).
Operation is subject to the following two conditions:(1) This device may not cause harmful interference,
and (2) this device must accept any interference received, including interference that may cause
undesired operation.
Any Changes expressly or modifications not approved by the party responsible for compliance could
void the user's authority to operate the equipment.
Cet appareil est conforme à la section 15 des règles de la FCC et aux normes RSS exemptes de licence
ISEDC. Son fonctionnement est soumis aux deux conditions suivantes: (1) Cet appareil ne doit pas
causer d’interférences nuisibles et (2) cet appareil doit accepter toutes les interférences reçues, y
compris celles pouvant entraîner un fonctionnement non souhaité.
Toute modification expresse ou non approuvée par la partie responsable de la conformité peut annuler
l'autorité de l'utilisateur à utiliser l'équipement.
Note: This equipment has been tested and found to comply with the limits for a Class B digital device,
pursuant to part 15 of the FCC Rules. These limits are designed to provide reasonable protection against
harmful interference in a residential installation. This equipment generates, uses and can radiate radio
frequency energy and, if not installed and used in accordance with the instructions, may cause harmful
interference to radio communications. However, there is no guarantee that interference will not occur in
a particular installation. If this equipment does cause harmful interference to radio or television
reception, which can be determined by turning the equipment off and on, the user is encouraged to try to
correct the interference by one or more of the following measures:
—Reorient or relocate the receiving antenna.
—Increase the separation between the equipment and receiver.
—Connect the equipment into an outlet on a circuit different from that to which the receiver is
connected.
—Consult the dealer or an experienced radio/TV technician for help.
RF Exposure Information
Aircraft complies with FCC/ ISEDC radiation exposure limits set forth for an uncontrolled environment.
In order to avoid the possibility of exceeding the FCC/ ISEDC radio frequency exposure limits, human

proximity to the antenna shall not be less than 20cm during normal operation.
For Remote Controller (model GL900A),SAR tests are conducted using standard operating positions
accepted by the FCC/ ISEDC with the device transmitting at its highest certified power level in all
tested frequency bands, although the SAR is determined at the highest certified power level, the actual
SAR level of the device while operating can be well below the maximum value. Before a new model is
a available for sale to the public, it must be tested and certified to the FCC/ ISEDC that it does not
exceed the exposure limit established by the FCC/ ISEDC, Tests for each product are performed in
positions and locations as required by the FCC/ ISEDC. For Handheld operation, this device has been
tested and meets the FCC/ ISEDC RF exposure guidelines when used with an accessory designated for
this product or when used with an acces sory that contains no metal.
For body worn operation, Remote Controller (model GL900A) has been tested and meets the FCC/
ISEDC RF exposure guidelines when used with an accessory designated for this product or when used
with an accessory that Contains no metal and that positions the handset a minimum of 10 mm from the
body.
Non-compliance with the above restrictions may result in violation of RF exposure guidelines.
ISEDC Radiation Exposure Statement:
L’aéronef est conforme aux limites d’exposition aux rayonnements de la FCC/ ISEDC établies pour un
environnement non contrôlé. Afin d'éviter tout risque de dépassement des limites d'exposition aux
fréquences radioélectriques imposées par la FCC/ ISEDC, la proximité humaine de l'antenne ne doit pas
être inférieure à 20 cm en fonctionnement normal.
Pour le contrôleur à distance (modèle GL900A), les tests SAR sont effectués à l'aide de positions de
fonctionnement standard acceptées par la FCC/ ISEDC, l'appareil transmettant à son niveau de
puissance certifié le plus élevé dans toutes les bandes de fréquences testées, bien que le SAR soit
déterminé au niveau de puissance certifié Le niveau de DAS de l'appareil en cours d'utilisation peut être
bien inférieur à la valeur maximale. Avant qu'un nouveau modèle ne soit disponible à la vente au public,
il doit être testé et certifié par la FCC/ ISEDC qu'il ne dépasse pas la limite d'exposition fixée par la
ISEDC. Les tests de chaque produit sont effectués à des emplacements et à des emplacements requis par
la ISEDC. . Pour le fonctionnement en mode portable, cet appareil a été testé et respecte les directives
d'exposition RF de la FCC/ ISEDC lorsqu'il est utilisé avec un accessoire conçu pour ce produit ou avec
un accessoire ne contenant pas de métal.
Pour une utilisation sur le corps, la télécommande (modèle GL900A) a été testée et répond aux

directives d'exposition RF de la FCC/ ISEDC lorsqu'elle est utilisée avec un accessoire conçu pour ce
produit ou avec un accessoire ne contenant pas de métal et positionnant le combiné à 10 mm minimum.
du corps.
Le non-respect des restrictions ci-dessus peut entraîner une violation des consignes d'exposition aux RF.
KCC Warning Message
“해당무선설비는 운용 중전파혼신 가능성이 있으므로 인명안전과 관련된 서비스는 할수
없습니다.”
“해당 무선설비는 운용 중전파혼신 가능성이 있음”
NCC Warning Message
低功率電波輻射性電機管理辦法
第十二條經型式認證合格之低功率射頻電機,非經許可,公司、商號或使用者均不得擅自變更頻
率、加大功率或變更原設計之特性及功能。
第十四條 低功率射頻電機之使用不得影響飛航安全及干擾合法通信;經發現有干擾現象時,應
改善至無干擾時方得繼續使用。前項合法通信,指依電信法規定作業之無線電通信。低功率射頻
電機須忍受合法通信或工業、科學及醫療用電波輻射性電機設備之干擾。

Hay disponible online una copia de la Declaración de conformidad UE en www.dji.com/euro-
compliance
Dirección de contacto de la UE: DJI GmbH, Industriestrasse 12, 97618, Niederlauer, Germany
EU-verklaring van overeenstemming: SZ DJI TECHNOLOGY CO., LTD. verklaart hierbij dat dit apparaat
voldoet aan de essentiële vereisten en andere relevante bepalingen van Richtlijn 2014/53/EU.
De EU-verklaring van overeenstemming is online beschikbaar op www.dji.com/euro-compliance
Contactadres EU: DJI GmbH, Industriestrasse 12, 97618, Niederlauer, Germany
Declaração de conformidade da UE: A SZ DJI TECHNOLOGY CO., LTD. declara, através deste
documento, que este dispositivo está em conformidade com os requisitos essenciais e outras
disposições relevantes da Diretiva 2014/53/EU.
Existe uma cópia da Declaração de conformidade da UE disponível online em www.dji.com/euro-
compliance
Endereço de contacto na UE: DJI GmbH, Industriestrasse 12, 97618, Niederlauer, Germany
Dichiarazione di conformità UE: SZ DJI TECHNOLOGY CO., LTD. dichiara che il presente dispositivo è
conforme ai requisiti essenziali e alle altre disposizioni rilevanti della direttiva 2014/53/EU.
Una copia della dichiarazione di conformità UE è disponibile online all'indirizzo Web
www.dji.com/euro-compliance
Indirizzo di contatto UE: DJI GmbH, Industriestrasse 12, 97618, Niederlauer, Germany
Déclaration de conformité UE : Par la présente, SZ DJI TECHNOLOGY CO., LTD déclare que cet
appareil est conforme aux principales exigences et autres clauses pertinentes de la directive
européenne 2014/53/EU.
Une copie de la déclaration de conformité UE est disponible sur le site www.dji.com/euro-compliance
Adresse de contact pour l'UE : DJI GmbH, Industriestrasse 12, 97618, Niederlauer, Germany
EU-Compliance: Hiermit erklärt SZ DJI TECHNOLOGY CO., LTD., dass dieses Gerät den wesentlichen
Anforderungen und anderen einschlägigen Bestimmungen der EU-Richtlinie 2014/53/EU entspricht.
Eine Kopie der EU-Konformitätserklärung finden Sie online auf www.dji.com/euro-compliance.
Kontaktadresse innerhalb der EU: DJI GmbH, Industriestrasse 12, 97618, Niederlauer, Germany

CAUTION: RISK OF EXPLOSION IF BATTERY IS REPLACED BY AN INCORRECT TYPE. DISPOSE OF USED
BATTERIES ACCORDING TO THE INSTRUCTIONS
Environmentally friendly disposal
Old electrical appliances must not be disposed of together with the residual waste, but
have to be disposed of separately. The disposal at the communal collecting point via
private persons is for free. The owner of old appliances is responsible to bring the
appliances to these collecting points or to similar collection points. With this little
personal effort, you contribute to recycle valuable raw materials and the treatment of
toxic substances.
Umweltfreundliche Entsorgung
Elektro-Altgeräte dürfen nicht mit gewöhnlichem Abfall entsorgt werden und müssen
separat entsorgt werden. Die Entsorgung an kommunalen Sammelstellen ist für
Privatpersonen kostenlos. Die Eigentümer der Altgeräte sind für den Transport zu den
Sammelstellen verantwortlich. Durch diesen geringen Aufwand können Sie zur
Wiederverwertung von wertvollen Rohmaterialien beitragen und dafür sorgen, dass
umweltschädliche und giftige Substanzen ordnungsgemäß unschädlich gemacht werden.
Tratamiento de residuos responsable con el medio ambiente
Los aparatos eléctricos viejos no pueden desecharse junto con los residuos orgánicos, sino
que deben ser desechados por separado. Existen puntos limpios donde los ciudadanos
pueden dejar estos aparatos gratis. El propietario de los aparatos viejos es responsable
de llevarlos a estos puntos limpios o similares puntos de recogida. Con este pequeño
esfuerzo estás contribuyendo a reciclar valiosas materias primas y al tratamiento de
residuos tóxicos.
Mise au rebut écologique
Les appareils électriques usagés ne doivent pas être éliminés avec les déchets résiduels. Ils
doivent être éliminés séparément. La mise au rebut au point de collecte municipal par
l'intermédiaire de particuliers est gratuite. Il incombe au propriétaire des appareils
usagés de les apporter à ces points de collecte ou à des points de collecte similaires. Avec
ce petit effort personnel, vous contribuez au recyclage de matières premières précieuses
et au traitement des substances toxiques.
Smaltimento ecologico
I vecchi dispositivi elettrici non devono essere smaltiti insieme ai rifiuti residui, ma devono
essere smaltiti separatamente. Lo smaltimento da parte di soggetti privati presso i punti
di raccolta pubblici è gratis. È responsabilità del proprietario dei vecchi dispositivi portarli
presso tali punti di raccolta o punti di raccolta analoghi. Grazie a questo piccolo impegno
personale contribuirete al riciclo di materie prime preziose e al corretto trattamento di
sostanze tossiche.

Milieuvriendelijk afvoeren
Oude elektrische apparaten mogen niet worden weggegooid samen met het restafval,
maar moeten afzonderlijk worden afgevoerd. Afvoeren via het gemeentelijke
inzamelpunt is gratis voor particulieren. De eigenaar van oude toestellen is
verantwoordelijk voor het inleveren van de apparaten op deze of vergelijkbare
inzamelpunten. Met deze kleine persoonlijke inspanning lever je een bijdrage aan de
recycling van waardevolle grondstoffen en de verwerking van giftige stoffen.
Eliminação ecológica
Os aparelhos elétricos antigos não podem ser eliminados juntamente com os materiais
residuais. Têm de ser eliminados separadamente. A eliminação no ponto de recolha
público através de entidades particulares é gratuita. É da responsabilidade do
proprietário de aparelhos antigos levá-los a estes pontos de recolha ou a pontos de
recolha semelhantes. Com este pequeno esforço pessoal, contribui para a reciclagem de
matérias-primas úteis e para o tratamento de substâncias tóxicas.
Other manuals for MATRICE 200 series
5
This manual suits for next models
3
Table of contents
Other dji Drone manuals

dji
dji PHANTOM 4 User manual

dji
dji FPV FD1W4K User manual

dji
dji INSPIRE 2 Instruction Manual

dji
dji PHANTOM Instruction manual

dji
dji E1200 Standart User manual

dji
dji FlameWheel550 User manual

dji
dji P4 MULTISPECTRAL User manual

dji
dji Phantom 4 RTK User manual

dji
dji Mavic 3 User manual

dji
dji MATRICE 600 User manual