manuals.online logo
Brands
  1. Home
  2. •
  3. Brands
  4. •
  5. Dormakaba
  6. •
  7. Door Opening System
  8. •
  9. Dormakaba TS 97 FL XEA User manual

Dormakaba TS 97 FL XEA User manual

EN
TS 97 FL XEA
WN 059870 45532/13715
2019-08
Mounting instructions
1 About this document
1.1 Contents and purpose
This manual describes the installation, startup,
maintenance and disassembly of the TS97FL XEA
door closer. The manual’s picture section is partly
supported by text in this section of the manual.
1.2 Target group
The hold-open system’s mounting, commissioning,
maintenance and disassembly must only be carried
out by qualified personnel that have been authorized
by dormakaba. The acceptance inspection must only
be carried out by qualified personnel certified for this
by dormakaba.
1.3 Other applicable documents
The following documents belong to the unit’s
complete documentation and must be observed:
• Drilling template
• Picture section for mounting instructions
• General design approval
• Information sheet about the use of hold-open
systems
1.4 Documents storage
This manual must be kept during the service life of the
product and must be passed on with the product.
1.5 Safety instructions
CAUTION
This signal word indicates a situation of
potential risk, which could lead to minor or
slight injury if not averted.
1.6 Symbols used
1. 2. Step-by-step graphics
dormakaba Deutschland GmbH
Postfach 4009
58256 Ennepetal
19
0432-CPR-00026-58 EN 1154:1996/A1:2002/AC:2006
EN 1155: 1997/A1: 2002/AC:2006 3 8 3-6 1 1 4
DOP_0172
Contents
1 About this document 1
1.1 Contents and purpose 1
1.2 Target group 1
1.3 Other applicable documents 1
1.4 Documents storage 1
1.5 Safety instructions 1
1.6 Symbols used 1
1.6.1 Tool icons 1
2 Safety 1
2.1 Intended use 1
2.2 Prerequisites for the operation of hold-open
systems 2
2.3 Requirements for the electrical installation by the
customer 2
3 Product description 2
3.1 Technical data 2
3.2 Optional components 3
4 Mounting 3
4.1 Mounting variants 3
4.2 Mounting the door closer and slide rail 3
4.3 Mount lever arm 3
4.4 Adjust door closer 3
4.5 Mount the cladding 3
4.6 Set the doorstop 3
4.7 Function test 3
4.7.1 Freewheel function 3
4.7.2 Close door 3
5 Disassembly, recycling and disposal 3
2TS 97 FL XEA 2019-08
dormakaba Mounting instructions Safety
WN 059870 45532
1 2 Position numbers of components
The icon indicates the installation
stages of the supplied cable loop
The icon indicates installation stages if
the supplied cable loop is not mounted.
The icon indicates installation stages
when the door closer is mounted on the
door leaf.
The icon indicates installation stages
when the door closer is mounted on the
door lintel.
1.6.1 Tool icons
Allen wrench,
e.g. wrench size 3
2 Safety
2.1 Intended use
The TS97FLXEA is intended solely for the controlled
closing of swing doors with the following properties:
• Maximum door leaf weight 180 kg
• Maximum door leaf weight 1,400 kg
• Maximum door opening angle approx. 145° when
TS97FLXEA is mounted on the door leaf on the
hinge side, on the lintel on the hinge side, or on the
lintel on the opposite side to the hinge.
• Maximum door opening angle approx. 105° when
TS97FLXEA is mounted on the door leaf on the
opposite side to the hinge.
• The swing door’s opening angle must be limited by a
doorstop.
• An external manual release button is required to
interrupt the power supply. The manual release
button must not be covered by the opened door.
Observe country-specific regulations when using on
fire barriers, fire protection doors and smoke barriers.
Do not operate the TS97FLXEA on the lintel on the
opposite side to the hinge for fire protection doors.
2.2 Prerequisites for the operation of hold-
open systems
The use of hold-open systems is subject to special
provisions due to the official approval regulations.
These provisions relate in particular to acceptance,
ongoing monitoring and maintenance. Observe the
instructions in the information sheet on the use of
hold-open systems. Additional requirements apply for
use as fire/smoke protection closure in conjunction
with external RMZ and RM. A separate verification
of suitability is required for the respective fire/smoke
protection door.
2.3 Requirements for the electrical
installation by the customer
Before mounting, connect the cables to the TS97FL
XEA’s 24VDC power supply. Only use the cable loop
supplied when mounting the TS97FL XEA on the door
leaf’s hinge side.
3 Product description
The TS97FLXEA is a slide rail door closer with
freewheel function. The door closes automatically in
the following cases:
• In case of power failure
• In connection with an external RMZ in case of fire
• In conjunction with an external manual switch
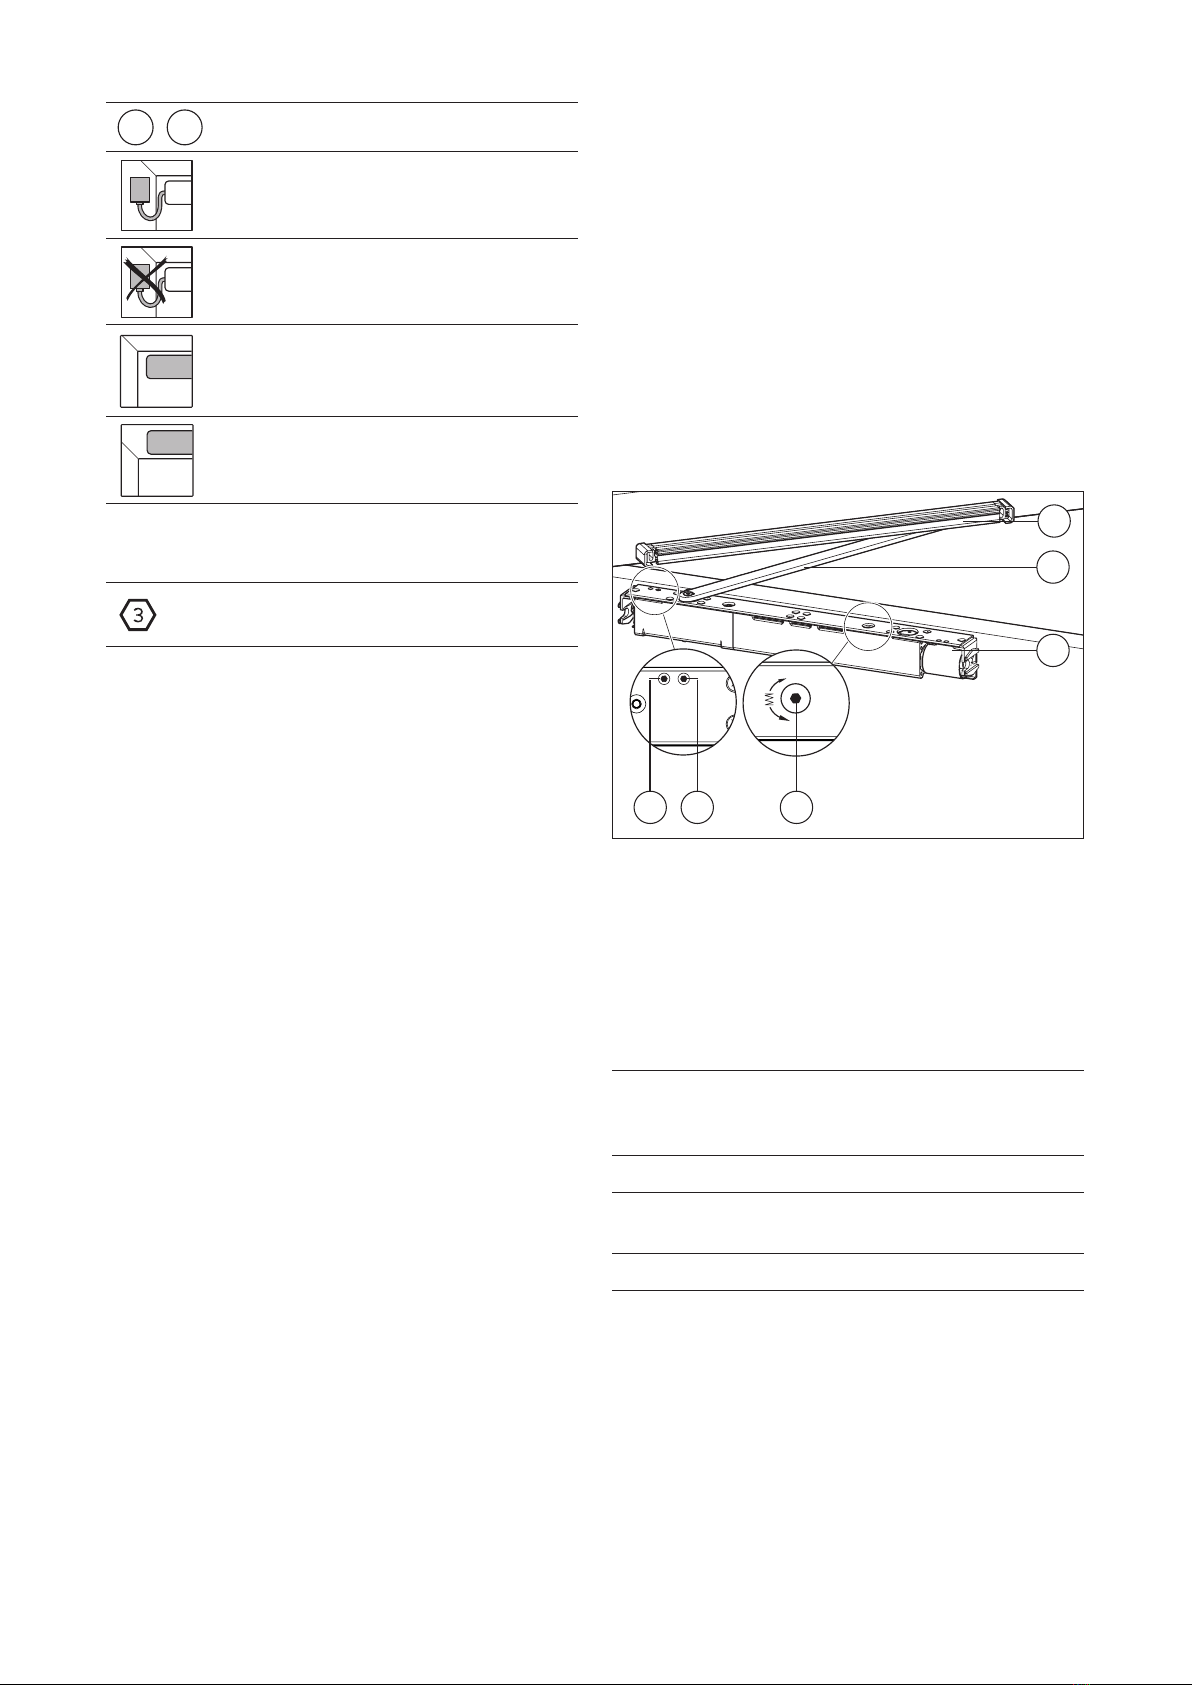
7° - 0°
145° - 0°
3
46 5
1
2
Fig.1 TS97FLXEA in DIN-L mounting on the door leaf
(1) Slide rail (without cladding)
(2) Lever arm
(3) TS97FLXEA (without cladding)
(4) Adjusting screw for adjusting the closing force
(5) Valve for adjusting the closing speed
(6) Valve for adjusting the end stop
3.1 Technical data
Supply voltage operating
voltage
Power consumption
24VDC +/- 15%
approx. 3 W
Ambient temperature: -15°C to +40°C
Rel. humidity: up to 93%
(non condensing)
Protection class: IP54
3TS 97 FL XEA 2019-08
dormakaba Mounting instructions Mounting
WN 059870 45532
3.2 Optional components
• Concealed cable loop for the door closer’s power
supply via the door leaf, e.g. dormakaba KÜ 480 and
LK12
• 24VDC power supply and smoke detector panel,
e.g. dormakaba RMZ
4 Mounting
The figures in this manual’s picture section show in
part only the mounting for DIN-L. For DIN-R, the
instructions must be mirror-inverted.
4.1 Mounting variants
The TS97FLXEA can be mounted at the following
positions:
• on the door leaf on the hinge side
• on the door lintel on the hinge side
• on the door leaf on the opposite side to the hinge
• on the lintel on the opposite side to the hinge if
the door is not a fire/smoke protection door. This
mounting position does not conform to the CE
marking.
4.2 Mounting the door closer and slide rail
1 - 7
Carry out the mounting according to the enclosed
illustrated instructions.
4.3 Mount lever arm
8
CAUTION
Risk of injury due to unintentional loosening
of the screw connection on the lever arm
• Only use the self-locking screw supplied.
If this screw is loosened during repair or
maintenance work, the screw must be
replaced by a new self-locking original
screw.
Mount the lever arm according to the illustrated
instructions and the mounting variant.
4.4 Adjust door closer
9
Adjust the door closer power.
10
1. Adjust the closing speed.
2. Adjust the end stop.
4.5 Mount the cladding
11 - 13
Carry out the mounting according to the enclosed
illustrated instructions.
4.6 Set the doorstop
14
Set the doorstop according to the mounting variant
and the structural conditions. The maximum opening
angle must not be exceeded.
4.7 Function test
4.7.1 Freewheel function
1. Apply the voltage
2. Open the door until it stops once
‣ After the first opening, the door can be
opened and closed manually without
resistance by the door closer.
4.7.2 Close door
1. Disconnect the voltage
‣ The door closes automatically.
5 Disassembly, recycling and
disposal
Disassembly is carried out in reverse order to the
mounting and must be carried out by qualified
personnel.
The product must be disposed of in an
environmentally friendly manner. Electrical
parts and batteries must not be disposed of
with domestic waste. Dispose of
electrotechnical parts and batteries in the designated
acceptance and collection points. Refer to the
statutory regulations for your country.
dormakaba Deutschland GmbH
DORMA Platz 1 58256 Ennepetal Germany T: +49 2333 793-0 F: +49 2333 793-4950 www.dormakaba.com
Translation of the original manual, subject to change without notice

Other Dormakaba Door Opening System manuals

Dormakaba ED50 User manual

Dormakaba

Dormakaba ED50 User manual

Dormakaba C800 User manual

Dormakaba

Dormakaba C800 User manual

Dormakaba Muto Premium XL120 User manual

Dormakaba

Dormakaba Muto Premium XL120 User manual

Dormakaba ED100 User manual

Dormakaba

Dormakaba ED100 User manual

Dormakaba EN 2-5 User manual

Dormakaba

Dormakaba EN 2-5 User manual

Dormakaba ED 100 LE User manual

Dormakaba

Dormakaba ED 100 LE User manual

Dormakaba SVI 2 Series Training manual

Dormakaba

Dormakaba SVI 2 Series Training manual

Dormakaba ED50LE User manual

Dormakaba

Dormakaba ED50LE User manual

Dormakaba UNIVERSAL GK 50 User manual

Dormakaba

Dormakaba UNIVERSAL GK 50 User manual

Dormakaba UNIVERSAL GK 30 User manual

Dormakaba

Dormakaba UNIVERSAL GK 30 User manual

Dormakaba ITS9613 User manual

Dormakaba

Dormakaba ITS9613 User manual

Dormakaba 8600 SIS User manual

Dormakaba

Dormakaba 8600 SIS User manual

Dormakaba 8900 FT User manual

Dormakaba

Dormakaba 8900 FT User manual

Dormakaba PORTEO User manual

Dormakaba

Dormakaba PORTEO User manual

Dormakaba RTS Series User manual

Dormakaba

Dormakaba RTS Series User manual

Dormakaba ED100 User manual

Dormakaba

Dormakaba ED100 User manual

Dormakaba TS93 GSR PT User manual

Dormakaba

Dormakaba TS93 GSR PT User manual

Dormakaba ED900 User manual

Dormakaba

Dormakaba ED900 User manual

Dormakaba G-EMR-140 Manual

Dormakaba

Dormakaba G-EMR-140 Manual

Dormakaba G-SR/BG Series User manual

Dormakaba

Dormakaba G-SR/BG Series User manual

Dormakaba ED50 User manual

Dormakaba

Dormakaba ED50 User manual

Dormakaba ED100 User manual

Dormakaba

Dormakaba ED100 User manual

Dormakaba GSR-EMR XEA BG User manual

Dormakaba

Dormakaba GSR-EMR XEA BG User manual

Dormakaba PT 22 User manual

Dormakaba

Dormakaba PT 22 User manual

Popular Door Opening System manuals by other brands

GEZE Powerturn IS/TS installation instructions

GEZE

GEZE Powerturn IS/TS installation instructions

SAINT-GOBAIN SEVAX MINOS+ manual

SAINT-GOBAIN

SAINT-GOBAIN SEVAX MINOS+ manual

ENFORCER Enforcer E-942FC-600SQ installation manual

ENFORCER

ENFORCER Enforcer E-942FC-600SQ installation manual

cinetto PB01 Assembly instructions

cinetto

cinetto PB01 Assembly instructions

Elton EllenMatic Slim Soundproof installation instructions

Elton

Elton EllenMatic Slim Soundproof installation instructions

D+H KA 66-TW1-K-BSY+ Original instructions

D+H

D+H KA 66-TW1-K-BSY+ Original instructions

B&D Auto-Lock Kit installation instructions

B&D

B&D Auto-Lock Kit installation instructions

Chamberlain K001D8398-1 Power board replacement

Chamberlain

Chamberlain K001D8398-1 Power board replacement

Iseo IS 9100 Mounting and Commissioning instructions

Iseo

Iseo IS 9100 Mounting and Commissioning instructions

FAAC 595 manual

FAAC

FAAC 595 manual

CDVI Digiway SR Easy start guide

CDVI

CDVI Digiway SR Easy start guide

Dorma 7300 S-IS manual

Dorma

Dorma 7300 S-IS manual

B&D Roll-A-Door R1N installation instructions

B&D

B&D Roll-A-Door R1N installation instructions

Dorma ITS 96 EN 2-4 Fixing instructions

Dorma

Dorma ITS 96 EN 2-4 Fixing instructions

Johnson Controls MC-302E PG+ installation guide

Johnson Controls

Johnson Controls MC-302E PG+ installation guide

S4A RS-140 quick start guide

S4A

S4A RS-140 quick start guide

Yale YM Series installation instructions

Yale

Yale YM Series installation instructions

DAS 008641 manual

DAS

DAS 008641 manual

manuals.online logo
manuals.online logoBrands
  • About & Mission
  • Contact us
  • Privacy Policy
  • Terms and Conditions

Copyright 2025 Manuals.Online. All Rights Reserved.