Doro HANDLEPLUS 326I GSM User manual

HandlePlus
326i gsm
English
Svenska
Norsk
Dansk
Suomi
Français
Deutsch
Español
Italiano
eština
Nederlands

4
2
1
3
ABC
GHI
PQRS TUV XYZ
JKL MNO
DEF
56
7
8
9

1 UPP volym/navigering
2 NED volym/navigering
3 Menyknapp/OK w
4 Uppringning/svara
5 *och knapplås
6 #och ringsignal/
vibrator
7 Nedkoppling (AV/PÅ)
8 Direktvalsknappar
9 Laddnings/
headset-uttag
Svenska
1 UP volume/
navigation
2 DOWN volume/
navigation
3 Menu/OK w
4 Call/answer
5 *and Keylock
6 #and ring setup/
vibrator
7 Disconnect
(ON/OFF)
8 One-touch keys
9 Charging/headset
socket
English
1 OPP volum/navigering
2 NED volum/navigering
3 Meny/OK w
4 Oppringing/svar
5 *og tastelås
6 #og ringesignal/
vibrator
7 Nedkobling (AV/PÅ)
8 Hurtigtaster
9 Lade-/hodesettuttak
Norsk

1 Augmentation du
volume/navigation
2 Diminution du
volume/navigation
3 Touche de défilement
du menu/OK w
4 Touche de décroché
5 Touche *et de
verrouillage du clavier
6 Touche #et
de réglage de
sonnerie/vibreur
7 Touche de raccroché
et de mise en/
hors service
8 Touches de
mémoires directes
9 Prise du chargeur
et du casque
Français
1 Lisää
äänenvoimakkuutta/
siirtyminen ylös
2 Vähemmän
äänenvoimakkuutta/
siirtyminen alas
3 Valikkonäppäin/OK w
4 Soitto-/vastauspainike
5 *ja näppäinlukko
6 #ja soittoääni/
värinähälytin
7 Katkaisu-/virtapainike
8 Pikavalintapainikkeet
9 Lataamis-/
kuulokeliitäntä
Suomi
1 OP lydstyrke/
navigering
2 NED lydstyrke/
navigering
3 Menutast/ OK w
4 Opkalds-/besvartast
5 *og tastaturlås
6 #og ringesignal/
vibrator
7 Afbrydertast (TIL/FRA)
8 Hurtigvalgstaster
9 Stik til opladning/
headset
Dansk

1 Lautstärke/
Navigation
AUFWÄRTS
2 Lautstärke/Navigation
ABWÄRTS
3 Menü/OK w
4 Anruf/beantworten
5 *und Tastensperre
6 #und Rufaufbau/
Vibrationsalarm
7 Verbindung beenden
(EIN/AUS)
8 Kurzwahltasten
9 Laden/Headset-
Buchse
Deutsch
1 Volumen + / Navegación
2 Volumen - / Navegación
3 Tecla de menú/
Aceptar w
4 Tecla llamar/
Responder
5 *y bloqueo del teclado
6 #y Configuración
de señal de
llamada/vibrador
7 Tecla de desconexión
(encendido/apagado)
8 Teclas de
marcación directa
9 Conector de carga/
auriculares
Español
1 SU volume/
navigazione
2 GIÙ volume/
navigazione
3 Pulsante Menu/OK w
4 Pulsante di
chiamata/risposta
5 *e blocco tasti
6 #e configurazione
squillo/vibrazione
7 Pulsante di
disconnessione
(ON/OFF)
8 Tasti di selezione
rapida
9 Presa carica/auricolare
Italiano

1 NAHORU hlasitost/
navigace
navigace
3 Menu/OK w
4 Hovor
5 *a zámek klávesnice
6 #a nastavení
headsetu
esky
1 OMHOOG volume/
navigatie
2 OMLAAG volume/
navigatie
3 Menu/OK w
4 Oproep/opnemen
5 *en toetsblokkering
6 #en configuratie
beltoon/trillen
7 Verbreken (AAN/UIT)
8 Snelkiestoetsen
9 Contact voor
lader/headset
Nederlands
w
5 *
6 #
(ON/OFF)

1
English
Installation
Note!
Always turn off the telephone before removing
the battery cover.
Battery cover
To remove the battery cover, press carefully on
the cover and slide it downwards.
To replace the battery cover, slide it from below
and up along the telephone.
Installation/removal of SIM card
The SIM card holder is located behind the
battery.
Make sure that the SIM card’s contacts are
facing inwards and that the cut-off corner is
pointing upwards. Take care not to scratch or
bend the contacts on the SIM card.
If the SIM card is missing or incorrectly inserted,
is shown in the display.
If the SIM card is damaged, is shown in the
display.

2
English
Installation/removal of battery
Place the top of the battery in the battery slot
with the battery contacts facing the contacts in
the slot, then press carefully on the bottom of
the battery until it locks in place.
To remove the battery, carefully press and lift
the bottom of the battery in the “finger-shaped”
groove.
Charging
Connect the mains adapter to the wall socket
and to the socket on the telephone. Charge the
telephone for 24 hours the first time. After that,
it takes approximately 5 hours to fully charge
the battery.
!"#
'()
0123 456 89:
*+, -./
$%&
AC 110/240 V

3
English
Battery
Full battery capacity will not be reached until
the batteries have been charged 4–5 times.
Batteries degrade over time, which means
that call time and standby time will normally
decrease with regular use.
The automatic charging mechanism prevents
the batteries from being overcharged or
damaged due to prolonged charging.
When the battery is running low, is
displayed and a warning signal is heard.
Warning!
Only use batteries, charger and accessories
that have been approved for use with
this particular model. Connecting other
accessories may be dangerous and may
invalidate the telephone’s type approval and
guarantee.
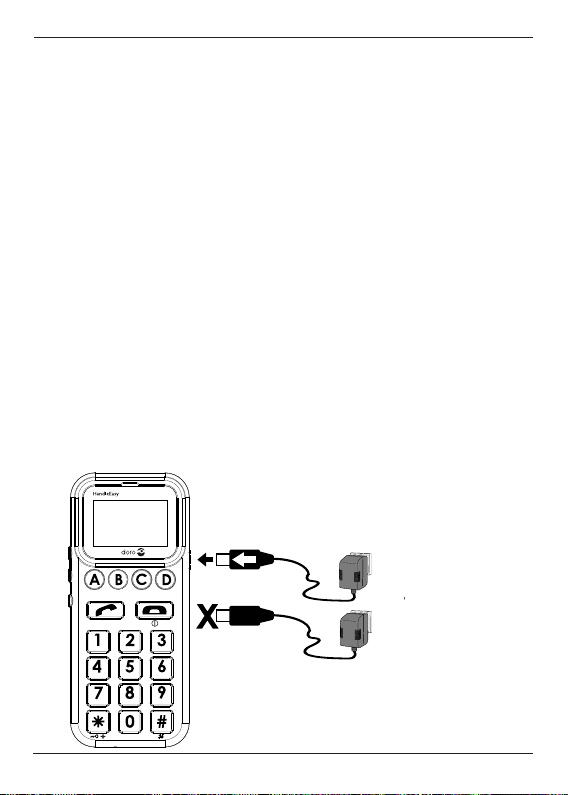
Connection to a USB port on a computer may
damage the telephone or the computer.

4
English
Display symbols
Searching for networks
No SIM card
SIM card error
General error indication
Charger connected
Charging completed
Signal strength
Line 1 (some operators have 2 lines)
Battery indicator
Keylock active
Roaming (connected to other network)
Headset connected
Ring only
Vibrator only
Vibrator + Ring
Missed call
Incoming call
Outgoing call

5
English
Operation
Activating the telephone
Press and hold L/14–5 seconds until the
ON signal is heard and the display lights up.
If the SIM card is locked with a PIN code
(Personal Identification Number), enter your PIN
code now and confirm with w .
The SIM card will only accept a certain number
of incorrect PIN code attempts. The display
shows how many attempts you have left with
”Remain: #”, where # is the number of attempts
left.
When no attempts remain, you need the PUK
code (Personal Unblocking Key) supplied with
your SIM card to unlock the card and supply a
new PIN code.
Enter the PUK code, confirm with w, then enter
a new PIN code and confirm it.
If PIN and PUK codes were not supplied with
the SIM card, contact your network operator.

6
English
To turn off the telephone, press L/1until the
OFF signal is heard.
Making a call
1. Enter the desired number with the keypad.
Skip backwards with L.
2. Press qto dial. A signal will be heard as
the number is dialled.
3. Press Lto end the call.
Note!
When making international calls, press *twice
for the international prefix "+".
Dialling with the one-touch keys
1. Press one of the one-touch keys A–D
followed by q. A signal will be heard as the
number is dialled.
Alternatively, press and hold the one-touch
key until the signal is heard.
2. Press Lto end the call.

7
English
Dialling with the phonebook
1. Press w, then scroll the list of entries with
}/{ or press a keypad key to jump to the
entries beginning with that character.
2. Press qto view details for the selected
entry. Press Lbriefly to go back to the
list, or press and hold Lthen wto delete
the entry.
3. Press qto dial the number shown on
the display. A signal will be heard as the
number is dialled.
4. Press Lto end the call.
Receiving a call
1. Press qto answer, or Lto reject the call
without answering.
2. Press Lto end the call.
Caller ID
The telephone number of an incoming call
is shown on the display. If no information is
available, ????? is displayed.

8
English
Call memory
The 15 most recent calls are saved in the call
memory. If multiple calls are related to the same
number only the most recent of these calls will
be saved.
Retrieving and dialling
1. Press q.
2. Scroll through the call list with {/}.
= Incoming call
= Outgoing call
= Missed call
3. Press qto view details for the selected
call.
4. Press qto dial the number, or press
Lbriefly to go back to the call list. To
delete the call, press and hold Lthen
acknowledge with w.
5. Press Lto end the call.

9
English
Missed calls
When an incoming call is unanswered, is
shown on the display. The most recent missed
call(s) can then be retrieved by immediately
pressing w.
1. Press w.
2. Scroll through the missed calls list with
{/}.
3. Press qto view details for the selected
call.
4. Press qto dial the number, or press
Lbriefly to go back to the call list. To
delete the call, press and hold Lthen
acknowledge with w.
5. Press Lto end the call.
Note!
This only works immediately after the call has
been received. After that, missed calls can be
retrieved from the call list (see page 8).

10
English
Speakerphone function
The speakerphone function allows the
telephone to be used without holding it, e.g.
placed on a table in front of you.
1. Place a call in the usual way. When the call
is connected, press qagain.
2. Speak into the microphone on the lower front
edge of the telephone (max 1 metre away).
3. The volume can be adjusted during a call
with }/{.
4. To change between speakerphone and
normal function, press q.
5. Press Lto end the call.
Note!
The speakerphone function allows only one
person at a time to talk. Switching between
talk/listen is automatic and triggered by the
sound of the person talking. Loud noises (music,
etc.) in the background may interfere with the
speakerphone function.

11
English
Volume control
The volume can be adjusted during a call with
}/{on the side of the telephone.
Redial
Press qand scroll between the 15 most
recently dialled/incoming numbers with }/{.
Press qto review details, then press qto
dial the number or Lto end.
Press and hold Lthen wto delete the entry.
Emergency calls
When the telephone is switched on, it is
possible to place an emergency call by entering
112 followed by q.
Most mobile networks accept emergency calls
even when the SIM card is not in the telephone.

12
English
Keylock
Press and hold */Lfor 2 seconds to lock/
unlock the keypad. is shown in the display
when keylock is active.
Headset
When a headset is connected, the internal
microphone in the telephone is disconnected
automatically.
When receiving a call, the answer key on the
headset cable can be used instead of q.
Warning!
Using a headset on high volume can damage
your hearing. Adjust the sound volume
carefully when using a headset.

13
English
Settings
Saving telephone numbers
One-touch numbers
Four numbers can be stored under the one-
touch keys A–D.
1. Enter the number, including the area code. Skip
backwards with L.
2. Press and hold one of the one-touch button
A–D until the text cursor appears.
3. Enter a name or description for the number
using the keypad (see page 16).
4. Press wtwice to save or Lto end.
Phone book numbers
20 numbers can be stored in the phone book.
1. Enter the number, including the area code. Skip
backwards with L.
2. Press w.
3. Enter a name or description for the number
using the keypad (see page 16).
4. Press wtwice to save or Lto end.

14
English
Sending additional numbers
Additional numbers can be saved with an entry
and sent after the call is connected.
1. Enter the telephone number.
2. Press *4 times until wis shown.
3. Enter the additional number.
4. Save the entry (see page 13).
After dialling, wait until the call is connected
then press wto send the additional number.
Inserting a pause in a number
A short pause (3 seconds) can be inserted
anywhere in the saved number.
1. Enter the first part of the telephone number
(before the pause).
2. Press *3 times until pis shown.
3. Enter the last part of the number.
4. Save the entry (see page 13).
Other manuals for HANDLEPLUS 326I GSM
2
Table of contents
Languages:
Other Doro Cell Phone manuals

Doro
Doro PhoneEasy 740 User manual

Doro
Doro PhoneEasy 345gsm User manual

Doro
Doro 8031 User manual

Doro
Doro HandleEasy 330gsm User manual

Doro
Doro 1372 User manual

Doro
Doro PhoneEasy 345gsm User manual

Doro
Doro 6525 User manual

Doro
Doro Secure 580IUP User manual

Doro
Doro 6038 User manual

Doro
Doro 6250 User manual