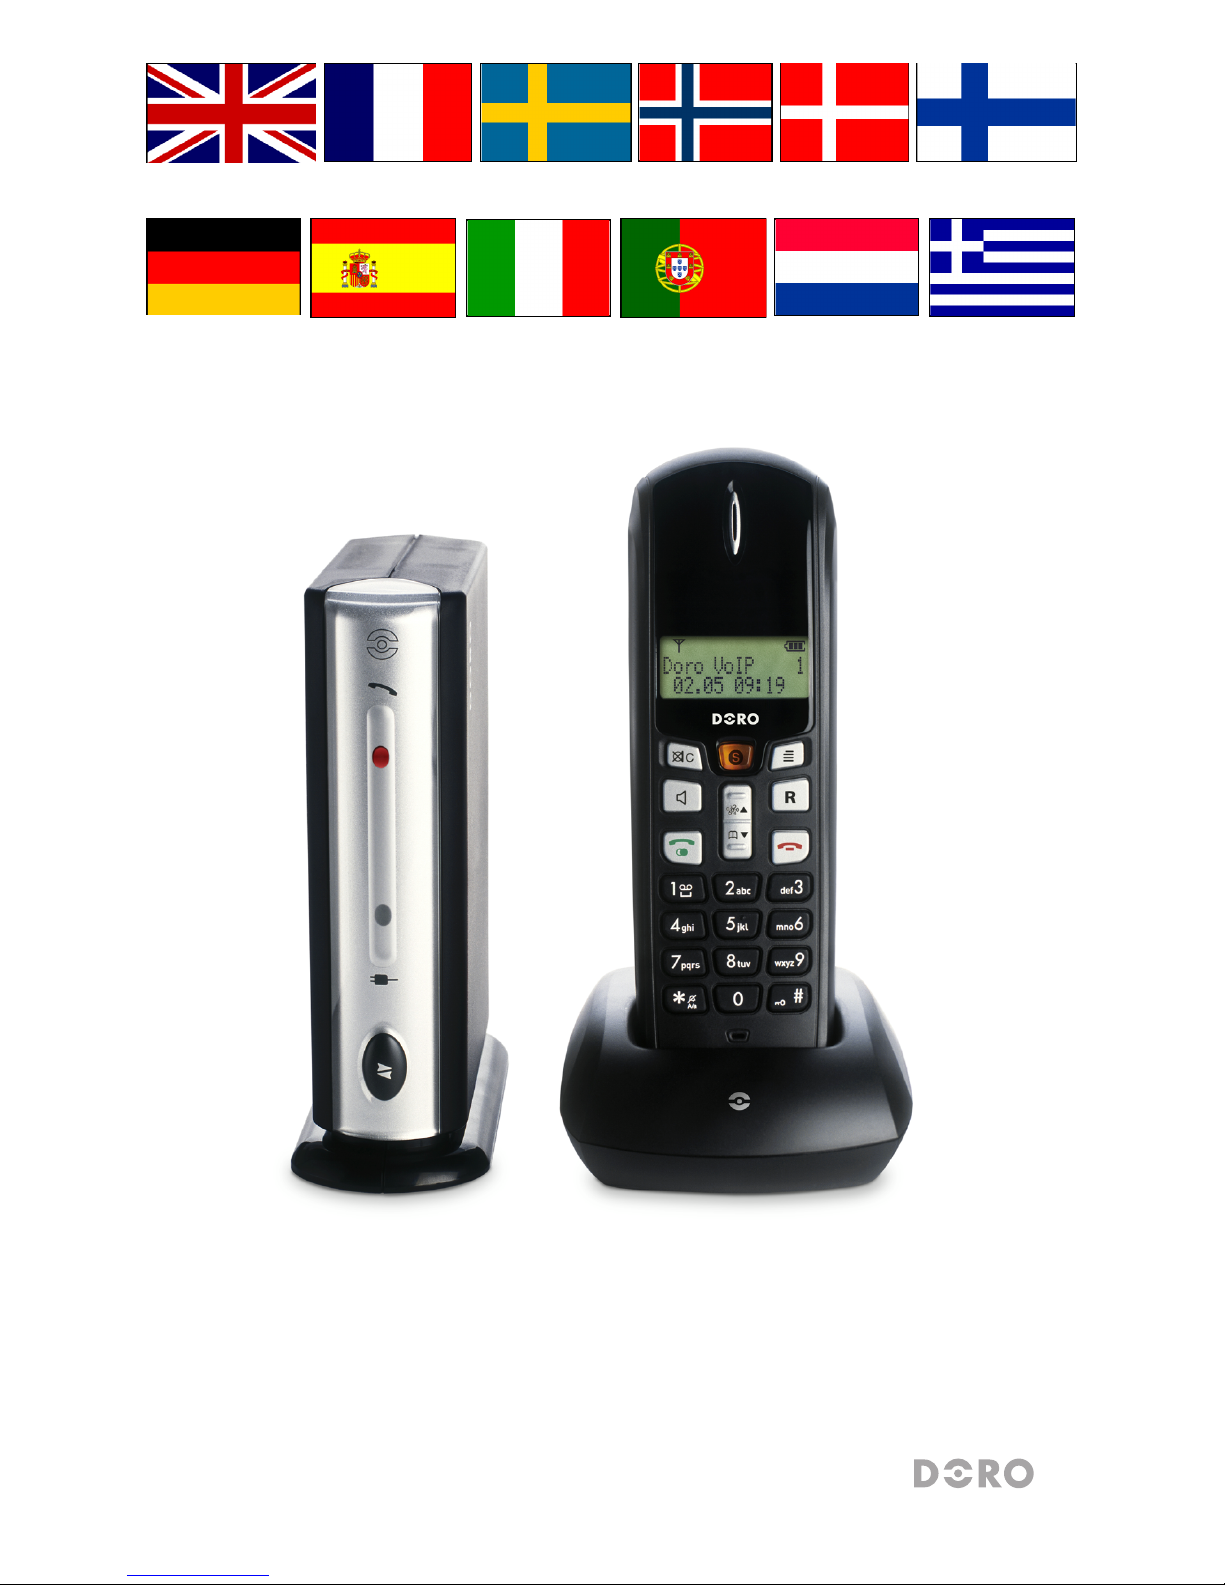
Doro 635ipw User manual

doro 635ipw
English Svenska Norsk Dansk SuomiFrancais
Nederlands
Português
Italiano
Español
Deutsch Ελληνικά

10
11
1
3
4
67
9
5
#
2
812
13
14
System requirements
Microsoft Windows 2000 or XP
400MHz processor with available USB1.1
or USB2.0 port
128MB RAM
20MB available hard drive space
Internet connection, 33.6 Kbps
minimum
1 Skype-button
2 UP scroll/Caller ID button
3 Erase/Back/Mute button
4 Speaker phone
5 Line Button/Call Back
6 *and ringer off/on
7 #and KeyGuard
8 DOWN scroll/Phonebook
9 Disconnect
10 Flash
11 Menu/OK button
12 USB-port
13 Phoneline connector
14 Mains adapter connector
Unpacking
The package contains:
- Handset
- Mains adapter (6VDC 200mA)
- Base unit
- Cables (with adapters)
- 2 AAA batteries (Ni-MH 1.2V 600 mAh)
- Charger unit
- Charger adapter (6VDC 300mA)
- CD-Rom
Expanded versions (e.g. +1) also include an
additional handset, batteries, chargers and
adapters.
English

2
English
Installation of software
In order for Doro 635ipw to function correctly with Skype, the Doro USB Phone Suite
and Skype software MUST be installed on the computer before connecting the phone.
1. Insert the provided CD-ROM in your computer. The installation will start
automatically (if the installation does not start, please run Menu.exe on the CD-
ROM unit).
2. The User Manual can be accessed by clicking on Manual.
3. If Skype has been installed already, (must be version 1.0.0.106 or later), skip this and
move on to next step.
Install Skype by clicking on Download and install Skype, this will direct you to
the ofcial Skype web page, from where it's possible to download and install Skype.
If it is the rst time that Skype is used, enter a Skype name and password.
4. Install Doro USB Phone suite by clicking Install Doro USB Phone Suite.
If a dialog box appears with the option to run or save, click Run.
Depending on your security settings, you may see a Security Warning dialog box,
asking if you’re sure you want to run this software. Click Run again.
When installation is complete you will be asked if Doro USB Phone Suite should be
started. Permit this by clicking on Ok. Also permit Doro USB Phone Suite to use
Skype when asked.
When installation is complete will be shown in the message eld at the bottom of the
right side of the computer screen. By right clicking on you can check status and adjust
the volume.
You can learn more about using Skype at www.skype.com/help/guides.
Connection
1. Connect the mains adapter (6V DC) and the telephone cord to the wall sockets.
2. Connect the USB-cable between the base unit and the computer.
3. Connect the mains adapter (6V DC) to the charger unit and to the wall socket.
4. Insert the batteries in the handset with plus and minus terminals as directed.
5. Charge the handset with the keypad facing outwards (for 24 hours the rst time).
Unpacking.........................1
System requirements........1
Installation of software......2
Connection........................2
Coverage...........................3
Battery...............................3
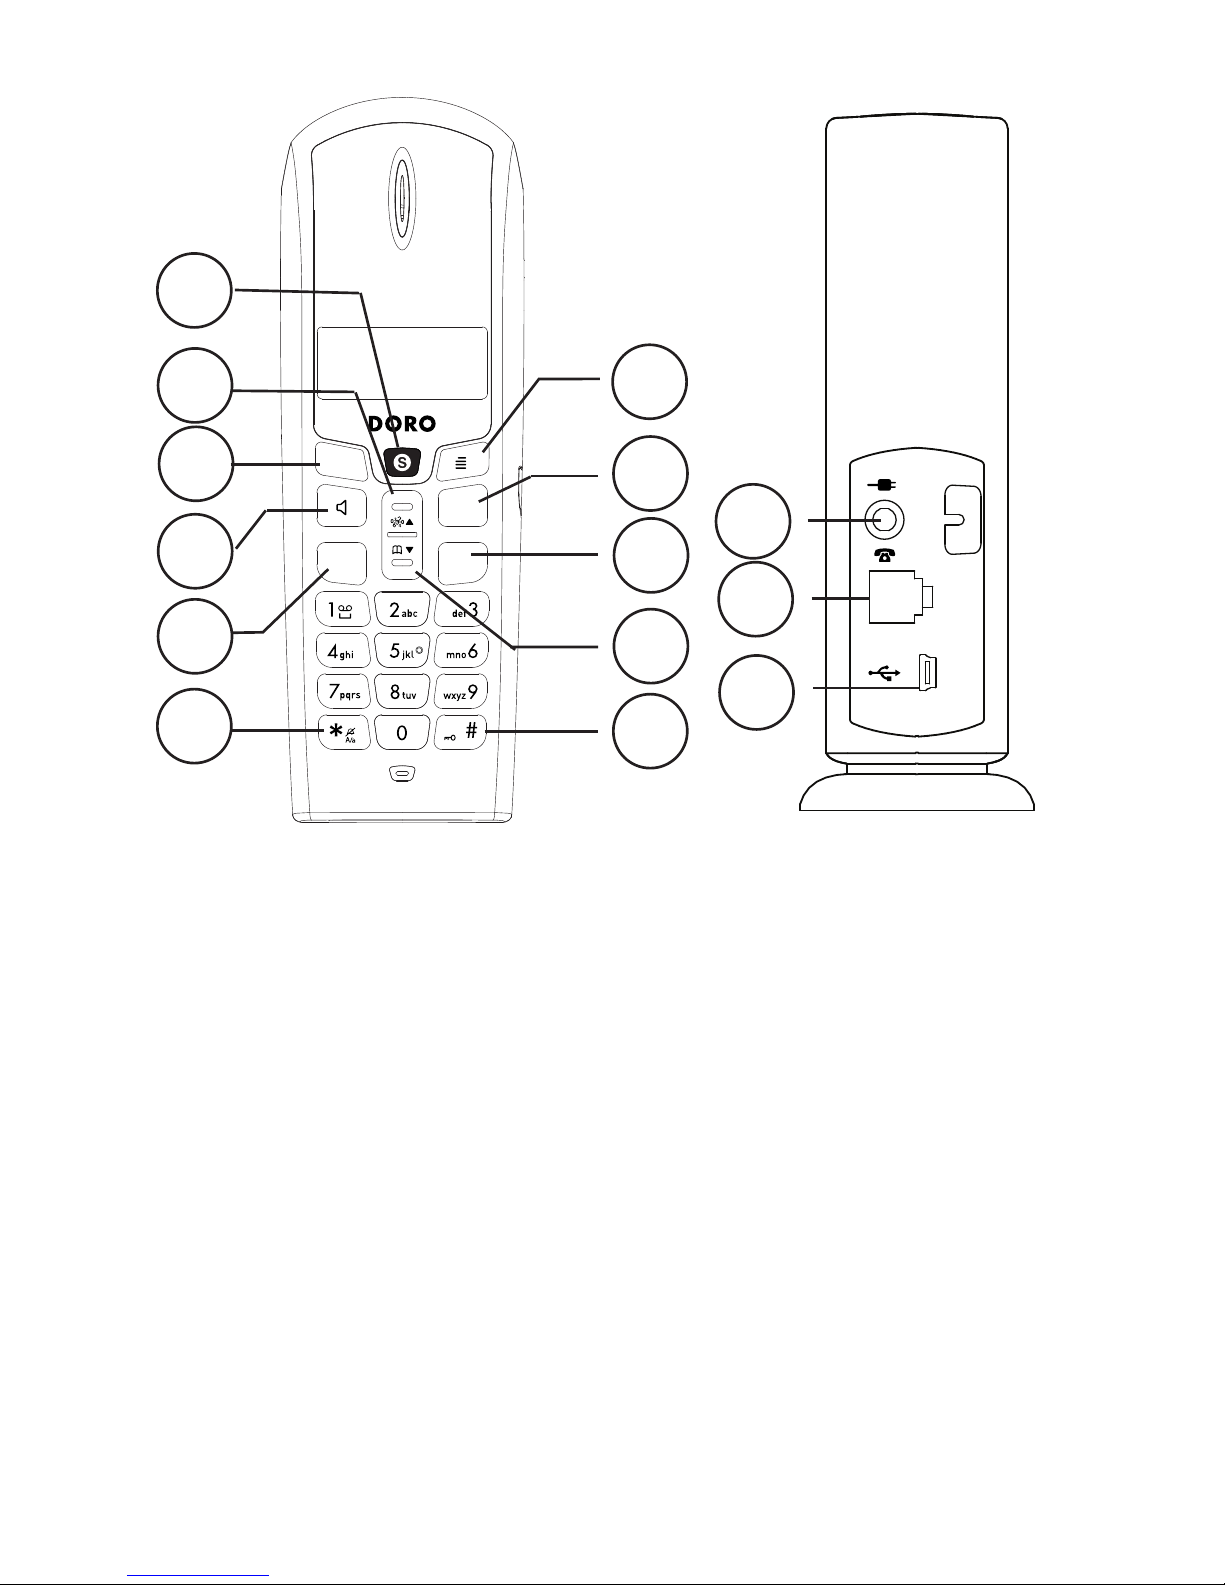
The Display .......................4
Base unit indicators ..........4
Paging ............................... 4
Making a call.....................5
Making a call with Skype..5
SkypeOut ..........................5
Receiving a call.................6
Call Waiting Skype/Tel......6
Skype Hold........................6
Volume control..................6
Redial ................................6
Mute button.......................6
KeyGuard..........................6
Phonebook........................6
New calls (Caller ID
memory*) ..........................7
Other services ..................8
Handset settings...............9
Changing settings in the
base menu ........................9
Changing settings for
Skype ................................10
Expanded system (+1...) ...10
Troubleshooting ................11
Specic absorption rate
(SAR).................................12
Declaration of conformity..12
Guarantee .........................12

3
English
Language
1. Press w.
2. Scroll to Setup HS with }/{. Press w.
3. Scroll to Language. Press w.
4. Scroll to required setting. Press w.
5. Press Lto return to standby mode.
Date/Time
1. Press w. Scroll to Date/Time. Press w.
2. Scroll to Set Date/Time. Press w.
3. Set Year (20YY). Press W.
3. Set Date (DD.MM). Press w.
4. Set Time (HH MM). Press w.
It's also possible to change Time Format (12/24 H format) and Date Format (dd.mm
or mm.dd)
Coverage
The telephone’s coverage will vary normally between 50 and 300 metres, depending on
whether the radio waves carrying the conversation are blocked by obstacles in their path.
Coverage can be improved by turning ones’ head so that the handset is aligned with the
base unit.
Sound quality declines as the limit is reached until the call is nally interrupted.
Battery
Because batteries only have a certain lifespan it is quite normal that call time and standby
time will decrease somewhat compared to the specications when the telephone is used
regularly.
Batteries (600 mAh) that have been fully charged (10 hours) will last for approx. 100
hours in standby or approx. 10 hours call time. These operation times apply at normal
room temperature.
Full battery capacity will not be reached until the batteries have been charged 4-5 times.
The base unit has an automatic charging mechanism that prevents the batteries from
being overcharged or damaged due to prolonged charging.
Please note!
The charging connections should be cleaned regularly with a soft cloth and/or an eraser.
The base unit should not be located close to other electrical equipment, in direct sunlight or near any other
strong heat source! This is to minimize the risk of interference.
It is normal for the device to become warm during charging and is not dangerous.
Use only DORO original batteries. The guarantee does not cover any damage caused by incorrect batteries.

4
English
The Display
Icon Function
Scroll indicator.
6Shown within range of the base unit.
Flashes when out of range.
qDuring calls.
Speaker phone.
Ringer disabled.
zMicrophone muted.
Key lock activated.
Battery charge indicator.
Handset 1 Handset number (internal number).
23.06 12:00 Current date/time.
Base unit indicators
qFlashes during calls.
YIlluminated on normal operation, off if power failure.
Paging
Press 5on the base unit to activate the paging signal. The signal will stop automatically
or when Lon the handset or 5on the base unit are pressed.
)BOETFU

5
English
Making a call
1. Enter the desired phone number (C=erase).
2. Press O. The number is dialled. Press Lto terminate call.
Please note!
To obtain dialling tone without entering a number, e.g. if a call is to be transferred from this phone, hold
Odown for a second or two.
Making a call with Skype
1. Press
S
.
2. Press Wrepeatedly to choose between the functions: Contact List, Incoming
List, Outgoing List, Missing List and Voicemails (Press #to see time and
date for the selected entry).
3. Scroll through the entries using }/{.
4. Press
S
, and the contact will be dialled.
5. Press Lto terminate the call.
It also is possible to dial a Speed-Dial or SkypeOut number (see below) directly using the
keypad and then press
S
. Contacts and Speed-Dial must rst be created in Skype before
it's possible to call them. More help can be found at www.skype.com/help/guides/.
The following status symbols is displayed for Skype contacts:
Status Function
Contact Online
xContact Ofine
OSkypeOut contact
?Contact Away/Not Available
!Contact status Don’t Disturb
SkypeOut
SkypeOut must be activated in order for you to call ordinary telephone numbers. You do
this by buying SkypeOut credit from www.skype.com.
Use the number buttons to dial the number. To make a SkypeOut call you enter the
number in the following way (local calls as well): 00 àcountry code ànumber. You can
enter 00 or 011 before the country code.
Example (using the “44”country code for UK calls.):
00 44 123 456 789
011 44 123 456 789
You can create SkypeOut contacts by clicking on Add contact in Skype and entering a
number. It is possible to specify an abbreviated number for SkypeOut contacts.
Please note!
The current version of Skype does not allow emergency calls (e.g.112). If you need to make an emergency
call you should use a land line or a mobile phone.

6
English
Receiving a call
1. Wait for the handset to ring.
2. Press Oto answer (or
S
if it’s a Skype-call).
3. Press Lto terminate call.
To switch between handset/speaker press . Please remember that in speaker mode, it is only possible for
one person at a time to talk.
This product does not usually ring on the rst signal to allow correct matching to the phone book.
Call Waiting Skype/Tel
It's possible to answer an incoming Skype-call during conversation on the phone line by
pressing
S
. The phone call is then put on hold and can be returned to by pressing O.
Disconnection of a call is done by pressing L when it's active.
It's also possible to answer an incoming phone call during a Skype-call by pressing O.
The Skype-call is then put on hold and can be returned to by pressing
S
.
Skype Hold
A call in progress can be put on hold by pressing
S
, press once again to return to call.
Volume control
The volume may be adjusted during a call using }/{. Press W.
Redial
Press Oand scroll through the 10 most recently dialled numbers using}/{. Press O
again to dial. Recent Skype-calls will not be displayed.
Mute button
The microphone may be muted/switched on during a call by using z.
KeyGuard
The KeyGuard is turned off/on by pressing /#.
Phonebook
50 telephone numbers (max. 20 digits) with names (max. 12 letters) can be stored in the
handset’s phonebook. If you subscribe to a caller ID service the name in the phonebook
will be shown for incoming calls.
Letters
Each number key has been allocated certain letters. The phonebook is arranged according
to the order of the buttons, which is not the same for all languages.
1...........................................[Space]
*...........................................Switch between upper/lower case letters ABC/abc
0(press & hold) ...................Pause in telephone number

7
English
Store name/number in handset
1. Press b. Press W.
2. Scroll to New. Press W.
3. Enter the telephone number, including the area code (C=erase). Press W.
4. Press equivalent digit key one or more times for desired name. Press W.
5. Press Lto return to standby mode.
Managing the phonebook
1. Press b.
2. Scroll among the entries with }/{. You can quick search the phone book by
pressing the corresponding number key for the rst letter.
3. Press Oto make a call (
S
for Skype-call) or press Wfor the following choices:
- New See description above
- Select Select number
- Edit Revise information
- Delete/Delete list
4. Press W.
New calls (Caller ID memory*)
Caller ID allows you to see who is calling before you answer a call or to see the last 20
missed calls. New numbers are indicated with the text New calls.
If one and the same number calls in more than once it will be saved as only one entry.
Retrieving and dialling incoming numbers
1. Press {/ . Scroll to the required entry using }/{.
2. Press Oto make a call or press Wfor the following choices:
-Select Select number
-Store No. Store number in Phonebook
-Delete Delete this number
-Delete list Delete all numbers
3. Press W.
Caller identication messages
Besides number display, the following message is shown sometimes:
Unavailable No information received, e.g. an international call.
Withheld Information about the number is blocked and the number cannot be
shown.
Please note!
*This function requires a subscription from your service provider

8
English
Message indication (voice mail box)
This applies only to subscribers with access to a voice mail service.
The telephone has a function that facilitates dialling/listening to this service.
In addition, if you subscribe to services for message indication and caller ID the display
will show if some one has left a message.
A new message is indicated then with the text Mailbox on standby (only applies in
certain countries).
Please note!
The telephone number to call voice mail depends on the network and must be programmed see Service
codes under Changing settings in the base menu further on in this chapter.
Playback with hot key
1. Hold 1pressed down for a few seconds.
2. Listen to the information/messages received.
3. Press Lto terminate the call.
Other services
Most usual operator/extra services can be accessed via the menu Wduring a call.
Please note!
The functions available will depend on your service provider.
You may have to pay extra for some services, contact your service provider for more information.
Some services will not work unless you have contacted your service provider to activate them.
Using the Flash button manually
1. Connect an external call and wait until the timer is shown. Press R.
2. Enter telephone number or manual code. Press W.
Busy number/call waiting
1. Connect an external call and wait until the timer is shown. Press W.
2. Scroll to required service. Press W.
- Call internal (see Expanded System).
- CW accept Answer incoming call waiting (=R2).
- CW reject Refuse incoming call waiting and send engaged tone (=R0).
- Auto Redial When a number is engaged. When the number is free you will hear a
quick ring signal (=5).
Under inquiry/alternating/answered call waiting
Use the respective menu button:
- Brokering Switching between two calls (=R2).
- Conference Conference/three party call (=R3).

9
English
Handset settings
1. Press w.
2. Scroll to Setup Hs. Press w.
3. Select a function below using {/}. Press w.
Ring melody, Ring volume, Tones, Handset Name, Language & Reset.
4. Modify the selected option using {/}.
5. Press w to conrm.
Important!
Resetting to factory defaults certain functions will be lost and will require reprogramming ie: Phone book,
Redial memories etc.
Changing settings in the base menu
1. Press w.
2. Scroll to Setup BS using {/}. Press w.
3. Select a function below using {/}. Press w.
Change PIN, Sevice Codes, Call Waiting, Dial mode, Flash time, Access
Code, Reset.
4. Modify the selected option using {/}. Press w to conrm.
Change Pin PIN code is 0000 when supplied.
Service Codes The codes supplied when you use the operator services can
be changed. The number for Call anonym and Mailbox
(voicemail) can also be programmed here.
Call Waiting Command to turn the call waiting service off or on easily.
Dial Mode The dial mode setting should DTMF (Europe only).
Flash Time Should be 100 ms for EU/UK/AUS, 300 ms France/Portugal
and 600 ms New Zeeland.
Access Code Enter the digit that obtains an external line and the telephone will
insert a pause automatically when a number starts with that digit.
Reset Reset base unit, conrm with PIN code and press w.
IMPORTANT!
Resetting to factory defaults certain functions will be lost and will require reprogramming ie: caller-id etc.
PIN code is 0000 when supplied.

10
English
Changing settings for Skype
1. Press w.
2. Scroll to Setup Skype using {/}. Press w.
3. Select a function below using {/}. Press w. Change Status or Show Ofine.
4. Modify the selected option using {/}.Press w to conrm.
Change Status Change Status of how other Skype users will see you.
Show Ofine Skype Contact list can show/hide users that are Ofine.
Expanded system (+1...)
The following functions only apply to +1 (2,3) systems. It is NOT possible to add
additional handsets at a later time. The base unit should be centrally positioned so that
the area covered is roughly equal for both handsets.
Intercom calls
Calls can be made internally between the handsets referred to as internal calls, or
intercom.
1. Press w.
2. Scroll to Call internal using }/{. Press w.
3. Enter the allocated number of the handset that you wish to call, 1 - 4
Should an external call come in while an intercom call is in progress, a tone will be heard. You
can then terminate the intercom call by pressing L, to receive the external call press O.
Transferring calls between handsets
1. With an external call connected and the timer displayed.
2. Press w.
3. Scroll to Call internal using }/{. Press w.
4. Enter the allocated number of the handset that you wish to call, 1 - 4.
5. To transfer the external call, press Lon the calling handset.
Conference
1. With an external call connected and the timer displayed.
2. Press w.
3. Scroll to Call internal using }/{. Press w.
4. Enter the allocated number of the handset that you wish to call, 1 - 4.
5. Press won the calling handset.
6. Scroll to Brokering/Conference using }/{. Press w.
Press Lto disconnect one party, any one of the handsets can terminate the conference
call allowing the other continue the conversation with the external caller.

11
English
Troubleshooting
Check that the telephone cord is undamaged and properly plugged in. Disconnect any
additional equipment that may be connected, eg. extension cords and other phones. If the
problem is resolved, the fault is with the other equipment.
Test the equipment on a known working line (eg. at a neighbours). If the product works
then the fault is with your telephone line. Please inform your local telephone company.
No number shown when ringing
- This function requires a subscription from your service provider.
- A switchboard cannot usually pass on incoming numbers.
Warning signal during call/Cannot connect
- The batteries may be running low (recharge the hand unit).
- The hand unit may be (nearly) out of range. Move closer to a base unit.
Telephone does not work
- Check that the adapter and telephone cord are connected to the base unit and to their
respective wall sockets.
- Check that you have selected Tone Dial, see System Settings/Dial.
- Check the charge status of the handset batteries.
- Try connecting another telephone, known to be in working order, to the line socket.
If that phone works then it is likely that this equipment is faulty.
Skype does not work
- Check that Doro USB Phone suite is running. will be shown in the message eld
at the bottom of the right side of the computer screen. If is shown, is either Skype
not started or the USB-cable not properly connected.
- The phones display will show USB Missing if the USB-cable isn't connected or if
Doro USB Phone suite isn't started.
- If Skype isn't started, will show and the phone display will show Skype Closed.
Restart computer if necessary.
If the telephone still does not work, contact the place of purchase. Don’t forget the
receipt or a copy of the invoice.

12
English
Specic absorption rate (SAR)
This device meets approved international safety requirements for exposure to radio
waves.
This telephone measures 0.05 W/kg (measured over 10g tissue).
The max. limit according to WHO is 2W/kg (measured over 10g tissue).
Declaration of conformity
Doro hereby declares that the products Doro 635ipw conform to the essential
requirements and other relevant regulations contained in the Directives 1999/5/EC and
2002/95/EC.
A copy of the manufacturer’s declaration is available at www.doro.com/dofc
Guarantee
This product is guaranteed for a period of 12 months from the date of purchase. In the
unlikely event of a fault occurring during this period, please return the item with a copy
of the purchase receipt to the place of purchase. Proof of purchase is required for any
service or support needed during the guarantee period.
This guarantee shall not apply to a fault caused by an accident or a similar incident or
damage, liquid ingress, negligence, abnormal usage, non-maintenance or any other
circumstances on the users’ part. Furthermore, this guarantee shall not apply to a fault
caused by a thunderstorm or any other voltage uctuations. As a matter of precaution, we
recommend disconnecting the telephone during a thunderstorm.
Batteries are consumables and are not included in any guarantee.
This guarantee does not apply if other batteries than DORO original batteries have been
used.
UK
If you cannot resolve the fault using the faultnder section, technical support is available
by email on: tech@doro-uk.com Further contact details are available on our website:
www.doro-uk.com

13
English
Australia and New Zealand
Products permitted for connection to the telephone network are marked with
in Australia and in New Zealand. These marks indicate the products
comply with the regulations and can be used without concern in the country of purchase.
If you believe this product is malfunctioning, please refer to the relevant section and/or
consult the troubleshooting guide in this manual to ensure that you have followed the
instructions carefully. As an alternative you can visit our web site for FAQ’s or send an
e-mail for a prompt reply.
Guarantee
This product is guaranteed for a period of 12 months from the date of purchase.
Should you experience difculties with the product, please contact us for assistance. If the
product is then found to be faulty you will be asked to return it directly to us with a copy
of the purchase receipt. This guarantee shall not apply to a fault caused by an accident or
a similar incident or damage, liquid ingress negligence, abnormal usage, not reasonably
maintained or any other circumstances on the purchaser’s part. Furthermore, this
guarantee shall not apply to a fault caused by a thunderstorm or lightning, excessive or
any other voltage uctuations or faults on the telephone line. (As a matter of precaution,
we recommend disconnecting the telephone during a thunderstorm).
This guarantee does not affect your statutory rights.
AUSTRALIA NEW ZEALAND
DORO Australia Pty Ltd Atlas Gentech (NZ) Limited
PO Box 6760 Private Bag 14927
Baulkham Hills BC NSW 2153 Panmure
Australia Auckland
New Zealand
Consumer Support Consumer Support
Ph: Ph: 1300 885 023 Ph: 0900-500-25 (Toll Call)
Fax: (02) 8853-8489 Fax: (09) 574-2722
Email: support@doro.com.au Email: support@atlasgentech.co.nz
Web site: www.doro.com.au

14
English
REN (RN for New Zealand)
The REN (Ringer Equivalence Number) or (RN) is of signicance only if you wish to
connect more than 1 telephone to your telephone line. A standard telephone line has a
maximum REN capacity of 3 (RN of 5). It is possible to connect 3 devices with a REN
of 1 (RN of 1) with no degradation to the product’s performance. Exceeding this limit
may cause the volume of the ringer in any phone to decrease or not ring at all.
ALL PRODUCTS
The grant of a Telepermit for any item of terminal equipment indicates only that Telecom
has accepted that the item complies with the minimum conditions for connection to its
network. It indicates no endorsement of the product by Telecom, nor does it provide any
sort of warranty. Above all, it provides no assurance that any item will work correctly in
all respects with another item of Telepermitted equipment of a different make or model,
nor does it imply that any product is compatible with all of Telecom’s network services.
This equipment shall not be set to make automatic calls to the Telecom “111“ Emergency
Service.
This equipment may not provide for the effective hand-over of a call to another device
connected to the same line.
This equipment should not be used under any circumstances that may constitute a
nuisance to other Telecom Customers.
CND PRODUCTS
If a charge for local calls is unacceptable, the “DIAL’’ button should NOT be used for
local calls. Only the 7 digits of the local number should be dialled from your telephone.
DO NOT dial the area code digit or the “0’’ prex.

10
11
1
3
4
67
9
5
#
2
813
14
Conguration requise
Microsoft Windows 2000 ou XP
Processeur de 400MHz et port libre
USB1.1 ou USB2.0
128Mo de mémoire vive
20Mo d’espace libre sur le disque dur
Connexion Internet à débit de 33,6
Kbits/s minimum
1 Touche Skype
2 Touche de navigation vers
le haut et de présentation
du numéro/nom
3 Touche Effacer/Retour/
Secret
4 Touche fonction Mains-
libres
5 Touche de
communication / Rappel
6 Touche *et Sonnerie
on/off
7 Touche #et de blocage
des touches
8 Touche de navigation vers
le bas et du Répertoire
9 Touche de déconnexion
10 Touche R
11 Touche de délement du
menu/OK
12 Port USB
13 Prise du câble
téléphonique
14 Prise du bloc
d’alimentation
Déballage
Vous trouverez dans l’emballage :
- Un combiné
- Un bloc d’alimentation (6VCC 200mA)
- Une base
- Des câbles (avec adaptateurs)
- 2 batteries (AAA Ni-MH 1,2V 600 mAh)
- Un chargeur
- Un bloc d’alimentation (6VCC 300mA)
- Un CD-Rom
Les modèles avec combinés supplémentaires
(comme le +1) sont livrés avec un combiné
supplémentaire, batteries, chargeurs et adaptateurs.
Français
12

2
Français
Installation du logiciel
Pour que le Doro 635ipw fonctionne correctement avec Skype, vous DEVEZ installer les
logiciels Doro USB Phone Suite et Skype sur l’ordinateur.
1. Insérez le CD fourni dans le lecteur de l’ordinateur. L’installation démarre
automatiquement (dans le cas contraire, exécutez le chier Menu.exe du CD).
2. Accédez au manuel d’utilisation en cliquant sur Manual.
3. Si Skype est déjà installé, (la version doit être 1.0.0.106 ou ultérieure), passez à l’étape
suivante. Installez Skype en cliquant sur Download and install Skype pour vous
connecter à la page Web du site Skype d’où vous téléchargez Skype pour l’installer.
A la première utilisation de Skype, choisissez un pseudo (login) et son mot de passe
associé de connexion au réseau Skype.
4. Installez Doro USB Phone suite en cliquant sur Install Doro USB Phone Suite.
Si une fenêtre de dialogue apparaît vous demandant d’exécuter ou d’enregistrer le
chier, cliquer sur Exécuter. Selon la conguration de vos paramètres de sécurité,
une fenêtre d’avertissement de sécurité peut apparaître vous demandant votre
conrmation pour exécuter ce logiciel. Cliquer alors sur Exécuter.
Une fois l’installation terminée, on vous demande si vous voulez démarrer Doro USB
Phone Suite. Conrmez en cliquant sur Ok. Permettez aussi à Doro USB Phone Suite
d’utiliser Skype à l’invite.
Une fois l’installation terminée, s’afche dans le champ de message en bas à droite de
l’écran de l’ordinateur. Cliquer avec le bouton droit sur vous permet de vérier l’état
courant et de régler le volume.
Pour plus d’informations sur Skype, visitez www.skype.com/help/guides.
Raccordement
1. Reliez le bloc d’alimentation (6V CC: connecteur N°13 de la base) et le câble
téléphonique (connecteur N°12 de la base) aux prises murales.
2. Reliez la base à l’ordinateur avec le câble USB.
3. Reliez le bloc d’alimentation (6V CC) au chargeur et à la prise de courant.
4. Insérez les batteries dans le combiné en respectant la polarité (+ et -).
5. Placez le combiné sur le chargeur, le clavier tourné vers l’extérieur. Chargez-le en
continu pendant 24 heures avant la première utilisation.
Déballage.......................... 1
Conguration requise .......1
Installation du logiciel .......2
Raccordement ..................2
Portée................................3
Batteries............................3
Afcheur............................4
Témoins de la base........... 4
Recherche du combiné.....4
Appeler..............................5
Appeler les contacts
Skype ................................5
SkypeOut ..........................5
Recevoir un appel.............6
Signal d’appel Skype/Tél .. 6
Mise en garde d’appel
Skype ................................6
Réglage du volume...........6
Touche Bis ........................6
Touche Secret...................6
Verrouillage des touches..6
Répertoire ......................... 6
Nouveaux appels (JAP*) ..7
Signalement des messages
(messagerie vocale)..........8
Autres services .................8
Réglages du combiné....... 9
Changer une option du
menu de la base ...............9
Modier les réglages de
Skype ................................10
Système élargi (+1...) ........10
En cas de problèmes........11
DAS (Débit d’Absorption
Spécique) ........................12
Déclaration de conformité 12
Garantie et S.A.V. .............12

3
Français
Langue
1. Appuyez sur w.
2. Atteignez Setup HS/Réglage comb avec les touches }/{. Appuyez sur w.
3. Atteignez Language/Langue. Appuyez sur w.
4. Atteignez le réglage désiré. Appuyez sur w.
5. Appuyez sur Lpour repasser en veille.
Touche R
1. Appuyez sur w. Atteignez Réglage base.Appuyez sur w.
2. Atteignez Touche R. Appuyez sur w.
3. Atteignez 300 ms. Appuyez sur w.
Date/Heure
1. Appuyez sur w. Atteignez Date/heure. Appuyez sur w.
2. Atteignez Réglage H/D. Appuyez sur w.
3. Réglez l’Année (20YY). Appuyez sur W.
3. Réglez la Date (JJ.MM). Appuyez sur w.
4. Réglez l’Heure (HH MM). Appuyez sur w.
Vous pouvez régler le Format heure (12hr ou 24hr) et le Format date (jj.mm ou mm.jj)
Portée
En général, la portée du téléphone varie de 50 à 300 mètres en fonction des conditions
ambiantes.
Vous pouvez améliorer la portée en tournant votre tête de façon à pointer le combiné vers la
base.
La qualité du son se détériore quand le combiné se rapproche de sa limite de portée, la
communication sera ensuite coupée.
Batteries
Les batteries ayant une durée de vie limitée, l’autonomie en veille ou en communication
peut varier par rapport aux spécications données.
Des batteries (600 mAh) complètement chargées (charge de 10 heures) ont une autonomie
d’environ 10 heures en communication et 100 heures en veille. Ces durées sont données
pour une utilisation à l’intérieur à des températures normales.
Les batteries sont complètement chargées au bout de 4 à 5 charges.
La base a un système de recharge automatique qui évite de surcharger les batteries ou de
les endommager par une recharge prolongée.
Remarque !
Nettoyez régulièrement les contacts de charge avec un chiffon doux et/ou une gomme.
Ne placez pas la base à proximité d’appareils électriques, d’une source de chaleur ou dans un endroit
exposé directement au soleil an de minimiser les risques d’interférences.
Vous pourrez observer un réchauffement de l’appareil pendant la charge ; ce phénomène est normal.
Utilisez uniquement des batteries DORO d’origine. La garantie ne couvre pas les dommages causés par de
mauvaises batteries.

4
Français
Afcheur
Icône Fonction
Témoin de délement
6S’afche quand le combiné est à portée de la base.
Clignote lorsqu’il est hors de portée.
qEn cours d’appel.
Mains-libres.
Sonnerie coupée.
zMicro coupé.
Verrouillage des touches activé.
Témoin de charge des batteries.
Combiné 1 Numéro du combiné (pour les appels internes).
23.06 12:00 Date et heure actuelles.
Témoins de la base
qClignote en cours d’appel.
YNormalement allumé, éteint hors tension.
Recherche du combiné
Appuyer sur la touche 5de la base déclenche le signal de recherche du combiné. Le
signal s’arrête automatiquement ou lorsqu’on appuie sur la touche Ldu combiné ou sur
la touche 5de la base.
)BOETFU

5
Français
Appeler
1. Composez le numéro de téléphone désiré (C=effacer).
2. Appuyez sur Opour appeler votre correspondant. Appuyez sur Lpour mettre
n à la communication.
Remarque !
Pour obtenir une tonalité sans composer de numéro, comme par ex. pour
transférer un appel sur ce téléphone, appuyez sur Opendant une ou
deux secondes.
Appeler les contacts Skype
1. Appuyez sur
S
.
2. Appuyez plusieurs fois sur Wpour atteindre la fonction désirée : Contacts, Appel
entrant, Appel sortant, Appel en abs. ou Boîte Vocale (Appuyez sur #pour
afcher l’horodatage de l’entrée choisie).
3. Faites déler les entrées à l’aide des touches {/}.
4. Appuyez sur
S
pour appeler votre correspondant.
5. Appuyez sur L pour mettre n à la communication.
Vous pouvez aussi appeler directement un numéro abrégé ou SkypeOut (voir ci-après)
à partir du clavier et en appuyant sur
S
. Vous ne pouvez appeler que les Contacts et
numéros abrégés créés au préalable dans Skype. Pour plus d’informations sur Skype,
visitez www.skype.com/help/guides/.
Les symboles suivants s’afchent pour les contacts Skype :
Etat Fonction
Contact Connecté
xContact Déconnecté
OContact SkypeOut
?Contact Absent/Indisponible
!Contact en état Ne pas déranger
SkypeOut
Pour appeler les numéros de téléphone ordinaires, vous devez activer SkypeOut. Pour ce
faire, achetez des unités directement à l’adresse www.skype.com.
Utilisez les touches numérotées pour appeler. Pour effectuer un appel SkypeOut (y
compris les appels locaux), composez le numéro comme suit: 00 àcode pays ànuméro.
Au besoin, entrez 00 ou 011 avant le code pays.
Exemple (« 44 » étant le code pour les appels vers la Grande Bretagne):
00 44 123 456 789
011 44 123 456 789
Créez les contacts SkypeOut en cliquant dans Skype sur Ajouter contact puis en
saisissant le numéro. Vous pouvez spécier un numéro abrégé pour les contacts SkypeOut.
Remarque !
La version actuelle de Skype ne permet pas d’effectuer des appels d’urgence (112 par ex.). Utilisez un téléphone
mobile ou xe pour les appels d’urgence.
Other manuals for 635ipw
1
Table of contents
Languages:
Other Doro Cordless Telephone manuals