Doro PHONEEASY 610 User manual

doro 610

1 Erase/Mute button
2 Memory button
3 Recall/Intercom button
4 Talk/Call end button
5 */Ringer (on/off) button
6 #/Key Lock button
7 Programming button
8 Redial button
9 Caller ID (CID) button
8
9
2
3
4
56
7
1

English
1
Connection
1. Connect the mains adapter (6V DC) and the telephone cord to the wall sockets.
2. Insert the batteries(AAA 1.2V 600mAh NiMH) in the handset with plus and minus
terminals as directed.
3. Chargethehandsetwiththekeypadfacingoutwards(for24hoursthersttime).
Range
The telephone’s range will vary normally between 50 and 300 metres, depending on whether
the radio waves carrying the conversation are blocked by obstacles in their path. The range
can be improved by turning one’s head so that the handset is aligned with the base unit.
Soundqualitydeclinesasthelimitisreacheduntilthecallisnallydropped.
The symbol 6isshowedinsidetherangeandashesuntillostoutsidetherange.
Battery
Because batteries only have a certain lifespan it is quite normal that call time and standby
timewilldecreasesomewhatcomparedtothespecicationswhenthetelephoneisused
regularly. Batteries that have been fully charged (10 hours) will last for approx. 100 hours
in standby or approx. 10 hours call time. These times apply at normal room temperature.
Full battery capacity will not be reached until the batteries have been charged 4 to 5 times.
The base unit has an automatic charging mechanism that prevents the batteries from
being overcharged or damaged due to prolonged charging.
Battery Charge Indicator
Whencharging,thebatterysymbolwillashaslongasthehandsetisplacedinthe
chargerandwillnotstopashingevenwhenfull.
If the batteries are running low will be displayed, although calls can still be made and
received the phone must be replaced on the charger should a warning tone be heard during
a call. Failure to recharge the batteries will result in the telephone ceasing to function.
Making a call
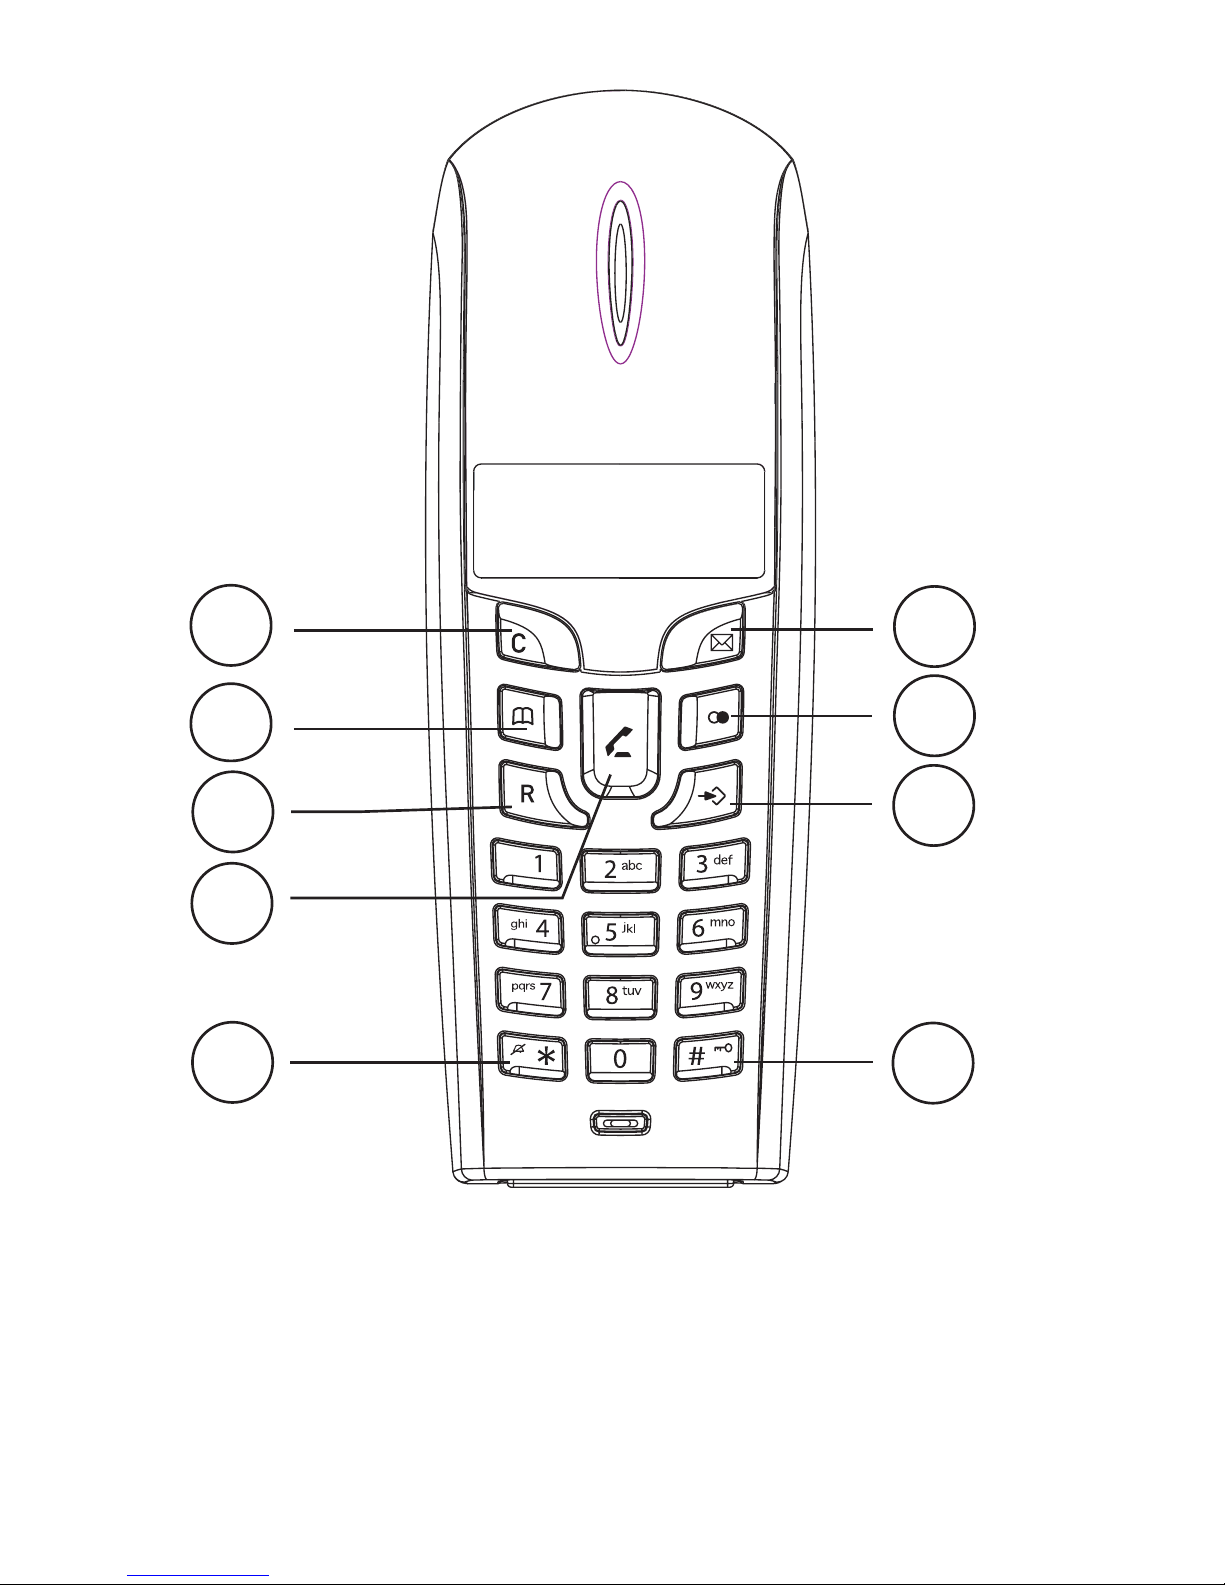
1. Enter the required number (C=delete).
2. Press qto dial the number. Press qto terminate call.
Receiving a call
1. Wait for the handset to ring. Lift the handset.
2. Press qto answer. Press qto terminate call.
Please note!
When the battery is low or when there is too great a distance to the base unit the telephone will be unable to
connect to a call.
The charging connections should be cleaned regularly with a soft cloth or eraser.
The base unit should not be located close to other electrical equipment, in direct sunlight or near any other
strong heat source! This is to minimize the risk of interference.
It is normal for the device to become warm during charging and not dangerous.
Use only DORO original batteries. The guarantee does not cover any damage caused by incorrect batteries.

English
2
Redial function
Press rand scroll among the 10 most recently dialled numbers using r. Press q. to
redial the selected number.
Mute button
The microphone can be turned off/on during a call using C(z= mic off).
KeyGuard
The KeyGuard is turned off/on by pressing and holding #.
Direct Dialling
This feature allows a preset number to be dialled regardless of which button is pressed
(except º). When active the stored number and BB will be displayed.
Storing the Direct Dial Number
1. Press º3.
2. Enter the PIN number (0000 when supplied). Press º.
3. Enter the telephone number (up to 18 digits). Press º(C=delete).
Turning Direct Dial On/Off
1. Press º2.
2. Enter the telephones PIN number (0000 when supplied). Press º.
3. Press ºtoconrm.
Memory
This telephone has 10 memory locations numbered 0-9.
Storing telephone numbers
1. Press ºb.
2. Select a memory location (0-9) by repeatedly pressing b.
3. Enter the telephone number (up to 18 digits). Press º(C=delete).
Please note!
If you need to insert a pause in the telephone number, press and hold 0until the display shows P.
If you need to change a number, store the new number in the same location as the old one.
Dialling Stored Telephone Numbers
1. Repeatedly press b until the number required is displayed. You can also enter the
memory position directly by pressing b then the relevant memory location 0-9.
2. Press qto dial the displayed number.
Erasing ALL Stored Telephone Numbers
Press º0bº.

English
3
Caller Identication
The display shows you who is calling and the 10 most recent missed callers.
New Caller ID is indicated by in standby mode.
If the same number calls in more than once it will be saved as only one entry.
This function requires a subscription from your service provider.
This telephone will not display the time and date of the call.
Retrieving and Dialling CID Numbers.
1. Repeatedly press until the required telephone number is displayed.
2. Press qto dial the displayed number, or press Cto return to standby mode.
Erasing Numbers
1. Repeatedly press until the required telephone number is displayed.
2. Press and hold Cuntil a beep is heard.
Erasing All Numbers
Press º05º.
Messages
Apart from showing phone numbers, the display may show the following:
No information was received, e.g. international call, secret
or blocked numbers (not stored).
The number is longer than the display size (>12 digits).
Network Voice Mail*.
*Network Voice Mail can be cancelled from the display by pressing º0 #º.
Settings
1. Press P.
2. Press button according to list below, e.g. 4for handset volume.
3. The display shows current setting, e.g. P-4 2
┘
3means commando 4, current
setting 2 out of 3.
4. Press corresponding digit for desired setting, e.g. 3for max.
5. Press ºtoconrm.
Button Function
4.....................................Handset Volume (1=min....3=max)
5.....................................Ringer Melody (1=type 1....6=type 6)
6.....................................Ringer Volume (1=min....3=max)*
9.....................................Reset (Enter PIN-code, 0000 when supplied)
R.....................................Recall Button Timing (2=100ms/normal, 6=300ms)
*.....................................Tone/Pulse Dialling (1=pulse, 2=tone/normal)
*To turn the ringer on/off, in standby press and hold * ( = ringer off).

English
4
PIN Number
The PIN number (four-digits) protects against unauthorised access of certain functions.
1. Press º1.
2. Enter the telephones PIN number (0000 when supplied). Press º.
3. Enter your new PIN number. Press º.
4. Enter your new PIN number again. Press º.
Paging
The handset will ring when Jon the base unit is pressed. The signal will stop
automatically after a while or if the qbutton on the handset or the Jbutton on the
base unit is pressed.
Expanded system (+1...)
The base unit should be centrally positioned so that the area covered is roughly equal for
both handsets. The handset number is showed in the display in stand-by.
It is NOT possible to add additional handsets at a later time.
Intercom
1. Press and hold Runtil the display shows int.
2. Enter the handset number for the handset that you wish to call, 1 -4.
Should an external call come in while an internal call is in progress, a tone will be heard.
You must then terminate the internal call by pressing q, press qagain to receive the
external call.
Transferring calls/Conference between handsets
1. While an external call is connected on line.
2. Initiate an internal call as described above.
3. Press qto transfer the call or press 5for conference.

English
5
Troubleshooting
Check that the telephone cord is undamaged and properly plugged in. Disconnect any
additional equipment, extension cords and other telephones that may be connected. If the
problem is resolved, the fault is with the other equipment.
Test the equipment on a known working line. If the product works then the fault is with
the line. Please inform your local telephone company.
Proof of purchase such as the receipt or a copy of the invoice will be required for service
or assistance if the above does not resolve the problem.
Specic Absorption Rate (SAR)
This telephone complies with applicable international safety requirements for exposure to
radio waves.
The SAR-value of this product is not greater than 0.05 W/kg (measured over 10g of
tissue). The maximum limit according to WHO is 2W/kg (10g of tissue).
Guarantee
This product is guaranteed for a period of 12 months from the date of purchase. Proof of pur-
chase is required for any service or support required during the guarantee period.
This guarantee shall not apply to a fault caused by an accident or a similar incident or damage,
liquid ingress, negligence, abnormal usage, not reasonably maintained or any other circum-
stances on the purchaser’s part. Furthermore, this guarantee shall not apply to a fault caused
byathunderstormoranyothervoltageuctuations.
This guarantee does not in any way affect your statutory rights. (As a matter of precaution, we
recommend disconnecting the telephone during a thunderstorm.)
UK
Ifyoucannotresolvethefaultusingthefaultndersection,technicalsupportisavailable
by email on: tech@doro-uk.com or via a premium rate telephone number 0905 895 0854
(calls cost 50 pence at time of print). Further contact details are available on our website:
www.doro-uk.com
Declaration of conformity
Doro declares that the apparatus Doro 610 complies with the essential
requirements and other relevant positions of Directive 1999/5/EC, 2002/95/EC.
A copy of the Declaration of Conformity can be found at www.doro.com/dofc

English
6
Australia and New Zealand
Products permitted for connection to the telephone network are marked with in
Australia and in New Zealand. These marks indicate the products comply
with the regulations and can be used without concern in the country of purchase.
If you believe this product is malfunctioning, please refer to the relevant section and/or
consult the troubleshooting guide in this manual to ensure that you have followed the
instructions carefully. As an alternative you can visit our web site for FAQ’s or send an
e-mail for a prompt reply.
Electro Magnetic Radiation (EMR)
This telephone complies with applicable safety requirements for exposure to radio waves.
The mean power of this telephone is not greater than 14 mW.
This is below the 20mW limit at which testing is required.
Guarantee
This product is guaranteed for a period of 12 months from the date of purchase.
Shouldyouexperiencedifcultieswiththeproduct,pleasecontactusforassistance.Ifthe
product is then found to be faulty you will be asked to return it directly to us with a copy
of the purchase receipt. This guarantee shall not apply to a fault caused by an accident or
a similar incident or damage, liquid ingress negligence, abnormal usage, not reasonably
maintained or any other circumstances on the purchaser’s part. Furthermore, this
guarantee shall not apply to a fault caused by a thunderstorm or lightning, excessive or any
othervoltageuctuationsorfaultsonthetelephoneline.(Asamatterofprecaution,we
recommend disconnecting the telephone during a thunderstorm).
This guarantee does not affect your statutory rights.
AUSTRALIA NEW ZEALAND
DORO Australia Pty Ltd Atlas Gentech (NZ) Limited
PO Box 6760 Private Bag 14927
Baulkham Hills BC NSW 2153 Panmure
Australia Auckland
New Zealand
Consumer Support Consumer Support
Ph: Ph: 1300 885 023 Ph: 0900-500-25 (Toll Call)
Fax: (02) 8853-8489 Fax: (09) 574-2722
Email: support@doro.com.au Email: support@atlasgentech.co.nz
Web site: www.doro.com.au

English
7
REN (RN for New Zealand)
TheREN(RingerEquivalenceNumber)or(RN)isofsignicanceonlyifyouwishto
connect more than 1 telephone to your telephone line. A standard telephone line has a
maximum REN capacity of 3 (RN of 5). It is possible to connect 3 devices with a REN of
1 (RN of 1) with no degradation to the product’s performance. Exceeding this limit may
cause the volume of the ringer in any phone to decrease or not ring at all.
ALL PRODUCTS
The grant of a Telepermit for any item of terminal equipment indicates only that Telecom
has accepted that the item complies with the minimum conditions for connection to its
network. It indicates no endorsement of the product by Telecom, nor does it provide any
sort of warranty. Above all, it provides no assurance that any item will work correctly in all
respects with another item of Telepermitted equipment of a different make or model, nor
does it imply that any product is compatible with all of Telecom’s network services.
This equipment shall not be set to make automatic calls to the Telecom “111“ Emergency
Service.
This equipment may not provide for the effective hand-over of a call to another device
connected to the same line.
This equipment should not be used under any circumstances that may constitute a
nuisance to other Telecom Customers.
CND PRODUCTS
If a charge for local calls is unacceptable, the “DIAL’’ button should NOT be used for
local calls. Only the 7 digits of the local number should be dialled from your telephone.
DONOTdialtheareacodedigitorthe“0’’prex.


English
Version 1.0
Other manuals for PHONEEASY 610
1
Table of contents
Other Doro Cordless Telephone manuals

Doro
Doro HandlePlus 334gsm User manual

Doro
Doro 1000 AHS User manual

Doro
Doro NEOBIO 10 User manual

Doro
Doro FORMULA 8R User manual

Doro
Doro congress Programmer User manual

Doro
Doro COMFORT 1000 User manual

Doro
Doro 530FM User manual

Doro
Doro 5015 User manual

Doro
Doro 130R User manual

Doro
Doro TH70 User manual

Doro
Doro 5055R User manual

Doro
Doro NEOBIO 5R User manual

Doro
Doro PHONEEASY 336W User manual

Doro
Doro 132 User manual

Doro
Doro IP880 DECT User manual

Doro
Doro 670R User manual

Doro
Doro PHONEEASY 100W User manual

Doro
Doro PHONEEASY 110 User manual

Doro
Doro ADAPTO 6 User manual

Doro
Doro 565 COLOUR User manual