Doro 670R User manual

doro 670/680R

11
9
10
48
7
2
1
56
3
16
13
15
12
13
14
680R
English
1 Messages/Network
services
2 Left menu button/Back/
Internal call
3 Talk button
4 Speaker button (or Hands
free button)
5 *and ringer off/on
6 #and key guard
7 Recall button
8 Headset connector
9 Disconnect and off/on
10 Right menu button/OK
11 Scroll button
12 Answering machine off/on
13 TAM functions, refer
to description in the
Answering machine
chapter
14 Message indicator/display
15 Paging
16 Indicators, see Installation
chapter

English
1
Connection
1. Connect the mains adapter (6V DC) and the telephone cord to the wall sockets.
2. Insert the batteries in the handset with plus and minus terminals as directed.
3. Chargethehandsetwiththekeypadfacingoutwards(for24hoursthersttime).
4. Select language/date by following the instructions below.
Language
5Press Menu.
6. Scroll to Setting using {/}. Press OK.
7. Scroll to Handset Settings using {/}. Press OK.
8. Scroll to Language. Press OK.
9. Scroll to required setting. Press OK to save.
10. Press Lto return to standby mode.
Date/Time
11. Press Menu.
12. Scroll to Date/Time/Alarm. Press OK.
13. Scroll to Set Date & Time. Press OK.
14. Enter date (DD MM YY). Press }.
15. Enter time of day (HH:MM). Press OK to save.
16. Press Lto return to standby mode.
Connection..................................................1
Range..........................................................2
Battery .........................................................2
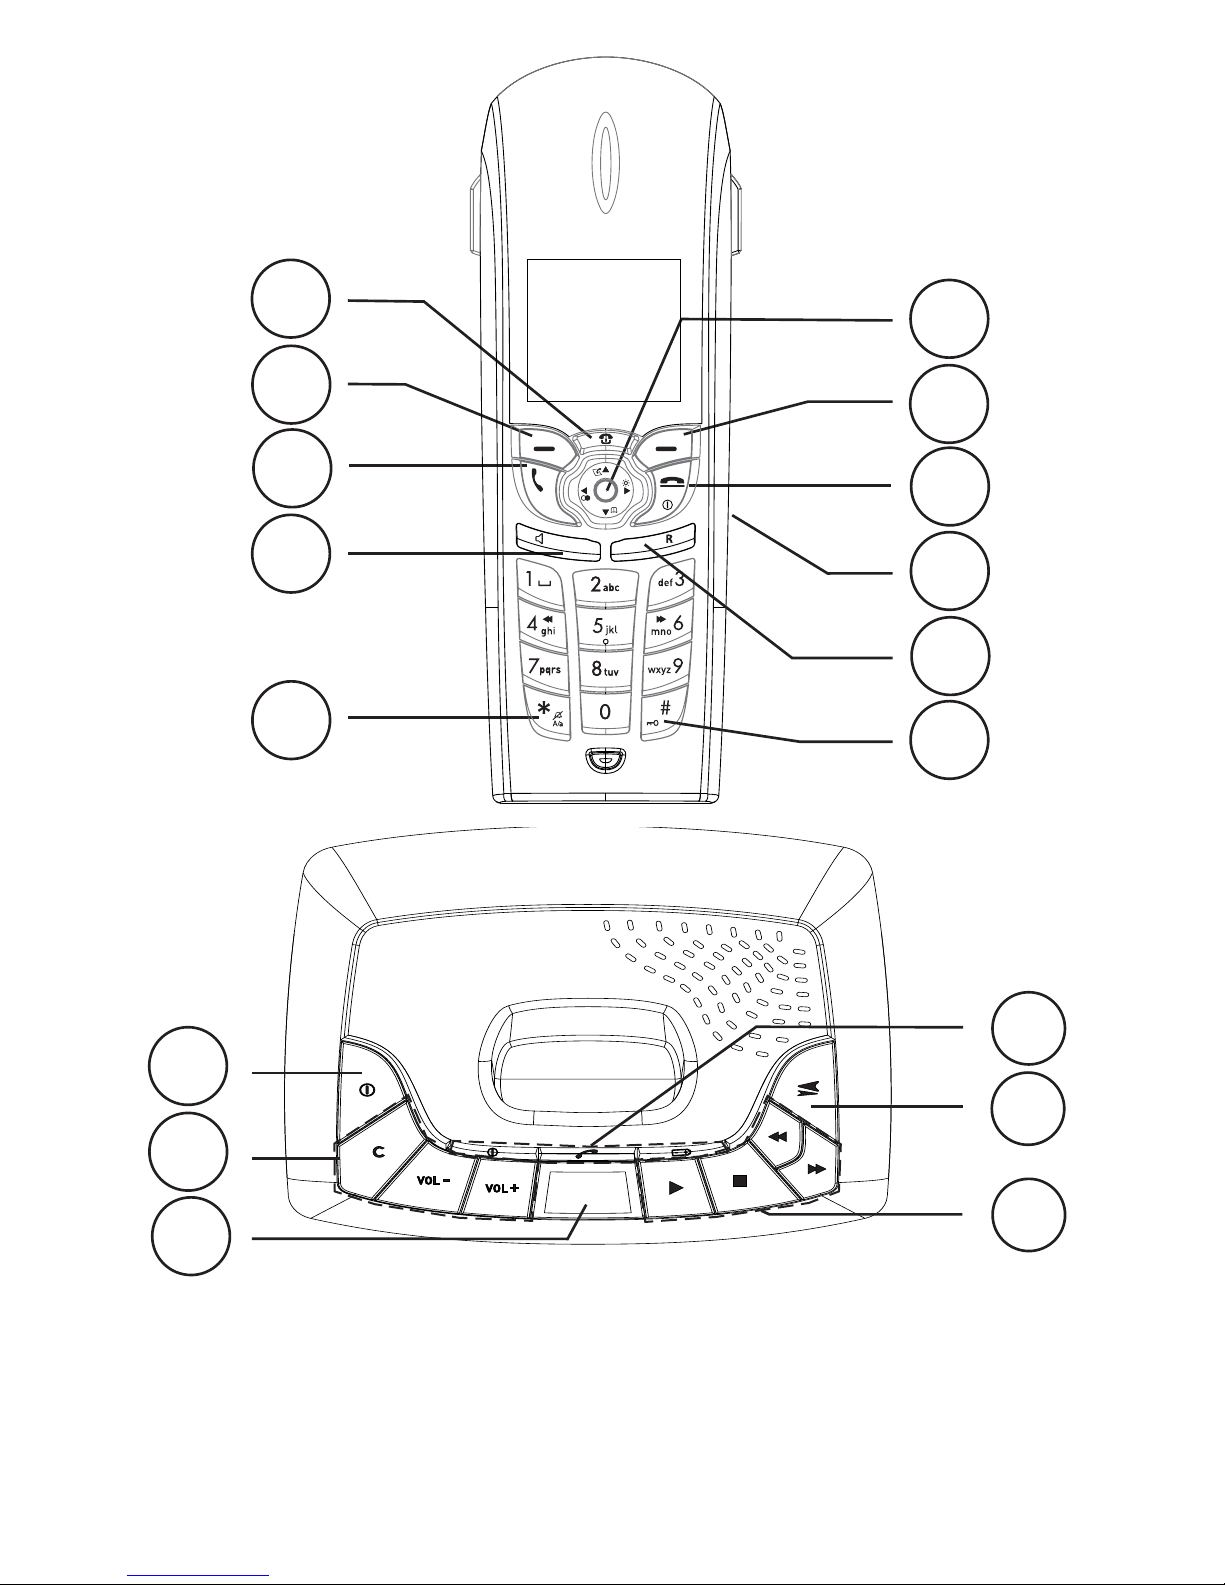
Base unit indicators....................................2
Handset indicator........................................2
Making a call ...............................................4
Receiving a call...........................................4
Recall (R) button.........................................4
Volume control............................................4
Turning off/on ..............................................4
Redial function............................................4
Mute button .................................................4
KeyGuard....................................................4
Paging..........................................................4
Phonebook..................................................5
SMS messages..........................................7
Calls Log (caller identication*).................9
Message indication (voice mail box).........10
Other network services..............................10
Audio signals and display..........................12
Date/Time/Alarm ........................................12
Game...........................................................13
Other settings in the handset ....................13
Register a new handset.............................14
System settings ..........................................14
Expanded system.......................................15
Answering machine (680R only) ..............16
Switching the answering machine on/off .16
Outgoing message.....................................16
Screening....................................................16
Playback of message in base unit............17
Playback of messages in handset............17
Answering machine settings.....................18
Personal message - MEMO .....................18
Out of memory............................................18
Remote activation.......................................19
Remote control ...........................................19
Troubleshooting..........................................20
Specic absorption rate (SAR)..................21
Declaration of conformity...........................21
UK ................................................................21
Australia and New Zealand.......................22

English
2
Range
The telephone’s range will vary normally between 50 and 300 metres, depending on whether
the radio waves carrying the conversation are blocked by obstacles in their path. The range
can be improved by turning one’s head so that the handset is aligned with the base unit.
Soundqualitydeclinesasthelimitisreacheduntilthecallisnallyinterrupted.
Battery
Because batteries only have a certain lifespan it is quite normal that call time and standby time
willdecreasesomewhatcomparedtothespecicationswhenthetelephoneisusedregularly.
Batteries (850 mAh) that have been fully charged (10 hours) will last for approx. 120 hours in
standby or approx. 12 hours call time. These times apply at normal room temperature.
Full battery capacity will not be reached until the batteries have been charged 4-5 times.
The base unit has an automatic charging mechanism that prevents the batteries from
being overcharged or damaged due to prolonged charging.
Please note!
The charging connections should be cleaned regularly with a soft cloth and/or an eraser.
The base unit should not be located close to other electrical equipment, in direct sunlight or near any other
strong heat source! This is to minimize the risk of interference.
It is normal for the device to become warm during charging and not dangerous.
Use only DORO original batteries. The guarantee does not cover any damage caused by incorrect batteries.
Base unit indicators
Flashes when new SMS message received.
7Illuminates when charging is in progress.
q/YIlluminatedonstandbyandashesduringcalls.
Handset indicator
Flashes when there is a new message in e.g. caller ID, SMS or telephone
answering machine (680R only). Press button to access the different
messages.
In order to save the batteries, the display is very dark on standby. Press L
once to illuminate. Use 9during calls (also illuminates clock on standby).

English
3
The display
Indicator Function
6Shown within the base unit range. Flashes when out of range.
Alarm activated.
Speaker function.
qHandset is connected (during calls).
Headset being used.
Ringer off.
Microphone muted.
KeyGuard activated.
Battery charge indicator.
New SMS* received.
New number received.
Messages indication*.
680R only:
(upper row) Illuminated when answering machine is on.
(lower row) New message on answering machine.
*Only functions in certain countries.

English
4
Making a call
1. Enter the required number.
2. Press , the number is dialled. Press Lto terminate call.
Receiving a call
1. Wait for the handset to ring.
2. Press to answer. Press Lto terminate call.
Please note!
To switch between handset/handsfree press . Please remember that in speaker mode, it is only possible for
only one person at a time to talk.
This product does not usually ring on the rst signal to allow correct matching to the phonebook.
If the telephone cannot connect to a line, a warning tone will be heard. The problem may be due to the batteries
running low, the handset being too far from the base unit or all of the transmission channels being engaged.
Recall (R) button
To avoid having to remember commands, certain network services have been pre-
programmed to the menu buttons, see Other network services.
Volume control
The volume may be adjusted during a call using }/{. Press OK.
Turning off/on
Press and hold the Lbutton for a few seconds to turn the handset off or on.
ConrmdisconnectionbypressingYes.
Redial function
Press 8and scroll among the 30 most recently dialled numbers using {/}. Press .
Mute button
The microphone can be turned off/on during a call using 8.
KeyGuard
The KeyGuard is turned off/on by pressing and holding #.
Paging
Pressing Jon the base unit will activate the paging signal of the handset. The signal will
stop automatically after a while or if the L button on the handset or the Jbutton on the
base unit is pressed.

English
5
Phonebook
200 telephone numbers (max. 24 digits) with names (max. 15 letters) can be
stored in the handset phonebook.
If you subscribe to a caller ID service the name in the phonebook will be
displayed for incoming calls.
You can also select different ring signals for different groups of numbers that are stored in
the phonebook.
Letters
Each number key has been allocated certain letters. The phonebook is arranged according
to the order of the buttons, which is not the same for all languages.
1......................................................[Space]
*......................................................Switch between upper/lower case letters ABC/abc
0(press & hold) ..............................Pause in telephone number
Save name/number in handset
1. Press }. Press Option.
2. Scroll to New Entry. Press OK.
3. Press equivalent digit key one or more times for desired name. Press }.
4. Enter the telephone number, including the area code. Press OK.
5. Press OK to save or scroll with {/}to store a mobile phone number or assign the
position to a speed dial number* or call group.
*To dial a speed dial number press down the equivalent 2-9 button.
Note! If the spelling help(see SMS chapter) is activated, it will actually make the storing of names in
phonebook more difcult.
Setting call groups
1. Press }. Press Option.
2. Scroll to Edit Call Group. Press OK.
3. Scroll to required group. Press OK.
4. Scroll to required ringtone. Press }.
5. Scroll to required image. Press OK to save.

English
6
Managing the phonebook
1. Press }.
2. Scroll through the entries using {/}. You can quick search the phonebook by
pressingtheequivalentnumberkeyfortherstletter.
3. Press to make a call or press Option for the following:
- New Entry see description on the previous page.
- Edit Entry - revise information.
- View to see stored information.
- Copy/Copy All to duplicate positions on other handsets.
- Delete Entry/Delete All.
- Capacity shows the number of free positions.
- Edit Call Group to select a certain image/ring signal for certain numbers.
- Call.
4. Press OK.
Shared phonebook
The phonebook in the base unit is shared by all handsets and has 10 positions which only
need to be saved once regardless of the number of handsets. Useful telephone
numbers may be pre-programmed in certain models.
Howeverthesenumbersmaynotmatchwithcalleridenticationforname/
ringtone.
1. Press Menu.
2. Scroll to Network Services. Press OK.
3. Scroll to Shared phonebook. Press OK.
4. Scroll through the entries using {/}.
5. Press to dial or scroll to the entry that is to be replaced. Press Option.
6. Scroll to Edit Entry. Press OK.
7. Enter name. Press }.
8. Enter the telephone number, including the area code. Press OK.

English
7
SMS messages
This feature requires a current Caller Id subscription to be in place and only
applies to text message users (SMS). The memory will store up to 30 messages,
the maximum number of characters per message is 160.
A new SMS message is indicated with the text New SMS Message and .
Please remember individual SMS features are country dependent and will vary or be
unavailable. Further details regarding the SMS text message service are available from you
local network provider.
Australia only
Short Message Service (SMS) facilities have been automatically activated for most Telstra®
telephone services across Australia. SMS services may not be available to, or between,
other service providers networks. A description of the SMS service provided by Telstra®
can be found at: http://www.telstra.com.au/talkingtext
ThereisnoneedtoregisteryourtelephonewiththeTelstra®xedlineSMSserviceas
yourDOROtelephoneissuppliedpre-congured.Whenyousendyourrsttextmessage
the Telstra® network will automatically accept and deliver it (providing the destination
offers a compatible service).
SettingsforyourTelstra®xedlineSMSservicecanbechangedbycalling0198339999
and following the prompts.
UK only
- Program the correct SMS Center numbers as described on next page under the
section Entering the telephone numbers in SMS centre/network.
E.g. for BT:
SMS-Center1(sending):147017094009
SMS-Center 2 (receiving):0800587529
- To register for the SMS text messaging service you can either send a text message to
another telephone number, or text REGISTER to 00000.
- Should you wish to reset your SMS settings text RESET to 00000.
- You can also request a delivery report by entering * 0 # prior to any SMS message.
- An SMS message can also be sent to a telephone number that does not support this
feature, and will be received as a voice message.
- Not all networks (ie mobile, cable) are compatible.
Please note!
The available functions/services vary depending on service provider. It may not be possible for all service
providers to offer sending/receiving SMS messages on all types of units.
Some operators offer a service where you can send an SMS message to someone who does not have SMS
equipment. The message will then be read by a computer voice.
Failed SMS messages are stored in the outbox.
The button ashes on the handset as well when there is some form of new message. Press button to
access the different messages.

English
8
Read new SMS/inbox
1. Press Menu.
2. Scroll to SMS. Press OK.
3. Scroll to SMS Inbox. Press OK.
4. Scroll to required entry. Press Read.
5. Read your message. Press Option.
6. Scroll to the required option:
Delete/Delete All, Reply, Forward, Use Number (for e.g. dialling), Save Number.
7. Press OK and follow the instructions in the display.
Writing messages
1. Press Menu.
2. Scroll to SMS. Press OK.
3. Scroll to Write Message or Write E-mail*. Press OK.
4. Writeyourmessage.Presstheequivalentdigitkeyonce/severaltimesfortherstletter.
1......................................................[Space]
*......................................................Switch between upper/lower case letters ABC/abc
5. Press Option. Scroll forwards if you want to send or save the message. Press OK.
6. Enter the telephone number including the area code, or press Option to retrieve the
telephone number from the phonebook.
7. Press Send.
8. The display shows if the SMS has been sent successfully or not. If no error report is
shown the message has been sent successfully.
*Requires special subscription. Remember to store special numbers in the service centre
for E-mail below.
Spelling help
The spelling help is switched on/off by pressing down #when you are writing the
message as above until Eis shown at the bottom of the display.
The spelling help is based on likelihood and gives priority to the most likely letter. Thus each
letter must be checked at once. If a letter is incorrect change it simply using #.
This technology differs somewhat from that used in mobile phones where the whole word
iskeyedinrst.
Note! If this spelling help is activated it will also be active during phonebook storing.
Entering the telephone number in SMS center/network
Check that the correct number for your network has been programmed. See details for
UK/Australia on the previous page.
1. Press Menu. Scroll to SMS. Press OK.
2. Scroll to SMS Settings. Press OK.
3. Scroll to SMS center. Press OK.
4. Scroll to required entry. Press OK.
5. Enter number. Press OK.

English
9
Calls Log (caller identication*)
The display shows the caller before you answer, or you can view the 30 most
recent incoming callers.
New numbers are indicated with the text New Calls as well as the symbol above.
If one and the same number calls in more than once it will be saved in only one entry.
Please note!
*This function requires a subscription from your network service provider. The button ashes on the
handset as well when there is some form of new message. Press button to access the different messages.
Retrieving and dialling incoming numbers.
1. Press {. Scroll to the required entry using {/}.
2. Press to make a call or press Option for the following choices:
-View e.g time/date.
-Delete Call/Delete All.
-Use Number for e.g. dialling.
-Save Number in phone book.
3. Press OK.
Caller identication messages
Besides number display, the following message is shown sometimes:
Unavailable No information received, e.g. an international call.
Withheld Number cannot be shown.
Message indication (voice mail box)
This applies only to subscribers with access to a voice mail service.
The telephone has a function that facilitates dialling/listening to this service.
In addition, if you subscribe to services for message indication and caller ID
the display will show if some one has left a message. A new message is indicated then with
the text Mailbox on standby and the symbol above (only applies in certain countries).
Please note!
The telephone number to call voice mail depends on the network and must be programmed see Network
codes under Other services further on in this chapter.
Playback with hot key
1. Hold 1pressed down for a few seconds.
2. Listen to the information/messages received.
3. Press Lto terminate the call.
Playback via the menu
1. Press Menu. Scroll to Network Services. Press OK.
3. Scroll to Mailbox. Press OK.
4. Press Yes to dial.
5. Listen to the information/messages received.
6. Press Lto terminate the call.

English
10
Other network services
The most common network/extra services can be accessed via the menu or
using the menu buttons during a call.
Some functions are pre-programmed but is not certain that all functions will
work on delivery as this will depend on the country of installation/network.
The functions available will depend on your network.
You can change the codes that are sent, see below.
You may have to pay extra for some services, contact your network for more information. Some services will not
work unless you have contacted your network service provider to activate them.
Using the R button manually
1. Connect an external call and wait until the timer is shown. Press R.
2. Enter telephone number or manual code. Press OK.
Busy number/call waiting
1. Connect an external call and wait until the timer is shown.
2. Press Option. Scroll to required service.
- CW Accept Answer incoming call waiting (=R2).
- CW Reject Refuse incoming call waiting and send engaged tone (=R0).
- Auto Call Back When a number is no longer engaged a quick ring signal is heard (=5).
3. Press OK.
Under inquiry/alternating/answered call waiting
1. Use the respective menu button:
- Brok Alternate between two calls (=R2).
- Conf Conference/three party call (=R3).
Call Forwarding
1. Press Menu. Scroll to Network Services. Press OK.
2. Scroll to Call Forwarding. Press OK.
3. Scroll to required service. Call forwarding: CF Unconditional/if No Reply/if Busy for
transfer of your incoming calls to another telephone number.
4. Press OK. Follow the instructions given in the receiver, handsfree or the display.
Other services
1. Press Menu.Scroll to Network Services. Press OK.
2. Scroll to Functions. Press OK.Scroll to required service.
- Call Anonymous Withhold your number from recipient. Enter number.
Press . The code for this service must be programmed manually, see below.
- Call Wait On/Off Command to turn the call waiting service off or on easily.
- Network Codes The codes that are sent when you use the network services can be
changed. The number for Messages indication can also be programmed here.
3. Press OK. Follow the instructions given in the receiver, handsfree or the display.
Inbox
Shows a summary of new messages e.g. SMS, incoming numbers, message
indication etc. Only shown when there are new messages.

English
11
Audio signals and display
1. Press Menu.
2. Scroll to Sound or Display. Press OK.
3. Scroll to desired function e.g. Display Contrast. Press OK.
4. Scroll to required setting. Press OK to save.
Sound
Ringtone The handset’s ring signal can be adjusted.
The telephone may continue to ring for up to 8 seconds after answering a call when the handset is set to use
one of the polyphonic ring tones (6-20).
Tones Can be heard when pressing buttons, low battery, new SMS,
charging start or out of range.
Display
Wallpaper The background image in the display can be changed.
Handset Name The text shown on standby can be altered.
Screensaver The clock replacing dimmed backlight can be turned off/on.
Display Contrast The contrast in the display can be adjusted at several levels.
Color Scheme The colour of the menus can be changed.
Backlight On/Off Illumination for the buttons can be turned off/on.
Dimmed backlight Function that shows the display with reduced light before it
turns off. When activated permanently on, the battery times are
reduced 50%.
Date/Time/Alarm
1. Press Menu. Scroll to Date/Time/Alarm. Press OK.
2. Scroll to required setting. Press OK to save.
Alarm The activated alarm is indicated with on standby.
When the alarm goes off, an audio signal is heard for 30 seconds.
Turn off permanently with Stop, or activate snooze 5 minutes
with any button on the handset. The volume is determined by the
set ring signal level. The alarm will go off every day if it is not
disconnected via the menu.
Calendar To store information/reminders.
Set Date & Time Setting of date/time is described in the Connection chapter.

English
12
Game
1. Press Menu.
2. Scroll to Game. Press OK.
3. Scroll to desired game. Press OK.
4. Scrolltodesireddifculty/gamelevel(Level1=easy,Level4=difcult).
5. Press OK to start the game.
Adder Game
The object is to lead the snake to the small dots (apples) without colliding. The snake
moves automatically and gets longer and longer as it eats each apple.
Other settings in the handset
1. Press Menu.
2. Scroll to Setting. Press OK.
3. Scroll to Handset Settings. Press OK.
4. Scroll to required function e.g. Language. Press OK.
5. Scroll to required setting. Press OK to save.
Direct Call This function allows you to dial a predetermined number by
pressing any button (however not Option which allows you to
disconnect this function).
Select Base Only used in systems with more than one base unit.
Language Language settings are explained in the Connection chapter.
Auto Talk On/Off Setting that allows the handset to answer incoming calls
automatically when it is lifted from the base unit.
Register HS To register a new handset, see separate description.
De-Register HS To deregister a handset from a base unit.
Enter PIN number (0000 when supplied).
Messages Waiting To turn off the message indication manually.
Reset Resetting the handset.

English
13
Register a new handset
Every new handset must be registered in order to use a base unit. Every base unit can
manage up to 5 different handsets.
See also the Expanded Systems chapter for more information.
1. Enter Register HS (as detailed above) and scroll to a base unit. Press OK.
2. Enter the base unit PIN code (0000 on delivery). Press OK.
3. Hold down the base unit’s search button Juntil a beep is heard.
4. If the registration is successful the handset will return to standby mode within one minute.
System settings
Enter PIN number (0000 when supplied).
1. Press Menu.
2. Scroll to Setting. Press OK.
3Scroll to Base Settings. Press OK.
4. Scroll to required function e.g. Exchange Code. Press OK.
5. Scroll to required setting. Press OK to save.
Ringer The base unit’s ring signals can be set at several different levels.
Handset Priority You can decide whether all handsets should ring at once when
there is an incoming call, or if one handset should start ringing
before the others. You can set the number of ring signals for this
function as well.
Flash Time Only for adaption to international company switchboards.
The standard setting is 100 ms.
Dial Mode The standard position is Tone.
Change System PIN You can change the pin code (0000 on delivery). It protects
against unauthorised use of certain functions.
Exchange Code Enter the digit that obtains an external line and the telephone will
insert a pause automatically when a number starts with that digit.
Selectable List Select whether the telephone will store missed or all incoming calls.
Reset Reset base unit.

English
14
Expanded system
When you purchased the telephone, the handset was registered with the supplied base
unit. The handset may have the call number 1, which will be seen in the display on
standby. This number will be used also for internal calls between handsets.
If you wish to use several handsets with one base unit, you should ensure that the base
unit is placed “in the middle”, to evenly divide the base unit range among the handsets.
You can register up to 5 handsets to one base unit.
ThismodelisGAP(GenericAccessProle)compatible,whichmeansthatthehandsetandthe
base unit can both be used with most other GAP compatible units irrespective of manufacturer.
However the GAP protocol cannot guarantee that all functions may be accessed.
Internal
When using several handsets with the same base unit internal calls (intercom) can be made
between those handsets.
1. Press Int.
2. Scroll to selected handset. Press OK.
Should an external call come in while an internal call is in progress, a tone will be heard.
You must then terminate the internal call by pressing L, in order to be able to receive
the external call by pressing .
Transferring calls/Conference
1. While an external call is connected on line.
2. Initiate an intercom call as described above.
3. Press Lto transfer the call or press Conf for conference.

English
15
Answering machine (680R only)
When the answering machine is switched on, calls are answered after a set
number of ring signals. Your outgoing message will be played, and the caller
can leave a message.
The recording capacity is 15 minutes.
Switching the answering machine on/off
Press 1(on the base unit) to switch the answering machine on/off.
Ifthebaseunit’sdisplayisashing/showing-- the answering machine is disconnected.
On/off from the handset
1. Press Menu. Scroll to TAM. Press OK.
2. Scroll to Answer On/Off. Press OK.
3. Scroll to required setting. Press OK.
Outgoing message
The outgoing message (max 1 min) is heard by incoming calls.
There are two separate outgoing messages, one for answer only (callers cannot leave a message)
and one for answer and record (normal). Example of an outgoing message:
-“Hello and welcome to the Andersons. We’re unable to take your call right now, but if you
leave a message after the tone we’ll call you back as soon as possible. Thanks for calling.”
1. Press Menu.
2. Scroll to TAM. Press OK.
3. Scroll to Answer Settings. Press OK.
4. Scroll to Outgoing message Press OK.
5. Scroll to Record OGM. Press OK.
6. Scroll to Answer & Record or Answer Only. Press OK.
7. Record your message by speaking approx. 30 cm from the handset with the keys
facing towards you. Press Save to terminate recording.
8. The message will be played back to you. Repeat the same procedure if you want to
change the message.
Screening
Incoming messages will be heard on the loudspeaker of the base unit as they are received.
If there is no sound, adjust the volume.
You can press Screen on the handset while a message is being recorded.
The call can be intercepted by pressing or by lifting the receiver of another telephone
connected to the same line.
If the recording doesn’t stop automatically, press ■on the base unit.

English
16
Playback of message in base unit
The display of the base unit always shows the total number of messages
in the memory, i.e. both old and new.
Thenumbersofthebaseunit’sdisplaywillashwhentherearenewmessages.
Playback will always begin with new messages.
1. Press 9(base unit) to begin playback of all messages.
2. The following functions are available during playback:
Button Function
88 ..................... Repeat/skip backwards.
99 ..................... Skip to next message.
■........................ Stop playback.
C......................... Delete current message.
VOL + / -............ Increase or decrease the volume.
3. Delete old messages to avoid reduction in memory capacity. Other messages will be saved.
Delete all messages
Deletion of all messages is only possible after playback: Press Cand then press C.
Playback of messages in handset
The symbol is shown at the bottom of the display when there are new
messages. Playback will always begin with new messages.
1. Press Menu. Scroll to TAM. Press OK.
2. Scroll to Play messages. Press OK.
3. Finish by pressing L.
The following functions are available during playback:
Command Function
2 .......................... Playback of messages/Stop
4 (<<)................... Repeat/skip to previous message
5 .......................... Erase single message during playback
6 (>>)................... Skip to next message
......................... Switch between handset/speaker
}/{................... Volume control
Please note!
The button ashes on the handset as well when there is some form of new message. Press button to
access the different messages. Delete old messages regularly to avoid lling up the memory!
Delete all old messages
1. Press Menu. Scroll to TAM. Press OK.
2. Scroll to Delete All. Press OK.
3. ToconrmpressDelete.

English
17
Answering machine settings
1. Press Menu.
2. Scroll to TAM. Press OK.
3. Scroll to Answer Settings. Press OK.
4. Scroll to desired function e.g. Recording time. Press OK.
5. Scroll to required setting. Press OK to save.
Answer Mode Select between normal answering function and answer only
(callers cannot leave a message).
Outgoing message Record and play back your outgoing message.
Answer Delay Select the number of ring signals before the answering machine
responds to incoming calls (2,4,6,8, Time Saver*).
Message Alert Is heard at regular intervals when at least one new message is received.
Recording time Enter the maximum recording time for messages.
Change Remote PIN To change the remote password PIN code (0000 on delivery).
The Time Saver function answers calls after six ring signals, until the rst new message has been registered.
Then the answering machine switches to answering after approximately two signals. This is useful when
using remote control; if you call up the answering machine and there is no reply after four rings that means
there are no messages recorded and you can hang up before you are charged for the call.
Personal message - MEMO
A personal message – a MEMO – is a message recorded directly onto the answering
machine without dialling (min 5 seconds and max 3 mins).
1. Press Menu.
2. Scroll to TAM. Press OK.
3. Scroll to Record Memo. Press OK.
4. Record your message. Speak clearly approx. 30 cm from the handset with the keys
facing towards you.
5. Press Save to terminate recording. The message will be repeated after a few seconds.
6. Memos are played back in the same way as regular incoming messages.
Out of memory
The memory will store a total of 15 minutes of messages (including the outgoing message).
When TAM memory full isshownorthebaseunitashesF, no new messages can
be received before existing ones are played back and deleted. In that case, the telephone
answering machine responds with the outgoing message for Answer only.
Note:
Delete old messages regularly to avoid lling up the memory!

English
18
Remote activation
If you have forgotten to turn the machine on, you can do so by remote access.
1. Call the answering machine. It will answer after approximately 10 rings (Australia 16
rings). However, if the password code is still 0000, it will not reply.
2. Enter the password code (see previous page).
3. New messages will be played back. Press 1to stop playback.
4. Press 0(off=2 beeps, on=1 beep).
5. Hang up.
Remote control
This machine can be remote controlled using the keys of an ordinary tone dialling telephone.
The password code must be changed before remote control is possible. (See description above).
Remote control
1. Check that password code is no longer 0000 (or remote control will not be possible).
2. Call the answering machine.
3. Press *when the outgoing message is played.
4. Enter password code.
5. New messages will be played back. Press 1to stop playback.
6. Select a remote control command, see below.
7. Hang up.
Command Function
1 .......................... Stop
2 .......................... Play all messages
3 .......................... Play new messages
4 .......................... Repeat/skip to previous message
5 .......................... Erase single message during playback
6 .......................... Skip to next message
7 .......................... Select answering function (normal=2 beeps, answer only=1 beep)
8 .......................... Playback of outgoing message
9 .......................... Record new outgoing message, Stop=#
0 .......................... Switching the answering machine on/off (off=2 beeps, on=1 beep)
Please note!
If the machine doesn’t respond to the remote control commands, try pressing the telephone buttons for a
longer or shorter time. In normal cases, the answering machine should react to tones approximately 0.5 – 1
seconds in length, but longer tones may be necessary in certain telephone networks.
This manual suits for next models
2
Table of contents
Other Doro Cordless Telephone manuals