Doro 640r User manual

doro 640/650r

1 Messages/Info services
2 Left menu button/Back/
Internal call
3 Line Button/Call Back
4 Speaker phone
5 *and ringer off/on
6 #and KeyGuard
7 Flash
8 Headset connector
9 Disconnect and Off/On
10 Right menu button/OK
11 Scroll button
12 Answer Mode, refer to
description in Answer
machine chapter
13 Answer machine Off/On
14 Paging
15 Message indication/
Display
16 Volume control
17 Indicators, see separate
description
650R 640
650R 640
650r
11
9
10
48
7
2
1
56
3
17
15
16
12
13
14

1
English
Connection
1. Connect the mains adapter (6V DC) and the telephone cord to the wall sockets.
2. Insert the batteries in the handset with plus and minus terminals as directed.
3. Chargethehandsetwiththekeypadfacingoutwards(for24hoursthersttime).
Language
4. Press Menu.
5. Scroll to Settings with /☼. Press OK.
6. Scroll to Setup Handset. Press OK.
7. Scroll to Language. Press OK.
8. Scroll to required setting. Press OK.
9. Press Lto return to standby mode.
Date/Time
10. Press Menu. Scroll to Settings with /☼. Press OK.
11. Scroll to Date/Time. Press OK.
12. Set date (DD.MM.YY). Press OK.
13. Enter time of day (HH MM). Press OK.
Coverage
The telephones’ coverage will vary normally between 50 and 300 metres, depending on
whether the radio waves carrying the conversation are blocked by obstacles in their path.
Coverage can be improved by turning ones’ head so that the handset is aligned with the base unit.
Soundqualitydeclinesasthelimitisreacheduntilthecallisnallyinterrupted.
Connection .............................1
Coverage ................................1
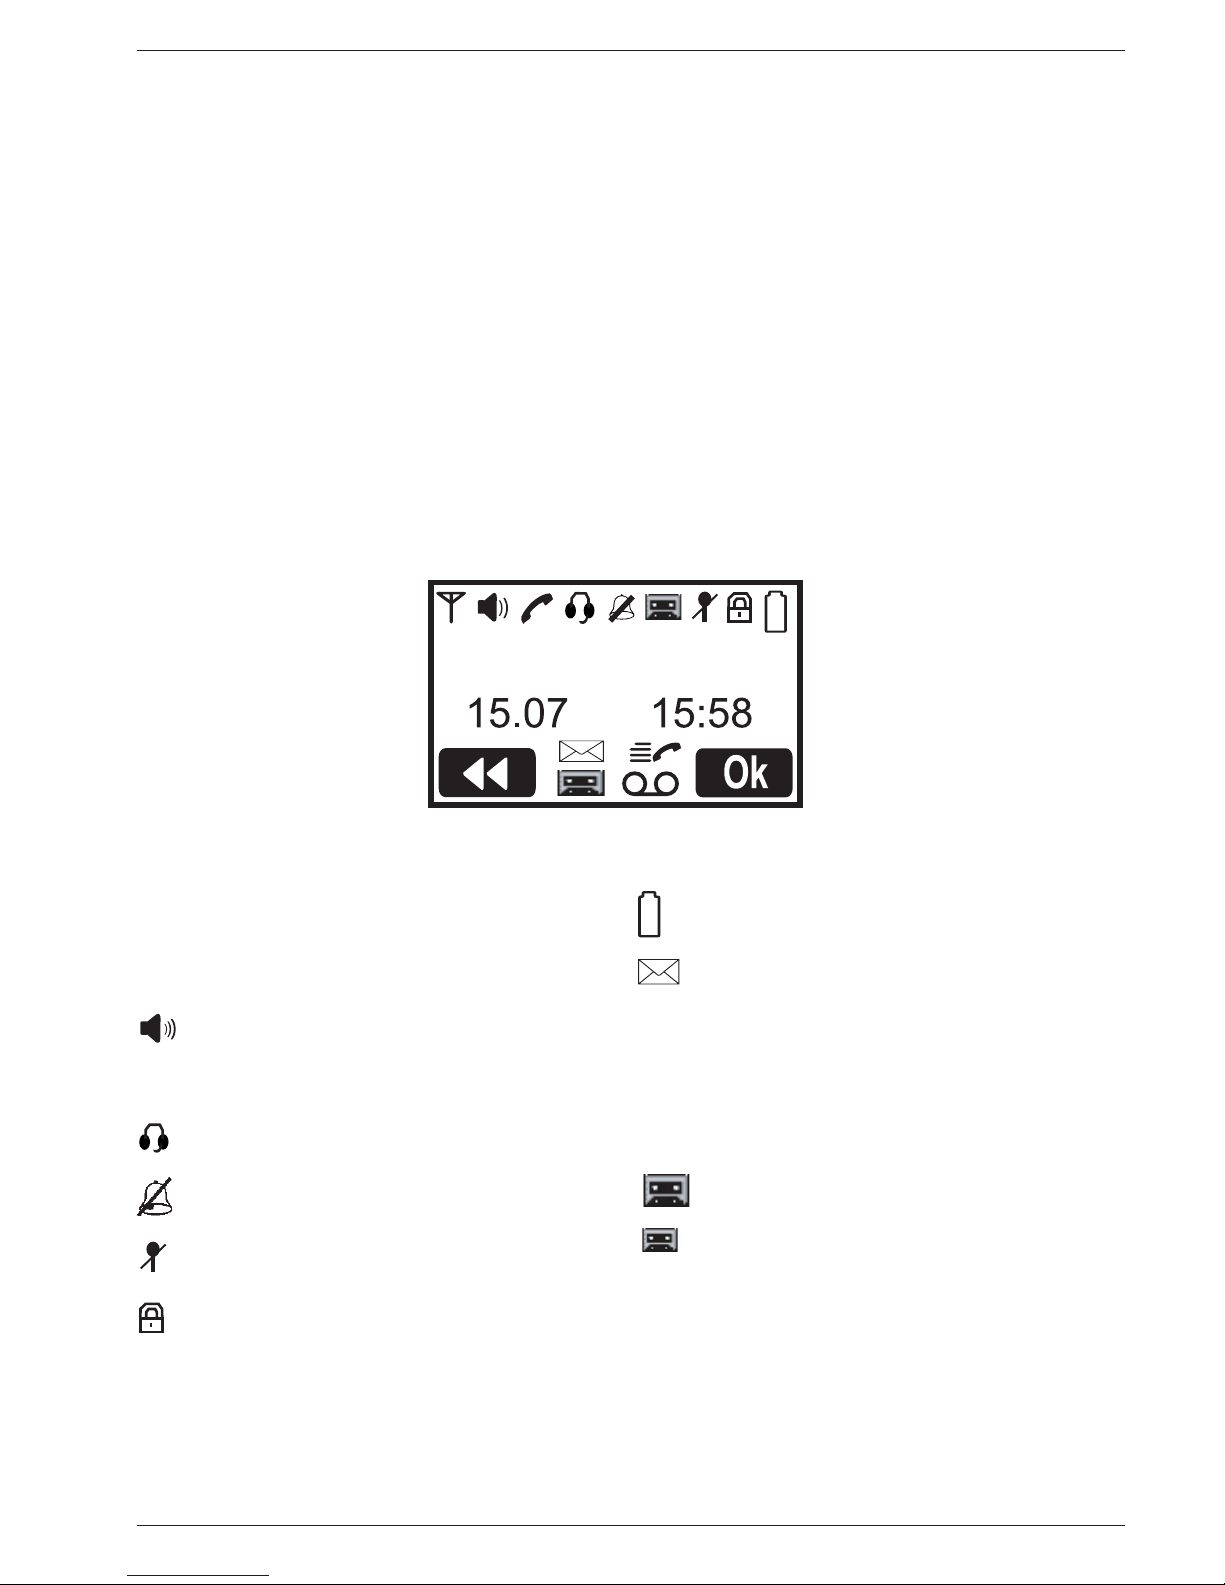
Battery.....................................2
The display..............................2
Base unit indicators ...............3
Making a call...........................3
Receiving a call......................3
Flash........................................3
Volume control .......................3
Call Back.................................3
Mute button.............................3
KeyGuard................................3
Turning the handset Off/On..3
Paging.....................................3
New Message key.................3
Phonebook .............................4
New calls (Caller ID
memory*)................................7
Message Indication
(voicemail)...............................7
Other info services.................8
Audio signals and display .....9
Handset settings....................9
Other settings.........................9
System settings......................10
Expanded system (+1)...........10
Telephone Answer Machine
(only 650r)...............................11
Switching the answer machine
on/off........................................11
Outgoing message................11
Screening................................11
Use of answer machine (base
unit) ..........................................12
Use of answer machine
(handset).................................12
Personal message - MEMO 13
Settings in answer machine .13
Out of memory.......................13
Remote activation..................14
Remote control.......................14
Troubleshooting .....................15
Specic absorption rate
(SAR).......................................16
Declaration of conformity......16
Guarantee...............................16

2
English
Battery
Because batteries only have a certain lifespan it is quite normal that call time and standby time
willdecreasesomewhatcomparedtothespecicationswhenthetelephoneisusedregularly.
Batteries (750 mAh) that have been fully charged (10 hours) will last for approx. 120 hours in
standby or approx. 12 hours call time. These operation times apply at normal room temperature.
Full battery capacity will not be reached until the batteries have been charged 4-5 times.
The base unit has an automatic charging mechanism that prevents the batteries from being
overcharged or damaged due to prolonged charging.
Please note!
The charging connections should be cleaned regularly with a soft cloth and/or an eraser.
The base unit should not be located close to other electrical equipment, in direct sunlight or near any other strong
heat source! This is to minimize the risk of interference.
It is normal for the device to become warm during charging and is not dangerous.
Use only DORO original batteries. The guarantee does not cover any damage caused by incorrect batteries.
The display
* Only functions in certain countries.
In order to conserve battery power, the display is very dark in standby mode.
Press ☼once to switch it on. During calls use O.
Icon FunctionFunction
6Shown within range of the
base unit.
Flashes when out of range.
Speaker phone.
qDuring calls.
Headset being used.
Ringer disabled.
Microphone muted.
Key lock activated.
Icon Function
Battery charge indicator.
New SMS* received.
wq New number received.
aMessage indication*.
Only 650r:
(upper row) Answer machine on.
(lower row) New message on
answer machine.

3
English
Base unit indicators
Flashes when new SMS* message received (only 650r).
7Illuminates when charging is in progress.
q/Y Illuminatedonstandbyandashesduringcalls(only 650r).
Making a call
1. Enter the desired phone number (Del=erase).
2. Press O. The number is dialled. Press Lto terminate call.
Receiving a call
1. Wait for the handset to ring.
2. Press Oto answer. Press Lto terminate call.
Please note!
As most consumers now use mobile telephones the menu system on this
phone has been designed to work in a similar way ie. the number is dialled
before obtaining a dialling tone. Should you wish to hear a dialling tone
before dialling a number hold down the Okey for a couple of seconds.
To switch between handset/speaker press . Please remember that in speaker mode, it is only possible for one
person at a time to talk.
This product does not usually ring on the rst signal to allow correct matching to the phone book.
When the battery is low or when there is too great a distance to the base unit the telephone will be unable to
connect to a line.
Flash
See Other Info Services.
Volume control
The volume may be adjusted during a call using /☼.
Call Back
Press rand scroll through the 20 most recently dialled numbers using /☼.Press O.
Mute button
The microphone may be muted/switched on during a call by using C.
KeyGuard
The KeyGuard is turned off/on by pressing #.
Turning the handset Off/On
Press and hold the Lbutton for a few seconds to turn the handset off or on.
ConrmdisconnectionbypressingYes.
Paging
The handset will ring when Jon the base unit is pressed. The signal will stop automatically
after a while or if the Lbutton on the handset or the Jbutton on the base unit is pressed.
New Message key
Press button to access a new message eg. Caller ID, SMS, message indication or
telephone answer machine (650r only).

4
English
Phonebook
100 telephone numbers (max. 24 digits) with names (max. 15 letters) can be stored in the
handsets’ phonebook. If you subscribe to a caller ID service the name in the phonebook will
be shown for incoming calls.
Letters
Each number key has been allocated certain letters. The phonebook is arranged according to
the order of the buttons, which is not the same for all languages.
1......................................................[Space]
*......................................................Switch between upper/lower case letters ABC/abc
0(press & hold) ..............................Pause in telephone number
Store name/number in handset
1. Press b. Press Opt.
2. Scroll to New Entry. Press OK.
3. Enter the telephone number, including the area code (Del=erase). Press OK.
4. Press equivalent digit key one or more times for desired name. Press Store.
5. Press Lto return to standby mode.
Managing the phonebook
1. Press b.
2. Scroll among the entries with /☼. You can quick search the phone book by pressing
thecorrespondingnumberkeyfortherstletter.
3. Press O to make a call or press Opt for the following choices:
- New Entry See description above.
- Edit Entry Revise information.
- Delete/Delete all.
4. Press OK.
Shared phonebook
The telephone book in the base unit is shared by all handsets and has 10 entries which need
only be stored once regardless of how many handsets are in use. Useful telephone numbers
are pre-programmed in certain models. However these numbers may not match with caller
identicationforname.
1. Press Menu.
2. Scroll to Info Service. Press OK.
3. Scroll to Shared phonebook. Press OK.
4. Scroll among the entries with /☼.
5. Press Oto dial or press Opt for entry to be replaced.
6. Scroll to Edit Entry. Press OK.
7. Enter the telephone number, including the area code. Press OK.
8. Enter name. Press Store.

5
English
SMS messages
This feature requires a current Caller Id subscription to be in place and only
applies to text message users (SMS). The memory will store up to 30 messages, the
maximum number of characters per message is 160.
A new SMS message is indicated with the text New SMS and .
Please remember individual SMS features are country dependent and will vary or be
unavailable. Further details regarding the SMS text message service are available from you
local network provider.
Australia only
Short Message Service (SMS) facilities have been automatically activated for most Telstra®
telephone services across Australia. SMS services may not be available to, or between, other
service providers networks. A description of the SMS service provided by Telstra® can be
found at: http://www.telstra.com.au/talkingtext
ThereisnoneedtoregisteryourtelephonewiththeTelstra®xedlineSMSserviceasyour
DOROtelephoneissuppliedpre-congured.Whenyousendyourrsttextmessagethe
Telstra® network will automatically accept and deliver it (providing the destination offers a
compatible service).
SettingsforyourTelstra®xedlineSMSservicecanbechangedbycalling0198339999and
following the prompts.
UK only
- Program the correct SMS Centre numbers as described on next page under the section
Entering the telephone numbers in SMS centre/network.
E.g. for BT:
SMS-Centre1(sending):147017094009
SMS-Centre 2 (receiving):0800587529
- To register for the SMS text messaging service you can either send a text message to
another telephone number, or text REGISTER to 00000.
- Should you wish to reset your SMS settings text RESET to 00000.
- You can also request a delivery report by entering * 0 # prior to any SMS message.
- An SMS message can also be sent to a telephone number that does not support this
feature, and will be received as a voice message.
- Not all networks (ie mobile, cable) are compatible.
Please note!
The available functions/services vary depending on service provider. It may not be possible for all service
providers to offer sending/receiving SMS messages on all types of units.
Some operators offer a service where you can send an SMS message to someone who does not have SMS
equipment. The message will then be read by a computer voice.
Failed SMS messages are stored in the outbox.

6
English
Entering the telephone number in SMS centre/network
Check that the correct number for your service provider has been programmed.
1. Press Menu. Scroll to SMS. Press OK.
2. Scroll to SMS Settings. Press OK.
3. Scroll to SMS-centre. Press OK.
4. Scroll to selected entry. Press OK.
5. Enter number. Press OK.
Write new SMS message
1. Press Menu. Scroll to SMS. Press OK.
2. Scroll to Write New SMS. Press OK.
3. Press equivalent digit key one or more times for desired text.
1......................................................[Space]
*......................................................Switch between upper/lower case letters ABC/abc
Del...................................................Delete
4. Press OK. Enter the telephone number including area code, or press bto retrieve the
number from the Phonebook. Press OK.
5. Scroll to required function. Press OK.
- Send SMS Send message.
- Save Save in outbox.
- Delete?Delete?ConrmwithYes.
6. The display shows if the SMS has been sent successfully or not. If no error report is
shown, the message has been sent successfully.
Read new SMS/inbox
1. Press Menu.
2. Scroll to SMS. Press OK.
3. Scroll to Inbox. Press OK.
4. Scroll to selected entry. Press Read.
5. Read your message. Press Opt.
6. Scroll to required function. Press OK.
- Answer SMS Press Yes if you want to include the original message.
- Delete.
- Call.
- Store in Phoneb. (Phonebook)
Message Alert
You can activate a tone that is heard when new messages have been received.
1. Press Menu. Scroll to SMS. Press OK.
2. Scroll to SMS Settings. Press OK.
3. Scroll to SMS Alert. Press OK.
4. Scroll to required setting. Press OK.

7
English
New calls (Caller ID memory*)
Caller ID allows you to see who is calling before you answer a call or to see the last 30 missed
calls.
New numbers are indicated with the text New calls as well as the symbol wq.
If one and the same number calls in more than once it will be saved as only one entry.
Retrieving and dialling incoming numbers.
1. Press . Scroll to the required entry using /☼.
2. Press Oto make a call or press Lto return to stand-by.
Other selections available:
- Press Ok to edit the number before dialling or
- Press Opt for the following choices:
- Delete/Delete all
- Details Show time/date.
- Store in Phoneb. (Phonebook)
Caller identication messages
Besides number display, the following message is shown sometimes:
Unknown No information received, e.g. an international call.
Withheld Information about the number is blocked and the number cannot be shown.
Please note!
*This function requires a subscription from your service provider.
Message Indication (voicemail)
This only applies to subscribers to voicemail services. If you also subscribe to
a Message Indication service, you can see in the display if someone has left a
message. A new message is indicated with the text Message Waiting on standby as well as
the symbol above (only applies in certain countries).
Please note!
The telephone number for dialling to voice messages depends on the operator and must be programmed. See
Network Codes in Other Info Services.
Playback with hot key
Hold 1pressed down for a few seconds. Listen to the information/messages received.
Playback via the menu
1. Press Menu. Scroll to Info Service. Press OK.
2. Scroll to Message Waiting. Press OK. Press Yes to dial.

8
English
Other info services
Most usual operator/extra services can be accessed via the menu or with the menu
buttons during a call. Some functions are pre-programmed but will not always work
on delivery as this will depend on the country of installation/operator. You can
change the codes that are supplied see Network Codes.
Please note!
The functions available will depend on your service provider.
You may have to pay extra for some services, contact your service provider for more information.
Some services will not work unless you have contacted your service provider to activate them.
Using the Flash button manually
1. Connect an external call and wait until the timer is shown. Press R.
2. Enter telephone number or manual code. Press OK.
Busy number/call waiting
1. Connect an external call and wait until the timer is shown. Press Opt.
2. Scroll to required service. Press OK.
- CW Accept Answer incoming call waiting (=R2).
- CW Reject Refuse incoming call waiting and send engaged tone (=R0).
- Auto Call Back When a number is engaged. When the number is free you will hear a
quick ring signal (=5).
Under inquiry/alternating/answered call waiting
Use the respective menu button:
- Brok Switching between two calls (=R2).
- Conf Conference/three party call (=R3).
Call Forwarding
1. Press Menu. Scroll to Info Service. Press OK.
2. Scroll to Call Forwarding. Press OK.
3. Scroll to required service. Redirection always/when no answer/engaged for moving your
incoming calls to another telephone number. Press OK.
4. Follow the instructions given in the receiver, speaker or on the display.
Other services
1. Press Menu. Scroll to Info Service. Press OK.
2. Scroll to Functions. Press OK.
3. Scroll to required service.
- Call Anonymous Withhold your number from recipient. The code for this service
must be programmed manually, see below.
- Call Wait On/Off Command to turn the call waiting service off or on easily.
- Network Codes The codes supplied when you use the operator services can be
changed. The number for Message indication can also be programmed here.
4. Press OK. Follow the instructions given in the receiver, speaker or on the display.
Message menu
Shows a summary of new messages e.g. SMS, incoming numbers, message indication etc.
Only shown when there are new messages.

9
English
Audio signals and display
1. Press Menu. Scroll to Sound or Display. Press OK.
2. Scroll to desired function, e.g. Wallpaper. Press OK.
3. Scroll to required setting. Press OK.
Sound
Ringer Thehandsets’ringercanbeadjusted.↑indicatesincreasedvolume.
When using the polyphonic ringtones (6-14) the tone will continue if the call is answered on another telephone until
complete (up to 8 seconds).
Warning Tones Can be heard when pressing buttons*, low battery or out of range.
*The beep heard when charging starts is deactivated as well.
Display
Wallpaper The background image in the display can be changed.
Handset Name The text shown on standby can be altered.
Contrast The contrast in the display can be adjusted at several levels.
Color Scheme The colour of the menus can be changed.
Dimmed backlight The dimmed backlight function can be programmed to turn off display
backlight after a given number of minutes.
Handset settings
1. Press Menu. Scroll to Settings. Press OK.
2. Scroll to Setup Handset. Press OK.
3. Scroll to required function e.g. Language. Press OK.
4. Scroll to required setting. Press OK.
Direct Call This function allows you to dial a predetermined number by pressing any
button (however not Opt which allows you to disconnect this function).
Base Selection Only used in systems with more than one base unit.
Auto Talk On/Off The handset answers incoming calls when lifted from the base unit.
Default Reset Resetting the handset.
Language Language setting is explained in Connection.
Other settings
1. Press Menu. Scroll to Settings. Press OK.
2. Scroll to desired function, e.g. Date / Time. Press OK.
3. Scroll to required setting. Press OK.
MW Indication To turn off the message indication manually.
Date/time Setting of date/time is described in Connection.
Flash Time Only for adaptation to international company switchboards.
The UK setting is 100 ms. (600 ms in New Zealand).
Register Handset To register a new handset, see separate description.
Deregister HS To deregister a handset from a base unit.

10
English
System settings
System PIN is 0000 on delivery.
1. Press Menu. Scroll to Settings. Press OK.
2. Scroll to Setup Base. Press OK.
3. Scroll to desired function e.g. Exchange Code. Press OK.
4. Enter the required setting. Press OK.
Dial Mode The dial mode setting for UK must be Tone (Europe only).
Exchange Code Enter the digit that obtains an external line and the telephone will
insert a pause automatically when a number starts with that digit.
Change PIN You can change the PIN code (0000 on delivery).
Default Reset Resetbaseunit,conrmwithYes.
Expanded system (+1)
All handsets included in the package are registered to the base unit already. The handset
number used for internal calls is shown in the display on standby.
The base unit should be positioned centrally so that the coverage area is roughly equal for all
handsets. You can register up to 5 handsets to one base unit.
This model is GAP (Generic Access Prole) compatible, which means that the handset and the base unit can
both be used with most other GAP compatible units irrespective of manufacturer. However the GAP protocol
cannot guarantee that all functions may be accessed.
Register a new handset
All new handsets that are to use the base unit must be registered.
1. Hold down the Jsearch button on the base unit for approx. 12 seconds.
2. Press Menu. Scroll to Settings. Press OK.
3. Scroll to Register Handset. Press OK.
4. Scroll to required base unit (*=previous reg.). Press OK.
5. Enter the base unit PIN code (0000 on delivery). Press OK.
6. If the registration is successful the handset will return to standby mode within one
minute.
INT calls
1. Press Int.
2. Scroll to selected handset. Press OK.
A tone will be heard if an external call comes in while an internal call is in progress. You must
then terminate the internal call by pressing L, in order to be able to receive the external
call by pressing O.
Transferring calls/Conference between handsets
1. While an external call is connected on line.
2. Initiate an internal call as described above.
3. Press Lto transfer the call or press Conf for conference.

11
English
Telephone Answer Machine (only 650r)
When the answer machine is switched on calls are automatically answered after a
number of rings set by yourself, your outgoing message is heard and the caller can
leave a message. The recording capacity is 15 minutes.
Most functions can be performed from either base unit or handset.
Switching the answer machine on/off
Press 1(on the base unit) to switch the answer machine off/on. If the base units’ display is
ashing/showing-- the answer machine is disconnected.
Off/On from the handset
1. Press Menu. Scroll to TAM. Press OK.
2. Scroll to Answer On/Off. Press OK.
3. Scroll to required setting. Press OK.
Outgoing message
The outgoing message (max 1 min) is heard by incoming calls.
There are two separate outgoing messages, one for answer only (callers cannot leave a message)
and one for normal answering function.
1. Press Menu. Scroll to TAM. Press OK.
2. Scroll to Settings. Press OK.
3. Scroll to Outgoing message Press OK.
4. Scroll to Record OGM. Press OK.
5. Scroll to Normal or Answer Only. Press OK.
6. Record your message (approx. 30 cm from the handset with the keys facing upwards).
7. Press Save. The message will be played back to you. Repeat the same procedure if you
want to change the message.
Remember to select desired answer mode. See Settings for answer machine.
Screening
Incoming messages will be heard on the loudspeaker of the base unit as they are received. If
there is no sound, adjust the volume.
You can press Scr. on the handset while a message is being recorded.
The call can be intercepted by pressing Oor by lifting the receiver of another telephone.

12
English
Use of answer machine (base unit)
The base unit display always shows the total number of messages in
the memory, i.e. both old and new.
Thenumberinthebaseunits’displaywillashwhentherearenewmessages.
Playback always starts with new messages.
1. Press 9(base unit) to begin playback of all messages.
2. The following functions are available during playback:
Command Function
8 8 ...................... Repeat/skip backwards.
9 9 ...................... Skip to next message.
■......................... Stop playback.
x.......................... Delete current message.
VOL + / -............ Increase or decrease the volume.
3. Delete old messages to avoid reduction in memory capacity. Other messages will be saved.
Delete all old messages
This can only be done after playback. Press xand then press x.
Use of answer machine (handset)
The symbol is shown at the bottom of the display when there are new messages.
Playback always starts with new messages.
1. Press Menu. Scroll to TAM. Press OK.
2. Scroll to Play Messages. Press OK.
3. Finish by pressing L.
Command Function
2 .......................... Playback of messages/Stop.
4 (|8) .................. Repeat/skip to previous message.
5 .......................... Erase single message during playback.
6 (9|) .................. Skip to next message.
......................... Switch between handset/speaker.
/☼................... Volume control.
Delete all old messages
1. Press Menu. Scroll to TAM. Press OK.
2. Scroll to Delete All Mess. Press OK.
3. ConrmbypressingDel.

13
English
Personal message - MEMO
A personal message – a MEMO – is a message recorded directly onto the answer
machine without dialling (min 5 seconds and max 3 minutes).
1. Press Menu. Scroll to TAM. Press OK.
2. Scroll to Record MEMO. Press OK.
3. Record your message (approx. 30 cm from the handset with the keys facing upwards).
4. Press Save. The message will be played back to you.
5. Memos are played back in the same way as regular incoming messages.
Settings in answer machine
1. Press Menu. Scroll to TAM. Press OK.
2. Scroll to Settings. Press OK.
3. Scroll to desired function, e.g. Answer Mode. Press OK.
4. Scroll to required setting. Press OK.
Answer Mode Select between normal answering function and answer only (callers
cannot leave a message).
Outgoing message Record or playback of outgoing message.
Recording time Enter the maximum recording time for messages.
Ring Delay Select the number of rings before the answer machine responds to
incomingcalls(2,4,6,8,TimeSaver*).
Change RemotePIN To change the remote password PIN code (0000 on delivery).
The Time Saver function answers calls after six rings, until the rst new message has been registered. Then the
answer machine switches to answering after approximately two signals. This is useful when using remote control;
if you call up the answer machine and there is no reply after four rings that means there are no messages recorded
and you can hang up before you are charged for the call.
Out of memory
The memory will store a total of 15 minutes of messages (including the outgoing message).
When TAM memory fullisshownorthebaseunitashesF,nonewmessagescanbe
received before existing ones are played back and deleted.
In that case, the telephone answer machine responds with the outgoing message for Answer
only.
Note: Delete old messages regularly to avoid lling up the memory!

14
English
Remote activation
If you have forgotten to turn the machine on, you can do so by remote access.
1. Call the answer machine. It will answer after approximately 10 rings.
However, if the RemotePIN code is still 0000, it will not reply.
2. EntertheRemotePINcode(seepreviouspage).Onebeepconrmscorrectcode.
3. Any new messages are played back, or press 1to stop.
4. Press 0(off=2 beeps, on=1 beep).
5. Hang up.
Remote control
This machine can be remote controlled using the keys of an ordinary tone dialling telephone.
The RemotePIN code must be changed before remote control is possible. (See description
above).
1. Check that RemotePIN code is no longer 0000 (or remote control will not be possible).
2. Call the answer machine.
3. Press *when the outgoing message is played.
4. EntertheRemotePINcode(seepreviouspage).Onebeepconrmscorrectcode.
5. Any new messages are played back, or press 1to stop.
6. Select a remote control command, see below.
7. Hang up.
Command Function
1 .......................... Stop
2 .......................... Play all messages
3 .......................... Play new messages
4 .......................... Repeat/skip to previous message
5 .......................... Erase single message during playback
6 .......................... Skip to next message
7 .......................... Select answer mode (normal=2 beeps, only otg msg=1 beep)
8 .......................... Playback of outgoing message
9 .......................... Record new outgoing message, Stop=#
0 .......................... Turn TAM off/on (off=2 beeps, on=1 beep)
Please note!
If the machine doesn’t respond to the remote control commands, try pressing the telephone buttons for a longer
or shorter time. In normal cases, the answer machine should react to tones approximately 0.5 – 1 seconds in
length, but longer tones may be necessary in certain telephone networks.

15
English
Troubleshooting
Check that the telephone cord is undamaged and properly plugged in. Disconnect any
additional equipment that may be connected, eg. extension cords and other phones. If the
problem is resolved, the fault is with the other equipment.
Test the equipment on a known working line (eg. at a neighbours). If the product works then
the fault is with your telephone line. Please inform your local telephone company.
No number shown when ringing
- This function requires a subscription from your service provider.
- A switchboard cannot usually pass on incoming numbers.
Warning signal during call/Cannot connect
- The batteries may be running low (recharge the hand unit).
- The hand unit may be (nearly) out of range. Move closer to a base unit.
Telephone does not work
- Check that the adapter and telephone cord are connected to the base unit and to their
respective wall sockets.
- Check that you have selected Tone Dial, see System Settings/Dial.
- Check the charge status of the handset batteries.
- Try connecting another telephone, known to be in working order, to the line socket. If
that phone works then it is likely that this equipment is faulty.
The telephone continues to ring
- Thetelephonemaycontinuetoringforupto8secondsafteransweringacallwhenthe
handset is set to use one of the polyphonic ring tones (6-14).
SMS does not work
- In order for this feature to function, you must subscribe to the SMS service from your
network provider.
- Check that the correct telephone number is stored for each service.
The answer machine is not answering
- Memory may be full. Listen to your messages and delete them.
- Check that the adapter and telephone cord are connected to the base unit and to their
respective wall sockets.
- Check that the unit is switched on.
The answer machine does not respond to remote control
- Check that the telephone you are using to remotely control the answer machine is a tone
dialling telephone.
- Also try holding the buttons down longer, approximately 1 second per digit.
If the telephone still does not work, contact the place of purchase. Don’t forget the receipt or
a copy of the invoice.

16
English
UK
Ifyoucannotresolvethefaultusingthefaultndersection,technicalsupportisavailablebyemail
on: tech@doro-uk.com Further contact details are available on our website: www.doro-uk.com
Specic absorption rate (SAR)
This device meets approved international safety requirements for exposure to radio waves.
This telephone measures 0.05 W/kg (measured over 10g tissue).
The max. limit according to WHO is 2W/kg (measured over 10g tissue).
Declaration of conformity
Doro hereby declares that the products Doro 640 & Doro 650r conform to the essential
requirementsandotherrelevantregulationscontainedintheDirectives1999/5/ECand
2002/95/EC.Acopyofthemanufacturer’sdeclarationisavailableatwww.doro.com/dofc
Guarantee
This product is guaranteed for a period of 12 months from the date of purchase. In the
unlikely event of a fault occurring during this period, please return the item with a copy of
the purchase receipt to the place of purchase. Proof of purchase is required for any service or
support needed during the guarantee period.
This guarantee shall not apply to a fault caused by an accident or a similar incident or damage,
liquid ingress, negligence, abnormal usage, non-maintenance or any other circumstances
on the users’ part. Furthermore, this guarantee shall not apply to a fault caused by a
thunderstormoranyothervoltageuctuations.Asamatterofprecaution,werecommend
disconnecting the telephone during a thunderstorm.
Batteries are consumables and are not included in any guarantee.
This guarantee does not apply if other batteries than DORO original batteries have been used.
Australia and New Zealand
Products permitted for connection to the telephone network are marked with in Australia
and in New Zealand. These marks indicate the products comply with the
regulations and can be used without concern in the country of purchase.
If you believe this product is malfunctioning, please refer to the relevant section and/or
consult the troubleshooting guide in this manual to ensure that you have followed the
instructions carefully. As an alternative you can visit our web site for FAQ’s or send an e-mail
for a prompt reply.
Electro Magnetic Radiation (EMR)
This telephone complies with applicable safety requirements for exposure to radio waves.
The mean power of this telephone is not greater than 14.0 mW.
This is below the 20mW limit at which testing is required.

17
English
Guarantee
This product is guaranteed for a period of 12 months from the date of purchase.
Shouldyouexperiencedifcultieswiththeproduct,pleasecontactusforassistance.Ifthe
product is then found to be faulty you will be asked to return it directly to us with a copy
of the purchase receipt. This guarantee shall not apply to a fault caused by an accident or
a similar incident or damage, liquid ingress negligence, abnormal usage, not reasonably
maintained or any other circumstances on the purchaser’s part. Furthermore, this guarantee
shall not apply to a fault caused by a thunderstorm or lightning, excessive or any other voltage
uctuationsorfaultsonthetelephoneline.(Asamatterofprecaution,werecommend
disconnecting the telephone during a thunderstorm).
This guarantee does not affect your statutory rights.
AUSTRALIA NEW ZEALAND
DORO Australia Pty Ltd Atlas Gentech (NZ) Limited
PO Box 6760 Private Bag 14927
Baulkham Hills BC NSW 2153 Panmure
Australia Auckland
New Zealand
Consumer Support Consumer Support
Ph: Ph: 1300 885 023 Ph: 0900-500-25 (Toll Call)
Fax: (02) 8853-8489 Fax: (09) 574-2722
Email: support@doro.com.au Email: support@atlasgentech.co.nz
Web site: www.doro.com.au
REN (RN for New Zealand)
TheREN(RingerEquivalenceNumber)or(RN)isofsignicanceonlyifyouwishto
connect more than 1 telephone to your telephone line. A standard telephone line has a
maximum REN capacity of 3 (RN of 5). It is possible to connect 3 devices with a REN of 1
(RN of 1) with no degradation to the product’s performance. Exceeding this limit may cause
the volume of the ringer in any phone to decrease or not ring at all.
ALL PRODUCTS
The grant of a Telepermit for any item of terminal equipment indicates only that Telecom has
accepted that the item complies with the minimum conditions for connection to its network.
It indicates no endorsement of the product by Telecom, nor does it provide any sort of
warranty. Above all, it provides no assurance that any item will work correctly in all respects
with another item of Telepermitted equipment of a different make or model, nor does it imply
that any product is compatible with all of Telecom’s network services.
This equipment shall not be set to make automatic calls to the Telecom “111’’ Emergency Service.
This equipment may not provide for the effective hand-over of a call to another device
connected to the same line.
This equipment should not be used under any circumstances that may constitute a nuisance to
other Telecom Customers.
CND PRODUCTS
If a charge for local calls is unacceptable, the “DIAL’’ button should NOT be used for local
calls. Only the 7 digits of the local number should be dialled from your telephone. DO NOT
dialtheareacodedigitorthe“0’’prex.

English
Version 1.0
This manual suits for next models
2
Table of contents
Other Doro Cordless Telephone manuals

Doro
Doro 1000 AHS User manual

Doro
Doro 635ipw User manual

Doro
Doro ADAPTO 3R User manual

Doro
Doro Form 40 User manual

Doro
Doro Magna 2000 User manual

Doro
Doro PHONEEASY 110 User manual

Doro
Doro COMFORT 1000 User manual

Doro
Doro FORMULA 8R User manual

Doro
Doro congress Programmer User manual

Doro
Doro 930R User manual