Doro Kronos User manual

KRONOS
ISDN Telephone
User guide

DORO AB

1
DORO KRONOS LIST OF CONTENTS
DORO Kronos
LIST OF CONTENTS
Installation ...................2Caller identity ..............24
Vad är ISDN? ..............2Explanation ..............24
Unpacking ................3New number .............24
Connecting ................3Read the CID ............24
Set day and time ............4Erase number ............25
Set prefix .................4Transfer number to the phone-
Outlook ..................6book ...................25
The buttons unctions .........7Dial up-function ..........26
Full memory .............26
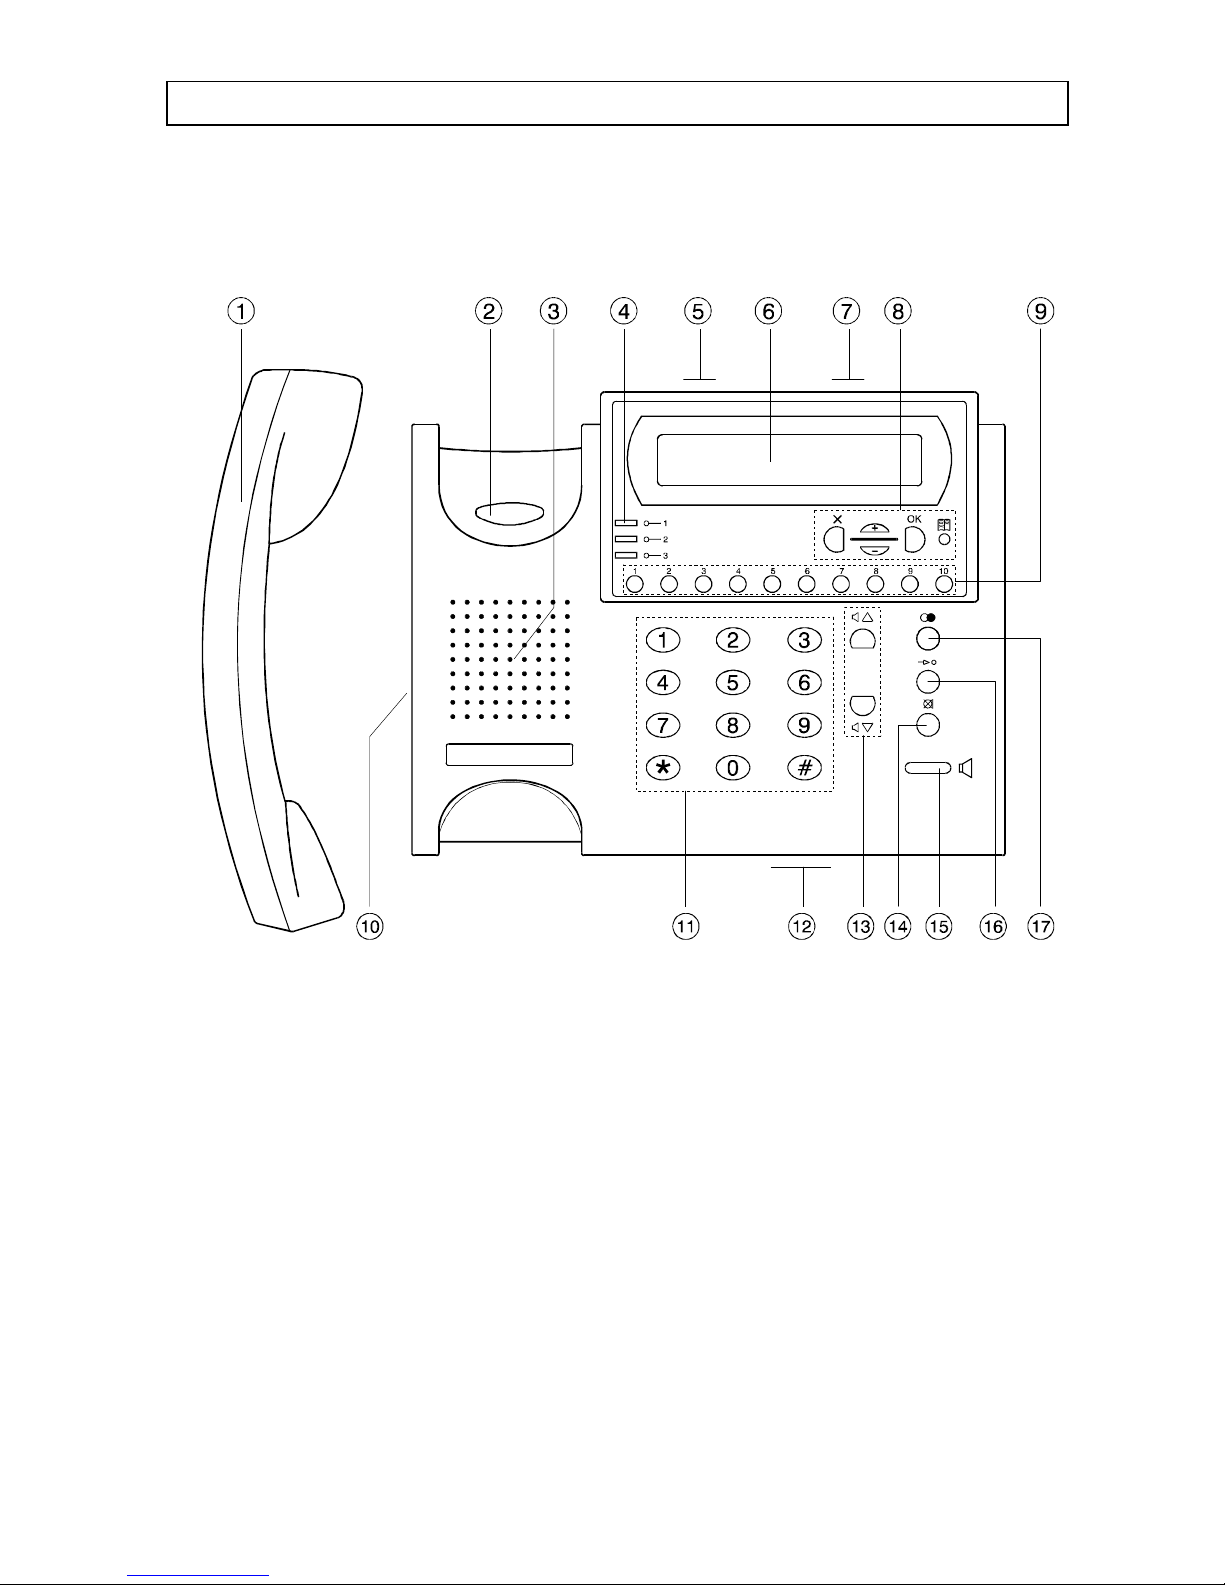
The phone ...................8Duplicate function .........26
The display ................8
Calleridentity ..............8Setting ....................27
MSN-number ..............8Explanation ..............27
To answer ................8MSN-number ............28
To call ...................9Call wait ................28
Timer ....................10 Room monitor ............29
Redial ....................10 Language ...............29
Mute .....................11 Date and time ............30
Volume control .............11 Charge display ...........30
Dial with direct memory ......11 Call block ...............31
Dial with the phone book .....12 Ring signal ..............33
Call functions ..............12 Prefix ..................33
Change PIN-code ........34
Functions ....................15
Menu system ..............15 Other .....................35
Functions button ............16 Erase ...................35
Open the menu system .......16 Emergency mode ..........35
Search in the phone book .....17 Trouble guide ............36
Phone book ...............18 Warentee ................37
Call counter ...............20
Setting ...................20
Resume a call ..............21
Transfer ..................21
Show own number ..........23

2
INSTALLATION DORO KRONOS
WHAT IS ISDN?

3
DORO KRONOS INSTALLATION
UNPACKING
In the box you should fin following items:
PTelephone PHandset cord
PHandset PUser guide
PLine cord
Please contact your retailer, if an item is missing or damaged.
CONNECTING
PConnect the handset cord to the telephone and the handset.
PConnect the line cord to the telephone and to the ISDN wall socket. The ISDN wall
socket could be a PBX, NT, router or something alike.
PLift the handset and check the tone.
PSet the day, time and prefix, see next page.
Beyond this installing there is several more to facilitate the phone call .

4
INSTALLATION DORO KRONOS
SET DAY AND TIME
PPress the function button .
PPress the button or until the display show "Service ?".
PPress the button. The display show "PIN-code >>".
PPress 0 0 0 0 0 (five zero).
PPress the button.
PPress the button or until the display show "Date/Clock ?".
PPress the button twice.
PEnter the topically year (four digits), then press the button.
PEnter the topically month (01-12), then press the button.
PEnter the topically day (01-31), then press the button.
PConfirm the setting by press the button.
PFinish the setting by press the button three times.
SET PREFIX
The prefix told for the telephone which digit/digits the abroad calls and national calls
(area code) begins on. This is important for the telephone should show correct phone
number in the caller identity and make calls.
The reason that you must give a prefix is that the PTT will not send out this information.
If your DORO Kronos is connected under a PABX, you maybe not need to give a prefix.

5
DORO KRONOS INSTALLATION
The national prefix is "0" (zero).
The abroad prefix is depending on which PTT you use. Telia, you enter "009" as a prefix,
for Tele2 you enter "007" etc. Take contact with your PTT if you are unsure on the prefix.
PPress the function button .
PPress on button or until the display show "Service ?".
PPress the button. The display show "PIN-code >>".
PPress 0 0 0 0 0 (five zero).
Ppress the button.
PPress on button or until the display show "INT./NAT. Prefix ?".
PPress the button.
PPress on button or until the display show "INT. Prefix ?".
PPress on the button. The display show "Prefix Number >>".
PEnter the abroad prefix with the digit button.
PPress the button.
PPress on button or until the display show "NAT. Prefix ?".
PEnter the national prefix with the digit button.
PPress the button.
PFinish the setting by pressing several times on the button.

6
INSTALLATION DORO KRONOS
OUTLOOK
1Handset 10 Outlet for handset cord (on the side)
2Hook 11 Digits 0-9, *, #
3Loudspeaker 12 Phone number list
4MSN-indicator 13 Volume control
5Outlet for ISDN line (backside) 14 Mute button and indicator
6Display 15 Loudspeaker button and indicator
7Switch for emergency mode 16 Indirect memory button
8Functions button 17 Redial button
9Direct memory button

7
DORO KRONOS INSTALLATION
THE KEYPAD FUNCTIONS
Below gives a explanation over the buttons functions. More information can you find
under respective chapter in this user guide.
The digits in parenthesis is refers to the picture on page 6.
DIGITS BUTTON (11)
Use to give digits and letters.
FUNCTIONS BUTTON (8)
Används för att styra telefonens menysystem. Tangenterna används för att gå in i
menysystemet, ändra, bläddra and avsluta en meny.
SPEED DIAL BUTTON (9)
10 number can be stored into this speed dial memory.
VOLUME CONTROL (13)
Use for get higher and lower volume in the ear-piece.
LAST NUMBER REDIAL (17)
Dial the last dialled number. There is place for the three last dialled number.
INDIRECT MEMORY BUTTON (16)
Dial a number from the phone book.
MUTE BUTTON (14)
Turns off/on the microphone. The indicator to the right is on then the mute-function is
activated.
LOUDSPEAKER BUTTON (15)
Activate/deactivate the phones loudspeaker function. The indicator on the button is on
then the function is activated.

8
THE TELEPHONE DORO KRONOS
THE DISPLAY
The display consist of two lines with 20 character per-line. In standby mode the display
show topic date and time. Then you use the phone the display show the dialled number
and receiver, call timer, caller identity for incoming calls, instruction for programming,
etc.
CALLER IDENTITY
For incoming calls the display will show number or name. For show name, the name must
be stored in the phone book.
The phone number will be stored in the caller identity memory and you can scroll
between them at any time. For more information about the caller identity and how you
read the incoming number, see page 24.
MSN-NUMBER
MSN-numberis that number the caller have dialled for to come to you. Because your
ISDN line could have several phone number it could be practical to see which of the
number the caller has dial.
This will shows with the three indicators under the display. Then the phone is ringing, the
indicator for that number will begin to flash. To programme the number the different
indicators should have, see page 28.

9
DORO KRONOS THE TELEPHONE
ANSWER A CALL
You answer a call by lift the handset or press on the loudspeaker button.
IGNORE CALL
You can also ignore a call (the phone will stop ring) if you don't want to answer.
PThen it's ring the display will show "Accept ?".
PPress button or .
The display show "Reject ?".
PPress the button to ignore the call.
PThe phone stop ringing.
TO MAKE A EXTERNAL CALL
You can make a call in two different way:
TO MAKE A CALL WITH THE HANDSET
PLift the handset and wait for signal.
PDial the phone number.
PFinish the call by put back the handset.
If you which, you can change to loudspeaker mode under a call, press the loudspeaker
button and put back the handset. In loudspeaker mode you talk to the other part frow
the microphone in the front.
TO MAKE A CALL WITH THE LOUDSPEAKER MODE
PPress the button. Loudspeaker mode will now be activated and you will hear the
ton. The indicator on the loudspeaker button goes on.

10
THE TELEPHONE DORO KRONOS
PDial the phone number.
PPress the button again to finish the call.
Under the call can you change to the handset anytime, just lift the handset. You finish the
call by put back the handset.
TIMER
Atimer up to the right in the display will begin to count then a call is connected. The
timer help you to see how long the call was.
LAST NUMBER REDIAL
With the last number redial function you easally call the three latest dialled number again.
PPress the redial button until you see the number in the display you which to call.
PPress the loudspeaker button, or lift the handset. The phone will now dial the number.

11
DORO KRONOS THE TELEPHONE
MUTE
With button could the microphone turns of. Press the button and the microphone
turns off and press again to put it on again. The red indicator is indicate then the
microphone is off.
The display show "Microphone of!" as long the function is activated.
VOLUME CONTROL
The level in handset and the loudspeaker could be changed. You change the level with
button and .
Thehandset have five step and the loudspeaker have eight step. The level will be the
same until it changes again. If you change the level in handset (loudspeaker) it will also
change it for the loudspeaker (handset).
MAKE A CALL WITH SPEED DIAL
DORO Kronos have ten speed dial memory there you can store phone number (see page
18). Then you make a call you need just to press on one button.
PPress on whiched speed dial button. The name will be displayed.
PAfter some seconds the call will be connected to the loudspeaker. Lift the handset if
want to use it.
PPut back the handset or press the loudspeaker button to finish the call.

12
THE TELEPHONE DORO KRONOS
TO MAKE A CALL WITH THE PHONE BOOK
APART from the 10 speed dial number there is a phone book for 40 number. Then phone
number is stored to the memory, could you dial it with fewer press on the buttons. The
Number is numbered 01-50.
Observation that number 01-10 is the same memory for the speed dial memory.
PPress the speed dial button.
The display show "Location>>(01-50)".
PEnter memory number 01-50. The name will be displayed.
PAfter some seconds the call will be connected to the loudspeaker. Lift the handset if
want to use it.
PPut back the handset or press the loudspeaker button to finish the call.
CALL FUNCTIONS
Several function could be used mean a call is connected. It will be displayed then a
function could be used. You can often use several function at the same time, and you
scroll between them with the function button and .
Chose the function with the button.
QUERY:
Then you already have a call connected, can you call a 2nd call. The first person can not
hear the new call.
PA call is connected.
PScroll until the display show "2nd Call ?".
PPress the button. New tone.
PDial the other phone number.

13
DORO KRONOS THE TELEPHONE
COMMUTE:
If you have two calls connected, you can commute between this with a commute
function. You can commute between the two calls as long you want.
PTwo calls are connected (one ongoing and one on hold).
PScroll until the display show "Toggle ?".
PPress the button.
PThe other call will be connected.
PTo finish the ongoing call, scroll until the display show "Disconnect ?".
PPress the button.
PThe ongoing call will go off, the other will be connected.
CONFERENCE:
With the conference function can you connect two calls at the same time.
PTwo calls are connected. (one ongoing and one for hold).
PScroll until the display show "3-Party ?".
PPress the button.
PBoth call is now connected.
PTo finish, scroll until the display show "Quit Held ?".
PPress the button.
PThe latest connected call will go off and the other will stay connected.

14
THE TELEPHONE DORO KRONOS
PARK A CALL :
If you have more then one ISDN phone, could you park a call and pick it up on the other
phone. The call can only be on hold for 3 minutes and then it will go off automatically.
PA call is connected.
PScroll until the display show "Suspend ?".
PPress the button .
PDisplay show " Suspend Digit >>".
PEnter a digit between 0 and 9.
PThe call will now be Parked.
The park number use as a identification, and must be entered then you are going to take
the call.
RESUME A PARKED CALL:
How you resume a parked call on is different on different ISDN phones. Down it show
you haw you do on a DORO Kronos.
PPress on the Menu button .
PScroll until the display show "Resume ?".
PPress the button.
PThe display show now "Resume digit >>".
PEnter the parking number.
PLift handset. The call is now resume återupptas.

15
DORO KRONOS FUNCTIONS
MENU SYSTEM
DORO Kronos have except the usually telephone functions also several other functions.
you can go to this by the phones menu system.
Below shows a schematic over the menu system and a short explanation for every
function:
Search for a receiver in the phone book.
Put in, change or erase a receiver in the phone book.
Controls how many incoming, outgoing there is don on
each MSN-number.
Menu with the phone setting for ex. call barrier,
date/time etc.
Resume a parked call.
Set transfer of phone number.
With this function you chose if the phone should show
your phone number on the receivers caller identity.
If there is stored number in the caller identity memory,
could this function activates.

16
FUNCTIONS DORO KRONOS
THE FUNCTIONS BUTTON
Youuse the function button to activate and scroll between the different functions. The
function button have always same function.
Scroll up
Cancel Open the menu
system
Scroll down Choose a menu or confirm a setting
OPEN THE MENU SYSTEM
PUse the menu button to open the menu system.
PScroll between the menu with the functions button or until
the display show the whiched menu.
PChoose the menu by press the button.
PFinish and go back to standby by pressing the button twice.

17
DORO KRONOS FUNCTIONS
SEARCH IN THE PHONE BOOK
With this function you can search after a receiver in the phone book. You can search on
name or scroll manual between the stored receiver. Then you have find a receiver you
which to call, could you do this easally.
SEARCH BY NAME:
POpen and choose "Search Phone Book ?" in the menu system.
PThe display ask you to input the receivers name.
PPress on the button that is correspond to that letter the name begin on. Every digit
correspond several letters and signs. Press on ore several times to select the right
letter.On page 19 there is a list over all letter and signs.
You can continue to give several letter in the name. Press on the if you
want to erase a letter.
PPress the function button to start the search.
PIf there is a receiver that fit to the letters, it will know be displayed.If there is no
receiver the display will show "No Matched Record !" and go back to "Input
Name / Quit".
SCROLL:
POpen and choose "Search Phone Book ?" in the menu system.
PScroll with the function button or .
The receiver will be displayed in alphabetical order.
DIAL A RECEIVER:
Lift the handset or press the loudspeaker button then the receiver is displayed. The phone
will now automatically dial the choosed number.

18
FUNCTIONS DORO KRONOS
PHONE BOOK
DORO Kronos have a phone book with place for 50 receiver. The receiver will be stored
in the phone book with name and phone number. Every receiver gets a indirect memory
number between 01 - 50. See page 12 to use the indirect memory. The memory number
01 - 10 are corresponded to the speed dial button on the phone.
STORE A NEW RECEIVER:
POpen and choose "Phone Book ?" in the menu system.
PChoose "Program Phone Book ?".
PThe display show the first empty location. Press the function button to choose
this location.
You can store the receiver to a optional location, just press the function button to
erase the number that is displayed and enter the new location. Then press the
button to select the number. If there already are a receiver in that location, the display
will ask you "Overwrite". Press the button to confirm.
PThe display show "Input name / Quit". Input the receivers name with the digits, max
20 signs. Press on the digit that correspond to the first letter in the name. Every digit
correspond to several different letters and sign. Press several times to get the letter or
sign you want on the corresponding digit.
The list on next page show a summary over the letter and sign there is.
The function button uses to erase the nearest sign to the left.
Table of contents
Other Doro Telephone manuals

Doro
Doro PHONEEASY RECORD 327CR User manual

Doro
Doro MemoryPlus 319ph User manual

Doro
Doro 6531 User manual

Doro
Doro PHONE EASY User manual

Doro
Doro AFTI 45 User manual

Doro
Doro Arc 6 User manual

Doro
Doro 501 User manual

Doro
Doro AlertEasy 314C User manual

Doro
Doro PhoneEasy 311C User manual

Doro
Doro HEARPLUS 313CI User manual

Doro
Doro AFTI 40 User manual

Doro
Doro PhoneEasy Display 312C User manual

Doro
Doro 80 User manual

Doro
Doro 914c User manual

Doro
Doro 509C User manual

Doro
Doro SeePlus 314ci User manual

Doro
Doro 4100H User manual

Doro
Doro aub200h User manual

Doro
Doro PhoneEasy 311C User manual

Doro
Doro CONGRESS 200 User manual