Doro 313C User manual

doro 313C
Manual

2 www.doro.com
1 Call Number
2 OK/Cancel button
3 Hanging Hook for Handset
4 Select Caller ID mode
5 Handset Volume Control
6 Store Button
7 Memory button
8 Recall button
9 Redial button
10 Hands Free Button
11 Controls for hands free
12 Handset earpiece tone control
13 One-touch memory buttons M1/M2
14 Controls for ringer
15 Scrolling Buttons
16 New CID message and Visual
Ring Indicator
17 Select Phone Book mode
18 Warning tone control
English (see pages 4-16)
2
3
4
5
10
12
9
8
6
1
7
13
15
17
16
11
14
18

www.doro.com 3
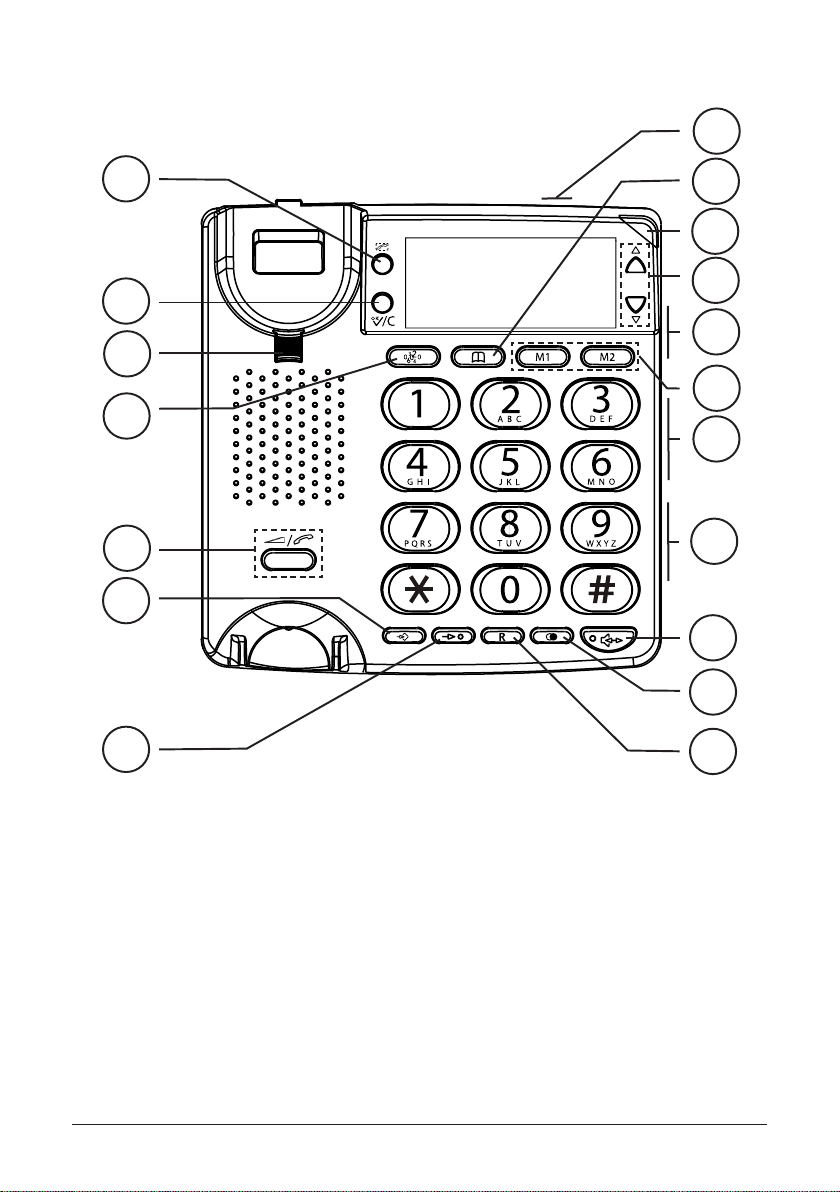
1 Touche de prise de ligne
2 Touchepourconrmer/effacer
3 Languette de support du combiné
4 Touche du journal des appelants
5 Réglage du volume du combiné
6 Touche d’enregistrement
7 Touche de mémoire
8 Touche R
9 Touche Bis
10 Touche mains-libres avec LED
11 Curseur de réglage volume
mains-libres
12 Réglage de la réponse en
fréquence du combiné
13 Touches de mémoire directe M1
et M2
14 Curseur de réglage des sonneries
15 Touchesdedélement
16 Témoin de nouvel appel et de
sonnerie
17 Répertoire
18 Réglage du bip d’avertissement
Français (voir pages 17-26)
1 AnrufenAnrufen
2 Bestätigen/LöschenBestätigen/Löschen
3 HöreraufhängungHöreraufhängung
4 RufnummeranzeigeRufnummeranzeige
5 HörerlautstärkereglerHörerlautstärkeregler
6 Nummern speichernNummern speichern
7 KurzwahltasteKurzwahltaste
8 R-TasteR-Taste
9 WahlwiederholungWahlwiederholung
10 Taste für Lautsprecher undTaste für Lautsprecher und
Anzeige
11 Regler für LautsprecherRegler für Lautsprecher
12 Regler für das Lautbild/Regler für das Lautbild/
Frequenzumfang des Hörers
13 Kurzwahltasten M1/M2Kurzwahltasten M1/M2
14 Regler für die RufsignallautstärkeRegler für die Rufsignallautstärke
15 Blätter-TastenBlätter-Tasten
16 Anzeige für neue Nummer undAnzeige für neue Nummer und
Rufsignal
17 TelefonbuchTelefonbuch
18 Regler für WarnungsalarmRegler für Warnungsalarm
Deutsch (siehe Seite 27-36)
1 Numero di chiamata
2 Pulsante OK/Annulla
3 Supporto di aggancio per il
microtelefono
4 Selezione modalità ID chiamante
5 Controllo volume del
microtelefono
6 Pulsante memorizzazione
7 Pulsante chiamata abbreviata
8 Pulsante Recall
9 Pulsante Ripetizione numero
10 Pulsante “mani libere” (vivavoce)
11 Comandi per vivavoce
12 Controllo risposta in frequenza
del microtelefono
13 Tasti memoria “one-touch”
M1 e M2.
14 Comandi per suoneria
15 Pulsanti di scorrimento
16 Indicatore nuovo messaggio ID
chiamante e indicatore visivo di
chiamata
17 Selezione modalità rubrica
18 Controllo tono di avviso
Italiano (vedere pagine 37-46)

English
4 www.doro.com
Installation
Important!
Please note when programming all references to press = to press once and then immediately
release the button.
The earpiece of the handset may attract small ferromagnetic objects such as staples and pins,
care should be taken when placing the handset near these items.
Connection/Basic setting
1. Connect the curly cord to the handset and to the socket marked Qon the
side of the telephone.
2. Connect the mains adapter to the socket marked DC 9V on the back of the
telephone and then to an electrical wall socket.
3. ThedisplayshouldashthewordENGLISH.Ifnotpressandholdvfor
approximately 4 seconds.
4. Selectthedesiredlanguageusingv/V. Press 0.
5. Selectthedesiredcontrastsetting(3=normal)usingv/V. Press 0.
6. Setthehour(00-23)usingv/V. Press 0.
7. Settheminuteusingv/V. Press 0.
8. Setthedayusingv/V. Press 0.
9. Setthemonthusingv/V. Press 0.
10.Ensurethecorrectdiallingmethodisdisplayed(ie:TONE).Press0.
11.Selecttherequiredringermelodyusingv/V. Press 0.
12.EnsurethecorrectRecalltimeisdisplayed(ie:100).Press0.
13.Connect the telephone line cord to the socket marked Ton the back of the
telephone, and then to a network wall socket.
14.Liftthehandsetandlistenforthedialtone.
Tochangeanyoftheabovesettings,pressandholdvfor approximately 4
seconds and repeat steps 4. -12.above.

English
www.doro.com 5
Installation
Batteries
FourgoodqualityAAalkalinebatteriescanbeinstalledtoprotectthememory
duringprolongedpowerfailure.Whenthebatteriesarerunninglowwillbe
displayed.
1. Disconnect the telephone line cord.
2. Ontheundersideofthetelephonecarefullyremovethebatterycover.
3. Insertthebackupbatteriesensuringcorrectbatterypolarityisobserved.
4. Replacethebatterycover.
5. Reconnectthetelephonelinecord.
Wall mounting
Thetelephonecanbewallmountedbyusingtheincludedwallmountbracket.It
canalsobettedtoastandardwallplatewithoutusingscrewsinAustralia.
1. Securetwoscrews,verticallypositioned83mmapart.
2. The screws should locate into the two keyholes on the back of the telephone.
3. Removethehangingpeg(locatedbythehookswitch)bypushingitupwards.
4. Rotatethehangingpeg180degrees,andthenreplaceit.
The display
Whenthetelephoneisnotinusethedateandtime,numberofnewandtotal
numberofcallsstoredintheCallerIDmemorywillbeshowninthedisplay.
Thedisplaywillilluminateduringringing,whenaccessingmemoryfunctions
anddiallingout.

English
6 www.doro.com
Operation
Making a call
Normal Dialling
1. Liftthehandset.
2. Dial the desired telephone number.
Pre-Dialling
Thisallowsyoutoenterandchangeatelephonenumberbeforeitisdialled.
1. Entertherequiredtelephonenumber.Mistakescanbeerasedbypressing0.
2. Youcannoweitherliftthehandset,pressORs, the displayed
telephone number will now be dialled.
Please note!
During a conversation, you can switch from the handset to hands free mode at any time by
pressing s. Press sagain to terminate the call.
Redial function
Ifthenumberdialledisengagedoryouwishtoredialthelastnumbercalled
simplyliftthehandset(orpresss)andpressr.
Volume control
Thehandsetearpiecevolumemaybeadjustedduringacallusing/Q.
Theaudibleresponsewithintheearpiecemaybeadjustedusing♫
located on the side of the unit.
Toadjustthespeakervolume(handsfree),uselocatedonthesideofthe
telephone.
Warning!
Do NOT select the maximum handset volume unless you already
having hearing difculties.

English
www.doro.com 7
Operation
Timer
Immediatelyafterdiallingatelephonenumberacalltimerwillbeshownonthe
display.Thetimerisasimplewaytohelpyoukeeptrackofhowlongthecall
lasts.
Hands free function
1. Press s.ThespeakerwillbeactivatedandtheHandsfreeindicatorlight
will illuminate.
2. Dialtherequiredtelephonenumber.Thespeakervolumecanbeadjusted
usinglocatedonthesideofthetelephone.
3. Speaktowardsthemicrophonelocatedonthefrontedgeofthetelephone.
4. Press sto terminate the call.
Please note!
During a conversation, you can switch from the hands free to handset mode at any time by
picking up the handset. Replace the handset to terminate the call.
Please remember that in hands free speaker mode it is only possible for one person at a time
to talk. The switch over between speaker and microphone is automatic and dependent on the
sound level of the incoming call and the microphone respectively. It is therefore essential that
there are no loud noises, e.g. music, in the immediate vicinity of the telephone, as this will
disrupt the speaker function.
Warning tone
Awarningtonecanbeselectedusingtheswitchlocatedonthebackofthe
unit,ifthehandsetisthennotreplacedcorrectlyanalarmwillsoundafter20
minutes.

English
8 www.doro.com
Phone Book
Using the Phone Book
ThePhoneBookwillstore32telephonenumbers(22digitsmax)andtheir
associatednames(16charactersmax)withentriesarrangedalphabetically.
Astoredphonenumbercanbedialledusingfewerkeystrokesthanifdialled
manually.IfyousubscribetoaCallerIDservice,thename/numberofthecaller
willbeshownwhenyoureceiveanincomingcall(onlyforthosenumbersstored
inthePhoneBookorM1/M2memories).
Letters
Eachnumberkeyhasbeenallocatedcertaincharacters.
Button Letters/symbols
1.......................................... [Space character] + & - / X 1
2.......................................... A B C Å Ä Æ æ å ä ß 2
3.......................................... D E F ë 3
4.......................................... G H I ï 4
5.......................................... J K L 5
6.......................................... M N O Ñ ñ ö @ ö 6
7.......................................... P Q R S 7
8.......................................... T U V Ü ü 8
9.......................................... W X Y Z 9
* .......................................... ` @ ( ) * < >
0.......................................... , . : ? = 0
#.......................................... $ _ % ! #
Storing names/numbers
1. Press b.
2. Press P.
3. Press Pagain.
4. Enterthetelephonenumbertobestored(upto22digits).PressP.
5. Enterthename(upto16characters).Pressthecorrespondingnumber
buttononeormoretimesfortherstletter(seethetableabove).
6. Press P.
Press rif you need to insert a pause in the telephone number.
If you wish to change a number, store the new number in the same location as the old one.

English
www.doro.com 9
Phone Book
Dialling from the Phone Book
1. Press b.
2. Scrolltotherequiredmemorylocationusing v/V. Toquick-searchinthe
PhoneBookpressthecorrespondingnumberbuttononeormoretimesfor
therstletter(refertothetableonthepreviouspage).
3. Presstodialthedisplayednumber.Ifyoudonothingthephonewill
return to standby mode.
Please note!
During a conversation, you can switch from the handset to hands free mode at any time by
pressing s. Press sagain to terminate the call.
Changing phone numbers/names
1. Press b.
2. Scrolltotherequiredmemorylocationusing v/V.
3. Press and hold P untilEDIT?isdisplayed.PressP.
4. Changestothedisplayedtelephonenumbercanbemadeusing0and v/V.
Press P.
5. Changestothedisplayednamecanbemadeusing0and v/V.
6. Press Ptoconrmthechanges.
Deleting a phone book entry
1. Press b.
2. Scrolltotherequiredmemorylocationusing v/V.
3. Press 0.DELETE?willbedisplayed.
4. Press and hold 0until the displayed telephone number disappears.
Deleting all entries in the Phone Book
1. Press b.
2. Scrolltotherequiredmemorylocationusing v/V.
3. Press and hold 0untilthedisplayshowsDELETEALL?
4. Press and hold 0until the displayed telephone number disappears.

English
10 www.doro.com
Phone Book
Memory
Thetelephonealsohas2one-touchand10two-touchmemoriesforfrequently
dialled telephone numbers.
Whenanumberisstoredintomemoryyouonlypressoneortwobuttons
dependent on location to make a call.
Theone-touchmemoriesareM1-M2,thetwo-touchmemoriesareaccessed
usingthetelephonekeypaddigits0-9.
Storing One-touch Memories
1. Press P.
2. Enterthetelephonenumbertobestored(upto22digits).PressP.
3. Enterthename(upto16characters).Pressthecorrespondingnumber
buttononeormoretimesfortherstletter(seethetableforthePhone
Book).PressP.
4. PresseitherM1-M2tostorethenumber.
Dialling using One-touch Memories
1. Liftthehandset(orpresss)andwaitforadiallingtone.
2. PresseitherM1-M2,thestoredtelephonenumberwillnowbedialled.
Storing Two-touch Memories
1. Press P.
2. Enterthetelephonenumbertobestored(upto22digits).PressP.
3. Enterthename(upto16characters).Pressthecorrespondingnumber
buttononeormoretimesfortherstletter(seethetableforthePhone
Book).PressP.
4. Press either 0-9to store the number.
Dialling using Two-touch Memories
1. Liftthehandset(orpresss)andwaitforadiallingtone.
2. Press m.
3. Selectamemorylocationbypressingtherelevantkeypaddigit0-9.
Press rif you need to insert a pause in the telephone number.
If you wish to change a stored telephone number, store the new number in the same location as
the old one.

English
www.doro.com 11
Caller Identication
Explanation of Caller ID
CallerIDallowsyoutoseewhoiscallingbeforeyouansweracallandtosee
whohascalledinyourabsence.IfthenumberisstoredinthePhoneBook,the
callersnamewillbeshowninstead.Receivedcallsarestoredchronologically
withthesequentialnumbershowninthetoprighthandsideofthedisplay.
WhentheCallerIDlogisfull,theoldestnumberwillbedeletedautomatically
asthenewcallislogged.Newcallsareindicatedbytextinthedisplayand
ashingoftheredringindicator light.
Please note!
In order for numbers to be shown, the Caller ID service must be provided by your network
operator and a current subscription in place. Contact you operator for more information.
Retrieving and dialling CID numbers
1. Presstoselectcaller-idmode.
2. Press either vor VtoreviewthenumbersstoredintheCallerIDmemory.
3. To dial a displayed telephone number either press ORs, the displayed
telephonenumberwillnowbedialled.Ifyoudonothingthephonewill
return to standby mode.
Please note!
During a conversation, you can switch from the handset to hands free mode at any time by
pressing s. Press sagain to terminate the call.
Messages
Besidesshowingtelephonenumbers,thedisplaycanshowanumberoftext
messagesorsymbols:
OUTOFAREA ItisanInternationalcalloracallfromaPBX(no
informationreceived).
PRIVATE Informationonthenumberisblocked.Thecallcould
alsobefromaPBX.
q Newnumbernotpreviouslyrecordedorlogged.
Z Severalcallshavebeenreceivedfromthesamecaller.

English
12 www.doro.com
Caller Identication
Deleting Numbers
1. Scrolltothetelephonenumberyouwishtoeraseusingv/V.
2. Press 0:DELETE?willbedisplayed,alternativelypressandhold0until
thedisplayshowsDELETEALL?
3. Press and hold 0until the number disappears.
Transferring Numbers to the Phone Book
1. Scrolltothetelephonenumberyouwishtocopyusingv/V.
2. Press P.
3. Press Pagain.
4. NamecanlaterbeaddedaccordingtothechapterChangingphone
numbers/namesonpage9.
Set up for New Zealand CID operation
1.Setrecalltimeto600ms(page4,Connection/Basicsetting).
Theunitisnowsetuptoinsert0/00whenusingthedialbackfeaturefromthe
CIDloginaccordancewithTelecomNZrequirements.
Ifachargeforlocalcallsisunacceptablethedialbackfeatureshouldnotbe
used,refertopage16.

English
www.doro.com 13
Other
Recall Time (Australia and New Zealand only)
Accesstoadditionalnetworkservicessuchas“CallWaiting”canbegainedby
usingtherecallbuttonR.Example:whenthecallwaitingtonesareheard,press
R,listenforthedialtone,thenpress2.Pleasenotethatsomenetworksrequire
only the Rbuttontobepressed,contactyournetworkoperatorformoreservices
information.
IfthisproductisconnectedtoabusinessPBXsystem,presstherecallbuttonR
followedbytheextensionnumbertotransferacall.Thestandardsettingis100ms.
Troubleshooting
Checkthatthetelephonecordisundamagedandproperlypluggedin.Disconnect
anyadditionalequipment,extensioncordsandothertelephones.Iftheproblemis
resolved,thefaultiswiththeotherequipment.
Testtheequipmentonaknownworkingline.Iftheproductworks,thenthefault
is probably with the line. Please inform your local telephone company.
No number shown in display when ringing
- Inorderforthisfeaturetofunction,youmustsubscribetotheCaller
Identicationservicefromyournetworkprovider.
- Ifatextmessageisshownonthedisplay,thecallmaybeaninternationalcall
(nodatareceived),orfromaprivateorwithheldnumber.
- ItmaynotbepossibletoreceiveCallerIDinformationifthephoneoperates
inaPBXsystem.
Ifthetelephonestilldoesnotwork,contactDoroortheplaceofpurchase.Don’t
forgetthereceiptorcopyoftheinvoicewillberequiredforguaranteepurposes.

English
14 www.doro.com
Other
UK
Ifyoucannotresolvethefaultusingthefaultndersection,technicalsupportis
availableonthePremium Rate Number: 0906 302 0114.
Calls cost 50 pence per minute(pricescorrectatthetimeofgoingtopress),
andisoperationalbetween9AM-5PMMonday-FridayexcludingBank
Holidays.Alternatively,
E-mailon:tech@doro-uk.com
Youcancontactusinwriting:ConsumerSupportGroup,DoroUKLtd.,
22WalkersRoad,NorthMoonsMoat,Redditch,Worcestershire,B989HE,
(regardinganySparesorTechnicalquery),or
Telephoning(Sparesonly):01527584377
Website:www.doro-uk.com
Guarantee
Thisproductisguaranteedforaperiodof12monthsfromthedateofpurchase.
Proofofpurchaseisrequiredforanyserviceorsupportrequiredduringthe
guaranteeperiod.
Thisguaranteeshallnotapplytoafaultcausedbyanaccidentorasimilar
incidentordamage,liquidingress,negligence,abnormalusage,notreasonably
maintainedoranyothercircumstancesonthepurchaser’spart.Furthermore,
thisguaranteeshallnotapplytoafaultcausedbyathunderstormoranyother
voltageuctuations.
Thisguaranteedoesnotinanywayaffectyourstatutoryrights.(Asamatterof
precaution,werecommenddisconnectingthetelephoneduringathunderstorm.
Declaration of conformity
DorodeclaresthattheapparatusDoro313Ccomplieswiththeessential
requirementsandotherrelevantpositionsofDirective1999/5/EC.Acopyof
the Declaration of Conformity can be found at www.doro.com/dofc

English
www.doro.com 15
Other
Australia and New Zealand
Products permitted for connection to the telephone network are marked with
inAustraliaand inNewZealand.Thesemarksindicatethe
productscomplywiththeregulationsandcanbeusedwithoutconcerninthe
country of purchase.
Ifyoubelievethisproductismalfunctioning,pleaserefertotherelevantsection
and/orconsultthetroubleshootingguideinthismanualtoensurethatyouhave
followedtheinstructionscarefully.Asanalternativeyoucanvisitourwebsite
forFAQ’sorsendane-mailforapromptreply.
Guarantee
Thisproductisguaranteedforaperiodof12monthsfromthedateofpurchase.
Shouldyouexperiencedifcultieswiththeproduct,pleasecontactusfor
assistance.Iftheproductisthenfoundtobefaultyyouwillbeaskedtoreturn
itdirectlytouswithacopyofthepurchasereceipt.Thisguaranteeshallnot
applytoafaultcausedbyanaccidentorasimilarincidentordamage,liquid
ingressnegligence,abnormalusage,notreasonablymaintainedoranyother
circumstancesonthepurchaser’spart.Furthermore,thisguaranteeshallnot
applytoafaultcausedbyathunderstormorlightning,excessiveoranyother
voltageuctuationsorfaultsonthetelephoneline.(Asamatterofprecaution,
werecommenddisconnectingthetelephoneduringathunderstorm).
Thisguaranteedoesnotaffectyourstatutoryrights.
AUSTRALIA NEWZEALAND
DORO Australia Pty Ltd Atlas Gentech (NZ) Limited
PO Box 6760 Private Bag 14927
Baulkham Hills BC NSW 2153 Panmure
Australia Auckland
New Zealand
ConsumerSupport ConsumerSupport
Ph: Ph: 1300 885 023 Ph: 0900-500-25 (Toll Call)Ph: 1300 885 023 Ph: 0900-500-25 (Toll Call)Ph: 0900-500-25 (Toll Call)
Fax: (02) 8853-8489 Fax: (09) 574-2722
Web site: www.doro.com.au

English
16 www.doro.com
Technical information
REN (RN for New Zealand)
TheREN(RingerEquivalenceNumber)or(RN)isofsignicanceonlyif
youwishtoconnectmorethan1telephonetoyourtelephoneline.Astandard
telephonelinehasamaximumRENcapacityof3(RNof5).Itispossible
toconnect3deviceswithaRENof1(RNof1)withnodegradationtothe
product’sperformance.Exceedingthislimitmaycausethevolumeoftheringer
inanyphonetodecreaseornotringatall.
NotesforoperationinNewZealand
ALL PRODUCTS
ThegrantofaTelepermitforanyitemofterminalequipmentindicatesonly
that Telecom has accepted that the item complies with the minimum conditions
forconnectiontoitsnetwork.Itindicatesnoendorsementoftheproductby
Telecom,nordoesitprovideanysortofwarranty.Aboveall,itprovidesno
assurance that any item will work correctly in all respects with another item of
Telepermittedequipmentofadifferentmakeormodel,nordoesitimplythat
anyproductiscompatiblewithallofTelecom’snetworkservices.
ThisequipmentshallnotbesettomakeautomaticcallstotheTelecom“111“
EmergencyService.
Thisequipmentmaynotprovidefortheeffectivehand-overofacalltoanother
deviceconnectedtothesameline.
Thisequipmentshouldnotbeusedunderanycircumstancesthatmayconstitute
a nuisance to other Telecom Customers.
CND PRODUCTS
Ifachargeforlocalcallsisunacceptable,the“DIAL“buttonshouldNOTbe
usedforlocalcalls.Onlythe7digitsofthelocalnumbershouldbedialledfrom
yourtelephone.DONOTdialtheareacodedigitorthe“0“prex.

Français
www.doro.com 17
Installation
Raccordement/Réglages de base
1. ReliezlecordonspiraléaucombinéetauconnecteurdutéléphonemarquéQ.
2. Reliezleblocd’alimentationàlaprisedutéléphonemarquée9V 200mAetà
la prise de courant.
3. FRANCAISclignotesurl’afcheur.Sinon,appuyezpendantenviron4
secondes sur la touche v.
4. Atteignezlalanguedésiréeaveclestouchesv/V.Appuyezsur0.
5. Atteignezlecontrastedésiré(3=normal)aveclestouchesv/V.Appuyezsur0.
6. Atteignezl’heuredésirée(00à23)aveclestouchesv/V.Appuyezsur0.
7. Atteignezlaminutedésiréeaveclestouchesv/V.Appuyezsur0.
8. Atteignezlejourdésiréaveclestouchesv/V.Appuyezsur0.
9. Atteignezlemoisdésiréaveclestouchesv/V.Appuyezsur0.
10.Assurez-vousquel’écranafchelaméthodecorrectedenumérotation(=FV).
Appuyezsurlatouche0.
11.Choisissezlamélodiedesonnerieàl’aidedestouchesv/V.Appuyezsur0.
12.RéglagedesynchronisationdelatoucheR(TOUCHER):sélectionnez300.
Appuyezsurlatouche0.
13.Reliezlecâbletéléphoniquefourniàlaprisetéléphoniqueetauconnecteurdu
téléphonemarquéT.
14.Prenezlecombiné:vousdevezentendrelatonalité.
Sivoussouhaitezchangerlesréglagesci-dessus,vouspourreztoujourslefaire
ultérieurement,appuyezpendantenviron4secondessurlatouchevetrépétez
lesétapes4.à9.mentionnéesci-dessus.
Piles
Pourquelaprésentationdunuméro,lesmémoiresetc.puissentfonctionneren cas
de coupure de courant, l’appareilabesoindequatrepilesAAde1,5V.
Lesymbole s’allumelorsquelespilesdoiventêtrechangées.
N’utilisezquedespilesdequalité.
1. Débranchezlecâbledutéléphoneetretirezlatrappe.
2. Insérezlespilesenobservantlesmarquesdepolarité(+et-).
3. Remettezlatrappedespilesenplace.

Français
18 www.doro.com
Installation
Position murale
1. Installezlesupportmuralenl’insérantsousletéléphoneetfaitesleglisser
verslehaut.
2. Montezdeuxvisespacéesverticalementde83mmd’entre-axe.
3. Encastrezlestêtesdesdeuxvisdanslestrouscorrespondantsetfaites-le
glisserleverslebaspourlemettreenplace.
4. Retirezlalanguettedesupportducombinésituéeàcôtédelapédalede
raccrochéenlatirantverslehaut.
5. Tournezlalanguettedesupportducombinéde180degrésetremettez-laen
place.
L’afcheur
Enveille,ladateetl’heuresontafchéesainsiquelenombretotaldenuméros
detéléphoneenregistrésdansleJAP(journaldesappelants).

Français
www.doro.com 19
Utilisation
Appeler
Appel normal
1. Prenezlecombiné.
2. Composezlenumérodésiré.
Appeler en utilisant la pré-numérotation
Lapré-numérotations’effectueaveclecombinéraccroché.Sonintérêtestde
pouvoircorrigerlenuméro.
1. Composezlenumérodevotrecorrespondant.Encasd’erreur,effacezavec
la touche 0.
2. PrenezlecombinéOUappuyezsur OUappuyezsurs, pour appeler
votrecorrespondant.
Encoursdeconversationvouspouvezalternerentrelesmodescombinéet
mains-libres.
Touche Bis
Lorsquelalignedevotrecorrespondantestoccupéeousivousdésirezrappeler
lederniernumérocomposé,prenezlecombiné(ouappuyezsurs)etappuyez
sur la touche Bis r.
Réglage du volume
Utilisezlatouche/Qpourajusterlevolumed’écouteducombinéen
coursdeconversation.
Laréponseenfréquenceducombinépeut-êtrerégléeàl’aidedubouton♫
(situésurlecôté).
Utilisezleboutonsituésurlecotédutéléphonepourréglerlevolumedu
haut-parleur.
Attention
Le volume du combiné peut être réglé sur un niveau très fort.
Ce réglage est destinné uniquement aux personnes ayant des
difcultés d’audition.

Français
20 www.doro.com
Utilisation
Chronométrage des appels
Lorsquelacommunicationestétablie,unchronomètres’afche.Ce
chronomètrevouspermetdecontrôlerladuréedesappels.
Fonction Mains-libres
1. Appuyezsurs.Lehaut-parleurestactivéetlaLEDs’allume.
2. Composezlenumérodetéléphone.Réglezéventuellementlevolumeàl’aide
duboutonsituésurlecôtédutéléphone.
3. Parlezfaceautéléphone.
4. Appuyezsurspourmettrenàlacommunication.
Encoursdeconversationvouspouvezalternerentrelesmodescombinéet
mains-libres.
Remarque !
Notez qu’en position mains-libres les deux correspondants ne peuvent pas parler
simultanément, mais uniquement un à la fois. L’alternance entre celui qui parle et celui qui
écoute se fait automatiquement, et elle est gérée par le niveau du son de la ligne téléphonique
(votre correspondant) et celui du micro (votre discours). C ’est pourquoi il est important qu’il
n’y ait pas trop de bruit dans l’entourage du téléphone, comme par exemple de la musique à
haut volume.
Bip d’avertissement
Lebipd’avertissementpeutêtreactivésiquelqunneraccrochepaslecombiné
correctement.Cebips’activeauboutde20secondessaufsiunappelesten
cours.
Other manuals for 313C
1
Table of contents
Languages:
Other Doro Telephone manuals

Doro
Doro 912c Installation guide

Doro
Doro TEL2 User manual

Doro
Doro HearPlus 317c User manual

Doro
Doro AUB 300i User manual

Doro
Doro COMFORT 3000 User manual

Doro
Doro X50 User manual

Doro
Doro Audioline AL505 User manual

Doro
Doro PhoneEasy 311C User manual

Doro
Doro PhoneEasy 312cs User manual

Doro
Doro 6521 User manual