3361343 (A3-D-P)
PSS®5000 S Series
Self contained breathing apparatus Instructions for Use
D
**** ****
p.s . i .
D
0
1000
2000 3000
4000
5000
N
N
PSS®and PAS®are registered trade marks of Dräger
1
4555
4
2
5
3
4118
33793088
4493
1
2
3
4
5
6
3094
1
7
3095
1
2
3
1 For your safety
1.1 General safety statements
●Before using this product, carefully read the Instructions for Use.
●Strictly follow the Instructions for Use. The user must fully understand and strictly
observe the instructions. Use the product only for the purposes specied in the
Intended Use section of this document.
●Do not dispose of the Instructions for Use. Ensure that they are retained and
appropriately used by the product user.
●Only fully trained and competent users are permitted to use this product.
●Comply with all local and national rules and regulations associated with this product.
●Only trained and competent personnel are permitted to inspect, repair and service
the product. Dräger recommend a Dräger service contract for all maintenance
activities and that all repairs are carried out by Dräger.
●Properly trained service personnel must inspect and service this product as detailed
in the Maintenance section of this document.
●Use only genuine Dräger spare parts and accessories, or the proper functioning of
the product may be impaired.
●Do not use a faulty or incomplete product, and do not modify the product.
●Notify Dräger in the event of any component fault or failure.
●All approved respiratory equipment shall be selected, tted, used, and maintained
in accordance with MSHA (Mine Safety and Health Administration), OSHA
(Occupational Safety and Health Administration), and other applicable regulations.
●Do not use any form of chemical marking or paint on the equipment.
●The air supply shall meet the requirements for breathing air according to CGA G-7.1,
Grade D or higher quality.
1.2 Denitions of alert icons
Alert icons are used in this document to provide and highlight text that requires a greater
awareness by the user. A denition of the meaning of each icon is as follows:
!
WARNING
Indicates a potentially hazardous situation which, if not avoided, could result in
death or serious injury.
CAUTION
Indicates a potentially hazardous situation which, if not avoided, could result in
physical injury or damage to the product or environment. It may also be used to
alert against unsafe practices.
i
i
NOTICE
Indicates additional information on how to use the product.
3 Use
!
WARNING
Only trained and competent personnel should prepare and use breathing
apparatus. Ensure that any accessories, ancillary equipment and other
protective clothing items do not interfere with the apparatus and do not create
a safety hazard.
The effective working duration of the apparatus is dependent on the initial air
supply available and the breathing rate of the wearer. Fill air cylinders to their
full rated pressure prior to use, and do not commence any operation (including
SAR (supplied airline respirator) operations) using a cylinder that is less than
90 percent full.
CAUTION
Do not apply excessive force or use tools to open or close a cylinder valve, and
do not drop or throw down the breathing apparatus.
Refer to the following additional information before preparing or using the breathing
apparatus:
●The special instructions (see Section 9).
●The NIOSH Approval Label 3361918 for approved congurations.
3.1 Preparation for use
i
i
NOTICE
The face of the pressure gauge may be tted with a thin exible protective
covering. Remove this covering before rst use.
1. Carry out a visual inspection of the breathing apparatus (see Section 3.5.1).
2. Fit the air cylinder (see Section 3.5.2).
3. Press the male coupling of the lung demand regulator hose into the female coupling
of the medium-pressure hose until an audible click is heard (do not connect the
regulator to the face mask at this stage).
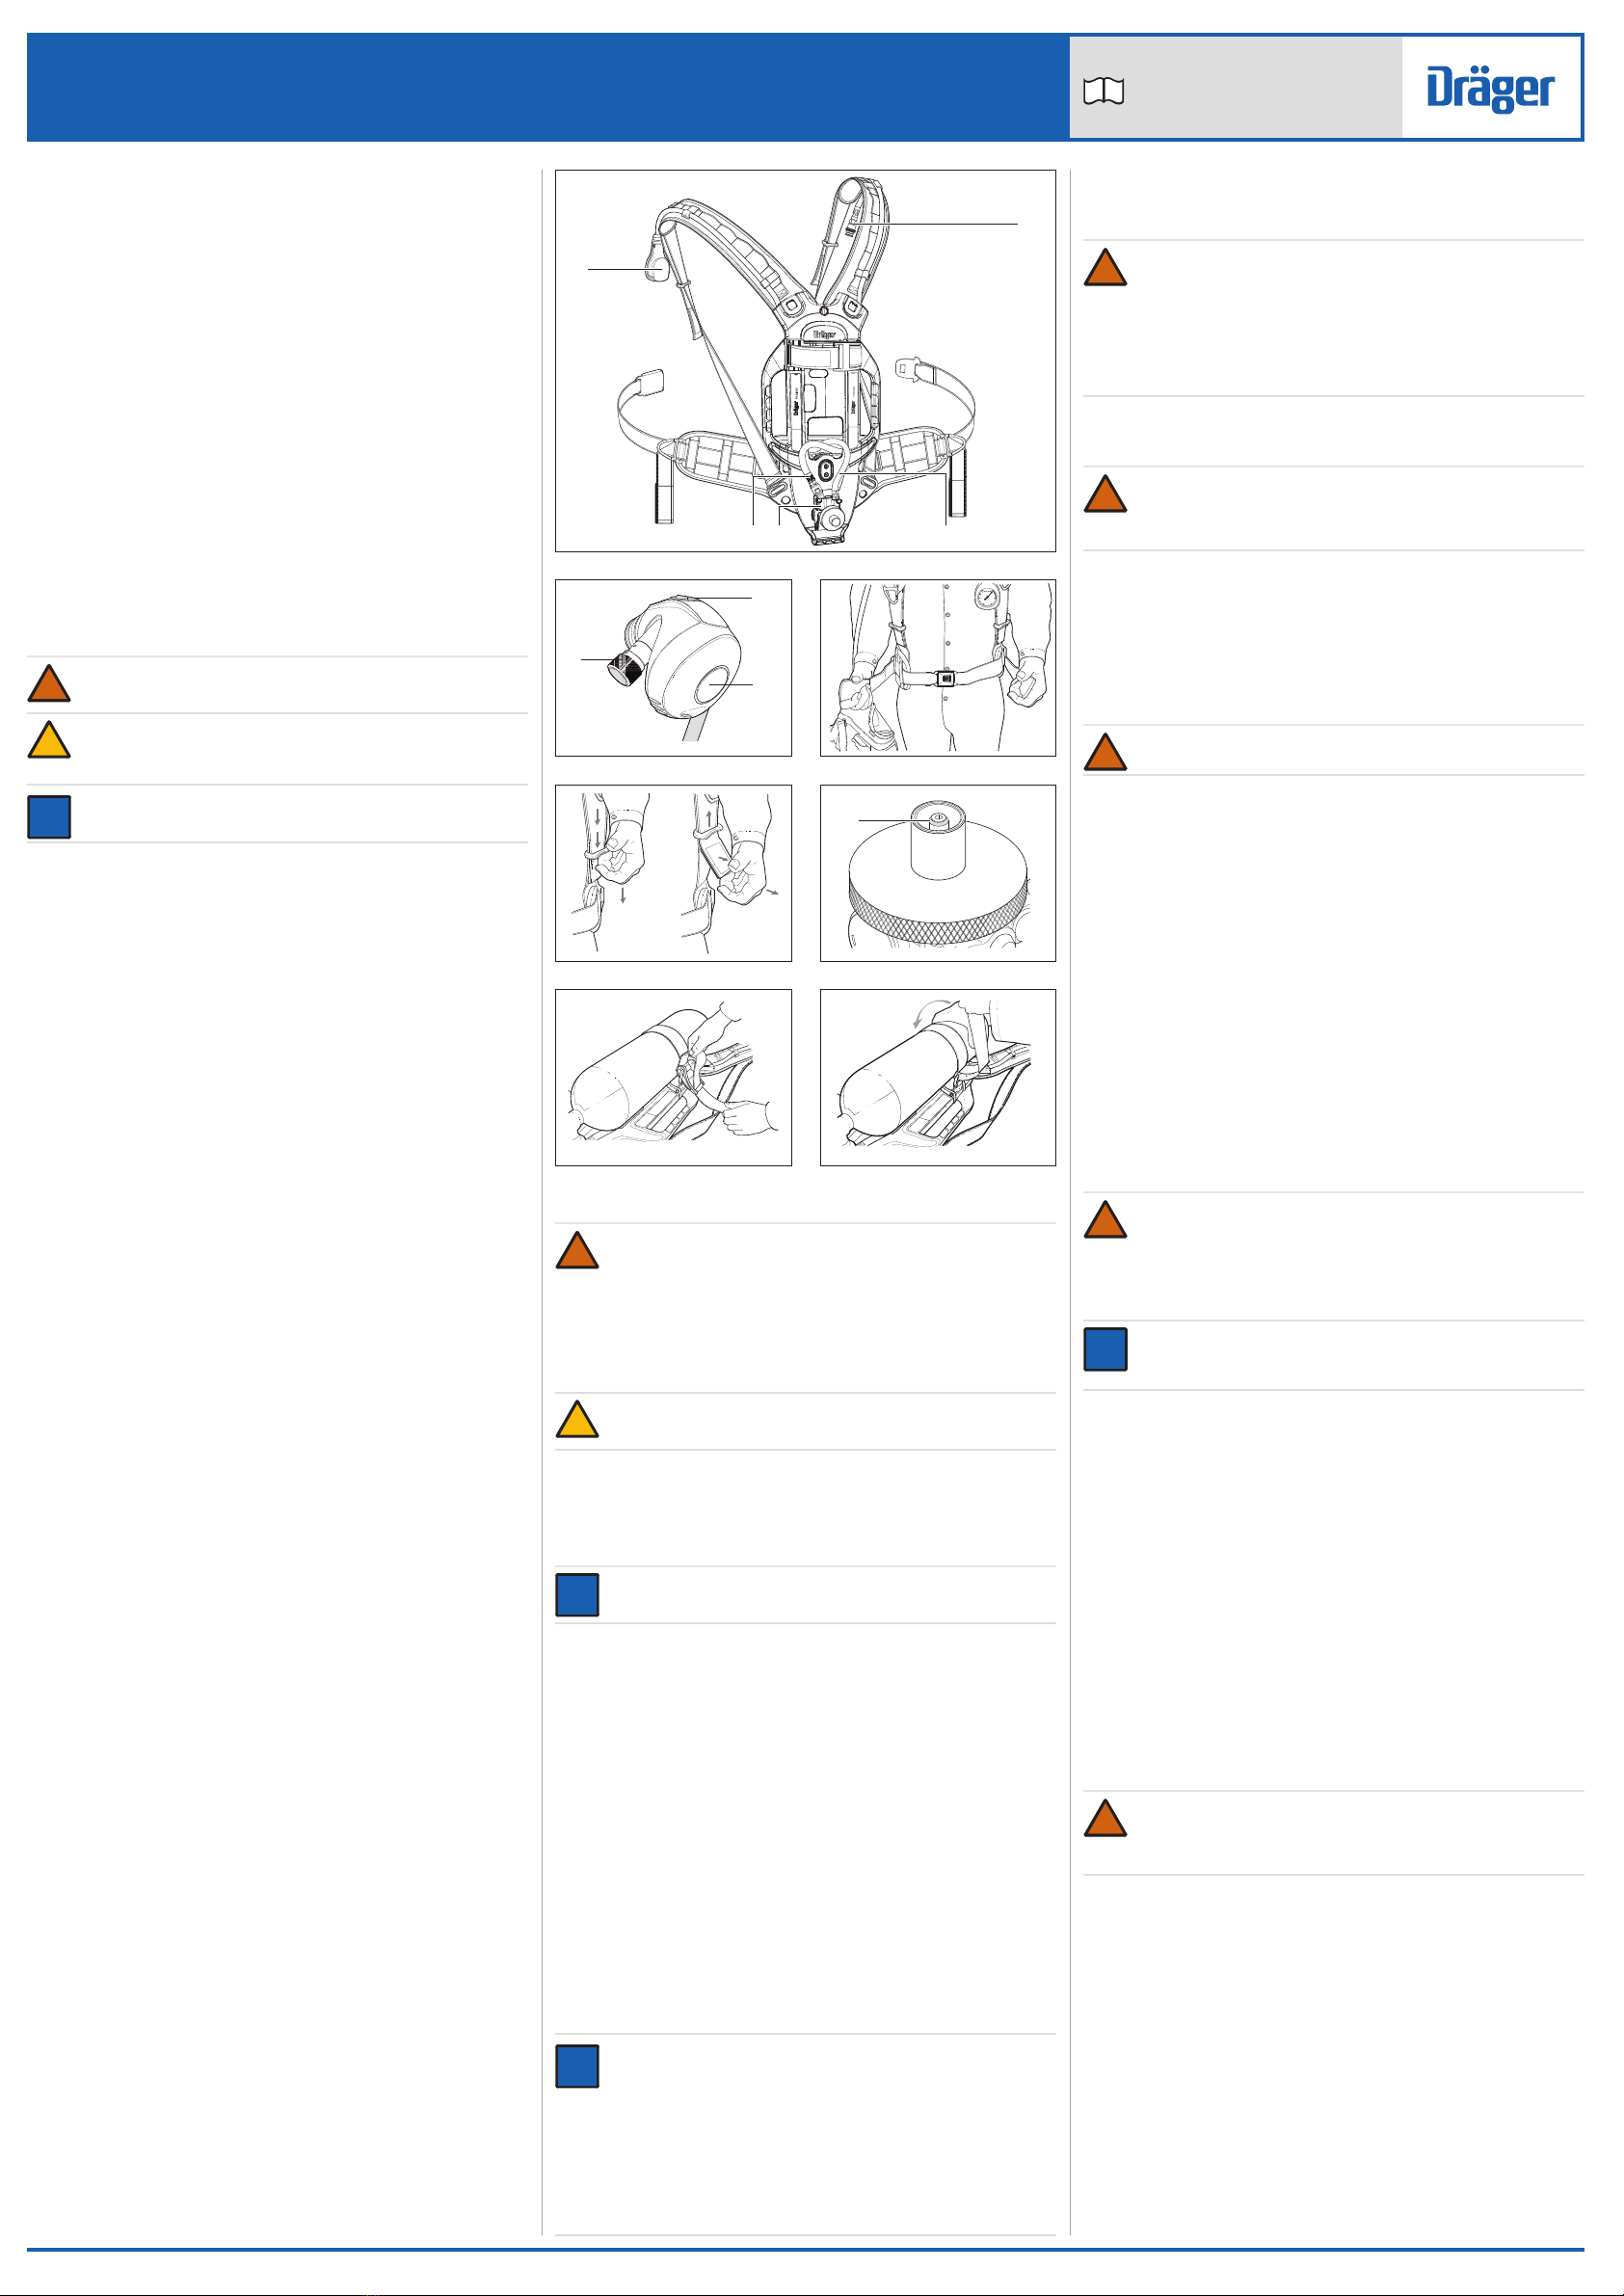
4. Press the reset button (Fig 2, Item 1) to switch off the positive pressure. Press and
rotate the bypass button (Fig 2, Item 3) to align the red spots and then release the
button to switch off the bypass.
5. Carry out a full functional test of the apparatus (see Section 3.5.3).
6. Align and push the lung demand regulator into face mask port until it latches in
position, and check the attachment by gently attempting to pull the coupling apart.
3.2 Putting on the breathing apparatus
1. Fully loosen the shoulder straps and waist belt and put on the breathing apparatus.
2. Check that the shoulder pads are not twisted, and take the weight of the system on
the shoulders by pulling the shoulder straps. Do not fully tighten at this stage.
3. Close the waist belt buckle and pull the ends of the waist belt until it ts securely and
comfortably (Fig 3). Tuck the belt ends behind the waist pad or belt.
4. Pull the shoulder straps until the breathing apparatus rests securely and comfortably
on the hips. Do not over tighten. Pull the strap retainers down to secure the strap
ends (Fig 4).
5. Fully loosen the head straps of the face mask and place the neck strap over the
back of the neck.
6. Press the reset button (Fig 2, Item 1) to switch off the positive pressure.
7. Open the cylinder valve slowly, but fully, to pressurize the system.
i
i
NOTICE
After storage at temperatures below 32 °F (0 °C) leakage may be observed
when the cylinder valve is initially opened due to ice formation.
●If leakage is observed from the lung demand regulator: Press the front
button (Fig 3, Item 2) to allow a rush of air to pass through the lung
demand regulator and then quickly press the reset button (Fig 3, Item 1)
to switch off the positive pressure. Resume normal operation.
●If leakage is observed from the quick connect cylinder coupling: Close
the cylinder valve and vent the system. Disconnect then reconnect the
cylinder to the breathing apparatus, then reopen the cylinder valve slowly,
but fully, to pressurize the system. Resume normal operation.
●In the event that leakage still occurs, remove the breathing apparatus from
service and report the fault to trained service personnel or contact Dräger.
8. Put on the face mask and check for tight t (see the Instructions for Use supplied
with the face mask).
3.3 During use
!
WARNING
Fully open the cylinder valve and ensure it remains open during self contained
use of the breathing apparatus.
Users should be in a safe area before the end-of-service-time indicator (EOSTI)
warning commences. Evacuate to a safe area immediately if the warning
commences during an operation.
Using the bypass button (Fig 2, Item 3) will use air from the cylinder and rapidly
reduce the working duration of the apparatus.
●Regularly check the remaining cylinder pressure on the gauge.
●If additional air is required, briey press and release the bypass button (Fig 2, Item 3)
to deliver a single jet of air into the face mask.
!
WARNING
The emergency air ow procedures below may greatly reduce the operating
duration of the air supply. When activated the user must immediately evacuate
to a safe area. The reason for using the procedure must be investigated and
repaired before reusing the apparatus.
●Additional air ow required (emergency procedure only used in the unlikely condition
of low or blocked airow) – Press and rotate the bypass button (Fig 2, Item 3) to
deliver a sustained air supply (85 to 130 liters/minute) into the face mask.
●Excessive or loss of air ow (emergency procedure only used in the unlikely
condition of high or loss of airow) – Close the cylinder valve then immediately begin
to slowly reopen the valve. Use the cylinder valve as a regulating valve to set the air
ow to meet the user requirement. This procedure can be used with screw-type and
ratchet-type cylinder valves.
3.4 After use
!
WARNING
Do not remove the breathing apparatus until in a safe breathing environment.
1. Loosen the face mask straps. As the seal between the face mask and the face is
broken, press the reset button (Fig 2, Item 1) to switch off the positive pressure. Fully
remove the face mask and extend all of the straps of the head harness.
2. Close the cylinder valve.
3. Press the front button (Fig 2, Item 2) to vent system and then press the reset button
(Fig 2, Item 1) to switch off the positive pressure.
4. Release the waist belt buckle.
5. Lift the shoulder strap ends to release the strap retainers (Fig 4) and then lift the
shoulder strap buckles to loosen the straps.
6. Remove the breathing apparatus and face mask.
7. Carry out the after use tasks in the maintenance table (see Section 5.1).
8. Remove the air cylinder if required (see Section 3.5.2).
9. Pass the breathing apparatus to the service department with details of any faults or
damage that occurred during use.
3.5 Common user tasks
3.5.1 Visual inspection
A visual inspection must check the full breathing apparatus including all component parts
and accessories. Check that the equipment is clean and undamaged, paying particular
attention to pneumatic components, hoses and connectors. Typical signs of damage that
may affect the operation of the breathing apparatus include impact, abrasion, cutting,
corrosion and discoloration. Report damage to service personnel and do not use the
apparatus until faults are rectied.
3.5.2 Air cylinder tting and removing
!
WARNING
High-pressure air release may cause injury to the user or other personnel near
the breathing apparatus. Close the cylinder valve and fully vent the system
before attempting to disconnect an air cylinder.
Impact damage to the cylinder valve or rst-stage regulator connector may
prevent valve connection or cause an air leak. Handle the air cylinder and
breathing apparatus with care.
i
i
NOTICE
The following instructions are for a CGA-type threaded cylinder coupling. For
other cylinder connector types, refer to the Instructions for Use supplied with
the connector.
Fitting the cylinder
1. Check the threads of the cylinder valve port and the rst-stage regulator. Ensure that
the O-ring seal (Fig 5, Item 1) in the regulator is clean and undamaged.
2. Lay the apparatus horizontal, with the regulator uppermost, and fully extend the
cylinder strap.
3. Insert the cylinder through the loop of the strap, and align the valve with the regulator.
4. Lift the cylinder and backplate into the vertical position (supported on the end of the
cylinder opposite the valve).
5. Tighten the hand wheel of the regulator, using only the thumb and index nger, until
a denite metal-to-metal contact is felt. Do not use tools or over tighten.
6. Place the unit back into the horizontal position.
7. Take up the slack in the cylinder strap (Fig 6).
8. Pull the strap over the cylinder to operate the cam lock (Fig 7), and secure using
the Velcro fastening.
Removing the cylinder
1. Close the cylinder valve and press the front button (Fig 2, Item 2) to fully vent the
system.
2. Lay the apparatus horizontal, with the cylinder uppermost.
3. Remove the free end of the cylinder strap from the Velcro.
4. Lift the strap against the cam lock to release the buckle tension, and then loosen
the strap.
5. Disconnect the cylinder valve from the rst-stage regulator.
6. Lift the cylinder away from the regulator and remove the cylinder.
3.5.3 Functional testing
!
WARNING
Failure of the breathing apparatus to meet any of the standards or parameters
described in the functional tests indicates a system fault. Report the fault to
trained service personnel or contact Dräger. Do not use the breathing apparatus
until the fault condition is rectied.
Assemble the breathing apparatus as described in the preparation for use (see
Section 3.1) before commencing any functional testing.
Leak test and whistle warning test
1. Press the reset button (Fig 2, Item 1) to switch off the positive pressure. Press and
rotate the bypass button (Fig 2, Item 3) to align the red spots and then release the
button to switch off the bypass.
2. Open the cylinder valve slowly, but fully, to pressurize the system. During
pressurization a momentary sounding of the whistle will occur.
3. Fully close the cylinder valve.
4. After 20 seconds, check the contents gauge and then reopen the cylinder valve. The
gauge must not show an increase in pressure of more than 300 psi. If the pressure
increase is more than 300 psi, investigate and repair the fault (see Section 4), and
then repeat the leak test.
5. Fully close the cylinder valve.
6. Cover the outlet port of the lung demand regulator with the palm of the hand and
press the front button (Fig 2, Item 2) to switch on the positive pressure.
7. Carefully lift the palm of the hand to very slowly vent the system until the whistle
activates, and observe the pressure displayed on the gauge.
8. The whistle must begin to sound in the range:
○2216 psi cylinder: 598 psi to 510 psi
○4500 psi cylinder: 1215 psi to 1035 psi
9. Continue to vent the system until it is fully exhausted.
10. Press the reset button (Fig 2, Item 1) to switch off the positive pressure.
D
D
2 Description
2.1 Product overview
The Dräger PSS 5000 S Series is a self contained breathing apparatus (SCBA) that
provides the wearer with respiratory protection using an open-circuit, pressure-demand,
compressed-air system. The apparatus can be used as a self contained system, or tted
with an airline connector which allows connection of a medium-pressure air supply for
SAR (supplied airline respirator) use.
2.2 Feature description
The carrying system has a carbon-composite backplate, with adjustable shoulder straps
and waist belt connected using quick release connectors. The waist pad is connected at
a exible joint to compensate for the twisting and bending of the user.
The pneumatic system uses the Dräger high-performance rst-stage regulator (Fig 1,
Item 4), which is available as a 2216 psi or 4500 psi version. The regulator reduces
cylinder pressure and supplies breathing air through a medium-pressure hose (Fig 1,
Item 5) and a quick coupling (Fig 1, Item 2) to an attached lung demand regulator. The
apparatus is tted with a mechanical pressure gauge (Fig 1, Item 1) that incorporates an
end-of-service-time indicator (EOSTI) whistle that sounds to warn the wearer that there is
low cylinder pressure (see Section 8 for the EOSTI activation pressures). A dual-pressure
hose (Fig 1, Item 3) supplies air to the whistle when it is activated, and has an internal
capillary tube that supplies high-pressure air from the cylinder to the gauge.
The air hoses are integrated into the backplate and held by hose clips on the shoulder
straps to prevent snagging and enhance protection.
2.2.1 Compressed-air cylinders, lung demand regulators and face masks
The PSS 5000 S Series is compatible with a range of compressed-air cylinders, lung
demand regulators and face masks (e.g. FPS 7000 face masks, Dräger lung demand
regulators, and Dräger aluminum or composite cylinders of 30 to 60 minute capacity).
Full descriptions and user instructions are contained in separate Instructions for Use
supplied with the cylinder, face mask or lung demand regulator.
2.2.2 Optional accessories
The breathing apparatus can be tted with the following optional Dräger accessories:
●An alternative rst-stage regulator with a Dräger Quick Connect Cylinder Coupling
is available. The quick coupling replaces the standard threaded cylinder coupling
on the rst-stage regulator to allow rapid connection and disconnection of the air
cylinder.
●An alternative rst-stage regulator with a RIC UAC (rapid intervention crew universal
air connection) or Dräger ChargAir coupling is available, and is used for relling the
air cylinder when it is connected to the breathing apparatus. Each is available as
a 2216 psi or 4500 psi version, and has a male quick coupling and pressure relief
valve. A RIC UAC coupling is on the rst-stage regulator, and a ChargAir coupling
is on a waist belt hose.
●An airline connector is an inlet connector which is used to connect a medium-
pressure air supply to the breathing apparatus for SAR (supplied airline respirator)
use.
Full descriptions and user instructions are contained in separate instructions supplied
with the accessory. Always refer to the accessory Instructions for Use when using the
PSS 5000 S Series with an accessory tted.
2.3 Intended use
The PSS 5000 S Series breathing apparatus, when tted with a cylinder, lung demand
regulator and face mask, is intended for use in applications where a high level of
respiratory protection is required. The assembled breathing apparatus provides the
wearer with respiratory protection for working in contaminated or oxygen-decient
conditions.
The cylinder, lung demand regulator, face mask and other accessories used with this
product must be certied Dräger components, assembled in an approved conguration,
otherwise the operation of the device may be impaired. Contact Dräger for further
information.
2.3.1 Limitation
This product is not approved to provide protection from military grade chemical,
biological, radiological, and nuclear hazards (CBRN). Do not attempt to use the product
for respiratory protection in CBRN environments.
2.4 Approvals
The Dräger PSS 5000 S Series is certied by NIOSH. The apparatus must only be used
in conjunction with compressed-air cylinders approved by NIOSH.
2.5 Explanation of marking and symbols
Refer to the relevant authority for explanation of approval body symbols and marking
on the equipment. Examples of other marking on component parts of the breathing
apparatus are:
BRAC-1359 – Month and year of manufacture
3356812 or R21034 – Dräger part number
SF – Standard force coupling
LF – Low force coupling


