Drieaz F286 User manual
07-00438D F286, F287 1 Dri-Eaz Products, Inc.
Owner’s Manual
Rescue Mat System
Models F286, F287
DRI-EAZ PRODUCTS, INC.
15180 Josh Wilson Road, Burlington, WA 98233
Phone: 800-932-3030 Fax: 360-757-7950 www.dri-eaz.com
The Rescue Mat System uses the power of the Dri-Eaz DriForce®high pressure blower to
deliver effective drying to the full depth of water damaged wood floors and floor
substrate. Two different mat sizes make it easy to custom fit your Rescue Mat System to
any floor layout. Patents: http://www.LBpatents.com
SAVE TH ES E INSTRUCTI O NS
INTRODUCTION
The Dri-Eaz Rescue Mat System is used along with the
Dri-Eaz DriForce high pressure blower to deliver
effective drying to the full depth of water damaged wood
floors, even to the substrate. The system utilizes sturdy,
self-sealing mats and the Dri-Force (#F211-BU,
purchased separately) to draw evaporated moisture from
deep inside the material to the surface, replacing it with
drier air. The Rescue Mat System is durable and easy to
use, and works fast to restore wood floors to a dry
standard.
BEFORE YOU BEGIN
Visit warranty.Dri-Eaz.com to register your purchase.
Registration allows us to better assist you with using,
maintaining or servicing your equipment, as well as to
contact you in case we have important safety information
concerning your Dri-Eaz product. If you determine
service is required, have your equipment model, serial
number and original proof of purchase available and call
your distributor for assistance with obtaining a return
material authorization (RMA).
USE AND OPERATION
1.Before installing the Rescue Mats, remove any visible
liquid from the floor surface using a truckmount or
portable extraction equipment.
2.Before attaching the DriForce, first attach the extractor
hose to one or several mats and place them over the
floor to remove any remaining liquid water. Run
extractor and mats until no more liquid water is drawn
from the floor. Move the mat/mats to a new section
and repeat process on all affected flooring.
CAUTION: Make sure all liquid water is removed before
installing the mats and operating the DriForce. Liquid
water drawn in to the DriForce may damage the motor
and void the DriForce warranty.
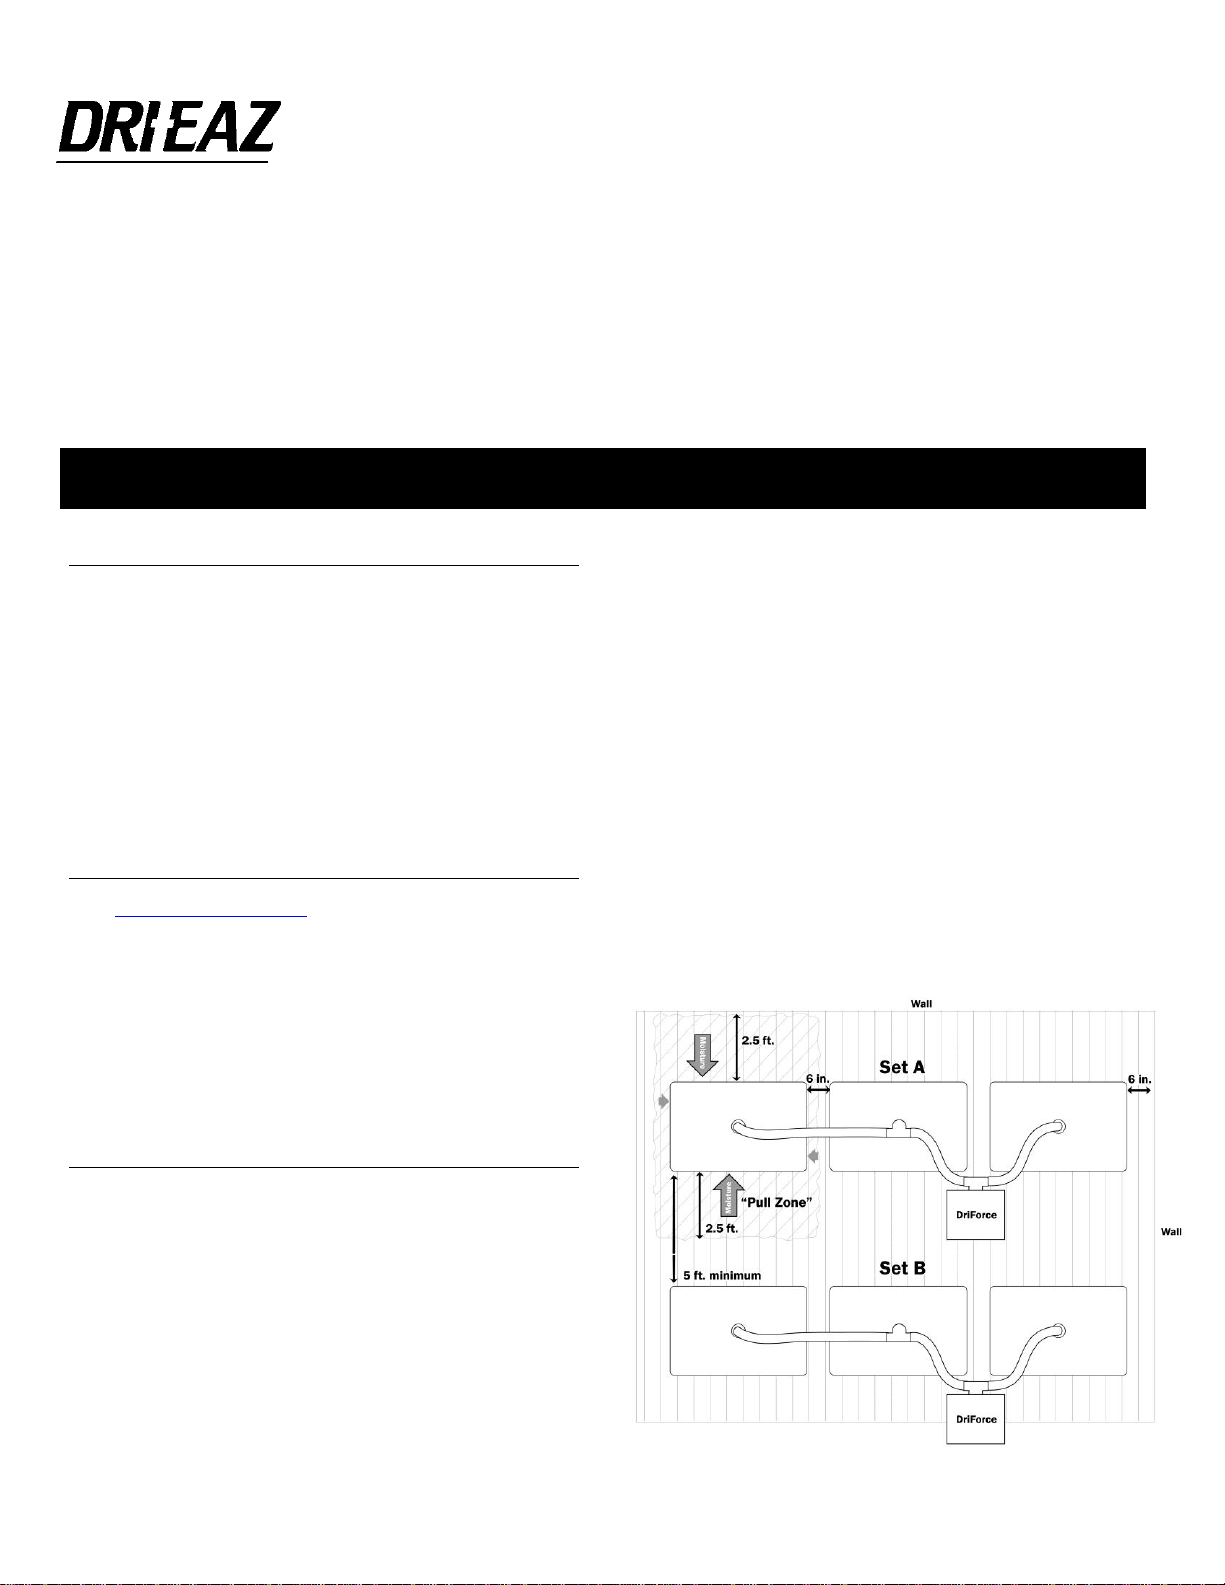
3.Arrange the mats on top of the floor over the affected
area as show in Fig. 1. To maximize coverage, orient
each panel so that the longer edge crosses the
greatest number of boards at a right angle, and set the
mats no more than six inches apart.
4.The mats are self-sealing. However, if the floor is too
uneven for the mat to maintain a strong vacuum seal,
secure the mat edges with removable painter’s tape.
5.Attach the DriForce’s suction flange to the mats and
arrange the hoses and T-connectors as shown in
Fig. 1. Start the DriForce and check for leaks at hose
connections and along the mat edges. Adjust as
necessary.
Figure 1: Typical Rescue Mat Setup
07-00438D F286, F287 2 Dri-Eaz Products, Inc.
WARNING
Trip hazard. The edges of the mats are raised. Place Rescue
Mat System out of traffic area or re-route foot traffic to avoid
creating a hazard.
MAINTENANCE
DAILY
To ensure maximum air delivery remove hose from
intake of DriForce unit and remove any lint or dust that
has accumulated.
AFTER EACH USE
Routine cleaning of the Rescue Mat System can help
prevent cross-contamination between jobs. Clean mats
by wiping gently with a soft, damp cloth or chamois. Use
pure soap or detergent and lukewarm water.
TIPS
The Rescue Mat System is designed only for water
removal restoration of wood floors. If you are in doubt
about the suitability of a particular wood floor for
restoration, consult with a wood floor professional.
Each DriForce blower may be used with up to a
maximum of three mats. When greater coverage is
required, use additional DriForce blowers and mats.
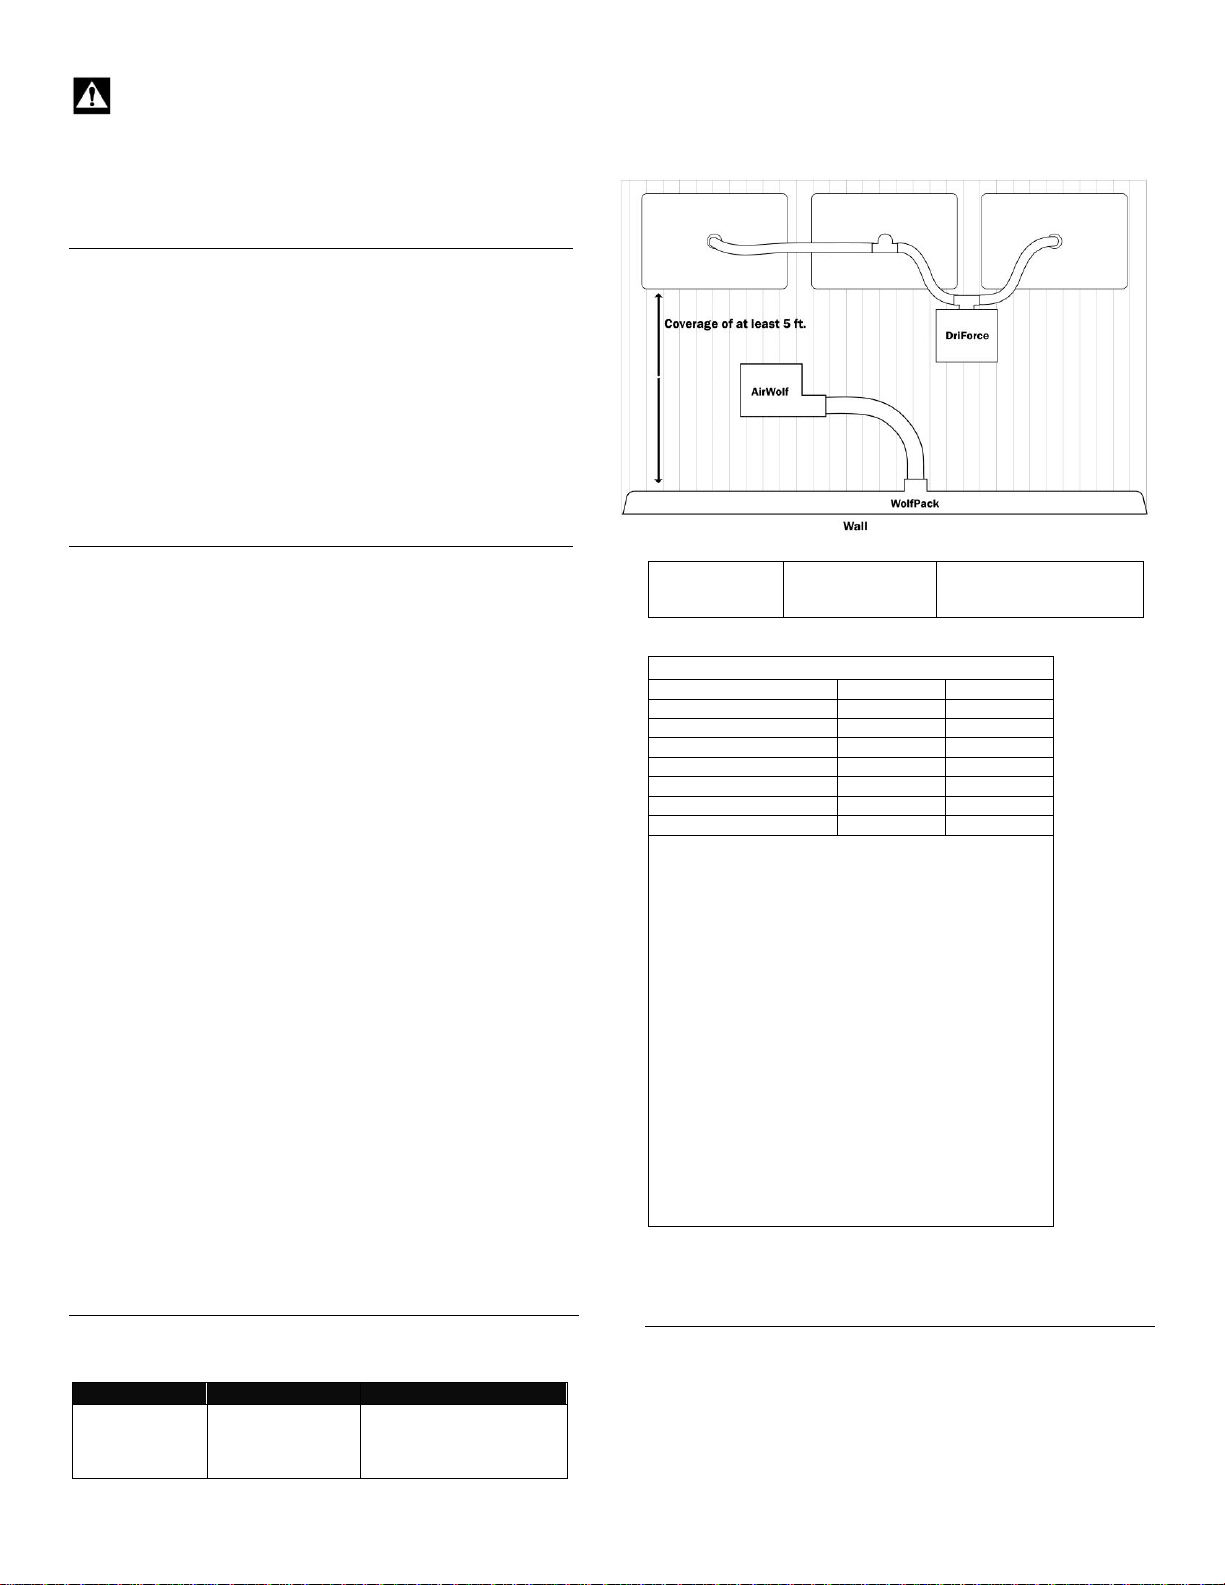
For optimum results, create a “Push-Pull” extraction
system with Rescue Mat System and AirWolf (F228)
and WolfPack System (F243), purchased separately.
See Fig. 2 for information about how to set up a Push-
Pull Extraction System.
To maximize vacuum efficiency, avoid sharp bends in
the vacuum hose and keep hose runs as short as
possible.
Due to the many differences in construction of wood
floors, wood species, installation methods, and degree
of wetness, adjust the recommended mat system
placement as needed.
Effective wood floor restoration requires very dry air.
Dri-Eaz recommends the use of LGR or desiccant
dehumidifiers.
For fast, thorough drying inside walls, cabinets and
other cavities, use DriForce InterAir Drying System
(F211). Contact your Dri-Eaz distributor or visit
www.Dri-Eaz.com for more information.
TROUBLESHOOTING
For any problems not listed below call the Dri-Eaz
Service Department at 800-932-3030.
Problem
Cause
Solution
Mats won’t seal
Gasket seal has
been damaged
Check gasket seal for any
damaged areas; repair
with gasket seal tape
included with system.
Floor is uneven or
severely “cupped”
or “crowned”
Seal Rescue Mat edges
to floor using removable
painter’s tape.
SPECIFICATIONS
Kit no.
F286
F287
Large mat
4
4
Small mat
2
2
Vacuum hoses
3
n/a
Connector sleeves
2
n/a
Hose cuffs
6
n/a
T-connectors
5
n/a
Spare gasket material
1 roll
n/a
Component Descriptions
Large mat: 46 × 30 in.
Small mat: 23 × 30 in.
Mat material: Clear PVC plastic. Mats are stackable
for storage
Gasket material: 117 ft. roll of .375 ×.125 in. closed
cell neoprene tape
Hose with cuffs: 7 ft. vacuum hose length with cuffs
attached
Hose cuffs can be threaded on to hose ends
Connector sleeves: connect two hose lengths
together at hose cuffs
T-connectors: Connects hoses in multiple
configurations.
Rescue Mat Related Products
DriForce Base Unit (F211-BU)
CONTACT
Dri-Eaz Products, Inc.
15180 Josh Wilson Road
Burlington, WA 98233
Phone: 800-932-3030 Fax: 360-757-7950
Figure 2: Push-Pull Extraction System
(Requires the AirWolf and the Wolf Pack System,
purchased separately)
This manual suits for next models
1
Other Drieaz Cleaning Equipment manuals


