manuals.online logo
Brands
  1. Home
  2. •
  3. Brands
  4. •
  5. DS18
  6. •
  7. Marine Equipment
  8. •
  9. DS18 Hydro MXRC-BT User manual

DS18 Hydro MXRC-BT User manual

Other DS18 Marine Equipment manuals

DS18 MRX150 User manual

DS18

DS18 MRX150 User manual

DS18 MRX100 User manual

DS18

DS18 MRX100 User manual

DS18 NXL200.2D User manual

DS18

DS18 NXL200.2D User manual

DS18 MRX2 User manual

DS18

DS18 MRX2 User manual

DS18 CF-X8TP User manual

DS18

DS18 CF-X8TP User manual

DS18 MP4TP.4A User manual

DS18

DS18 MP4TP.4A User manual

DS18 NXL-X600.4D User manual

DS18

DS18 NXL-X600.4D User manual

Popular Marine Equipment manuals by other brands

POWERWINCH 825 Operation manual

POWERWINCH

POWERWINCH 825 Operation manual

JRC JLN-628 brochure

JRC

JRC JLN-628 brochure

DIGITAL YACHT PilotLink2 Product handbook

DIGITAL YACHT

DIGITAL YACHT PilotLink2 Product handbook

Clarion CMS2 Owner's manual & installation manual

Clarion

Clarion CMS2 Owner's manual & installation manual

EBS M7000 installation manual

EBS

EBS M7000 installation manual

Kongsberg M3 Bathy installation manual

Kongsberg

Kongsberg M3 Bathy installation manual

NPK SCS-1002 operating manual

NPK

NPK SCS-1002 operating manual

Furuno FE-800 installation manual

Furuno

Furuno FE-800 installation manual

Harken 1561 instructions

Harken

Harken 1561 instructions

Simrad DD15 manual

Simrad

Simrad DD15 manual

Notifier FS-BSO Installation and maintenance instructions

Notifier

Notifier FS-BSO Installation and maintenance instructions

Raymarine ST40 Quick reference guide

Raymarine

Raymarine ST40 Quick reference guide

Raymarine Maxiview ST80 Owner's handbook

Raymarine

Raymarine Maxiview ST80 Owner's handbook

E2S E2XS112UL Instructions/service manual

E2S

E2S E2XS112UL Instructions/service manual

GUIDANCE MARINE 20- Series Installer's guide

GUIDANCE MARINE

GUIDANCE MARINE 20- Series Installer's guide

R2Sonic 2026 Operation manual

R2Sonic

R2Sonic 2026 Operation manual

COBHAM SAILOR 6000 installation manual

COBHAM

COBHAM SAILOR 6000 installation manual

Raymarine ST60 Tridata Owner's handbook

Raymarine

Raymarine ST60 Tridata Owner's handbook

manuals.online logo
manuals.online logoBrands
  • About & Mission
  • Contact us
  • Privacy Policy
  • Terms and Conditions

Copyright 2025 Manuals.Online. All Rights Reserved.

OWNER’S MANUAL
FOR MORE INFORMATION
PLEASE VISIT
DS18.COM
RECEPTOR DE AUDIO BT
MARINO CON CONTROLES
MXRC-BT
MARINE BT STREAMING
AUDIO RECEIVER WITH CONTROLS
MXRC-BT
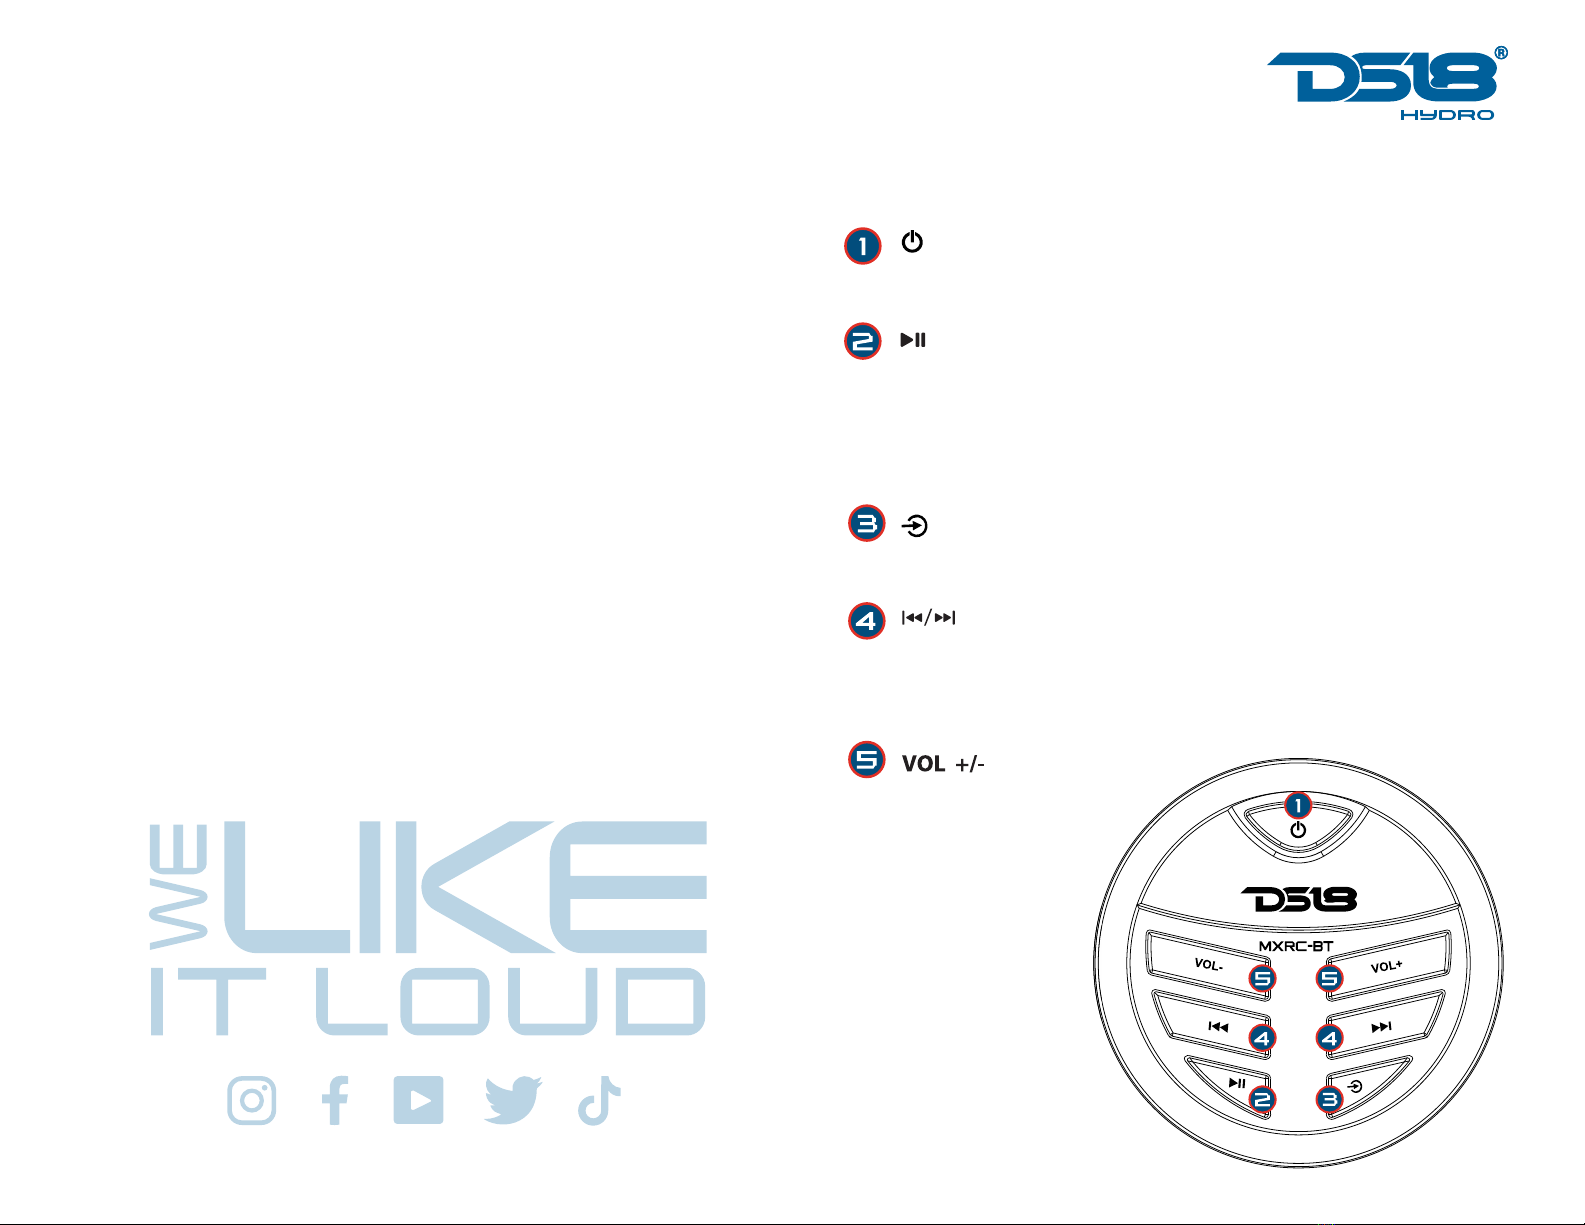
General Specifications / Especificaciones Generales Key Functions / Funciones de los Botones
Frequency Response / Respuesta de Frecuencia..............................................20Hz-20KHz
Signal to Noise Ratio / Relación Señal a Ruido ......................................................... ≧80dB
Total Harmonic Distortion (T.H.D) / Distorsión Armónica Total.................................... ≦0.1%
Channel Separation / Separacion de Canales ......................................................... ≧60dB
Operation Voltage / Voltaje de Operación ...................................................... 10V - 15V DC
BT Wireless Audio Version / Versión de Audio Inalámbrico BT ............................ 5.0 + A2DP
RCA Line Out (Pre-Amp) / 1 Pair (Left & Right) 2.5 Volts /
Salida de línea RCA (Preamplificador) .............................. 1 par (izquierda y derecha) 2.5 voltios
Remote Output (Turn-on Signal) / Up to 200mA /
Salida Remota (Señal de Encendido) ................................................................. Hasta 200mA
Features / Caracteristicas
Wireless Connection Range / up to 35Ft (conditions may vary) /
Rango de Conexión Inalámbrica ............................ hasta 35 pies (las condiciones pueden variar)
Aux Line Input / Entrada de Línea Auxiliar ......................................................... Plug 3.5mm
USB Player / Reproductor USB..................................................... Up to 32GB / Hasta 32GB
Water Resistance Rating / Clasificación de Resistencia al Agua ................................... IPX5
UV + Salt Resistance / Resistencia a la Sal + UV..................................................... YES / Si
Conformal Coating / Revestimiento de Conformación.............................................. YES / Si
LED Backlit Push Button / Botón Pulsador con Retroiluminación LED .... YES (blue) / Si (Azul)
Buttons Material / Material de los Botones.................................................... Rubber / Goma
- Power ON/OFF (Short Press)
- Encendido / Apagado (pulsación corta)
- Source Select (Short Press)
- Adjust Volume Level
- Ajustar el nivel de volumen
- Selección de Fuente (pulsación corta)
- USB/BT Mode: PLAY or PAUSE
- Modo USB / BT: REPRODUCCIÓN o PAUSA
- AUX Mode: Mute ON/OFF
- Modo AUX: Silencio ON / OFF
- USB/BT Mode: Previous/Next TRACK (Short Press)
- Modo USB / BT: PISTA anterior / siguiente (pulsación corta)
- USB/BT Mode: Fast Forward/Rewind (Press and Hold)
- Modo USB / BT: avance rápido / rebobinado (mantener pulsado)
- RESET (Long Press)
- RESET (Pulsación Larga)
Measurements / Medidas
Overall Diameter / Diámetro Total................................................................2.43" / 61.8 mm
Overall Depth / Profundidad Total.................................................................1.83" / 46.5 mm
Mounting Hole Diameter / Diámetro del Orificio de Montaje ..............................1.77" / 45 mm
Mounting Depth / Profundidad de Montaje ....................................................... 1.18" / 30 mm
Negative/Ground, Connect this directly to the Negative post or
chassis ground.
Black Wire / Cable Negro
Negativo / Tierra, conecte este directamente al polo negativo o tierra del chasis.
Connect a USB Drive up to 32GB with MP3/WMA Audio files.
USB Port / Puerto USB
Conecte una unidad USB de hasta 32 GB con archivos de audio MP3 / WMA.
Analog Audio Auxiliary input using a stereo plug wire.
3.5mm Jack Audio Input / Entrada de Audio Jack de 3,5 mm
Entrada auxiliar de audio analógico mediante un cable de conexión estéreo.
Audio Signal to the external amplifier (White: Left Ch, Red: Right Ch).
RCA Pre-Output / Salida previa RCA
Señal de audio al amplificador externo (blanco: canal izquierdo, rojo: canal derecho).
Remote Output, connect this to the external amplifier.
Blue Wire / Cable Azul
Salida remota, conéctela al amplificador externo.
Power +12V, connect this to an Accessory switch or a Master Switch,
you could connect it directly to the battery for continuous operation
(you could have a risk of battery discharge in long periods of time).
Yellow Wire / Cable Amarillo
Alimentación + 12V, conéctelo a un interruptor de accesorios o un interruptor maestro,
puede conectarlo directamente a la batería para un funcionamiento continuo
(podría correr el riesgo de que la batería se descargue durante largos períodos de tiempo).
MXRC-BT
Wiring Diagram / Diagrama de Cableado
1.83” / 46.5mm
1.18” / 30mm
0.61” / 15.5mm
2.43” / 61.8mm
1.77” / 45mm
Installation / Instalación
MXRC-BT
Once a suitable location has been determined, drill a 45mm (1-3/4) hole and secure
your MXRC-BT using the metal mounting bracket. If the bracket needs to be shortened,
remove the appropiate number of breakaway segments using a pair of pliers.
Una vez que se haya determinado una ubicación adecuada, taladre un orificio de 45 mm (1-3 /
4) y fije su MXRC-BT con el soporte de montaje de metal. Si es necesario acortar el soporte,
remueva el número apropiado de segmentos separables con un par de alicates.
1. The MXRC-BT should be installed by a professional technician.
2. Please read the instructions and operation of the equipment carefully before
installing.
3. Make sure to connect first the other wires before power connection.
4. To avoid short circuit; Please make sure all the exposed wire are insulated.
5. Please secure all the wires after installation.
6. Please make the connection to the headunit accordingly to this manual.
Wrong connection may cause severe damage.
7. This player is only for 12V DC electric systems and please make sure your boat
belongs to this kind of cathode grounding electrical system.
8. Please connect the wires rightly. Wrong connection will cause malfunction or
damage the electrical system.
1. El MXRC-BT debe ser instalado por un técnico profesional.
2. Lea atentamente las instrucciones y el funcionamiento del equipo antes de instalarlo.
3. Asegúrese de conectar primero los otros cables antes de conectar la alimentación.
4. Para evitar cortocircuitos; Asegúrese de que todos los cables expuestos estén aislados.
5. Asegure todos los cables después de la instalación.
6. Realice la conexión a la unidad principal de acuerdo con este manual.
Una conexión incorrecta puede causar daños graves.
7. Este reproductor es solo para sistemas eléctricos de 12 V DC y asegúrese de que su
barco pertenece a este tipo de sistema eléctrico de puesta a tierra de cátodos.
8. Conecte los cables correctamente. Una conexión incorrecta provocará un mal
funcionamiento o dañar el sistema eléctrico.