Dupray Hill Injection User manual

Instruction manual
Manuel d’utilisation

DUPRAY.COM
1-800-881-8482
DUPRAY CANADA
3700 St-Patrick Suite 214,
Montreal, QC,
H4E 1A2
DUPRAY USA
40E Main Street Suite 168,
Newark, DE,
19711
ENGLISH................................................................ 01
FRANÇAIS .............................................................. 21

TABLE OF CONTENTS
IMPORTANT SAFETY INSTRUCTIONS ......................................................................................................................................................... 03
DESCRIPTION AND CONTROL PANNEL ...................................................................................................................................................... 06
ACCESSORIES ............................................................................................................................................................................................ 07
HOW TO USE YOUR STEAM CLEANER ........................................................................................................................................................ 08
REFILLING WITH WATER ............................................................................................................................................................................ 09
FEATURES ................................................................................................................................................................................................. 09
USING THE ACCESSORIES ......................................................................................................................................................................... 10
MAINTENANCE .......................................................................................................................................................................................... 14
TECHNICAL SPECIFICATIONS..................................................................................................................................................................... 16
TROUBLESHOOTING ................................................................................................................................................................................. 16
WARRANTY................................................................................................................................................................................................. 19
2
en

IMPORTANT SAFETY INSTRUCTIONS
When using your steam cleaner, basic safety precautions should always be followed. Please read the following instructions carefully
as they provide important information concerning how to install, use and care for your steam cleaner.
• Use the steam cleaner only for its intended use.
• To protect against a risk of electric shock, do not immerse
the steam cleaner in water or any other liquids.
• The steam cleaner should always be turned o before plugging it into
or unplugging it from a wall outlet. Never pull the power cord
to disconnect from the outlet; instead grasp the plug and pull
to disconnect.
• Do not let the power cord touch hot surfaces.
• Let the steam cleaner cool completely before putting it away.
Wrap the power cord around the handle bar when not in use.
• WARNING: Do not operate the steam cleaner with a damaged cord,
plug, safety device, hose, trigger gun or if the steam cleaner has been
dropped or damaged. This will void any and all warranties. Please
contact Dupray at 1-800-881-8482 for repair procedure,
or visit dupray.com.
• Keep away from children.
• Do not leave the steam cleaner ON while unattended.
• Do not use this unit in the presence of explosive
and/or flammable fumes.
• Keep ventilation slots free from dust.
• Never drop or insert any object into ventilation slots.
• To prevent overheating, unravel the electrical cord completely.
• Do not operate where aerosol (spray) products are being used
or where oxygen is being administered.
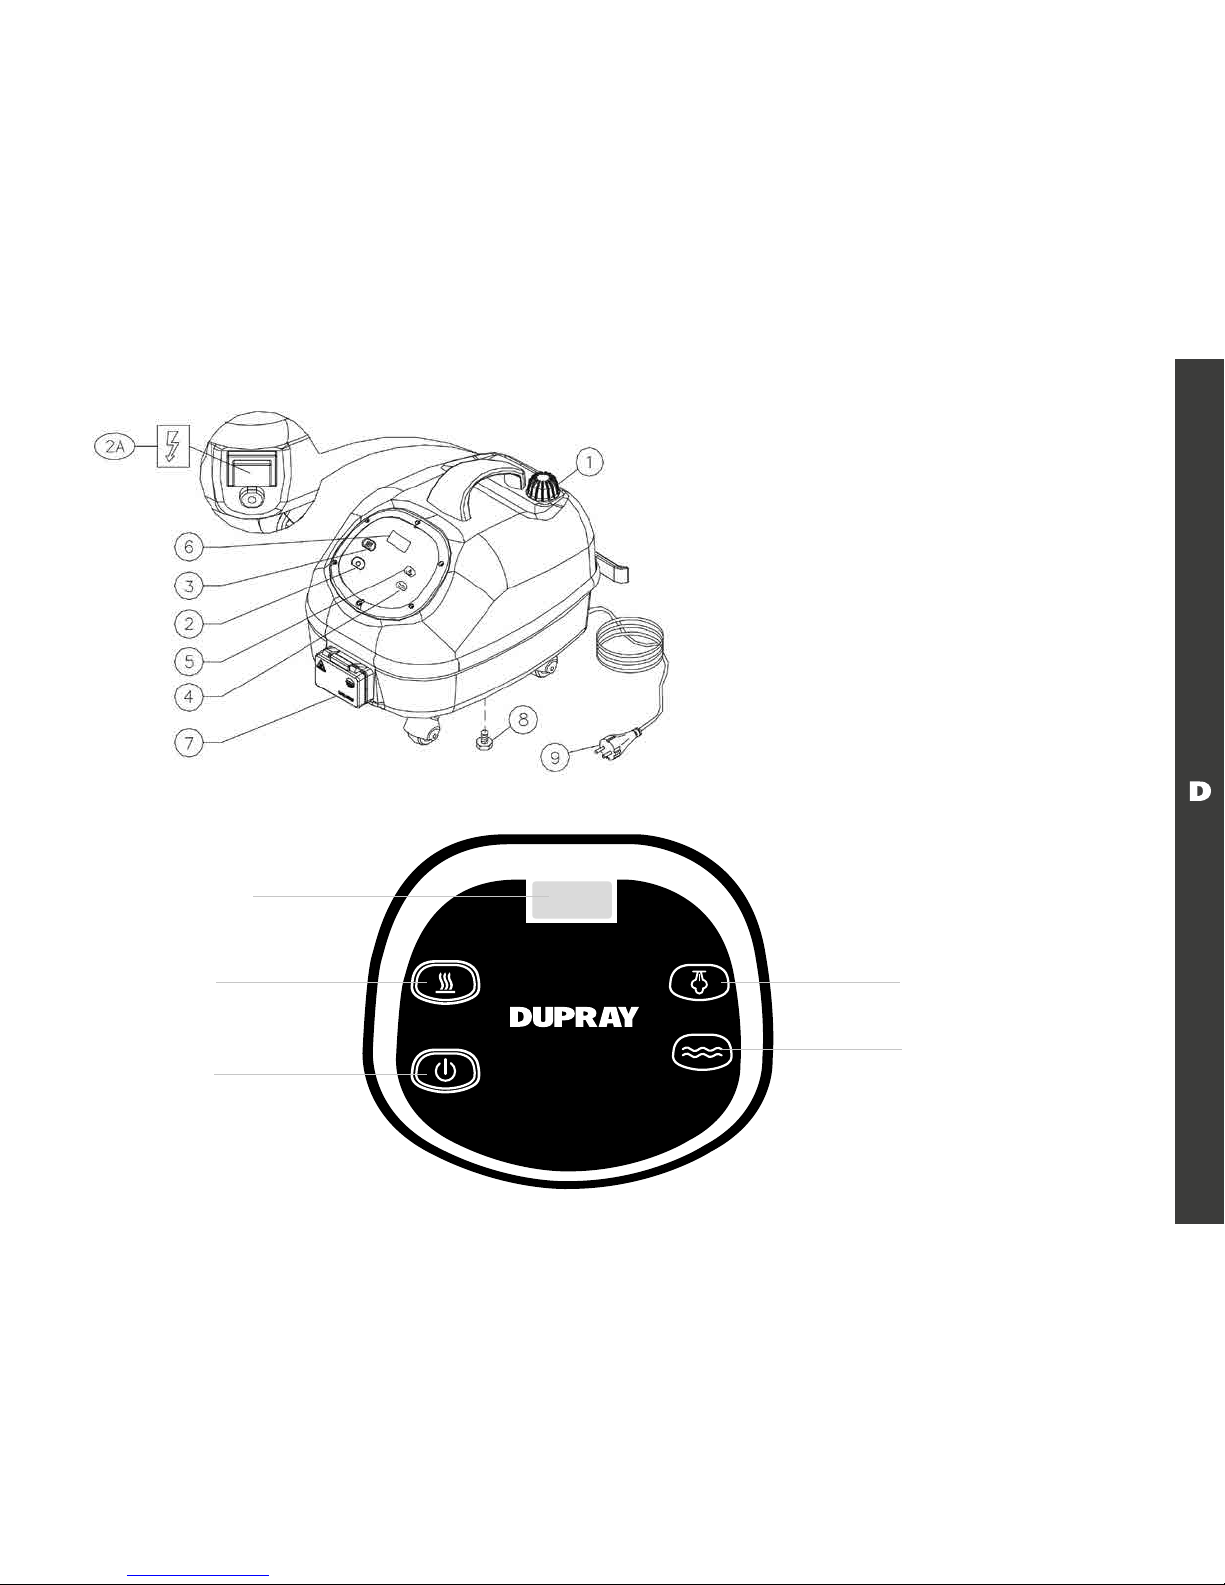
• To disconnect, turn o the main power button (2A),
then remove the plug from the main power.
• Never put away your steam cleaner while it is still hot. There is no need
for emptying the tank unless you intend to leave it unused for a long
period of time.
• Follow all user instructions in this manual.
• Never pull the machine by the steam hose. Move the machine instead.
• Handle might get hot during use.
• When using the steam cleaner on an uneven surface ensure
the machine is blocked in place.
• Sound pressure levels do not exceed Lpa<99db (A).
• Do not freeze.
• This is machine is intended for commercial use only.
• The electric supply connection shall be made by a qualified
electrician and comply with IEC 60364-1.
• It is recommended that the electric supply to this machine should
include either a residual current device that will interrupt the supply
if the leakage current to earth exceeds 30ma for 30ms or a device,
which will prove the earth circuit.
• This machine is equipped with two safety valves, able to ensure the safety
of the machine itself in case other primary control devices are ineicient
(due to a failure). Due to the extreme importance of these components
and as not to compromise the safety of the machine, it is recommended
to provide to check them and to substitute them through and authorized
service center every 2 years starting from the purchasing date.
• This Machine is equipped with a pressure switch able to check
and to maintain the pressure under certain preset limits
(ref. «Rated pressure» on the technical label underneath the machine).
In case there would be a steam leakage on the lower side of the
machine, it means that the functioning of this device has been
compromised and the safety valve has been involved as to limit
the boiler’s internal pressure.
It is recommended not to use the machine, immediately unplug
the machine from the power feeding and call the service center.

IMPORTANT WARNING
Steam is a powerful tool. Like any other tool, it should be used with caution. Certain surfaces, fabrics, materials and finishes are water
and heat sensitive and can be damaged or discolored by steam. ALWAYS check with the manufacturer of the surface or product being
cleaned before using steam. TEST a small, hidden surface to make sure the surface can be steamed.
DO NOT leave steam in one spot on any surface for any period of time with a wet cleaning cloth/pad attached as this will damage your floors.
DO NOT use on unsealed wood, on wood or tile floors that are highly worn, unfinished or have a wax or oil finish.
Surfaces that have been treated with wax or no-wax floors may be damaged by heat.
DO NOT use on leather, synthetic fabrics, velvet or other delicate, steam-sensitive materials.
DO NOT use the steam cleaner for any other purpose than what is described in the instructions manual.
In no event is Dupray liable for incidental or consequential damages to anyone, of any nature whatsoever. Some states/provinces
do not permit the exclusion or limitation of incidental or consequential damages, so the above may not apply to you.
WARNING: Do not use this machine in the presence
of flammable liquids, or dusts that are hazardous to health.
WARNING: Operators shall be adequately instructed
on the use of this steam cleaner.
WARNING:This machine is not suitable for picking up hazardous dust.
WARNING: If liquid escapes from the machine, switch OFF immediatly.
WARNING: High pressure jets can be dangerous if subject to misuse.
The jet must not bedirected at persons, live electrical equipment
or the machine itself.
WARNING: Do not use the machine within range of persons
unless they wear protective clothing.
WARNING: Do not direct the jet against yourself or others in order
to clean clothes or foot-wear.
WARNING: Risk of explosion - Do not spray flammable liquids.
WARNING: High pressure cleaners shall not be used by children or
untrained personnel.
WARNING: To ensure machine safety, use only original spare parts
from the manufacturer of approved by the manufacturer.
WARNING: High pressure hoses, fittings and couplings are important
for the safety of the machine. Use only hoses, fittings and couplings
recommended by the manufacturer.
WARNING: The hand -arm vibrations data, referred to this device,
are not metioned as they are bellow 2.5 m/s
WARNING: This machine is built with a safety valve to protect
the steam cleaner in case of a primary control failure.
It is recommended to have an authorised service center verify
the integrity of this safety valve and replace it if needed every 2 years.
WARNING: Do not disassemble the accessories while the machine
is supplying steam.
CAUTION: This machine is for indoor use only.
CAUTION: This machine shall be stored indoor only.
CAUTION: RISK OF BURNS
• This appliance produces steam at a very high temperature.
• The steam cleaner and its accessories can get very
hot always use appropriate precautions.
• Avoid direct skin contact.
4
en

ELECTRICAL INSTRUCTIONS
To avoid a circuit overload, do not operate another high-wattage appliance on the same circuit simultaneously
with the steam cleaner. If an extension cord is necessary, a 15-amp rated cord with a 3-prong grounded plug should be used.
Cords rated for less may overheat and cause damage.
EXTENSION CORD
3-PRONG GROUNDED PLUG
This system features a 3-prong grounded plug. As a safety feature, this plug will fit into a grounded outlet only one way.
If the plug does not fit fully into the power outlet, contact a qualified electrician. Do not attempt to defeat this safety feature.
WARNING: Inadequate extension cords can be dangerous. If an extension cord is used, it shall be suitable for outdoor use,
and the connection has to be kept dry and o the ground. It is recommended that this is accomplished by means
of a cord reel which keeps the socket at least 60mm above the ground.
WATER INSTRUCTIONS
Your steam cleaner has been designed to use with normal tap water. In order to extend the life of this product,
if you are living where the level of water hardness is very high, we recommend using 50% normal water with 50% distilled water.
IMPORTANT: Never put anything else other than water in the boiler
IMPORTANT: Always respect the surface that you are cleaning, adhere to the surface cleaning instructions.
Do a colour test on a hidden section before you begin cleaning.

DESCRIPTION
1. WATER TANK CAP
2 A. MAIN POWER SWITCH
2. POWER BUTTON
3. BOILER ACTIVATION BUTTON
4. LOW WATER INDICATOR
5. STEAMREADY™ INDICATOR
6. ADI™ DISPLAY
7. STEAM HOSE CONNECTION OUTLET
8. BOILER DRAIN CAP
9. ELECTRICAL CORD
CONTROL PANNEL
6
en
ADI™ DISPLAY (6)
BOILER
ACTIVATION
BUTTON (3)
STEAMREADY™
INDICATOR (5)
LOW WATER
INDICATOR (4)
POWER
BUTTON (2)

ACCESSORIES
10. STEAM HOSE
11. STEAM RELEASE TRIGGER
12. STEAM PRESSURE
CONTROL MINIMUM
13. STEAM PRESSURE
CONTROL MEDIUM
14. ACCESSORY
LOCK / RELEASE
15. STEAM HOSE
CONNECTOR
16. HOSE LOCKING PIN
17. EXTENSION TUBES
18. EXTENSION TUBES
LOCKING PIN
19. RECTANGULAR TOOL
20. CLOTH HOLDING CLIPS
21. TRIANGULAR TOOL
22. WINDOW TOOL
23. LANCE
24. LARGE NYLON BRUSH
25. SMALL NYLON BRUSH
26. SMALL BRASS BRUSH
27. SMALL STAINLESS
STEEL BRUSH
28. STEAM SCRAPPER
29. PLUNGER TOOL
30. STEEL WOOL
31. REFILL BOTTLE
32. MICROFIBER CLOTH
33. MICROFIBER PAD
34. HOT WATER INJECTION
35. STEAMMOP™

HOW TO USE YOUR STEAM CLEANER
1. Remove the water tank cap (1) and fill the tank with up to a maximum of 0.8 gal / 3 L of regular tap water.
Securely replace the water tank cap. The refilling bottle (31) is 30oz / 900ml.
2. Unravel completely the electrical cord (9). Connect the electrical cord (31) to a 15 or 20 amp 110V/120V power outlet.
(make sure the circuit is not already used by another high wattage appliance).
3. Turn ON the main power switch (2A), press the power button (2), and then press the boiler activation button (3).
The SteamReady™ indicator (5) will light up when the steam cleaner is ready to use, aer approximately 7 minutes of heat up time.
This light is only ON when the unit is at maximum operating pressure. While in use, the light will turn OFF automatically, indicating
that the boiler is producing steam.
4. Connect the steam hose (10) by inserting the steam hose connector (15) in the steam hose connection outlet (7) and press firmly.
5. Select the desired steam pressure (on the hose handle) between minimum (12), medium (13) and maximum (12 and 13 together).
6. Connect the steam hose (10) to the accessory that you want to use.
7. To release steam, press the steam release trigger (11) on the hose handle.
8. When you are done using your steam cleaner, turn the unit OFF by pressing on the power button (2).
Turn OFF the main power switch (2A) and unplug the machine. Your steam cleaner is now ready for storage aer cool down.
WARNING
:Always turn OFF the main power switch (2A) when leaving the machine unattended.
9. It is safe to leave water in the boiler when the steam cleaner is not in use. If it is for an extended period of time (months),
then it is best to flush out the remaining water. To do so, follow the water removal instructions as outlined in the maintenance
of the boiler section.
8
en

REFILLING WITH WATER
Equipped with CST™ (Continuous Steam Technology), your steam cleaner can be refilled at anytime during operation. When the water level
inside the tank is low, the red low water indicator light (4) will turn ON and the low water alarm will sound. You can simply refill the water
tank using the refilling bottle (31) up to a maximum of 0.8 gal / 3L.
IMPORTANT: Never put anything else other than water in the boiler.
FEATURES
This model is equipped with the following features:
LOW WATER INDICATOR (4)
A red warning light signals that the water needs to be refilled. If you wish to continue steam cleaning, see the “Refilling with Water” instructions.
VARIABLE PRESSURE CONTROL (12, 13)
With the steam pressure regulator, it is possible to select the steam pressure that you wish to use during your cleaning
from minimum(12), medium (13) and maximum (12+13).
HOT WATER INJECTION (34)
To release a blast of hot water in the steam, press the hot water injection button (34) on the hose handle and hold the steam release
trigger (11) at the same time. Do not use the hot water injection for more than 5 seconds at a time.
STEAMREADY™ INDICATOR (4)
Lets you know when the steam cleaner is operating at optimal pressure and ready to use.

ADI™ DISPLAY (6)
TEMPERATURE AND PRESSURE DISPLAY
While the steam cleaner is ON (number 2A, 2 and 3), the temperature indicated on the display is in Farenheit.
To display the operating pressure in psi, press and hold the button (3). Aer 10 seconds,
the display will return to the operating internal temperature.
HOUR COUNTER
This device is equipped with two hour counter; C1 and C2. C1 is fixed and C2 is resettable by the user. To display them, turn o the unit
with the power button (2), then press the boiler activation button (3); every time you will press the button (3) the display will show
respectively the hour counter C1 and the hour counter C2.
RESETTING THE HOUR COUNTER C2
Turn the steam cleaner o by pressing the main power switch (2A) located in the rear side of the unit.
Press both buttons (2) and (3) and hold them; in the meantime turn the machine on by pressing the main power switch (2A).
MAINTENANCE REMINDER DESCALE BOILER
The steam cleaner is equipped with a maintenance reminder which indicates DESCALE BOILER on the display alternating with the
temperature. When the display indicates DESCALE BOILER, it is time to perform a boiler maintenance. Let the steam cleaner cool down
for at least 8 hours before proceeding. Please refer to the maintenance instructions on page 13 to complete the boiler maintenance.
USING THE ACCESSORIES
CONNECTING THE HOSE (10)
Insert the steam hose connector (15) into the steam hose connection outlet (7) all the way, making sure it cannot be pushed in further.
Ensure the hose locking pin (16) is in place.
WARNING: This hose contains electrical connections, do not immerse in water for cleaning.
10
en

EXTENSION TUBES (17)
Connect the steam hose (10) to the extension tubes (17), until the accessory lock (14) snaps in. All the accessories are connected the same way.
RECTANGULAR TOOL (19)
The rectangular tool (19) is used to clean walls, floors and carpets. Use it with the microfiber cloth (32) to glide smoothly over the surface
by attaching it to the cloth holding clips (20). Change the cloth when saturated with dirt. Use the rectangular tool directly when you need
additional scrubbing action, for example when cleaning ceramic or porous tiles.
STEAMMOP™ (35)
The SteamMop™ is also used to clean floors, walls and ceilings. Its rotating head allows for easier access under low furniture.
Use it with the microfiber pad (33).
MICROFIBER PAD (33)
The microfiber pad (33) is used to glide smoothly over floors and carpets. To use this accessory, you can attach it to the SteamMop™
or place the rectangular tool directly over it. Wrap the extremities of the cloth around the tool and under the cloth holding clips (20).
IMPORTANT: Always respect the surface that you are cleaning, adhere to the surface cleaning instructions and do a colour
test on a hidden section before you begin cleaning.
WINDOW TOOL (22)
The window tool (22) makes the cleaning and degreasing of windows easy. Attach the window tool to the extensions (17) or directly on
the steam hose (30). Use the foam side to steam and scrub and vacuum the window and flip the tool to wipe o dirt and condensation
using the squeegee side. Wipe corners with a cloth.

CAUTION: During cold weather, warm up the windows with the window tool from a 2”-4” distance and with very little steam flow before starting
the actual cleaning ( to prevent possible damage to the window ).
TRIANGULAR TOOL (21)
The triangular tool (21) is used where it is impossible or awkward to use the rectangular tool. It is the best tool to use for disinfection,
as steam gets insulated by a thick microfiber cloth (32). The cloth attached to the triangular tool will pick up dirt and disinfect any
surface. Change the cloth when saturated with dirt.
UPHOLSTERY, DRAPERY, BEDDING, ETC.
Cover the tool with a clean dry cloth attaching it under the triangular tool cloth holding clips. Use a rapid back and forth motion,
making sure that you do not over saturate the material with steam.
IMPORTANT: Always respect the surface that you are cleaning, adhere to the surface cleaning instructions and do a colour
test on a hidden section before you begin cleaning.
LANCE (23) WITH BRUSHES (24 TO 27)
(NYLON, BRASS, STAINLESS STEEL)
The lance (23) can be used with or without one of the detail brushes supplied with the steam cleaner. For items that are particularly
prone to scratches, it is best to use the lance without a brush. For all other areas, start with the nylon brush (25) (least abrasive)
and carefully work your way up to the brass (26), then the stainless steel brush (27). It is always best to be careful when using
the brushes to prevent damage or scratching of delicate surfaces.
The use of the lance alone is particularly good for cleaning and degreasing many working surfaces, ventilation hoods, oven doors,
ventilation grating, kitchen furniture, stainless steel or enamel sinks, hand-basins, bath-tubs, water taps (to remove scale and water
residue), doors, metal frames, car wheel rims, pet areas etc. The nylon brush, because of its soness, is ideal for removing the dirt from
grout, sinks and other surfaces where you need some light scrubbing action, but need to be careful not to scratch the surface.
Use the large nylon brush (24) with or without the steel wool (26) to clean larger surfaces.
Tougher cleaning jobs may require the use of the brass brush that is supplied. Please make sure you are careful that this tool does not
12
en

scratch the surface. Brass is tougher than nylon, but soer than stainless steel. For surfaces (grout for example) where the dirt
is not being properly lied with the nylon brush, carefully using the brass brush may give the best results.
For the toughest cleaning assignments (very caked on grease, rust, BBQ grills, very dirty grout), we recommend that you use
the stainless steel (27) brushes.
When using the lance with or without the brushes, you will need a cloth to wipe o the moisture and dirt that has been
lied through cleaning.
IMPORTANT: Always respect the surface that you are cleaning, adhere to the surface cleaning instructions and do a colour
test on a hidden section before you begin cleaning.
STEAM SCRAPPER (28)
The steam scrapper (28) is used for removing stickers, wallpapers and adhesives. Attach it to the lance (23).
PLUNGER TOOL (29)
The plunger tool (29) is used to unclog drains. Attach the plunger tool to the lance (23), place the tool firmly on the drain
and blow the steam inside the drain for a few seconds. Steam will melt away residue and remove odors.

MAINTENANCE
MAINTENANCE OF THE BOILER
To maintain your steam cleaner in good condition and to ensure constant performance, we recommend that you periodically clean
the boiler aer every 50 hours of use or less depending on the water hardness. The ADI™ will display DESCALE BOILER when the boiler
needs to be maintained.
CLEANING INSTRUCTIONS
WARNING: Before cleaning the boiler, please make sure that the boiler is at room temperature, that it has not been used
for at least 8 hours, and that the steam cleaner is disconnected from the power source.
1. Place the steam cleaner above a sink or a bucket. Unscrew and remove the boiler drain cap (8) (use the provided Allen key).
Empty all the remaining water in the boiler. Put the boiler drain cap back on.
2. Refill the water tank with equal parts of water and white vinegar (for a maximum of 23 oz or 700ml). Reconnect the steam cleaner
to a power outlet and turn the steam cleaner ON (press the buttons 2A and 2). Doing so will fill the boiler with the vinegar solution.
Do NOT press the boiler activation button (3).
3. Turn the steam cleaner OFF, (press the buttons 2A and 2), disconnect and let sit overnight.
4. Replace the steam cleaner above a sink or a bucket. Unscrew and remove the boiler drain cap (8).
Empty the vinegar solution into the sink or bucket.
5. Flush the system with clean water by refilling the water tank with 0.8 gal / 3L of water, reconnecting the steam cleaner
to a power outlet and turning the steam cleaner ON (press the buttons 2A and 2). Do NOT press the boiler activation button (3).
At this point the boiler drain cap (8) is still removed.
6. Let the water drain into the sink or bucket from under the machine until the water tank is empty.
14
en

7. Replace the boiler drain cap. Refill the water tank with 0.8 gal / 3L of clean water.
8. To reset the DESCALE BOILER display, turn on the appliance by activating the switch (2A) and the power button (2), then press again the
power button (2) and keep it pressed for approximately 10 seconds, the DESCALE BOILER indicator will disappear from the display and will
only appear at the next maintenance interval.
WARNING: It is not recommended that you use any other chemical to clean this product. Doing so will automatically void the warranty.
ATTACHMENT COUPLINGS
If the attachment connections dry up aer intensive use, put a small amount of petroleum jelly (Vaseline)
around the O-rings on the male attachment.

POWER 1600 W, 15 AMPS, 120V
BOILER STEAM TEMPERATURE 345°F / 175°C
STEAM PRESSURE 121 PSI / 8 BAR
BOILER VOLUME 0.4 GAL / 1.5 L
HEAT UP TIME APPROX. 7 MINUTES
OPERATING TIME UNLIMITED
WEIGHT 28 Lbs / 13 Kg
TECHNICAL SPECIFICATIONS
To verify the technical data of your model, always consult the plate under the machine.
REPLACEMENT PARTS
ORDER AT DUPRAY.COM
#120716PKG: Small nylon brushes (10)
#120717PKG: Small brass brushes (10)
#120709PKG: Small stainless steel brushes (10)
#63071000PKG: Microfiber cloths (10)
#7000055PKG: Microfiber pads (5)
#120718PKG: Large nylon brushes (5)
16
en

TROUBLESHOOTING
Do not operate the steam cleaner with a damaged cord, plug or if the steam cleaner has been dropped or damaged.
To avoid risk of electric shock, do not disassemble or attempt to repair the unit on your own. Return the unit to Dupray
for examination, repair or replacement. All service is to be performed by authorized professionals of Dupray service centers.
PROBLEM POSSIBLE CAUSE REMEDY
The machine does not produce steam. A. Lack of power. A. Make sure the plug (9) is inserted
correctly and that there is proper
power to the outlets. Turn the main
power switch ON (2A).
The red low water indicator (4) lights up. A. All the water from the water tank
has been consumed.
A. Refill the water tank (1) with 0.5 gal / 1.8L
of clean water.
Water leaks from the connections. A. Check the wear and tear of the o-rings. A. Clean and lubricate the o-rings with
petroleum jelly. If necessary, replace with
spares supplied.
Steam does not come out. A. Boiler has not reached the operational
pressure (SteamReady™(5) is o).
B. Boiler activation button (3) not activated.
C. Variable pressure control (12 and 13)
is not set.
A. Wait a few minutes.
B. Press the boiler button (3).
C. Select the desired pressure setting
on the hose handle.
Drops of water come out of the accessories. A. When you start steaming, water condenses
in the cold hose and accessories due to
the dierence in temperature.
A. Aer a few minutes of use this problem
will disappear. If it continues, proceed with
the boiler cleaning.

18
en
PROBLEM POSSIBLE CAUSE REMEDY
On the display appears the writing FAIL.
Switches and buttons are blocked
(do not react to the command).
A. The microprocessor of the system execut-
ed a non valid operation and interrupted
the scanning of the program.
A. Disconnect the plug from the electric
socket, wait a minute, then connect
it again.
Noise inside the boiler. A. The boiler getting cold, aer about 6-7
hours creates an internal depression
which, at each ignition, provoke some
vibrations.
A. Wait until the pressure stabilizes (about
2-3 minutes), the noise will disappear.
Steam pressure is dropping when in use. A. The steam pressure is set to maximum
for too long.
A. Use lower pressure setting. (14 AND 15)

LIMITED WARRANTY FOR
COMMERCIAL STEAM CLEANERS.
For a period of twelve (12) months following the purchase of the Product (the “Warranty period”), if the Client has used the Product under normal use and instrict conformity with
the instructions and/or manual of operations provided by Dupray and discovers any defects in material or workmanship and notifies Dupray in writing thereof during
the Warranty period, Dupray shall use reasonable commercial eorts to repair or replace that portion of the Product found by Dupray to be defective in material or workmanship
or refund the purchase price of the Product or replace the Product or a portion of same. If the product is not repairable, a refurbished equivalent product, or a replacement
equivalent product or a store gi certificate equivalent to the current value towards the purchase of a new product will be issued.
1. The Warranty period shall be of thirty-six (36) months on parts only, excluding accessories and consumables, hoses, shipping and handling costs.
2. THE WARRANTY IS VOID:
a) if the damages a result of an accident, abuse, freezing, impact, alteration,
non authorized usage, a major force, or use of other electricity than that
indicated on the Product;
b) if the product was used with other substances besides water in the water chamber;
c) if repairs, modifications, or alterations were done by a person not authorized by Dupray;
d) the owner or user neglected to do routine maintenance required and the damages
or problems are directly related to such neglect. It is the Client’s responsibility to keep
equipment in proper condition and to use exclusively Dupray cleaning products
so as to not damage the internal components;
4. Notwithstanding points 1 and 2, Dupray oers a lifetime warranty on boilers and a lifetime telephone support.
5. It is understood that certain parts of the equipment are not covered by the Dupray warranty due to the fact they require replacement aer multiple use.
Such parts include,but are not limited to, buttons, hoses, seals, etc. These parts will eventuallyrequire replacement at the Client’s cost.
6. Dupray makes no warranty or representation that the Product complies with any local laws, rules or regulations and Client shall be responsible for obtaining all permits
or authorizations required by any regulatory body for installation or use of the Product.
7. DUPRAY MAKES NO OTHER WARRANTIES OR CONDITIONS AND THE WARRANTY STATEMENT IS IN LIEU OF ALL OTHER WARRANTIES, REPRESENTATIONS, PROMISES,
OR CONDITIONS, EXPRESSED OR IMPLIED, INCLUDING, BUT NOT LIMITED TO, THE IMPLIED WARRANTIES OF MERCHANTABILITY AND FITNESS FOR A PARTICULAR PURPOSE.
DUPRAY EXPRESSLY DISCLAIMS ALL WARRANTIES AND CONDITIONS NOT STATED HEREIN. ANY IMPLIED WARRANTIES AND CONDITIONS THAT MAY BE IMPOSED BY LAW
ARE LIMITED IN DURATION TO THE WARRANTY PERIOD. DUPRAY’S LIABILITY FOR WARRANTY CLAIMS IS LIMITED TO REPAIR OR REPLACEMENT AS SET FORTH HEREIN.
8. The Client understands that it shall strictly comply with the operation instructions or manual provided by Dupray in relation to the Product.
FAILURE TO DO SO SHALL EXONERATE DUPRAY FROM ANY WARRANTY AND LIABILITY WHATSOEVER.
9. This warranty is to benefit the original purchaser of the product. The warranty is not transferable beyond the original purchaser.
Table of contents
Languages:
Other Dupray Steam Cleaner manuals