Dupray one plus User manual

Instruction manual
Manuel d’utilisation
Manual de instrucciones

ENGLISH .......................................................... 01
FRANÇAIS ........................................................ 21
ESPAÑOL ......................................................... 41
ORIGINAL INSTRUCTIONS
1-800-881-3990
(USA & CANADA)
01-800-877-0180
(MEXICO)
DUPRAY.COM

TABLE OF CONTENT
IMPORTANT SAFETY INSTRUCTIONS ..................................................................................................................................... 03
FEATURES .......................................................................................................................................................................... 05
SPECIFICATIONS.................................................................................................................................................................. 05
STEAM HOSE ...................................................................................................................................................................... 07
HOW TO USE YOUR STEAM CLEANER .................................................................................................................................... 08
REFILLING WITH WATER....................................................................................................................................................... 09
USING THE ACCESSORIES .................................................................................................................................................... 11
MAINTENANCE .................................................................................................................................................................... 17
LIMITED WARRANTY ............................................................................................................................................................ 18
TROUBLESHOOTING ........................................................................................................................................................... 19
FOR MORE INFORMATION .................................................................................................................................................... 61
2
en

IMPORTANT SAFETY INSTRUCTIONS
When using your steam cleaner, basic safety precautions should always be followed. Please read the following instructions carefully
as they provide important information concerning how to install, use and care for your steam cleaner.
• Use the steam cleaner only for its intended use.
• To protect against a risk of electric shock, do not immerse the
steam cleaner in water or any other liquids.
• The steam cleaner should always be turned o before
plugging it into or unplugging it from a wall outlet. Never pull
the power cord to disconnect it from the outlet; instead grasp
the plug and pull to disconnect.
• Do not let the power cord touch hot surfaces.
• Let the steam cleaner cool completely before putting it away.
• Wrap the power cord around the posts that are positioned
in the rear of the steam cleaner when not in use.
• Do not operate the steam cleaner with a damaged cord,
plug, safety device, hose, trigger gun or if the steam cleaner
has been dropped or damaged. This will void any and all
warranties. Please contact Dupray at 1-800-881-3990 (USA &
Canada) or 01-800-877-0180 (Mexico) for repair procedure.
• Keep away from children.
• Do not leave the steam cleaner on while unattended.
• Do not use this unit in the presence of explosive and/or
flammable fumes.
• Keep ventilation slots free of dust.
• Never drop or insert any object into the ventilation slots.
• To prevent overheating, unravel the electrical cord completely.
• Do not operate where aerosol (spray) products are being used
or where oxygen is being administered.
• To disconnect, turn the main dial to the OFF position, then
remove the plug from the main power.
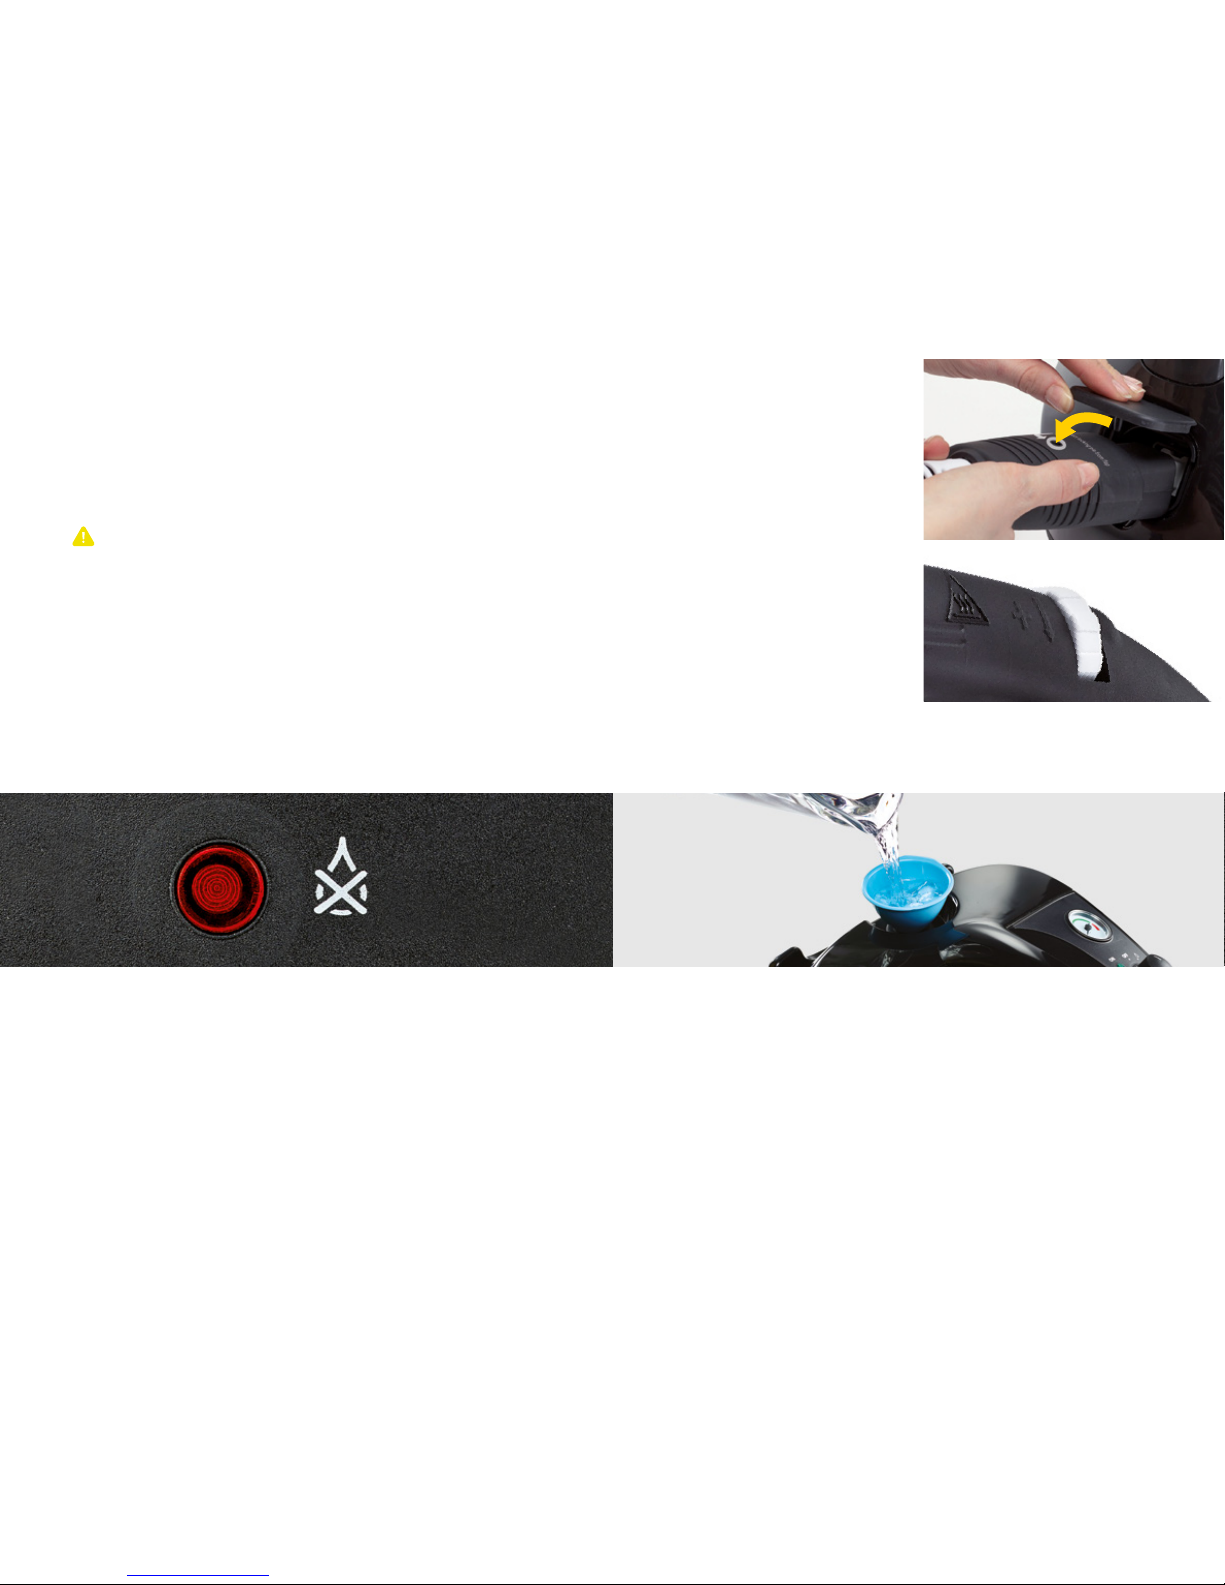
• Never put your steam cleaner away while it is still hot. There
is no need for emptying the water tank unless you intend to
leave it unused for a long period of time.
• This product is intended for household use only. Follow all
user instructions in this manual.
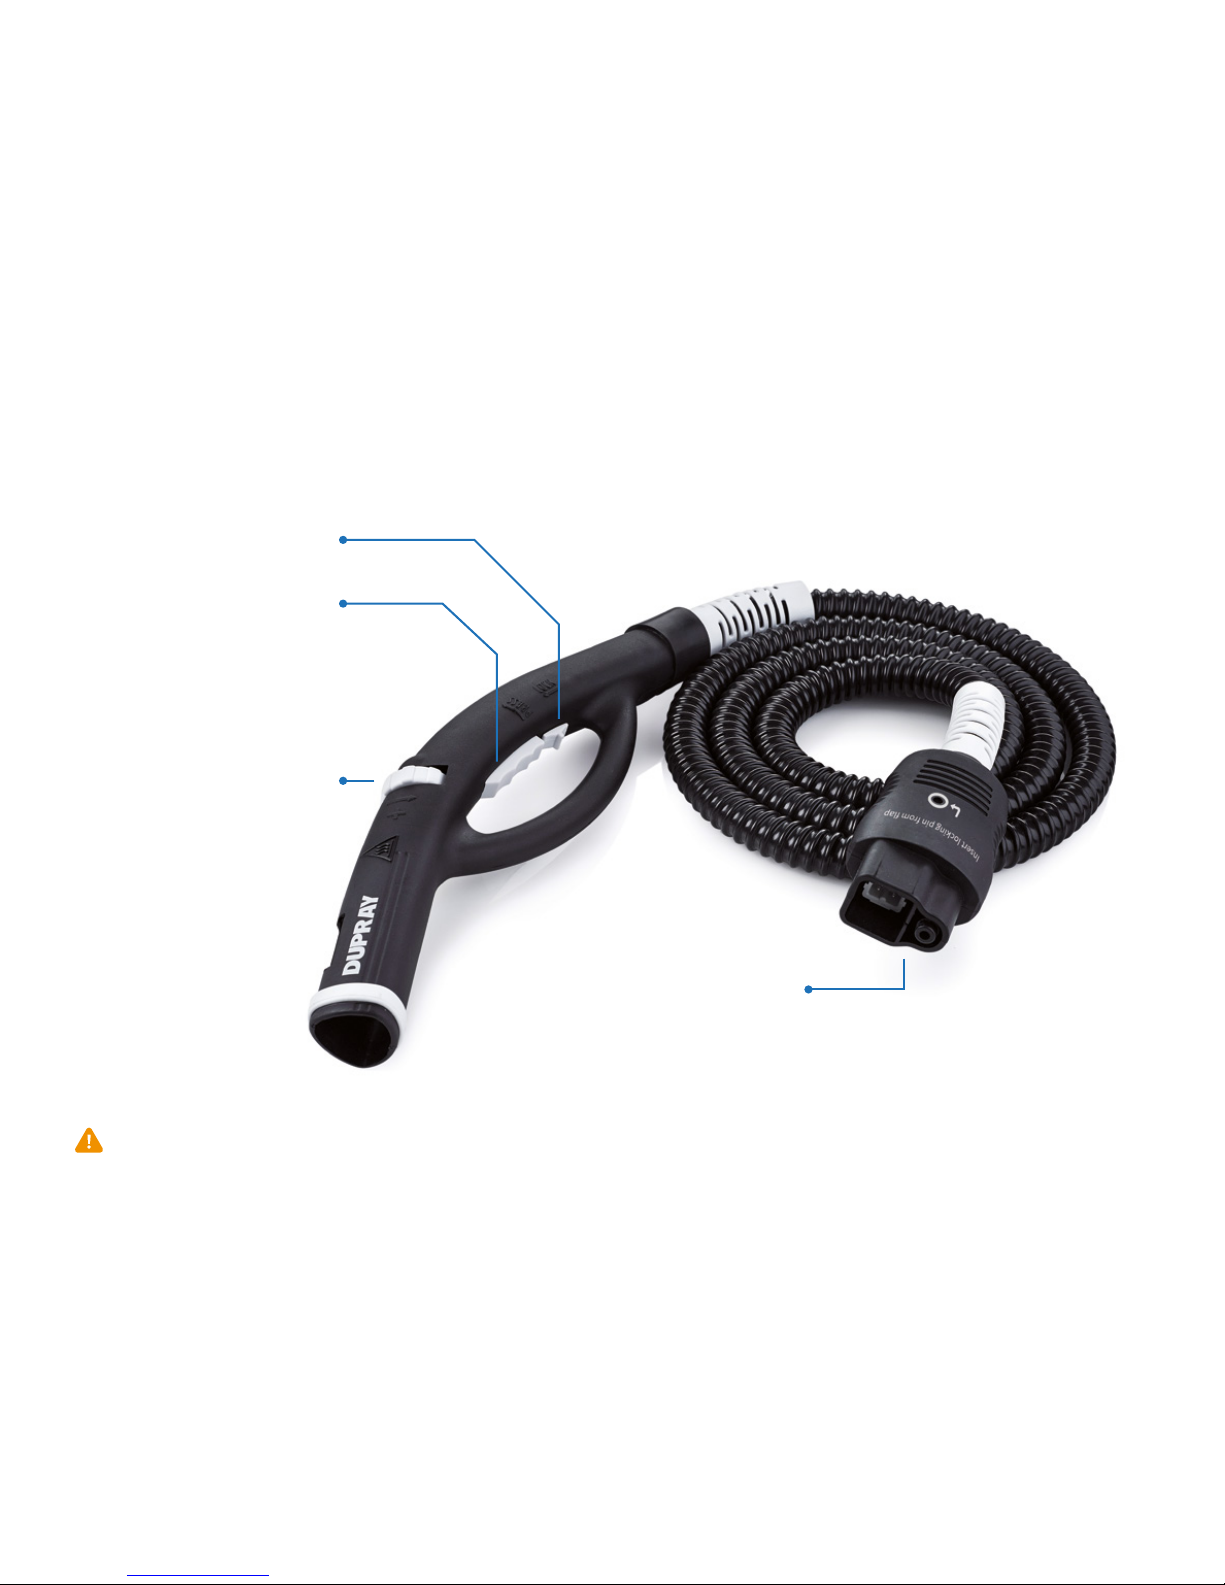
• Never pull the machine by the steam hose. Move the machine
instead.
• Handle might get hot during use.
• Do not freeze.
• Do not use steam on electrical components.
• When using the steam cleaner on an uneven surface ensure
the machine is blocked in place.
• Sound pressure levels do not exceed Lpa<70db (A).
WARNING: Do not use this machine in the presence of
flammable liquids, dust or dusts that are hazardous to health.
WARNING: Operators shall be adequately instructed
on the use of this steam cleaner.
CAUTION:This machine is for indoor use only.
CAUTION: RISK OF BURNS
This appliance produces steam at a very high temperature. The steam cleaner and its
accessories can get very hot always use appropriate precautions. Avoid direct skin contact.

ELECTRICAL INSTRUCTIONS
To avoid a circuit overload, do not operate another high-wattage appliance on the same circuit simultaneously with the steam cleaner.
If an extension cord is necessary, a 15-amp rated cord with a 3-prong grounded plug should be used.
Cords rated for less may overheat and cause damage.
3-PRONG GROUNDED PLUG
This system features a 3-prong grounded plug. As a safety feature, this plug will fit into a grounded outlet only one way.
If the plug does not fit fully into the power outlet, contact a qualified electrician. Do not attempt to defeat this safety feature.
WATER INSTRUCTIONS
Your steam cleaner has been designed for use with normal tap water. In order to extend the life of this product, if the water is very hard
where you live, we recommend using 50% normal tap water combined with 50% distilled water.
Check the water hardness in your area with the litmus paper supplied (the litmus paper supplied will only work once).
• Immerse the litmus paper in a glass of water for one second.
• Wait for the paper to dry and refer to the scale below.
So water
Medium hard water
Hard water
Very hard water
• For so and medium hard water, it is okay to use regular untreated tap water.
• For hard water and very hard water, it is recommended that you use a combination of tap
and distilled water.
IMPORTANT: Never put anything else other than water in the boiler.
4
en

FEATURES
SPECIFICATIONS
ELECTRICAL CORD 1
WATER TANK CAP 2
STEAM HOSE CONNECTION OUTLET 3
STEAM
TEMPERATURE
STEAM
PRESSURE HEATING TIME WATTAGE VOLTAGE AMPERAGE WATER TANK
CAPACITY
BOILER
CAPACITY WEIGHT
160O C
320O F
4.5 BAR
65 PSI 8 MINUTES 1200 -
1400 W
110 -
120 V 12 A 2.44 L
0.64 GAL
1.5 L
0.4 GAL
6.87 KG
15.15 LBS

4PRESSURE GAUGE
5POWER INDICATOR
OFF
PRESSURE RELEASE
This position will shut o the power to the heating elements.
Select this position to exhaust all the steam from the boiler.
BOILER ACTIVATION
Turn the main dial to this position to activate the heating of the water
inside the boiler and start the production of steam.
6MAIN DIAL
7STEAMREADYTM INDICATOR
Let you know when the steam cleaner is operating at optimal pressure
and ready to use.
8LOW WATER INDICATOR
This red warning light signals that the water needs to be refilled.
If you wish to continue steam cleaning, see the “Refilling with water”
instructions on page 09.
6
en

STEAM HOSE
CHILDPROOF SAFETY LOCK
STEAM RELEASE TRIGGER
VARIABLE PRESSURE CONTROL
Select the steam pressure
from minimum (-) to maximum (+).
STEAM HOSE
CONNECTOR
WARNING: This hose contains electrical connections, do not immerse in water for cleaning.

HOW TO USE YOUR STEAM CLEANER
FILLING WITH WATER
Remove the water tank cap (2) and fill with up 2.44 L (or 0.64 gal) of water.
Use the provided funnel if needed.
PLUGGING IN THE MACHINE
Unravel completely the electrical cord. Connect the electrical cord
to a 15 or 20 amp 110V / 120V power outlet (make sure the circuit
is not already used by another high wattage appliance).
TURNING THE MACHINE ON
Turn the main dial to the position. At this position the orange SteamReady™
indicator will come on when the unit reaches operating pressure, aer
approximately 8 minutes of heating time.
During use, the orange SteamReady™ indicator will turn on and o.
This is normal, and indicates that steam is being generated in the boiler.
NOTE: The position is used only to exhaust steam. The orange SteamReady™ indicator will not
come on and the steam cleaner will not produce steam when the dial is in the position.
8
en

CONNECTING THE STEAM HOSE
Connect the steam hose by inserting the steam hose connector in the steam hose connection outlet and
press firmly. Make sure it cannot be pushed in any further and that the locking pin on the flap is in place.
ADJUSTING THE STEAM PRESSURE
Adjust the desired steam pressure using the steam pressure regulator wheel located on the hose handle,
from minimum (-) to maximum (+). Connect the accessory that you want to use to the steam hose.
To release steam, simply press the steam release trigger on the hose handle.
REFILLING WITH WATER
If the low water indicator comes on during usage and you would like to continue using the steam cleaner, you will need to follow these steps:
Refill the water tank with up to 2.44L (or 0.64 gal) of water and keep
steaming. Equipped with CST™, your steam cleaner can be refilled with
water at any time during operation.
When the water level inside the tank is low, the machine will hum every
few seconds, then the red low water indicator will turn on and the low
water alarm will sound.
IMPORTANT: Make sure the locking pin on the flap is inserted in the hose connection.

TURNING THE MACHINE OFF
When you are done using your steam cleaner, turn the main dial to the OFF position
and unplug the unit.
STORING YOUR STEAM CLEANER
It is safe to leave water in the boiler when the steam cleaner is not in use.
If it is for an extended period of time (months), then it is best to flush out the remaining water.
To do so, follow the water removal instructions as outlined in the maintenance of the boiler
section on page 17.
CAUTION : This machine shall be stored indoors only.
TRAINING VIDEOS
AT DUPRAY.COM
10
en

USING THE ACCESSORIES
CONNECTOR
The connector is used to attach the triangular tool
or the rectangular tool to the extension tubes
or the steam hose.
POSITION 1 - ASSEMBLY
Installing the connector
• Slide the white lever to the first position (Assembly).
• Insert the connector sideways, aligning the two white arrows.
• Rotate the connector to align the arrow with the white dot on the tool.
Removing the connector
• Align the white dot with the arrow on the connector.
• Slide the white lever to the first position (Assembly).
• Rotate the connector to align the two white arrows.
• Pull out the connector.

POSITION 2 - LOCKED
Slide the white lever to the second position (Locked) to prevent the tool
from rotating.
Make sure the arrow on the connector and the dot on the tool
are aligned before sliding the white lever.
POSITION 3 - ROTATION
Slide the white lever to the third position (Rotation)
to allow the tool to rotate.
Make sure the arrow on the connector and the dot on the tool
are aligned before sliding the white lever.
12
en

TRIANGULAR TOOL
The triangular tool is the best tool to disinfect. Use it with the microfiber cloth or the microfiber bonnet to
insulate steam and provide a higher steam temperature to disinfect. The microfiber cloth or microfiber bonnet
will also pick up dirt as you clean.Use the connector to attach the triangular tool to the steam hose or extension tubes.
The bristles are made of a so nylon to be delicate and safe on most surfaces. With steam these bristles quickly lose
their original shape. This is perfectly normal. You can continue to use the brushes until the bristles are worn out.
RECTANGULAR TOOL
The rectangular tool is used to clean floors, walls, and carpets. Use it with the
microfiber cloth or the rectangular tool microfiber bonnet to insulate steam and provide
a higher steam temperature to disinfect. The microfiber cloth or microfiber bonnet will also
pick up dirt as you clean. Use the connector to attach the rectangular tool to the extension tubes
or the steam hose. The bristles are made of a so nylon to be delicate and safe on most surfaces.
With steam these bristles quickly lose their original shape. This is perfectly normal. You can continue
to use the brushes until the bristles are worn out.
MICROFIBER CLOTH
The microfiber cloth is used to pick up dirt as you clean. It will also help insulate
the steam to reach a higher steam temperature.
Use it on the triangular tool, the rectangular tool or to wipe o dirt aer
you steam with the lance. Machine washable.
ORDER MORE ON DUPRAY.COM
IMPORTANT: Always respect the surface that you are cleaning, adhere to the surface cleaning instructions.
Do a colour test on a hidden section before you begin cleaning.

FIRST, place the triangular tool on the center
of the microfiber cloth.
THEN, wrap the edges of the cloth around the
tool and secure it under the clips.
WELL DONE.
HOW TO INSTALL THE MICROFIBER CLOTH ON THE TRIANGULAR TOOL
HOW TO INSTALL THE MICROFIBER CLOTH ON THE RECTANGULAR TOOL
WELL DONE.
FIRST, fold the edges of the
microfiber cloth.
THEN, place the rectangular tool on the center of the
microfiber cloth. Secure the microfiber cloth under the clips.
14
en

TRIANGULAR TOOL MICROFIBER BONNET
The microfiber bonnet is used with the triangular tool to pick up dirt as you clean.
It will also insulate steam and provide a higher steam temperature to disinfect.
RECTANGULAR TOOL MICROFIBER FLOOR BONNET
The microfiber bonnet is used with the rectangular tool to pick up dirt
as you clean. It will also insulate steam and provide a higher steam
temperature to disinfect.
WINDOW TOOL
The window tool makes cleaning windows easy. Use the foam side to scrub the window
and flip the tool to wipe the dirt and condensation o using the squeegee. Wipe corners
with a cloth.
CAUTION: During cold weather, warm up the windows with the window tool from a 2”-4” distance and with
very little steam flow before starting the actual cleaning (to prevent possible damage to the window).
PLUNGER TOOL
The plunger tool is used to unclog drains. Attach the plunger tool to the lance, place the tool firmly on
the drain and blow steam inside the drain for a few seconds. Steam will melt away grease and remove odors.

EXTENSION TUBES
Connect the steam hose to the extension tubes,
pressing the locking button lightly until the button snaps in.
You may connect any accessory to one or two extension tubes
to extend your reach.
LANCE
Use the lance alone to clean surfaces that are diicult to reach and prone to scratches,
for example stainless steel or enamel. Use it with the nylon brush (least abrasive )
or the brass brush for additional scrubbing action. Always be careful when using
the brushes to prevent damage or scratching.
SMALL BRUSHES
SMALL NYLON BRUSH
The small nylon brush, because of its soness,
is ideal for cleaning grout, sink, or any surface
requiring light scrubbing action. The bristles are
made of a so nylon to be delicate and safe on
most surfaces. With steam these bristles quickly lose
their original shape. This is perfectly normal. You can
continue to use the brushes until the bristles are worn out.
IMPORTANT: Always respect the surface that you are cleaning, adhere to the surface cleaning instructions
Do a colour test on a hidden section before you begin cleaning.
SMALL BRASS BRUSH
Tougher cleaning jobs might require the
use of the small brass brush. For surfaces
where dirt cannot be removed by the nylon
brush carefully, using the brass brush may
give better results.
ORDER MORE ON DUPRAY.COM
16
en

MAINTENANCE
CLEANING THE BOILER
To maintain your steam cleaner in good condition and to ensure constant performance, we recommend that you periodically
clean the boiler aer every 50 hours of use or less depending on water hardness.
1. Before cleaning the boiler, make sure that the boiler is at room temperature, that it has not been used
for at least 8 hours, and that the steam cleaner is disconnected from the power source.
2. Turn the steam cleaner over and remove the boiler drain cap using the provided wrench, and empty all the remaining water from the
boiler.
3. Using the provided funnel, refill the boiler with equal parts of water and white vinegar (for a maximum of 700ml or 23 oz)
and close the boiler cap. Let sit overnight.
4. Drain the boiler, and rinse thoroughly with clean water.
5. Refer to page 08 for instructions on how to refill and turn on the machine.
ATTENTION: It is not recommended that you use any other chemical to clean this product.
Doing so will automatically void the warranty.
O’RINGS
If the attachment connections dry up aer intensive use, put a small amount of
lubricant (Vaseline) around the O-rings on the male attachment.

LIMITED WARRANTY
We guarantee Dupray products are free from manufacturer defects,
under normal use for a reasonable period of time as follows*:
*No warranty on accessories, hoses, or consumables. Warranty only covers original purchaser.
The warranty does not cover abuse or transport to our repair center.
Please refer to the following section for details.
• For a period of thirty-six (36) months following the purchase of the Product (the “Warranty period”), if the client has used the product under normal use and in strict
conformity with the instructions and/or manual of operations provided by Dupray and discovers any defects in material or workmanship and notifies Dupray in writing
there of during the Warranty period, Dupray shall use reasonable commercial eorts to repair or replace that portion of the product found by Dupray to be defective
in material or workmanship or refund the purchase price of the Product or replace the product or a portion of same.
• The Warranty excludes; accessories, consumables, shipping and handling costs.
•
• It is understood that certain parts of the equipment are not covered by the Dupray warranty due to the fact they require replacement aer multiple use.
Such parts include, but are not limited to, buttons, hoses, seals, etc. These parts will eventually require replacement at the client’s cost.
• Dupray makes no warranty or representation that the product complies with any local laws, rules or regulations and client shall be responsible
for obtaining all permits or authorizations required by any regulatory body for installation or use of the product.
• Dupray makes no other warranties or conditions and the warranty statement is in lieu of all other warranties, representations, promises, or conditions, express
or implied, including, but not limited to, the implied warranties of merchantability and fitness for a particular purpose. Dupray expressly disclaims all warranties
and conditions not stated here of. Any implied warranties and conditions that may be imposed by law are limited in duration to the warranty period. Dupray’s liability
for warranty claims is limited to repair or replacement as set forth here of.
• The Client represents that it shall strictly comply with the operation instructions or manual provided by Dupray in relation with the product.
Failure to do so shall exonerate dupray from any warranty and liability what so ever.
• This warranty is to benefit the original purchaser of the product. The warranty is not transferable beyond the original purchaser.
LIFETIME WARRANTY ON THE BOILER*
3-YEAR LIMITED WARRANTY*
A. The damages are as result of an accident, abuse, freeze, impact,
alteration, non authorized usage, a major force, or use of other electricity
than that indicated on the product;
B. The product was used with other substances besides water in the water chamber;
C. Repairs, modifications, or alterations were done by a person not authorized by Dupray;
D. The owner or user neglected to do routine maintenance required
and the damages or problems are directly related to such neglect.
It is the Client’s responsibility to keep equipment in proper condition
and to use exclusively Dupray cleaning products
as to not damage the internal components.
The Warranty is void if:
18
en

PROBLEM POSSIBLE CAUSE REMEDY
No steam is released through the hose and
accessories. A. Steam cleaner is not turned on.
B. Water reservoir is empty
C. Unit is not plugged in.
D. Boiler is not fully heated.
E. The hose is not properly connected.
A. Follow the instructions on page 08.
B. Add
2.44L (0.64gal)
of water to the reservoir
C. Plug unit into outlet.
D. Wait for the SteamReady™ indicator (7)
to turn on.
E. Make sure you push the hose all the way in
the connection outlet (3) and insert
the locking pin in place.
Drops of water leak from the attachments. A. Unit is not fully heated.
B. Condensation was created from non-use.
C. O-rings need to be replaced.
A. Wait for the SteamReady™ indicator (7)
to turn on.
B. Let water run through system until steam
comes out.
C. Replace O-rings.
Dirty water is coming out. A. Scale may have built up. A. Follow maintenance instructions
on page 17.
Not enough steam pressure. A. The dial on the handle may be set
too low.
B. Scale may have built up.
A. Turn the steam pressure regulator wheel until
the desired pressure is reached.
B. Follow maintenance instructions
on page 17.
Pump is not stopping (humming noise). A. An air bubble may be in the pump.
B. Water tank is empty.
A. Press the steam release trigger on the
steam handle. Hold for a few seconds untill
the pump is primed.
B. Put required amount of water into tank.
TROUBLESHOOTING
Do not operate the steam cleaner with a damaged cord, plug or if the steam cleaner has been dropped or damaged. To avoid risk of electric
shock, do not disassemble or attempt to repair the unit on your own. Return the unit to Dupray for examination, repair or replacement.
All service is to be performed by authorized professionals of Dupray service centers.
Other manuals for one plus
1
Table of contents
Languages:
Other Dupray Steam Cleaner manuals