manuals.online logo
Brands
  1. Home
  2. •
  3. Brands
  4. •
  5. DUSCHY
  6. •
  7. Bathroom Fixture
  8. •
  9. DUSCHY LINE 30908 User manual

DUSCHY LINE 30908 User manual

12
Page 1of 2
1
n=1 n=2
LINE: DUO + WALL
LINE: DOOR + WALL
LINE
WALL DOOR / DUO
(UK) Installation manual for shower walls LINE
(SE) Installationsmanual för duschväggarna LINE
×1
󱂕
󱂖
󱂗 󱂘 󱂙
×4 ×4 ×4
×1
×1×1
5 mm
×1 ×1 ×1
󱂚
2 mm
󱂛󱂜
󱂞
󱂟
󱂠
×1
×1
󱂓
󱂔
×4
×4
󱂡
×1
󱂝
×1
󱂢
󱂗 󱂘 󱂙
×4 ×4 ×4
×1×1
×1
󱂚
󱂥
󱂠
×1×1
5 mm 2 mm
󱂣󱂤
󱂓
󱂢
×4
×4
󱂡
WALL
DOOR / DUO
(UK) You also need (not included)...
(SE) Du behöver även (ingår ej)...
X
DOOR WALL
DOOR
#
WALL
##30908
1350-1400 Door 480 Wall 870 526n-40 522n-90
1440-1490 Door 670 Wall 770 523n-70 522n-80
1440-1490 Door 770 Wall 670 523n-80 522n-70
1540-1590 Door 670 Wall 870 523n-70 522n-90
1540-1590 Door 770 Wall 770 523n-80 522n-80
1540-1590 Door 870 Wall 670 523n-90 522n-70
1570-1620 Door 770 Wall 770 523n-80 522n-80 1×30mm
1600-1650 Door 770 Wall 770 523n-80 522n-80 2×30mm
1640-1690 Door 670 Wall 970 523n-70 522n-100
1640-1690 Door 870 Wall 770 523n-90 522n-80
1640-1690 Door 770 Wall 870 523n-80 522n-90
1640-1690 Door 970 Wall 670 523n-100 522n-70
1670-1720 Door 670 Wall 970 523n-70 522n-100 1×30mm
1700-1750 Door 670 Wall 970 523n-70 522n-100 2×30mm
1740-1790 Door 970 Wall 770 523n-100 522n-80
1740-1790 Door 770 Wall 970 523n-80 522n-100
1740-1790 Door 870 Wall 870 523n-90 522n-90
1770-1820 Door 770 Wall 970 523n-80 522n-100 1×30mm
1800-1850 Door 770 Wall 970 523n-80 522n-100 2×30mm
1840-1890 Door 870 Wall 970 523n-90 522n-100
1840-1890 Door 970 Wall 870 523n-100 522n-90
1870-1920 Door 870 Wall 970 523n-90 522n-100 1×30mm
1900-1950 Door 870 Wall 970 523n-90 522n-100 2×30mm
1940-1990 Door 970 Wall 970 523n-100 522n-100
1970-2020 Door 970 Wall 970 523n-100 522n-100 1×30mm
2000-2050 Door 970 Wall 970 523n-100 522n-100 2×30mm
X
DUO WALL
DUO
#
WALL
##30908
1150-1200 Duo 480 Wall 670 526n-40 522n-70
1180-1230 Duo 480 Wall 670 526n-40 522n-70 1×30mm
1210-1260 Duo 480 Wall 670 526n-40 522n-70 2×30mm
1250-1300 Duo 480 Wall 770 526n-40 522n-80
1280-1330 Duo 480 Wall 770 526n-40 522n-80 1×30mm
1310-1360 Duo 480 Wall 770 526n-40 522n-80 2×30mm
1380-1430 Duo 480 Wall 870 526n-40 522n-90 1×30mm
1410-1450 Duo 480 Wall 870 526n-40 522n-90 2×30mm
1450-1500 Duo 480 Wall 970 526n-40 522n-100
1480-1530 Duo 480 Wall 970 526n-40 522n-100 1×30mm
1510-1560 Duo 480 Wall 970 526n-40 522n-100 2×30mm
1 × #30908 = 30mm
2 × #30908 = 60mm
www.duschy.com
(EE) Paigaldusjuhend klaasseintele LINE
(LV) Uzstādīšanas pamācība dušas sienām LINE
(PL) Instrukcja montażu ściany prysznicowej LINE
(EE) Teil on vaja ka (ei ole kaasas)...
(LV) Arī nepieciešams (komplektā nav)...
(PL) Potrzebne narzędzia...
3
5
7
8
6
4
Page 2of 2
󱂓󱂓
X
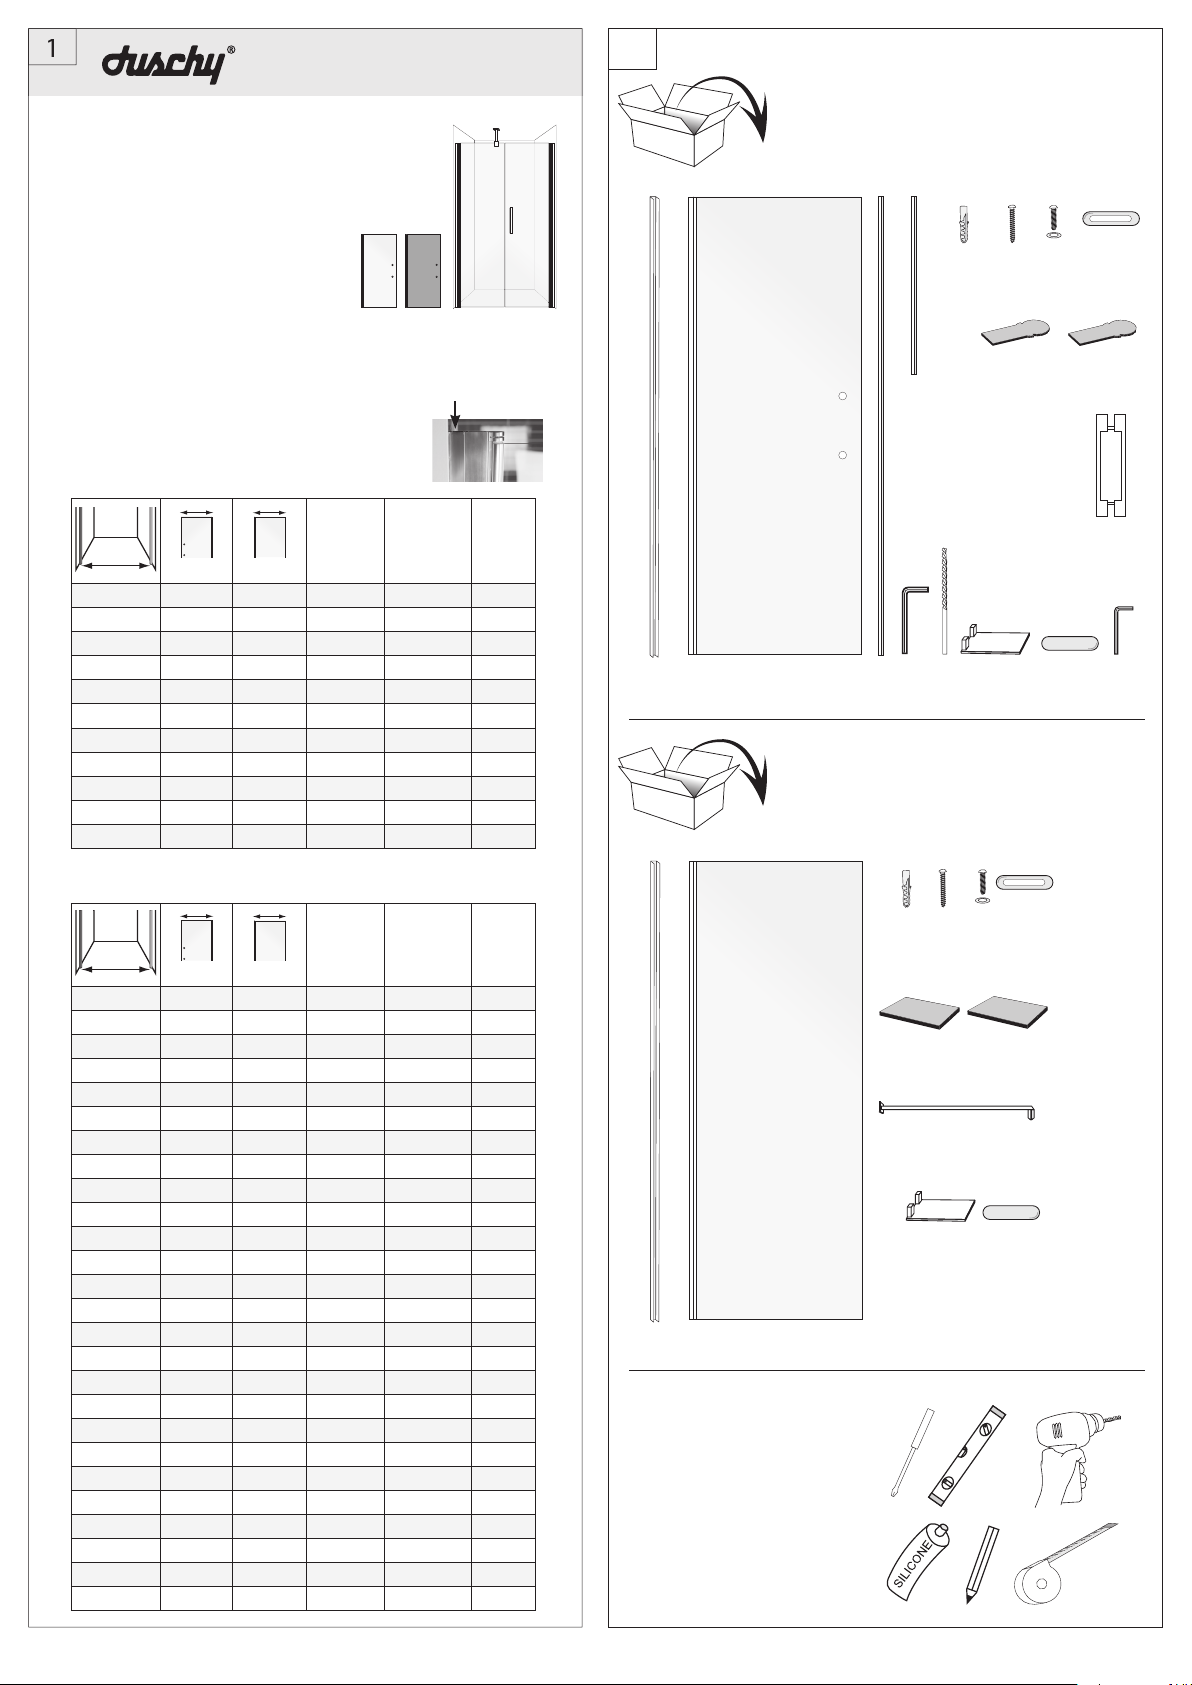
(UK) The value of X is found on the cover page of this installa-
tion manual. Note that the shower walls are reversible – they
can be mounted either to the left or to the right.
(SE) Måttet för X hittar du på framsidan av denna installations-
manual. Notera att duschväggarna är vändbara, de kan både
höger- och vänsterhängas.
DOOR / DUO
󱂖
≈100mm
≈100mm
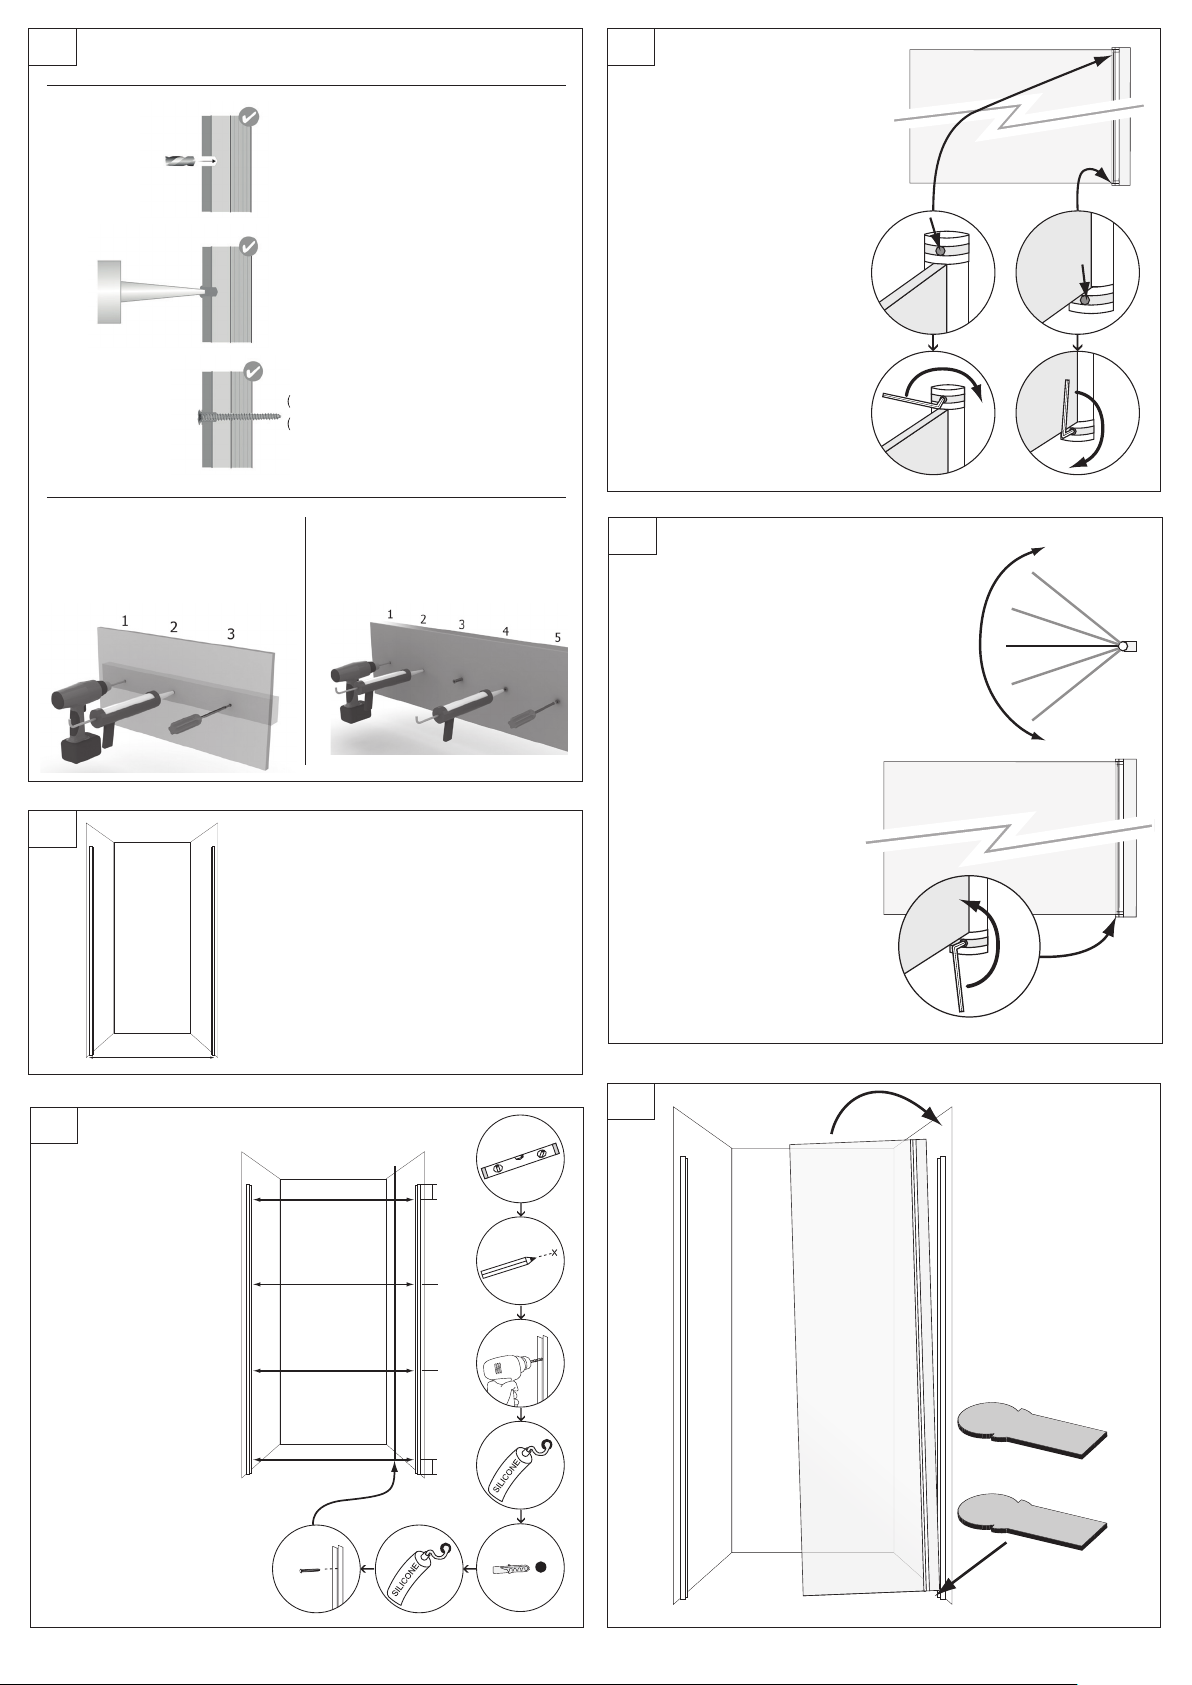
(UK) Fixing points must be in solid
construction, such as concrete,
beams, special construction detail
or wet area wall. See image [3].
(SE) Skruvinfästningarna ska göras i
massiv konstruktion såsom betong,
reglar, särskild konstruktionsdetalj
eller i Våtrumsvägg 2012. Se
bild [3].
(UK) Turn the door to the desired angle in relation
to the aluminium wall profile. Then lock the bottom
door hinge by screwing the screw counterclockwise
with the hex key. This can also be done later when
the door is fixed to the wall. Note: The top hinge
should be kept unlocked.
(SE) Vrid dörren till önskad vinkel i relation till
aluminiumväggprofilen. Lås vinkeln genom att
skruva skruven moturs i det nedre gångjärnet med
insexnyckeln. Denna justering kan även göras
senare när dörren sitter fastsatt. Obs: Det övre
gångjärnet ska ej låsas.
5 mm
2 mm
󱂛
󱂜
󱂔
(UK) If floor is slanting.
(SE) Om golvet lutar.
(UK) To adjust the raising/lowering
mechanism of the door: Unlock the
hinges both at the top and bottom by
screwing the screws clockwise with
a hex key.
(SE) För att ställa in dörrens höj-
och sänkmekanism: Lås först upp
gångjärnen både upptill och nedtill
genom att skruva skruven medurs med
en insexnyckel.
(UK) Wet area wall
(SE) Våtrumsvägg 2012
(UK) 1. Only drill through surface and waterproofing
(SE) 1. Borra bara genom yt- och tätskiktet
(UK) 2. Fill the drillhole with sealant
(SE) 2. Fyll hela borrhålet med tätmassa
(UK) 3. Tighten the screw until it attaches to the plywood
(SE) 3. Skruva så att skruven fäster i plywooden
(UK) How to drill/screw
(SE) Hur du bör borra/skruva.
© Säker Vatten AB
(UK) Wall with beams
(SE) Vägg med reglar
© Säker Vatten AB
(UK) Concrete wall
(SE) Betongvägg
(UK) 3. Tighten the screw until it attaches to the plywood
(SE) 3. Skruva så att skruven fäster i plywooden
© Säker Vatten AB
󱂞 󱂞
󱂔
󱂞
󱂔
󱂔
(EE) X-möödu leiate juhendi esilehelt (pilt 1). Klaassein on
pööratav – võimalik paigaldada vasakusse vöi paremasse seina.
(PL) Wymiar X należy odnaleźć w tabeli na pierwszej stronie
instrukcji. Elementy zestawu są odwracalne; drzwi mogą się
otwierać na prawą lub lewą stronę w zależności od strony, na
której są zamontowane.
(EE) Et kohandada ukse tösteme-
hhanismi, avada hinged ülevalt ja
alt, keerates kruvi kuuskantvötmega
joonisel näidatud suunas.
(LV) Atbloķēt eņģes augšā un apakšā,
ieskrūvējot ar sešstūru atslēgu skrūves.
(PL) Podczas montażu należy
odblokować system unoszenia
drzwi. Wykręcając śrubę kluczem
sześciokątnym uzbraja się zawias.
(EE) Kruvide kinnitused peavad
olema tehtud tugevasse konstruk-
tsiooni, nagu betoon vöi talad.
Vöi erikonstruktsiooniga detaili
niisketes ruumides. Vaata pilti 3.
(PL) Profil ścienny należy
zamocować według wskazówek
zawartych na stronie 3 niniejszej
instrukcji.
(EE) Keera uks soovitud nurga alla. Lukusta alt
keerates kuuskantvötmega. Seda vöib teha ka
hiljem kui uks on juba kinnitatud seina. NB!
Ülemine hing peab olema lukustamata.
(LV) Pagriezt durvis nepieciešamā leņķī pret
alumīnija sienas profilu. Nobloķēt to apakšā ar
sešstūru atslēgu. To var izdarīt arī pēc durvju
nostiprināšanas uz sienas.
(PL) Po ustawieniu drzwi pod kątem prostym
w stosunku do ściany należy zablokować
kluczem nr.12 mechanizm zawiasu, czynność
tę można wykonać również po zmontowaniu
całego zestawu.
(EE) Kui põrand on kaldu.
(LV) Ja grīda ir slīpa.
(PL) Podkładki dystansowe do
korygowania wysokości ścianki
(EE) Kuidas puurida/kruvida
(PL) Sposób mocowania
(EE) 1. Puurida ainult läbi seina ja isolatsiooni
(PL) 1. Wywiercić otwór w płytce ceramicznej
(EE) Niiske ruumi sein
(PL) Ściana z płyty OSB
(EE) 2.Täida puuritud koht hermeetikuga
(PL) 2. Wypełnić otwór masa uszczelniającą
(EE) 3. Keera kruvi kuni see kinnitub vineeri
(PL) 3. Profil należy przykręcić wkrętem do drewna
(EE) Taladega sein
(PL) Ściana z k/g
(EE) Betoonsein
(PL) Ściana z betonu lub cegły
9
10
11
12
13
Page 3of 4
󱂙 󱂚
󱂟
A
A
(UK) If floor is slanting.
(SE) Om golvet lutar.
(UK) Inside of the wall profile.
(SE) Insidan av väggprofilen.
(UK) Inside of the wall profile.
(SE) Insidan av väggprofilen.
(UK) Inside of the wall profile.
(SE) Insidan av väggprofilen.
󱂕
󱂖
󱂢
5 mm
2 mm
󱂣
󱂤
󱂙󱂚
󱂟
A
A
14
A
A
Adjustments
󱂡
WALL
󱂝
(EE) Seinte siseküljed.
(PL) Śruby regulacyjne muszą
znajdować się po wewnętrznej stronie.
(EE) Seinte siseküljed.
(PL) Śruby regulacyjne muszą
znajdować się po wewnętrznej stronie.
(EE) Seinte siseküljed.
(PL) Śruby regulacyjne muszą
znajdować się po wewnętrznej
stronie.
(EE) Kui põrand on kaldu.
(PL) Podkładki dystansowe do
korygowania ustawienia drzwi.
16
17
18
19
15
Page 4of 4
B
B
󱂙 󱂚
󱂡
󱂟
24 hr
≈100 mm
≈63-88 mm
24 hr
󱂥
󱂥
(UK) Inside of the wall profile.
(SE) Insidan av väggprofilen.
(UK) Inside of the wall profile.
(SE) Insidan av väggprofilen.
(UK) Outside of wall.
(SE) Utsidan av väggen.
a) b)
(UK) If needed, cut the supporting stay with a metal saw. Note: Only cut the end pointing towards the
wall/ceiling.
(SE) Vid behov, kapa staget till önskad längd med en metallsåg. Obs! Kapa enbart i den ände som är
mot väggen/taket.
󱂟
(EE) Seinte siseküljed.
(PL) Śruby regulacyjne muszą znajdować się po wewnętrznej stronie.
(EE) Seinte siseküljed.
(PL) Wewnętrzna strona kabiny.
(EE) Seinte välisküljed.
(PL) Zewnętrzna strona
kabiny.
(EE) Vajadusel sae stabiliseeriv sillus rauasaega soovitud pikkusesse. NB: Sae vaid sellest otsast, mis
läheb vastu seina.
(PL) Jeśli jest to konieczne można dopasować długość uchwytu ściennego skracając jego długość piłką
do metalu. Uwaga; należy odciąć część od strony ściany.

Other DUSCHY Bathroom Fixture manuals

DUSCHY 5304 User manual

DUSCHY

DUSCHY 5304 User manual

DUSCHY Corner User manual

DUSCHY

DUSCHY Corner User manual

DUSCHY WALL 522n-70 User manual

DUSCHY

DUSCHY WALL 522n-70 User manual

DUSCHY 6004 User manual

DUSCHY

DUSCHY 6004 User manual

DUSCHY 6004 User manual

DUSCHY

DUSCHY 6004 User manual

DUSCHY Square User manual

DUSCHY

DUSCHY Square User manual

DUSCHY 523n-70 User manual

DUSCHY

DUSCHY 523n-70 User manual

Popular Bathroom Fixture manuals by other brands

Gessi FASCINO 48155 manual

Gessi

Gessi FASCINO 48155 manual

Badorado Warenhandels Calmwaters 406192 installation instructions

Badorado Warenhandels

Badorado Warenhandels Calmwaters 406192 installation instructions

Fleurco K003 instruction manual

Fleurco

Fleurco K003 instruction manual

eisl EASY ENERGIE DX12004 installation instructions

eisl

eisl EASY ENERGIE DX12004 installation instructions

Hans Grohe Showerpipe Croma 100 27154000 Instructions for use/assembly instructions

Hans Grohe

Hans Grohe Showerpipe Croma 100 27154000 Instructions for use/assembly instructions

NOVUM FR126.04.2.0 AI installation instructions

NOVUM

NOVUM FR126.04.2.0 AI installation instructions

Franke AQRM650 Installation and operating instructions

Franke

Franke AQRM650 Installation and operating instructions

Gessi ORIGINI 66028 manual

Gessi

Gessi ORIGINI 66028 manual

Anzzi Expanse SP-AZ041 install guide

Anzzi

Anzzi Expanse SP-AZ041 install guide

ESS Container BOX S Installation advice

ESS

ESS Container BOX S Installation advice

MAAX KLEARA 6MM PIVOT owner's manual

MAAX

MAAX KLEARA 6MM PIVOT owner's manual

Excellent RIKO manual

Excellent

Excellent RIKO manual

Toto TCF795 Series instruction manual

Toto

Toto TCF795 Series instruction manual

MERLYN Arysto Ten GMW100 installation guide

MERLYN

MERLYN Arysto Ten GMW100 installation guide

KAWAJUN SE223 installation manual

KAWAJUN

KAWAJUN SE223 installation manual

Kinedo DES1151C installation instructions

Kinedo

Kinedo DES1151C installation instructions

OVE ORLANDO Installation and user guide

OVE

OVE ORLANDO Installation and user guide

Hans Grohe 28567 Series Instructions for use/assembly instructions

Hans Grohe

Hans Grohe 28567 Series Instructions for use/assembly instructions

manuals.online logo
manuals.online logoBrands
  • About & Mission
  • Contact us
  • Privacy Policy
  • Terms and Conditions

Copyright 2025 Manuals.Online. All Rights Reserved.