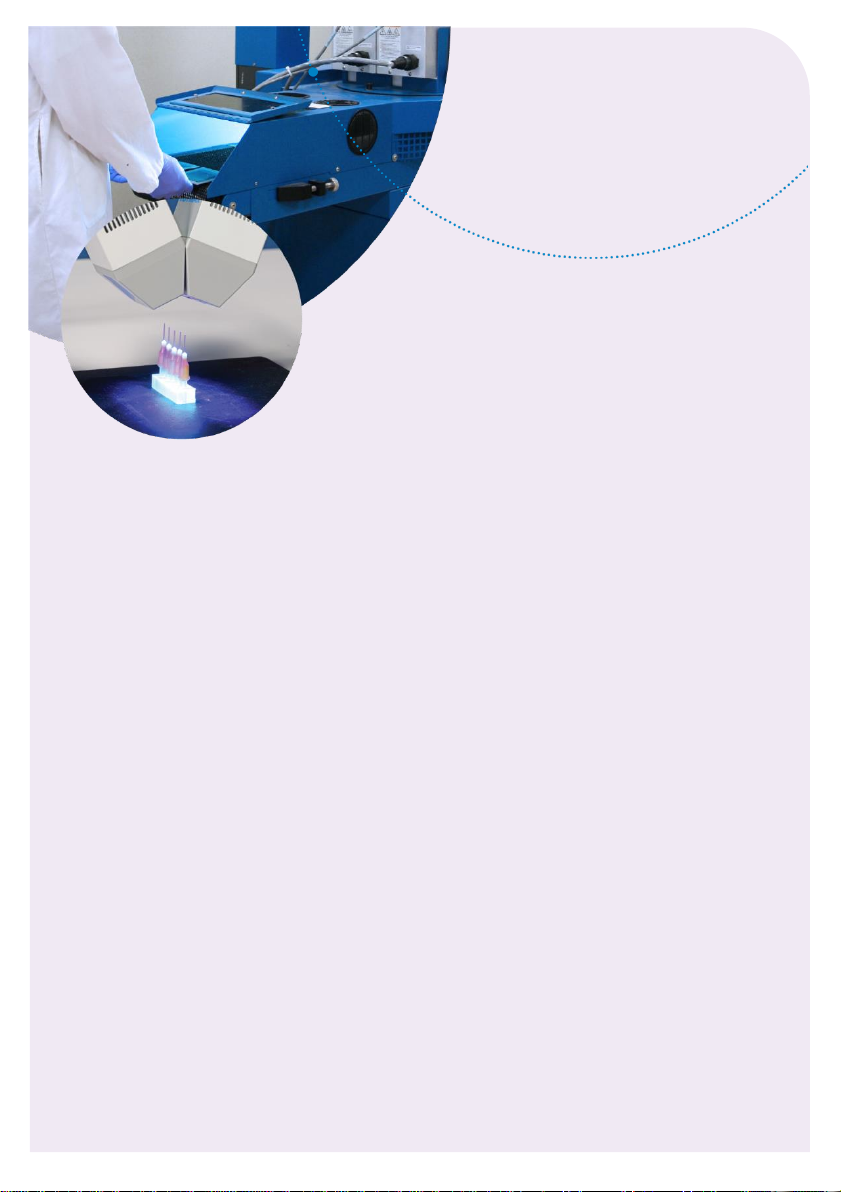
dymax BlueWave MX-250 User manual

BlueWave® MX-250
LED Flood-Curing Emitters
User Guide

2 U S E R G U I D E |B L U E W A V E M X - 2 5 0 E M I T T E R S
About Dymax
Light-curable adhesives. Systems for light curing, fluid
dispensing, and fluid packaging.
Dymax manufactures industrial adhesives, light-curable adhesives,
epoxy resins, cyanoacrylates, and activator-cured adhesives. We
also manufacture a complete line of manual fluid dispensing
systems, automatic dispensing systems, and light-curing systems.
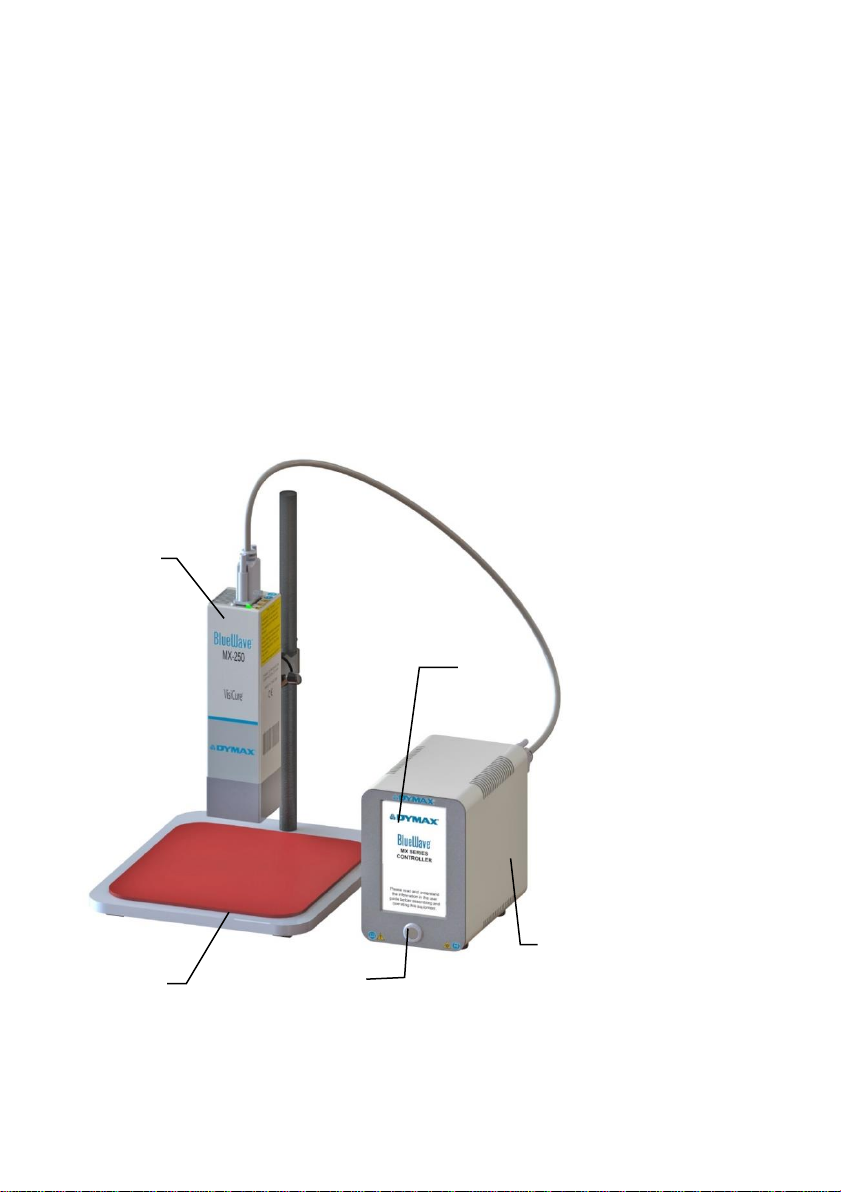
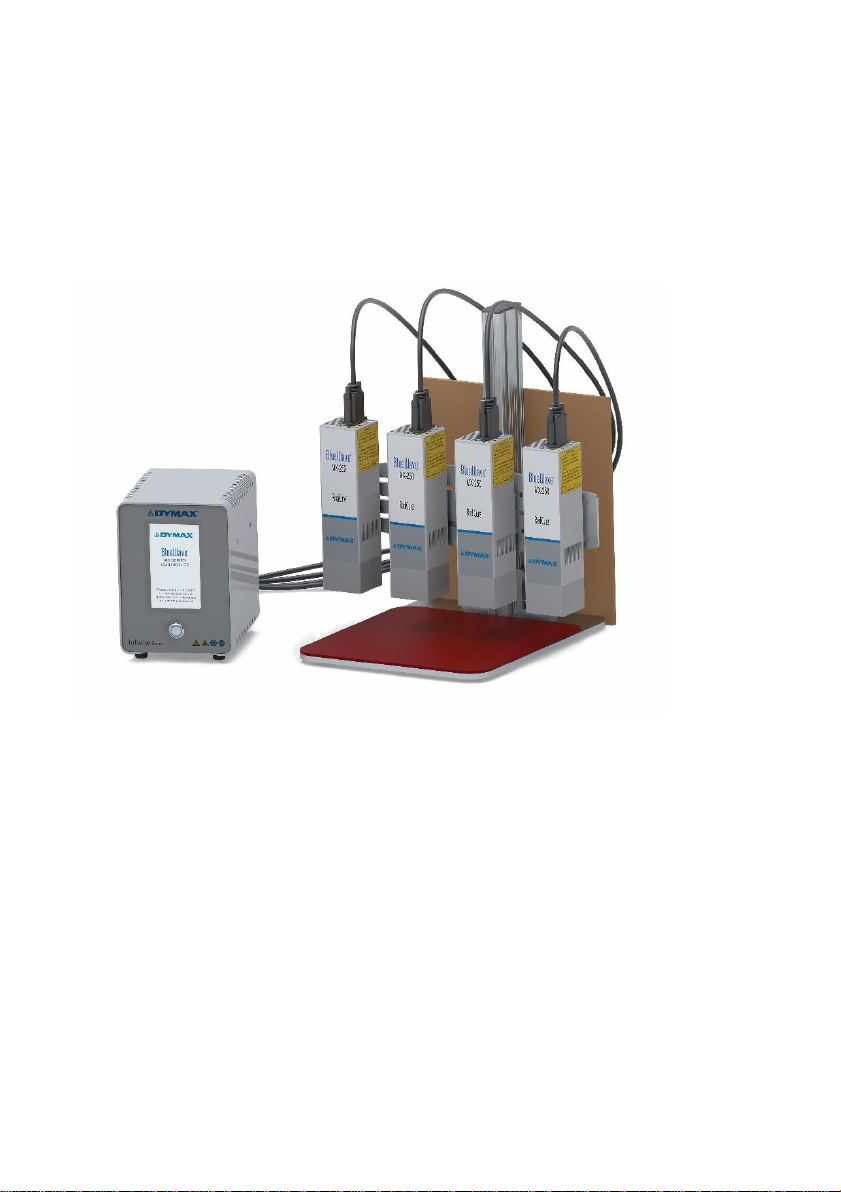
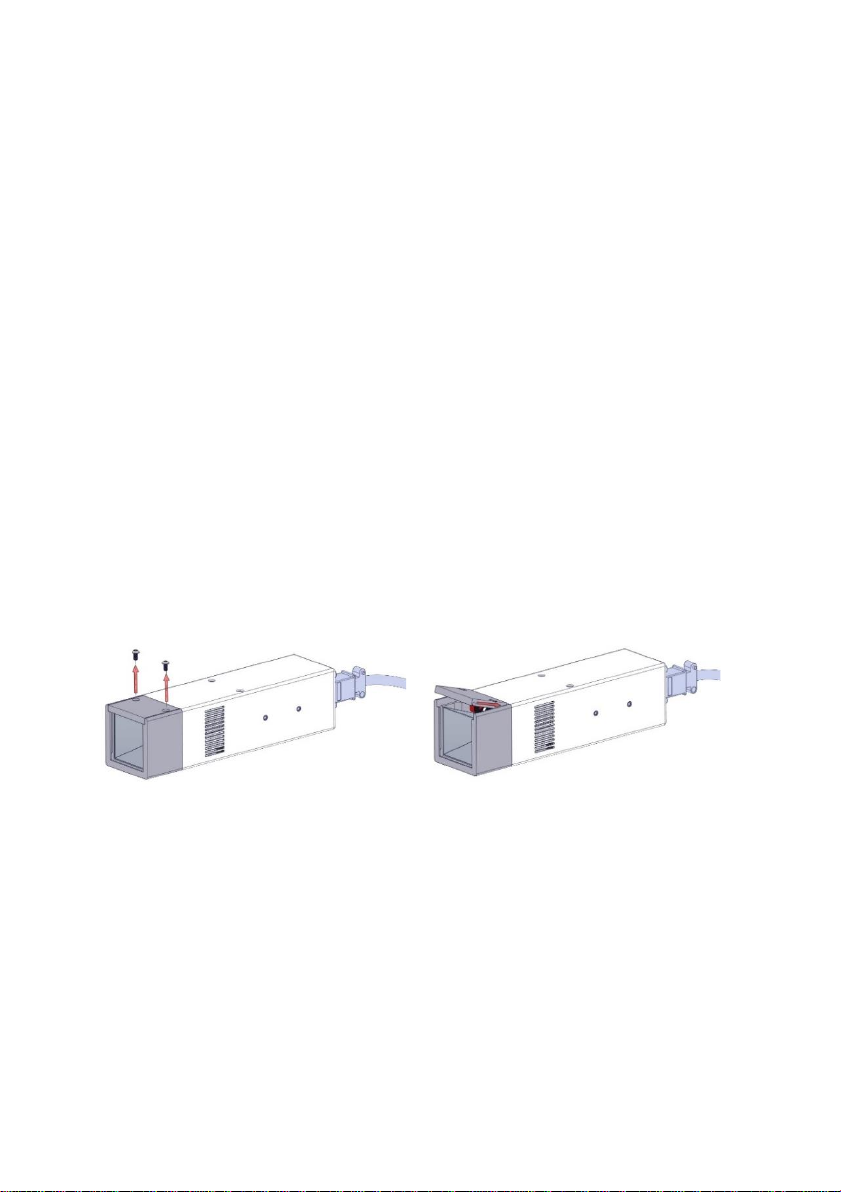
Light-curing systems include LED light sources, spot, flood, and
conveyor systems designed for compatibility and high
performance with Dymax adhesives. Dymax adhesives and light-
curing systems optimize the speed of automated assembly, allow
for 100% in-line inspection, and increase throughput. System
designs enable stand-alone configuration or integration into your
existing assembly line.
Please note that most dispensing and curing system applications
are unique. Dymax does not warrant the fitness of the product for
the intended application. Any warranty applicable to the product,
its application, and use is strictly limited to that contained in the
Dymax standard Conditions of Sale. Dymax recommends that any
intended application be evaluated and tested by the user to
ensure that desired performance criteria are satisfied. Dymax is
willing to assist users in their performance testing and evaluation.
Data sheets are available for valve controllers or pressure pots
upon request.

U S E R G U I D E |B L U E W A V E M X - 2 5 0 E M I T T E R S 3
Contents
Introduction............................................................... 4
Where to Get Help............................................................ 4
Safety......................................................................... 4
Product Overview ..................................................... 5
Description of BlueWave MX-250 Emitters ................... 5
Unpacking.................................................................. 6
Parts Included ................................................................... 6
Installation ................................................................. 6
Important Information....................................................... 6
Mounting/Connections..................................................... 7
Troubleshooting & Maintenance.............................. 9
Product Cleaning and Care............................................. 10
Glass Window Replacement ........................................... 10
Compatible Devices .................................................. 11
Spare Parts ................................................................ 11
Specifications............................................................ 13
Declaration of Conformity ........................................ 14
Warranty .................................................................... 15
Index .......................................................................... 15

4 U S E R G U I D E |B L U E W A V E M X - 2 5 0 E M I T T E R S
Introduction
This guide describes how to set up, use, and maintain BlueWave®MX-250 emitters
safely and efficiently.
Intended Audience
This user guide is meant for experienced process engineers, technicians, and
manufacturing personnel. If you are new to high-intensity LED light sources and do not
understand the instructions, contact Dymax Application Engineering for answers to
your questions before using the equipment.
Where to Get Help
Dymax Customer Support and Application Engineering teams are available by phone in
the United States, Monday through Friday, from 8:00 a.m. to 5:30 p.m. Eastern
additional Dymax locations can be found on the back cover of this user guide. For more
information about this product, visit dymax.com.
Safety
WARNING! If you use this UV LED light source without first reading and
understanding the information in the UV Light Safety Guide, SAF001, injury
can result from exposure to high-intensity light. To reduce the risk of injury,
please read and ensure you understand the information in that guide before
assembling and operating the Dymax UV LED light source.
Specific Safety statements for this device:
This device falls under IEC 62471 Risk Group 3 for UVA and Blue Light
Emissions:
WARNING. UV emitted from this product. Avoid eye and skin exposure
to unshielded products.
WARNING. Possibly hazardous optical radiation emitted from this
product. Do not look at operating lamp. Eye injury may result.

U S E R G U I D E |B L U E W A V E M X - 2 5 0 E M I T T E R S 5
Product Overview
Description of BlueWave MX-250 Emitters
•When paired with a MX-series controller, BlueWave MX-250 emitters function as a
mini- flood-curing system with a 50 mm x 50 mm (2 in x 2 in) asserted curing area.
They provide manufacturers with curing flexibility and expansion capabilities.
•The BlueWave MX-250 emitter is air cooled using an axial fan.
•The BlueWave MX-250 emitter can be mounted using one of two hole patterns
in the housing body.
Figure 1,
Main Components of BlueWave MX-250 System
Stand
Power
Switch
Controller
LED
Emitter
Touch
Screen
Display

6 U S E R G U I D E |B L U E W A V E M X - 2 5 0 E M I T T E R S
Unpacking
Upon arrival, inspect all boxes for damage and notify the shipper of box damage
immediately. Open each box and check for equipment damage. If parts are damaged,
notify the shipper and submit a claim for the damaged parts. Contact Dymax so that
new parts can be shipped to you immediately.
WARNING! Until the BlueWave MX-250 emitter is attached to a
controller via the interconnect cable it is susceptible to ESD damage, handle
according to ESD standards using a ground strap and do not touch exposed
connector pins.
The parts below are included in every package/order. If parts are missing from your
order, contact your local Dymax representative or Dymax Customer Support to resolve
the problem.
Parts Included
•BlueWave MX-250 LED Emitter Assembly
•User Guide
Installation
The BlueWave MX-250 emitter is part of a MX-series curing system and requires
connection to a controller via an interconnect cable for proper operation.
Important Information
•Do not connect any components while power is applied.
•Mount the BlueWave MX-250 emitter to a rigid support, such as the emitter
stand PN 42390, prior to connecting the interconnect cable to prevent
handling damage.
•Do not touch the emitter aperture glass. This can result in poor performance
and broken glass due to heating. Inspect before each use and clean with
isopropyl alcohol if contaminated.

U S E R G U I D E |B L U E W A V E M X - 2 5 0 E M I T T E R S 7
•If emitter aperture glass is permanently contaminated it must be replaced for
safe operation.
Mounting/Connections
•Each emitter has two sets of M3 x 0.5 mm holes (Figure 2) that align with
Dymax stands and holders.
•When connecting the emitter to the controller, ensure proper strain relief to
prevent pinching or kinking of the interconnect cable.
•The cooling air intake on top of unit must be free flowing, do not cover.
•Exhausting air on sides must be given at least 1 mm (0.04”) of clear space to
obstructions for safe use.
Figure 2.
BlueWave MX-250 Emitter Dimensions

8 U S E R G U I D E |B L U E W A V E M X - 2 5 0 E M I T T E R S
•When multiple emitters are mounted side-by-side, maintain 1 mm (0.04”) of
clear space between units. For outermost units, maintain 20 mm (0.8”) of free
space to obstructions for safe use.
Figure 3.
Example of Installation Using Array Stand

U S E R G U I D E |B L U E W A V E M X - 2 5 0 E M I T T E R S 9
Troubleshooting & Maintenance
Problem
Possible Cause
Corrective Action
BlueWave MX-250
LED does not
produce light
LED intensity adjustment
set to 0% or too low
Increase LED intensity setting.
LED cycle time is set to
0 seconds
0 Seconds sets manual mode and
requires a trigger.
Interlock is open
Verify interlock jumpers are in place.
Verify PLC command structure for
PLC mode.
Interface cable connections
loose or damaged
Check connections and condition of
interface cable.
Trigger setting not
matched to input
Trigger setting on admin screen
should match the desired input trigger
channel.
LED head is not connected
to the correct port/channel
Verify that the head is connected to the
desired port/channel.
BlueWave MX-250
LED suddenly
stops producing
light
Over-temperature
shutdown was triggered
Verify alarms.
Footswitch defective
Activate unit using the front control
panel. Replace the footswitch if the
unit operates from the front control
panel.
Interlock is open
Verify interlock jumpers are in place.
Verify PLC command structure for
PLC mode.
BlueWave MX-250
LED provides only
low-intensity light
LED intensity adjustment
set to minimum
Increase LED intensity setting on
admin settings or I/O input for PLC
mode.
Contaminated/dirty lens
optics
Clean the surface of the lens.

10 U S E R G U I D E |B L U E W A V E M X - 2 5 0 E M I T T E R S
Product Cleaning and Care
•Product cleaning is limited to wiping the product with a damp cloth. Do not soak.
Isopropanol Alcohol or household cleaners may be used for cleaning the product.
•Always inspect the quartz window for cleanliness before use. Foreign material can
cause permanent damage to the window. Clean with Isopropanol Alcohol to
remove smudges or foreign material. Damaged or permanently etched windows
should be replaced.
•Do not use compressed air to removed particle debris inside the emitter as it may
damage the high-speed cooling fan.
Glass Window Replacement
1. Before starting, disconnect power to the unit.
2. Lay the emitter on its side with the cover facing upwards. Using a 5/64” hex key,
loosen and fully remove the two screws (Figure 4).
3. Remove the side cover by lifting from the bottom as shown in Figure 5.
Figure 4.
Remove Screws
Figure 5.
Remove Side Cover
4. Slide the damaged glass cover out (Figure 6), taking care not to touch the metallic
reflector surfaces.
NOTE: If the old window has shattered, be sure to remove all debris before
attempting to install the new glass window.
5. Unwrap the new window and carefully clean with the enclosed alcohol swab.
Holding the window by its sides, slide into the groove (Figure 7). Take care not to
touch the glass with bare hands, as any residue left on the window can adversely
affect the performance of the unit.

U S E R G U I D E |B L U E W A V E M X - 2 5 0 E M I T T E R S 11
Figure 6.
Slide Glass Cover Out
Figure 7.
Insert New Glass Cover
6. Reinstall the side cover removed in Step 3.
7. Insert the two screws removed in Step 2 and tighten.
Spare Parts
Item
Part Number
BlueWave MX-250 Emitter Glass Replacement Kit
42929

12 U S E R G U I D E |B L U E W A V E M X - 2 5 0 E M I T T E R S
Compatible Devices
Item
Part Number
Controllers
BlueWave®MX Series 2-Channel Controller/Power Supply - Asian Power
Cord (Type G)
43186
BlueWave®MX Series 4-Channel Controller/Power Supply –Asian Power
Cord (Type G)
43183
Emitters
BlueWave MX-250, VisiCure®(405 nm)
42808
BlueWave MX-250, PrimeCure®(385 nm)
42807
BlueWave MX-250, RediCure®(365 nm)
42806
System Components
Interconnect Cable Assembly - 2 Meter
42287
Interconnect Cable Assembly - 5 Meter
42889
Extended Interconnect Cable - 10 Meter*
43010
Extended Interconnect Cable - 20 Meter*
43011
Radiometer
ACCU-CAL™ 50-LED Radiometer
40505
Stands
Array Stand
43070
Emitter Mounting Stand
42390
Personal Protection Equipment
Three-Sided Acrylic Shield
41395
Protective Goggles —Green
35286
Protective Goggles —Gray (standard model included with unit)
35285
Face Shield
35186
* Intended for machine installations only

U S E R G U I D E |B L U E W A V E M X - 2 5 0 E M I T T E R S 13
Specifications
Property
Specification
Emitter
RediCure
PrimeCure
VisiCure
Output Frequency
365 nm
385 nm
405 nm
Typical Intensity Output*
At Array Surface
At 25 mm
680 mW/cm2
255 mW/cm2
950 mW/cm2
355 mW/cm2
1,090 mW/cm2
375 mW/cm2
Emitter Dimensions
(W x D x H)
1.97" x 1.97" x 7.6" [5 cm x 5 cm x 19.3 cm]
Weight
1.64 lbs. [0.74 kg]
Unit Warranty
1 year from purchase date
Operating Environment
10°C to 40°C (50°F to 104°F)
* Measured using Dymax ACCU-CAL™50-LED radiometer in flood mode.
Figure 8.
BlueWave MX Series Spectral Output
RediCure
PrimeCure
VisiCure

14 U S E R G U I D E |B L U E W A V E M X - 2 5 0 E M I T T E R S
Declaration of Conformity

U S E R G U I D E |B L U E W A V E M X - 2 5 0 E M I T T E R S 15
Warranty
From date of purchase, Dymax Corporation offers a one-year warranty against defects
in material and workmanship on all system components with proof of purchase and
purchase date. Unauthorized repair, modification, or improper use of equipment may
void your warranty benefits. The use of aftermarket replacement parts not supplied or
approved by Dymax Corporation, will void any effective warranties and may result in
damage to the equipment.
IMPORTANT NOTE: DYMAX CORPORATION RESERVES THE RIGHT TO
INVALIDATE ANY WARRANTIES, EXPRESSED OR IMPLIED, DUE TO ANY REPAIRS
PERFORMED OR ATTEMPTED ON DYMAX EQUIPMENT WITHOUT WRITTEN
AUTHORIZATION FROM DYMAX. THOSE CORRECTIVE ACTIONS LISTED ABOVE
ARE LIMITED TO THIS AUTHORIZATION.
Index
Cleaning, 9
Compatible Devices, 12
Components, 4
Help, 3
Installation, 5
Maintenance, 9
Parts List, 5
Product Overview, 4
Safety, 3
Spare Parts, 13
Specifications, 14
Spectral Output, 14
Support, 3
Troubleshooting, 9
Unpacking, 5
Warranty, 16

www.dymax.com
Americas
Europe
Germany |+49 611.962.7900 |info_de@dymax.com
Asia
© 2019-2020 Dymax Corporation. All rights reserved. All trademarks in this guide, except where noted, are the property of, or used under license by Dymax Corporation,
U.S.A.
Please note that most curing system applications are unique. Dymax does not warrant the fitness of the product for the intended application. Any warranty applicable to the
product, its application and use is strictly limited to that contained in Dymax standard Conditions of Sale published on our website. Dymax recommends that any intended
application be evaluated and tested by the user to ensure that desired performance criteria are satisfied. Dymax is willing to assist users in their performance testing and
evaluation by offering equipment trial rental and leasing programs to assist in such testing and evaluations. MAN098DA 7/22/2019
Table of contents
Other dymax Industrial Equipment manuals

dymax
dymax SD-100 User manual

dymax
dymax BlueWave 200 Programming manual

dymax
dymax 39380 User manual

dymax
dymax BlueWave 200 User manual

dymax
dymax T40571 User manual

dymax
dymax BlueWave AX-550 Programming manual

dymax
dymax BlueWave AX-550 User manual

dymax
dymax BlueWave 200 User manual

dymax
dymax BlueWave FX-1250 User manual

dymax
dymax ZIP User manual
Popular Industrial Equipment manuals by other brands

M&R
M&R CHALLENGER II Series manual

Newport
Newport FMS Series user manual

MKS
MKS HPS 919 Series Operation and maintenance manual

Judo
Judo FERROCLEAN Installation and operating instructions

Fels
Fels Mobilis ELITE Assembly instructions

Zehnder Rittling
Zehnder Rittling ComfoPost Installation and maintenance manual