Dynamic iPortal User manual

iPortal
the wheelchair display
interface for powered
wheelchairs
Installation Manual
GBK52991 iPortal Installation Manual Issue 2.03, November 2012
compatible with

2 About this manual
About this manual
This manual is an Installation Manual, which is primarily targeted towards the manufacturer/dealer.
There is also a User Manual available, which is targeted towards the power wheelchair user.
This Installation Manual is for manufacturers/dealers. It is assumed that you are an approved
manufacturer/dealer preparing to install the iPortal module, mounting arm and cradle. It is
recommended that you read the User Manual, the Apple iPhone User Guide, and the relevant DYNAMIC
CONTROLS installation manual for the Shark, DX or DX2 system.
The iPortal connects with a Shark, DX, or DX2 System. This manual must be read together with the Shark,
DX or DX System Manual and all other relevant Shark, DX and DX2 component manuals as applicable.
iDevice(s) in this manual refers to iPhone, and iPod touch.
In this manual, a few symbols will help you identify the purpose of the paragraph that follows:
WARNING
Warnings provide important information that must be followed in order to
install, configure, and use the product safely and efficiently. Not following
the instructions given in a warning can potentially lead to equipment
failure, damage to surrounding property, injury or death.
CAUTION
Cautions provide supporting information in order to install, configure, and
use the product. Not following the instructions given in cautions can lead to
equipment failure.
NOTE
Notes provide supporting information that may be important to the user,
but which does not involve risk to life, or injury, or damage to the
equipment.
REFERENCE
Reference directs the reader to a source of further or more detailed
information on a given topic.
Key information follows such as a mechanical or electrical specification.

3 About this manual
WARNING
Do not install, maintain or operate this equipment without reading,
understanding and following this manual –including the Safety and Misuse
Warnings –otherwise injury or damage may result. This manual contains
integration, set-up, operating environment, test and maintenance
information needed in order to ensure reliable and safe use of the product.
CAUTION
The Shark, DX and DX2 Systems are not user serviceable. Specialised tools
are necessary for the repair of any component. Any attempt to gain access
to or in any way abuse the electronic components and associated
assemblies that make up the wheelchair system renders the manufacturer’s
warranty void and the manufacturer free from liability.
NOTE
Due to continuous product improvement, DYNAMIC CONTROLS reserves the
right to update this manual. This manual supersedes all previous issues, which
must no longer be used.
NOTE
DYNAMIC CONTROLS reserves the right to change the product without
notification.
iPhone, iPod touch, Safari, Mac and iTunes are trademarks of Apple Inc., registered in the U.S. and
other countries. The Bluetooth®word mark and logos are registered trademarks owned by Bluetooth®
SIG, Inc. and any use of such marks by Apple is under license. Apple is not a participant in or sponsor of
this promotion.
“Made for iPod” means that an electronic accessory has been designed to connect specifically to
iPod and has been certified by the developer to meet Apple performance standards.
“Made for iPhone” means that an electronic accessory has been designed to connect specifically to
iPhone and has been certified by the developer to meet Apple performance standards.
Apple is not responsible for the operation of this device or its compliance with safety and regulatory
standards. iPod is a trademark of Apple Inc., registered in the U.S. and other countries. iPhone is a
trademark of Apple Inc.
DYNAMIC CONTROLs, the Dynamic logo, the Shark, DX, DX2, iPortal and Dashboard logos are trademarks
of DYNAMIC CONTROLS. All other brand and product names, fonts, and company names and logos are
trademarks or registered trademarks of their respective companies.
DYNAMIC CONTROLs owns and will retain all trademark rights and DYNAMIC CONTROLS or its licensors own and
will retain all copyright, trade secret and other proprietary rights, in and to the documentation.
All materials contained within this manual, in hardcopy or electronic format, are protected by
copyright laws and other intellectual property laws.
© Copyright 2012 DYNAMIC CONTROLS. All rights reserved.

4 Contents
Contents
ABOUT THIS MANUAL......................................................................................................................................2
CONTENTS .......................................................................................................................................................4
1INTRODUCTION ........................................................................................................................................5
2SPECIFICATIONS .......................................................................................................................................6
2.1 ELECTRICAL SPECIFICATIONS ........................................................................................................................... 6
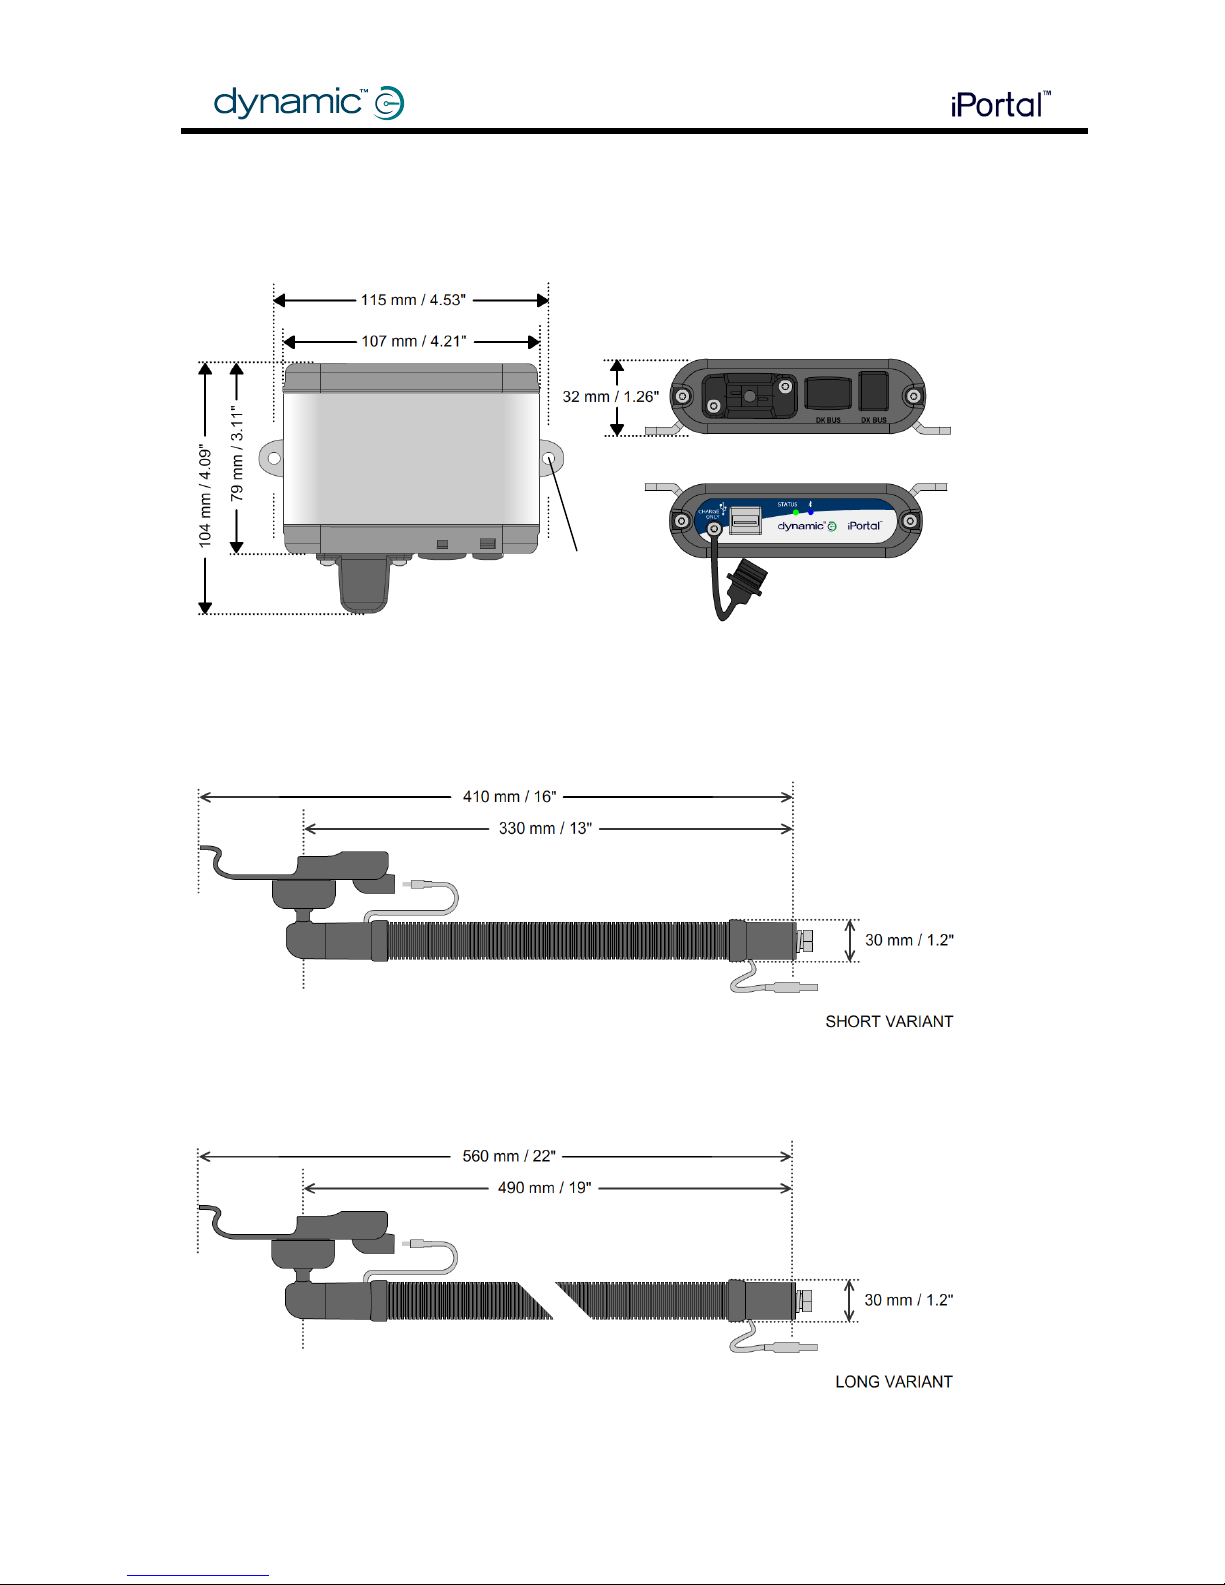
2.2 MECHANICAL SPECIFICATIONS ........................................................................................................................ 7
3INSTALLATION..........................................................................................................................................8
3.1 MOUNTING AND CONNECTING ....................................................................................................................... 8
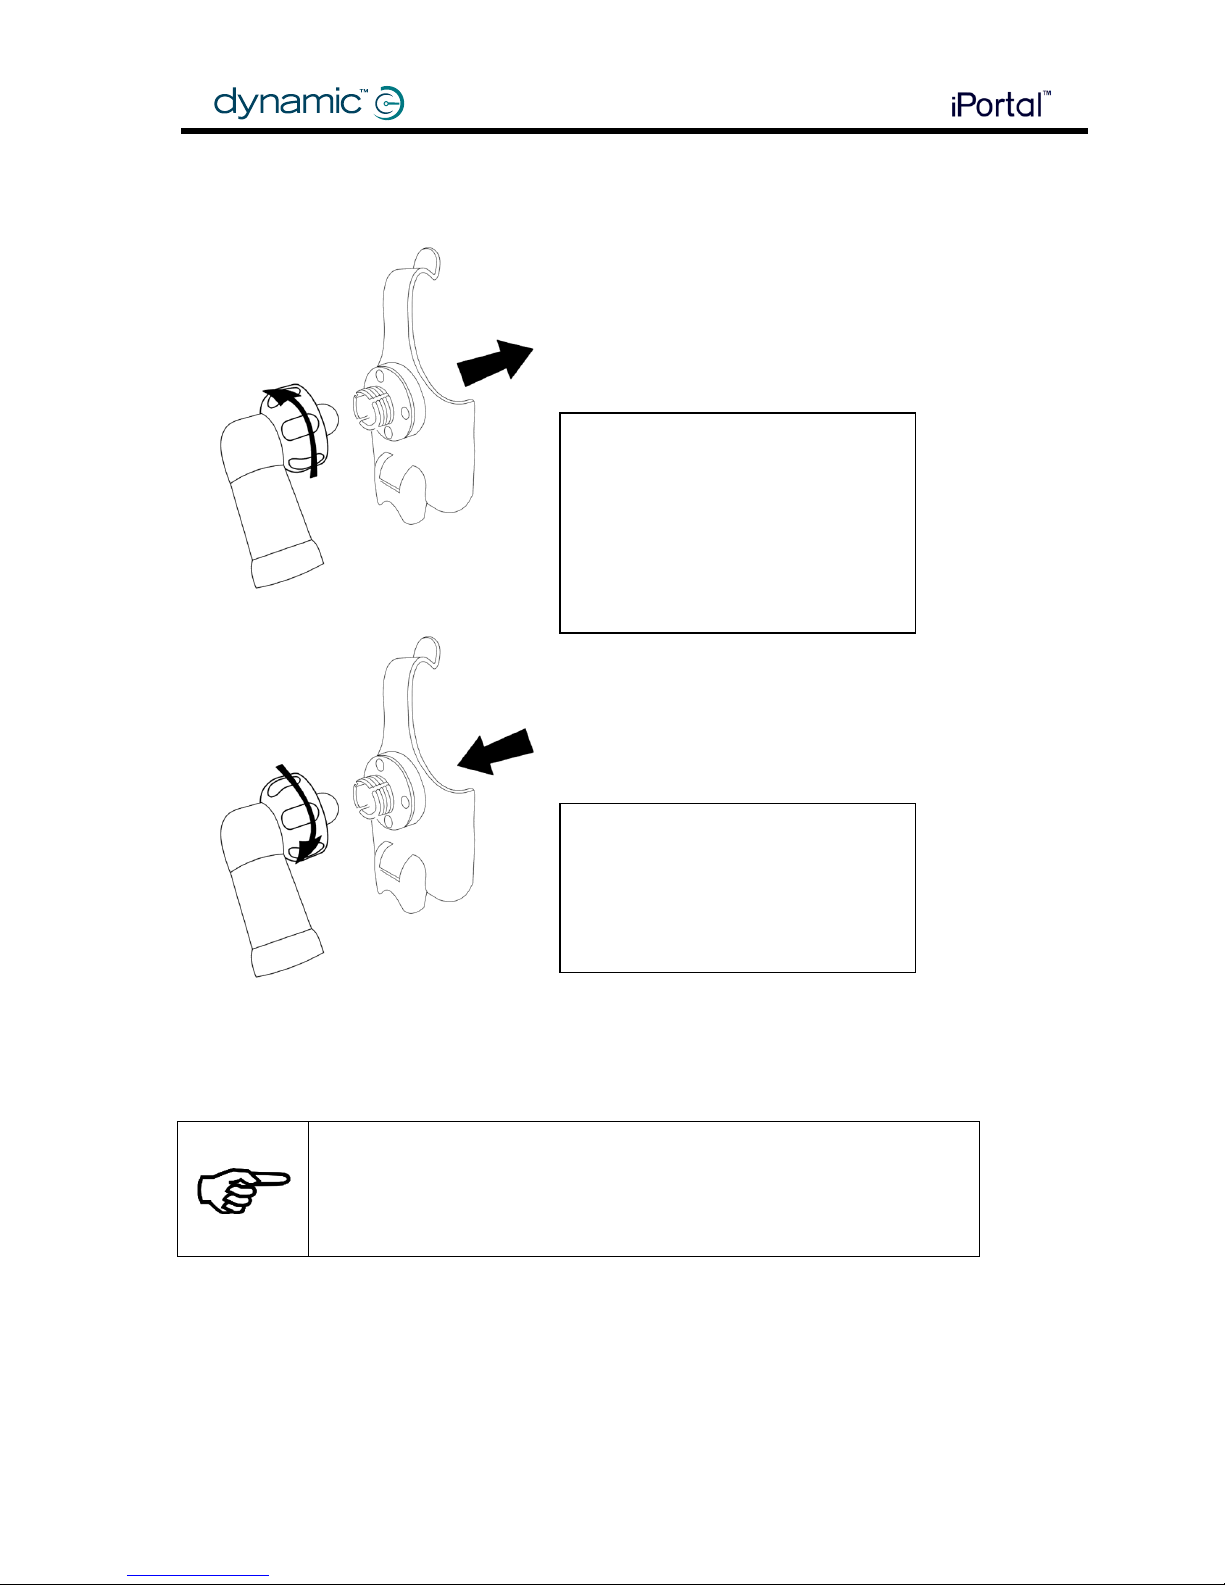
3.1.1 Mounting the arm and cradle......................................................................................................... 8
3.1.2 Mounting the module ................................................................................................................... 11
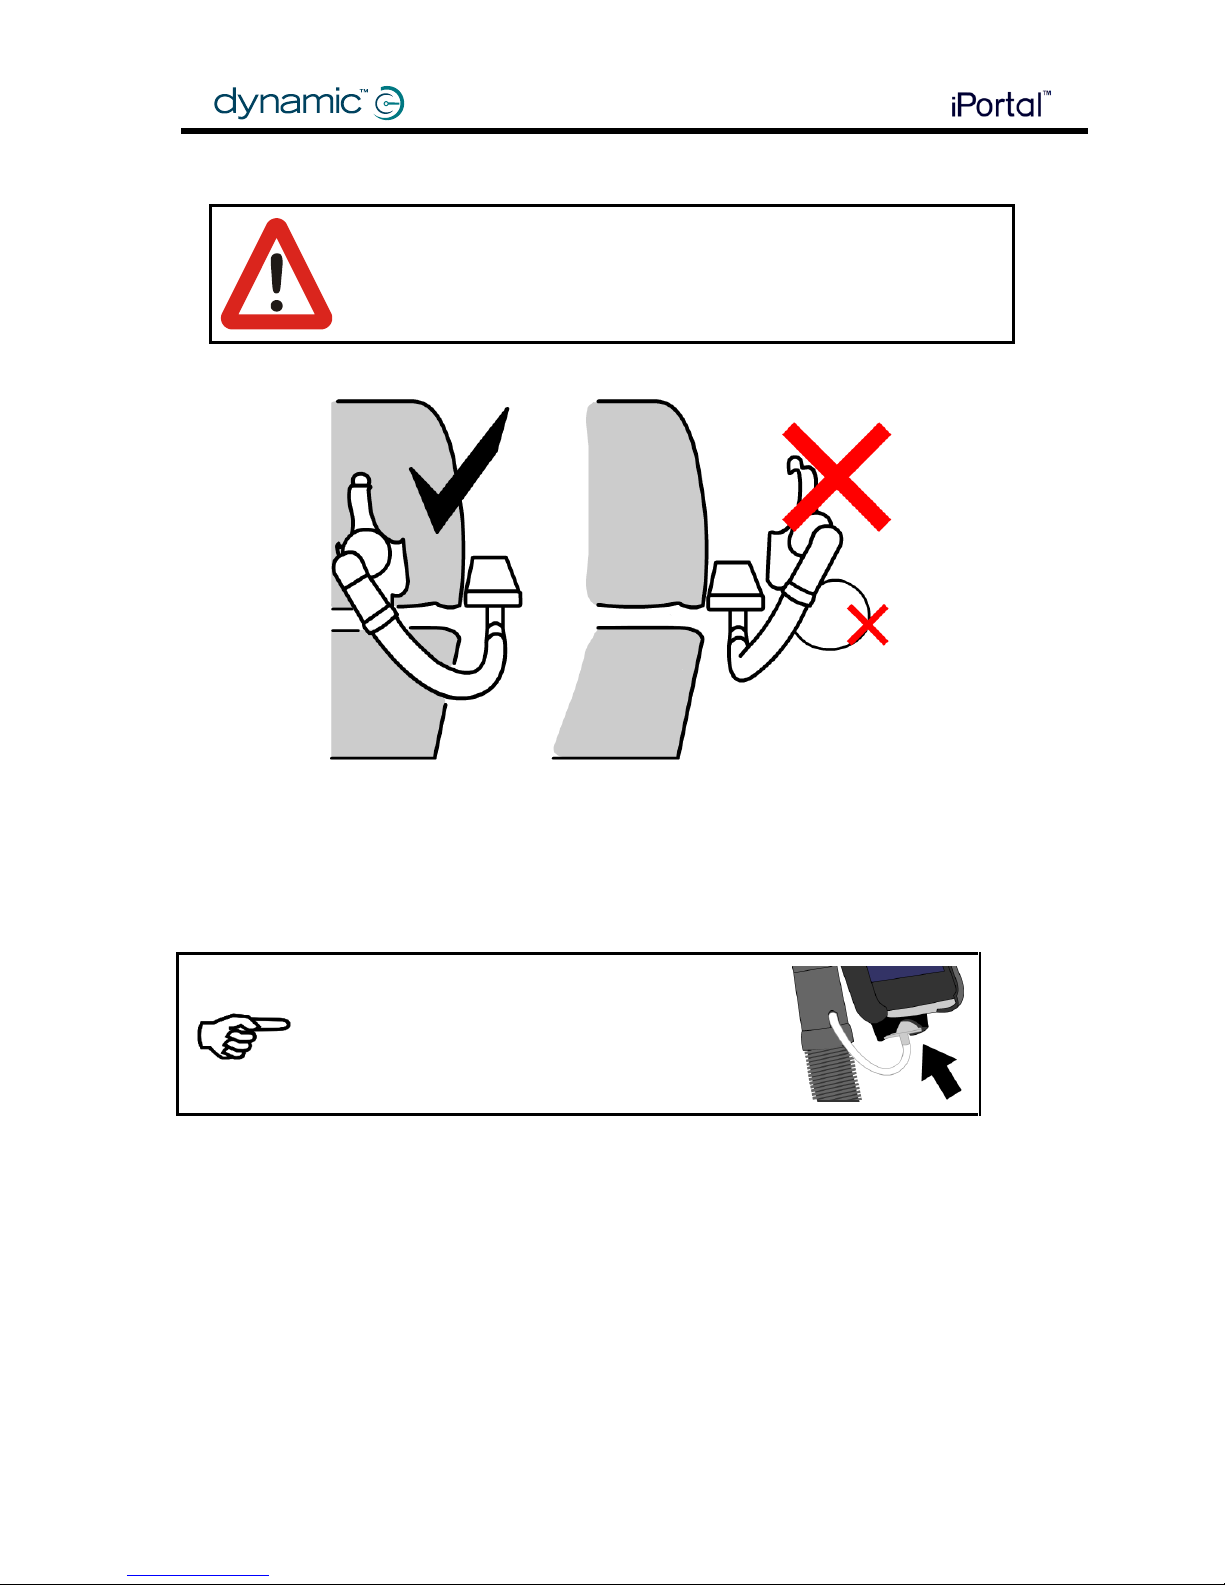
3.1.3 Connecting the module................................................................................................................. 13
3.1.4 Connecting the iDevice.................................................................................................................. 17
3.1.5 Status LEDs.................................................................................................................................... 21
3.2 DASHBOARD SOFTWARE APPLICATION............................................................................................................ 21
4PROGRAMMING.....................................................................................................................................22
5TROUBLESHOOTING ............................................................................................................................... 22
5.1 BLUETOOTH®CONNECTION FAILS .................................................................................................................. 22
5.1.1 Restart the iDevice’s Bluetooth®: .................................................................................................. 22
5.1.2 Wait longer for Bluetooth®to establish a connection:.................................................................. 22
5.1.3 Clear the iPortal from the iDevice’s Bluetooth®list:...................................................................... 22
5.1.4 Increase the sleep timeout of the chair:........................................................................................ 22
6APPENDICES ...........................................................................................................................................23
6.1 INTENDED USE AND REGULATORY STATEMENT ................................................................................................. 23
6.2 SERVICE LIFE ............................................................................................................................................. 23
6.3 MAINTENANCE.......................................................................................................................................... 24
6.4 WARRANTY .............................................................................................................................................. 24
6.5 SAFETY AND MISUSE WARNINGS.................................................................................................................... 25
6.6 ELECTROMAGNETIC COMPATIBILITY (EMC) .................................................................................................... 25
6.7 ENVIRONMENTAL STATEMENT ...................................................................................................................... 26
6.8 APPLE DISCLAIMER ..................................................................................................................................... 26
6.9 EU AUTHORISED REPRESENTATIVE ................................................................................................................ 26

5 Introduction
1Introduction
The iPortal Dashboard for iDevices displays wheelchair information in real-time using
Bluetooth® technology to communicate with the wheelchair system. The iPortal is fully
compatible with the Shark, DX, and DX2 control systems.
The iPortal Dashboard has the following features:
speed and speed range indicator
compass heading (iPhone 3GS only)
seat adjustment indicator
battery state indicator
a log of wheelchair faults
emergency call function
The iPortal also features:
connection with DYNAMIC CONTROLS Shark, DX or DX2 wheelchair control systems
without reprogramming the wheelchair
an adjustable mounting arm and cradle for iPhone or iPod touch that attaches to the
wheelchair and conveniently positions the iPhone or iPod touch for the user
an Apple USB charging-only port keeps the iDevice fully charged
an auxiliary USB charging-only port keeps other devices fully charged

6 Specifications
NOTE
Dashboard can only display information it receives from the wheelchair
control system. Dashboard does not send any information back to the
control system, and cannot control the wheelchair.
2Specifications
The specifications for the iPortal module should be read and understood in conjunction with
the specifications for the host control system.
2.1 Electrical specifications
Parameter
Min
Nom
Max
Units
DK and DX BUS
Battery voltage (powered-on non-operating)
12
40
V
Battery voltage (operating)
17
24
34
V
Battery voltage (powered-off)
0
45
V
Reverse supply voltage
-40
V
Quiescent current
35
100
mA
Powered-off current
0.25
0.5
mA
Operating current
1000
mA
iDevice USB charging connector
Output voltage at connector
4.75
5.0
5.25
V
Operating current
1000
mA
Auxiliary USB charging connector
Output voltage at connector
4.75
5.0
5.25
V
Operating current
500
mA

7 Specifications
2.2 Mechanical specifications
DJ-BTINT
DJ-GNKS-IPH
DJ-GNKL-IPH
M4

8 Installation
3Installation
The installation instructions for the iPortal module should be read and understood in
conjunction with the installation manual for the Shark, DX or DX2 host system.
CAUTION
Chemical cleaning agents may cause damage to the iPortal module,
mounting arm and cradle. To clean the iPortal system, wipe with a
damp cloth, using only warm soapy water. For cleaning instructions for
the iDevice refer to the iPhone, or iPod touch User Guide.
3.1 Mounting and connecting
The iPortal system includes a mounting arm, a cradle, a connection module and a USB
cover. In addition, a DX BUS cable (for DX and DX2) or a DK BUS cable and Y-cable (for
Shark) is needed. These must be ordered separately.
3.1.1 Mounting the arm and cradle
The iPortal mounting arm and cradle can be mounted anywhere on the wheelchair.
However, when choosing the location of the mounting arm and cradle, the following should
be taken into consideration:
ease of access by the wheelchair user
the length of the charging cable
mechanical interference with other equipment
protrusion beyond the frame of the wheelchair
crushing by the moving parts of the wheelchair
WARNING
Route the cables and fasten all DYNAMIC CONTROLS’components in a
position so that the cables, the connectors and the connector sockets
do not allow water entry or are subjected to physical strain, abuse or
damage, such as cutting or crushing. Take particular care on vehicles
with movable structures such as seat raise/tilt or swing-away arms.
Make sure that the cables do not extend from the wheelchair to
prevent them getting caught or damaged by external objects.

9 Installation
WARNING
Do not position the cradle outside the frame of the wheelchair,
otherwise it can strike objects or passers-by, causing injury. Adjust the
cradle such that it remains inside the outline of the chair.
Leave enough charging cable so that the user can adjust the angle of the cradle from
portrait to landscape orientation. Do not allow a loop of excess cable to hang down. Secure
any excess cable at or near the iPortal connection module in accordance with general
wiring recommendations.
CAUTION
When not in use, protect the charging cable
connector by putting it in the cable park. The
cable park prevents the ingress of dirt and
moisture.
There are two packages available for the mounting arm, and cradle: long, and short.
The long mounting arm and cradle package includes:
mounting arm (Part No. DJ-GNKL-IPH)
cradle for iPhone
cradle for iPod touch
The short mounting arm and cradle package includes:
mounting arm (Part No. DJ-GNKS-IPH)
cradle for iPhone

10 Installation
cradle for iPod touch
To change the cradle:
To increase or decrease the force required to tilt/rotate the cradle, tighten or loosen the nut.
If the nut becomes loose over time and the cradle starts moving about too easily, tighten the
nut until the force required to adjust the cradle position is as desired.
CAUTION
Use only the charging cable supplied by DYNAMIC CONTROLS. Do not
substitute this cable with one that looks similar. The characteristics of
the supplied cable are essential to the correct operation of the iPortal.
The charging cable is available in only one length: 950 mm / 37.4 inches.
Remove the cradle from the
mounting arm.
oLoosen and release the nut from
the cradle.
oPull hard to release the cradle
from the mounting arm.
Replace the cradle on the
mounting arm.
oPush the cradle firmly into
position.
oTurn the nut until it is tight.
1
2
1
2

11 Installation
To attach the mounting arm to the chair:
A mounting bracket is not supplied. It is the responsibility of the manufacturer/dealer to
design and make a suitable bracket for attachment to the chair. The mounting arm must be
attached to this bracket using only the M10 bolt and washers supplied by DYNAMIC CONTROLS.
Torque the M10 bolt to 15 Nm.
CAUTION
Use only the M10 bolt and washers supplied by DYNAMIC CONTROLS. Do
not substitute with parts of lesser quality. This bolt must be tightened to
a torque of 15 Nm. Do not omit the washers. The mounting arm may
become loose if these instructions are not followed.
3.1.2 Mounting the module
The iPortal module can be mounted anywhere on the wheelchair, using two M4 bolts and
lock nuts to secure the module to the frame of the chair. However, the following should be
taken into consideration:
ease of access by the wheelchair user
the length of the charging cable
the orientation of the module
routing of the DX or DK bus cable
sufficient clearance around the Apple USB port
sufficient clearance around the auxiliary USB charging port
Only two orientations of the module are permitted, as shown in the diagrams on the next
page.
M10 bolt (torque to 15Nm)
Mounting bracket (not supplied)

12 Installation
Permitted module orientation 1.
Permitted module orientation 2.
NOTE
As shown in the diagram above, leave at least 50 mm / 2 inches
clearance for the user to insert a USB plug into the auxiliary USB
connector on the module.
CAUTION
Mount the module only with the Apple USB connector, DK and DX BUS
connectors facing down or towards the rear of the chair. It is important
for the routing of cables and protection from the ingress of dust and
moisture that the module is only mounted as shown above.

13 Installation
3.1.3 Connecting the module
WARNING
Do not use damaged or abused cables or connectors. A damaged
cable can potentially produce localised heat, sparks or arcing and
can cause burning or fire resulting in injury or death.
CAUTION
Prevent water or dirt entering the module through the unused DX or DK
connector. The module is supplied with rubber bungs for both
connectors.
3.1.3.1 Connect the charging cable
Step 1: Assemble the USB cover (see diagram below) around the USB end of the charging
cable
Step 2: Insert the charging cable into the Apple USB connector of the iPortal module
Step 3: Attach the USB cover to the iPortal module using the two screws provided
Assembling the USB Cover
3.1.3.2 Connect the BUS cable
The iPortal module connects with either the Shark or the DX BUS. Do not connect the module
to both Shark and DX at the same time. No damage will result if both are accidently
connected, but the system will not work correctly until one is disconnected. The iPortal
module automatically detects which bus is connected.
CLICK!

14 Installation
3.1.3.3 Connecting the module into a Shark system
Note that the iPortal module has only one DK BUS socket.
Connecting with the Shark system
Use one Y cable(GSM80951) as shown in the diagram below.
Connecting with the Shark system when there is an Attendant Control Unit (ACU)
If an Attendant Control Unit (ACU) is in the system, use two Y cables (GSM80951) as shown in
the diagram below.
Connecting with the Shark system using a Y cable at the remote
If there is no ACU, and if it is more convenient for cable routing, a Y cable (GSM80951) may
be used from the Shark remote, as shown in the diagram below.
Y Cables
GSM80951

15 Installation
NOTE
DK BUS extensions and cables are available in a range of lengths. See
the DYNAMIC CONTROLS product catalogue for more information.
Always use the shortest cable that can be routed without it being
stretched or pinched.
Y Cable

16 Installation
3.1.3.4 Connecting the module into a DX or DX2 system
Note that the iPortal module has only one DX BUS socket.
Connecting with the DX system using any available DX BUS connector
Use an available connector on any DX module and a short DX cable such as the GSM63005.
Alternatively, use an available connector on a DX splitter box (DX-SKT-X4) and a short DX
cable such as the GSM63005.
Some DX-compatible modules have only one DX BUS socket, for example the
DX2-REM42x Remote. If this is the case, use a Y cable (GCB65231) to connect to the iPortal.
NOTE
DX BUS extensions and cables are available in a range of lengths. See
the DYNAMIC CONTROLS’product catalogue for more information.
Always use the shortest cable that can be routed without it being
stretched or pinched.
Y Cable

17 Installation
3.1.4 Connecting the iDevice
3.1.4.1 Connecting the charging cable
Connect the charging cable to the Apple USB port on the iPortal module and to the iDevice.
Depending on the way the user has set-up the iDevice, it may beep or vibrate to indicate
that the USB port is charging the device.
Charging is by cable, data is by Bluetooth®link.
Check the iDevice battery level and Bluetooth®
connection status from the icons on the top right of the
iDevice’s screen; visible at all times.
NOTE
The charging cable does not carry data. The iDevice connects to the
iPortal module using a Bluetooth®wireless connection. You must first
pair the iPortal with the iDevice. For instructions on pairing please refer
to the next section.
NOTE
The word iDevice refers to the iPhone, iPhone3G, iPhone3GS, or iPod
touch belonging to the wheelchair user and used to connect to the
iPortal.
When not in use,
protect the charging
cable connector by
putting it in the
cradle cable park.

18 Installation
3.1.4.2 Pairing the iDevice with the iPortal
An iDevice communicates with the iPortal module using a Bluetooth®wireless connection.
Before using an iDevice with the iPortal, a Bluetooth®wireless connection needs to be
established between the two; this is called pairing. Pairing is normally a one-off procedure:
that is, once an iDevice has been paired with the iPortal, it will remain paired during normal
operation.
To pair the devices, follow the three steps below. (The numbers in square brackets refer to the
images below).
Step 1: Turn the iDevice’s Bluetooth On. The iDevice will start searching for nearby devices
NOTE
To switch the iDevice’s Bluetooth on, start from the iDevice’s Home
screen, and select:
Settings [1] ► General [2] ► Bluetooth [3] ► Switch Bluetooth On[4]
Step 2: Turn the wheelchair’s power off and then on [5]. This will switch on the iPortal’s
Bluetooth.
Step 3: On the iDevice, when asked for a PIN, enter 7654 and then tap Connect[6]

19 Installation
NOTE
Allow between 30 and 60 seconds for the Enter PIN screen to be
displayed.
NOTE
When you see an instruction to “cycle the power” on the iDevice,
turn the power off at the Joystick, and then turn it on again.
3.1.4.3 Pairing a different iDevice with the iPortal
To pair a different iDevice with the iPortal, it may be necessary first to un-pair the previous
device.
To un-pair a device previously paired with the iPortal:
Step 1: on the device to be un-paired, set Airplane Mode to ON
Step 2: on the device to be paired, follow the procedure “Pairing the iDevice with the iPortal”
in the section above
NOTE
Allow approximately 60 seconds for the iPortal to find the new
device.
Step 3: On the un-paired device, reset Airplane mode to OFF
REFERENCE
For more details of how to manage Bluetooth®on an iDevice refer
to the online help available at www.apple.com/support
After the iDevice and the iPortal have successfully paired,
the connection is listed on the Bluetooth® menu [7].
Note that sometimes when attempting to pair the iDevice
with the iPortal, one or the other may time out waiting for
input from you. If the procedure does not work the first time,
repeat the steps above.
If the chair is programmed to go into sleep mode after only
one minute of inactivity, the chair may enter this mode
during pairing, causing pairing to fail. If this is the case,
increase the sleep timeout value.

20 Installation
To clear the iPortal from the iDevice Bluetooth®list:
From the iDevice Home screen, choose Settings ► General ► Bluetooth ► Forget this Device,
and tap Forget Device.
Other manuals for iPortal
1
Table of contents
Other Dynamic Wheelchair manuals

Dynamic
Dynamic nxt Series Instruction Manual

Dynamic
Dynamic DX-SLM User manual

Dynamic
Dynamic NXT Seating Series User manual

Dynamic
Dynamic NXT User manual

Dynamic
Dynamic NXT Seating BioFit User manual

Dynamic
Dynamic iPortal User manual

Dynamic
Dynamic NXT User manual

Dynamic
Dynamic GyroSet User manual

Dynamic
Dynamic NXT MultiFit User manual