Dyson DCo7 User manual

Please read this guide carefully before use.
User guide
6057-DCO7 OPS MAN (UPDATE) 10/23/01 12:26 PM Page 1

Assembling DCO7
1Slide hose into runners at
back of machine and
push down until it clicks.
2Press wand release button
and slide wand down into
hose.
DCO7
Hose
Wand cap
Upper cable winder
Wand
Wand release button
On/off switch
Valve release clips
Soleplate
Bin emptying trigger
Cyclone release catch
Shroud release catch
Shroud
Filter release catch
Ready-to-go hose release
Airway inspection valve
*Only supplied with
floortool models
Stair tool
Crevice tool
Brush tool
1
2
Floortool*
Slot wand into top of machine
and click into place. Wind cable anti-clockwise
around cable winders and
secure with clip.
Click tools into place.
6057-DCO7 OPS MAN (UPDATE) 10/23/01 12:26 PM Page 2

Using your DCO7
Plug in at mains and press
on/off switch. To start vacuuming, push
cleaner head down with foot
and pull handle towards you.
Ensure machine is in upright
position before using tools.
Press wand release catch 1to
release ready-to-go hose and
slide wand to end of hose.
AWand mode
Slide back wand cap and
place tools directly on to
wand handle.
Using the tools
NB You can twist the brush and
stair tool heads to make
cleaning easier.
Anti-jam brushbar
(Not available on silver/yellow model).
1Manual brush off
for delicate rugs and floors.
2Brush off
when upright.
3Auto brush on
for normal cleaning.
1
2
3
A
1
DCO7 silver/yellow is not
recommended for hard
floors: accessory tools are
ideal. The brushbar
continues to rotate while
the hose is in use.
Ensure hair and loose
clothing are kept clear of
wand cap/brush bar when
machine is switched on.
Stair cleaning
Always work with the
machine at the bottom of
the stairs.
Powerful suction can
cause the hose to ‘pull
back’ in use – please
take extra care when
cleaning stairs.
Reverse wand by inserting
wand handle into hose.
CReversed wand mode
Fix tools, floortool or
groomer (see back page)
on to end of wand. For
hard to reach areas.
Ensure wand cap is
closed, unless using with
tools.
Press wand release button and
remove wand.
BHose mode
Fit tools directly on end of
hose. For confined spaces
such as car cleaning.
B
C
C
6057-DCO7 OPS MAN (UPDATE) 10/23/01 12:26 PM Page 4

Where to look for blockages
Check that tools are clear of
blockages.
Remove bin assembly from
machine.
Remove wand and check
inside for blockages. Press hose release button A
from front of machine and
slide hose out with lower
cable winder from rear.
Check inside hose for
blockages.
Important
Please note that clearing
blockages is not covered by
your cleaner’s guarantee.
Turn power off and unplug
before starting to clear any
blockages.
NB Should any part of the
machine become blocked
it may overheat and stop
due to the thermal cut-out
being triggered. Unplug
from mains and leave to
cool down for at least
30 minutes.
A
Tilt machine forward and
slide out U-bend airway
inspection B. Check inside
for blockages.
Squeeze valve release
catches to remove airway
inspection valve C. Check
inside for blockages.
Lie cleaner on its front.
1Undo coloured fasteners
using a coin and remove
soleplate.
2Clear the brushbar
obstruction, carefully
cutting away any
threads.
Replace soleplate and tighten
fasteners.
2
B
C
6057-DCO7 OPS MAN (UPDATE) 10/23/01 12:26 PM Page 6

Washing the lifetime pre-motor filter
Press filter release catch and
remove filter housing from
machine.
Filter should be washed every
six months. Circle your two
washes.
Remove filter from housing.
Only blue foam and yellow
cage should be washed.
Wash in cold water only.
Turn power off and unplug
before removing filter.
Repeat steps 1and 2until
water runs clear. Allow 12 hours for filter to dry.
Make sure it is completely dry
before replacing in machine.
Replace in filter housing and
click back into machine.
12 hrs
1
2
6057-DCO7 OPS MAN (UPDATE) 10/23/01 12:26 PM Page 8

Clean shroud with a cloth or
dry brush to remove fluff and
debris.
To replace bin, first click
rear bin catch 1and then
front bin release catch 2
into place.
Ensure bin base is closed
securely and replace bin
assembly on to machine.
Option 2
AEmpty directly into dustbin.
BEnsure bin base is closed
securely and replace bin
assembly on to machine.
Emptying the clear binTM
Important
Bin must be emptied when
dust reaches MAX mark.
Press cyclone release catch
with thumb to remove bin
assembly.
Option 1 (recommended for
asthma/allergy sufferers).
Wipe outside of clear bin
with a damp cloth before
emptying.
APlace bin in bag and pull
bin emptying trigger to
release dust into bag.
BLet dust settle, then close
bin base securely before
removing from bag. Seal
bag and replace bin
assembly on to machine.
Ensure bin is empty and bin
base is open. Then press
shroud release catch to
remove bin.
Cleaning the shroud (if necessary)
Optional
Turn power off and unplug
before emptying the bin.
• You may rinse the clear bin
with water.
• Do not use detergents.
• Do not immerse the whole
cleaner in water.
• Ensure it is completely dry
before replacing.
1
A
B
A
B
2
12
The British Allergy Foundation considers that this product may in
proper use reduce exposure to both House Dust Mite (Der p 1) and
Cat Allergen (Fel d 1). It is strongly recommended that a sensitive
person should take care when emptying the clear binTM.
We recommend the manufacturers' emptying instructions should
be strictly followed.
Assessment carried out by BAF indicate that an individual's
exposure can be reduced but this does not mean that an
individual's allergic symptoms will necessarily diminish. BAF's
opinion applies only to the products and allergen stated. The
product should be used only for its intended purpose and strictly in
accordance with the manufacturers' instructions at all times.
Exposure to allergen can be dangerous. If you believe that you
may suffer from an allergy you should seek medical advice.
The British Allergy Foundation is a national charity (Charity Reg.
No. 1003726) founded in 1991 with the aim of improving
awareness, prevention and treatment of allergy.
The Foundation continually strives to help sufferers to help
themselves, often seeking to avoid or reduce exposure to
relevant allergens. The Seal of Approval scheme forms a part of
this initiative.
6057-DCO7 OPS MAN (UPDATE) 10/23/01 12:26 PM Page 10

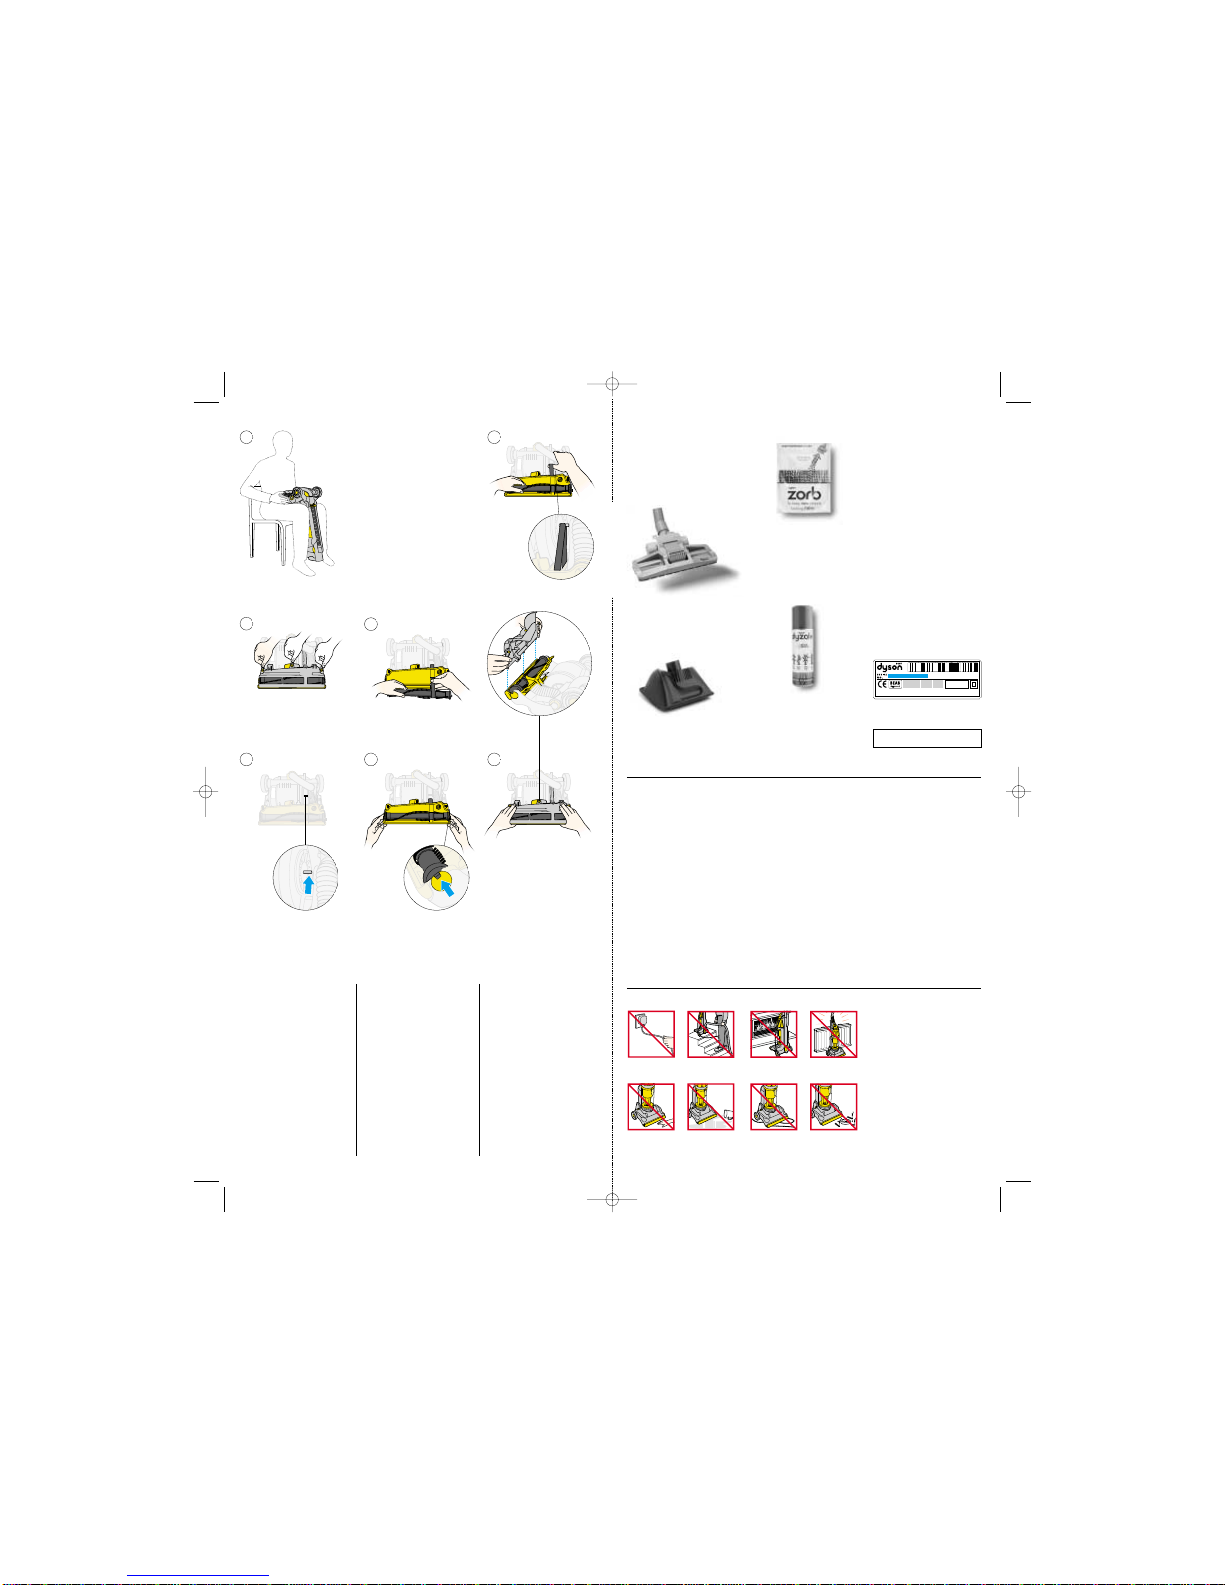
Changing/fitting your belt
(Silver/yellow model only)
1Recommended postion
for changing the belt,
with wand removed.
2Undo fasteners using a
coin and remove soleplate.
3Remove any debris and
check spindle is clean.
4To replace the belt -
remove brushbar, loop
belt around brushbar
and feed through hole.
5Check end caps are
in place.
6Using the back of the
cleaner as a lever, loop
the belt around your
thumb. Stretch and
release over spindle.
Belt should be free of
twists as shown.
7Rest the three tabs on
the inside of the yellow
bumper strip, before
pivoting soleplate
into position.
1
2
3
4
5
6
7
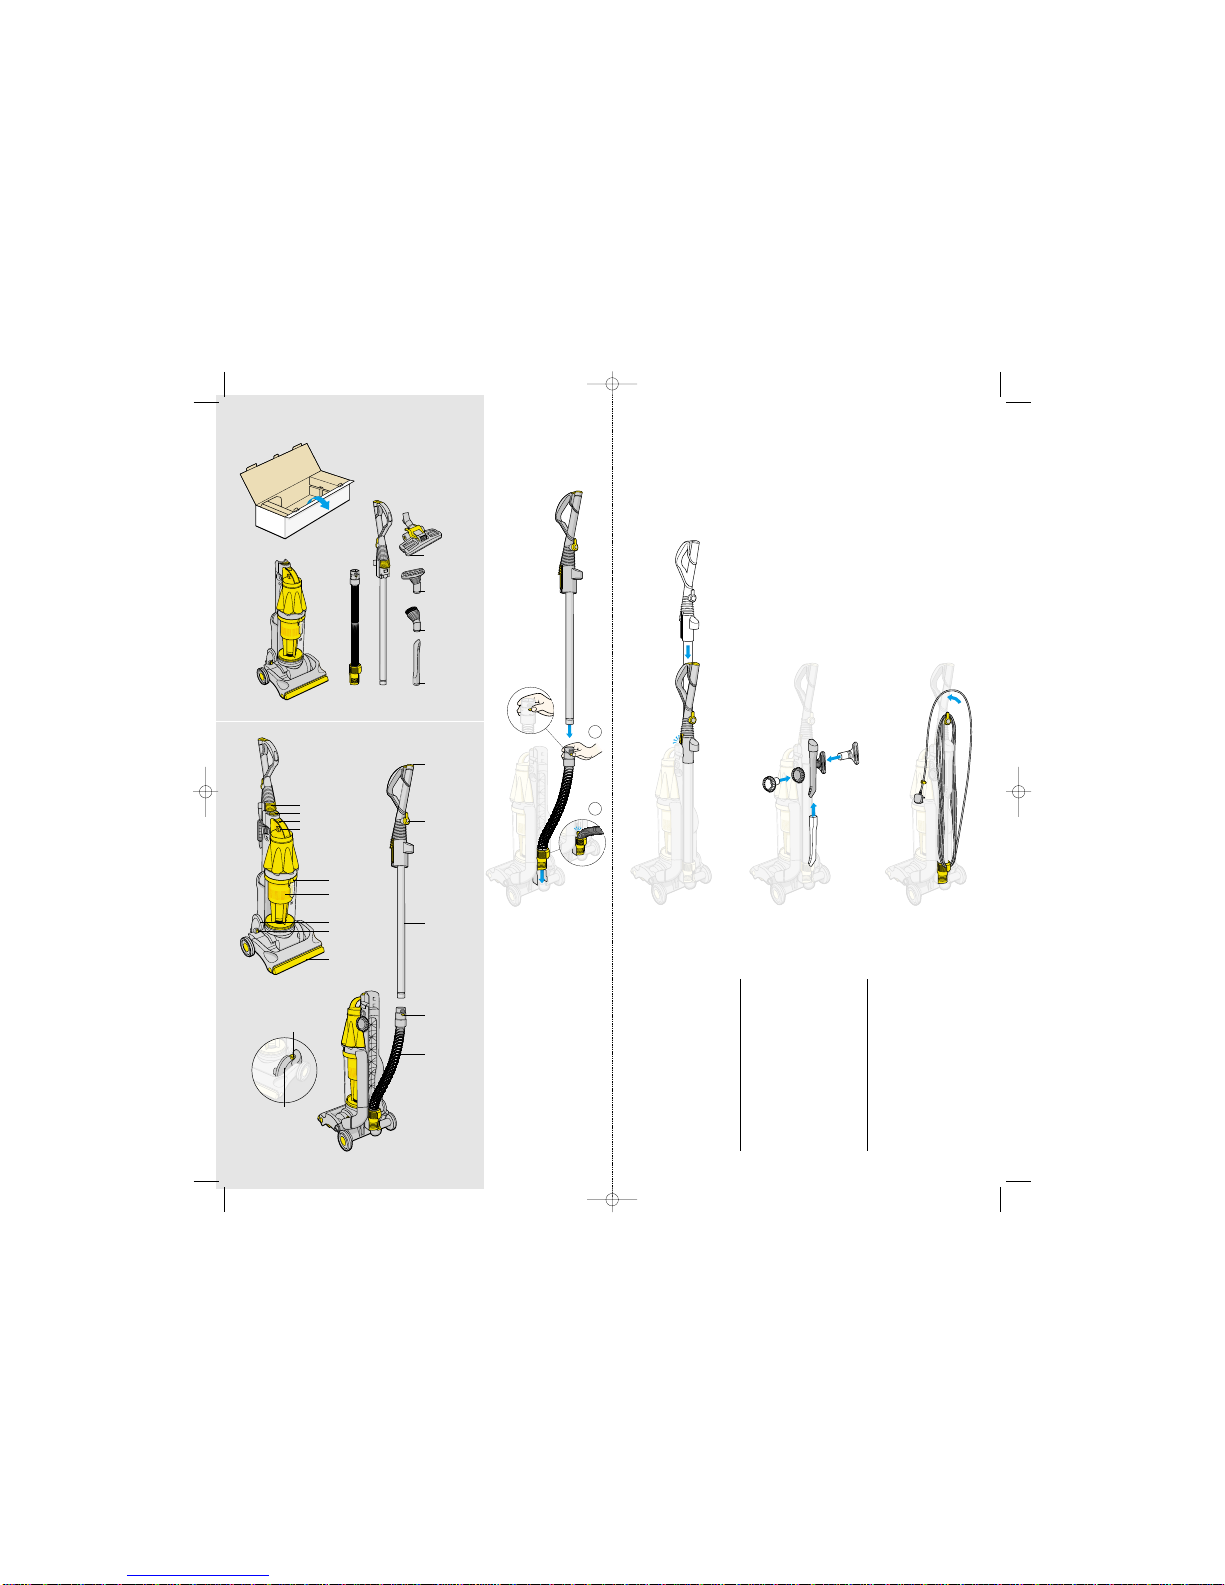
The following items can be
used with your DCO7. For
further information please
see the order form, or visit
the Dyson website at
www.dyson.com.
Dyson-engineered floortool
To reach under low furniture.
It is also adjustable for hard
floors and carpets.
Groomer
Long bristles work Zorb carpet-
cleaning powder deep into carpets.
Important
•This appliance is not intended for
use by young children or infirm
persons without supervision.
•Young children should be
supervised to ensure they do not
play with the appliance.
•Check that your electricity supply
corresponds to that shown on the
rating plate. The appliance must
only be used as rated.
•If the supply cable of the
appliance is damaged, disconnect
the appliance from the socket
outlet immediately. The supply
cable must be replaced by the
manufacturer or its service agent
or a similarly qualified person in
order to avoid a hazard.
This product is protected by the following Intellectual
Property Rights:
EP1066115, EP0489565, EP0636338,
EP0800359, EP0800360, EP99934871.7
EP99947732.9, EP99947735.9, EP99947736.7,
PCT/GB01/00498, US07/555,953,
US09/647,156, US09/806,918, US09/806,919,
US09/806,930, CA 2313177, CA 2325953,
AU30432/99, AU61106/99, AU61108/99,
AU61109/99, AU637272, AU697029,
AU691710, AU14947/99, AU30432/99,
AU50510/99, WO 99/49978, WO 00/21427,
WO 00/21424, WO 00/21425, GB 2342283,
GB 2342282, GB 0104675.4, GB 0104678.8,
GB 0104677.0, GB 0104662.2, GB 0109390.5,
GB 0109391.3, GB 0109393.9, GB 0109395.4,
GB 0109399.6, GB 0109402.8, GB 0109403.6,
GB 0109405.1, GB 0109406.9, GB 0109407.7,
Design registrations: GB 2099793
For your safety
Do not pull on
supply cable. Do not use cleaner
above you on stairs.
Do not place hands
under brushbar
when in use.
Do not use cleaner
to pick up water or
any other liquid.
Do not use cleaner
near naked flames. Do not leave cleaner
near heat sources.
Do not run over
supply cable. Do not use cleaner
to pick up burning
objects of any kind.
DCO7 accessories Dyson Customer Care
Every new Dyson domestic
vacuum cleaner has a 2 year
guarantee.
If you have a query about your
Dyson, call the Dyson Customer
Helpline with your serial number
and details of where/when you
bought the cleaner.
Most queries can be solved
over the phone by one of our
factory-trained Helpline staff.
If your cleaner needs attention
from our engineers, we aim to
have it repaired and tested
within 3 working days.
Your serial number can be
found on your rating plate
which is underneath the
machine beneath the wheels.
Note your serial number for
future reference:
DYSON LIMITED MALMESBURY SN16 ORP ENGLAND UK
230-240V 50Hz
1400 W
FOR PATENTINFORMATION SEE OPERATING MANUAL 02422-01-04
Zorb carpet-cleaning powder
(750g)*
Millions of tiny sponges absorb
dirt from the carpet, keeping
new carpets looking new with
none of the drawbacks of wet
cleaning.
Dyzolv spot cleaner (250ml)*
Contains 4 active agents to
clean spots and spills e.g.
grease, food, drinks and soil.
Ideal for wool and stain-
resistant carpets and rugs.
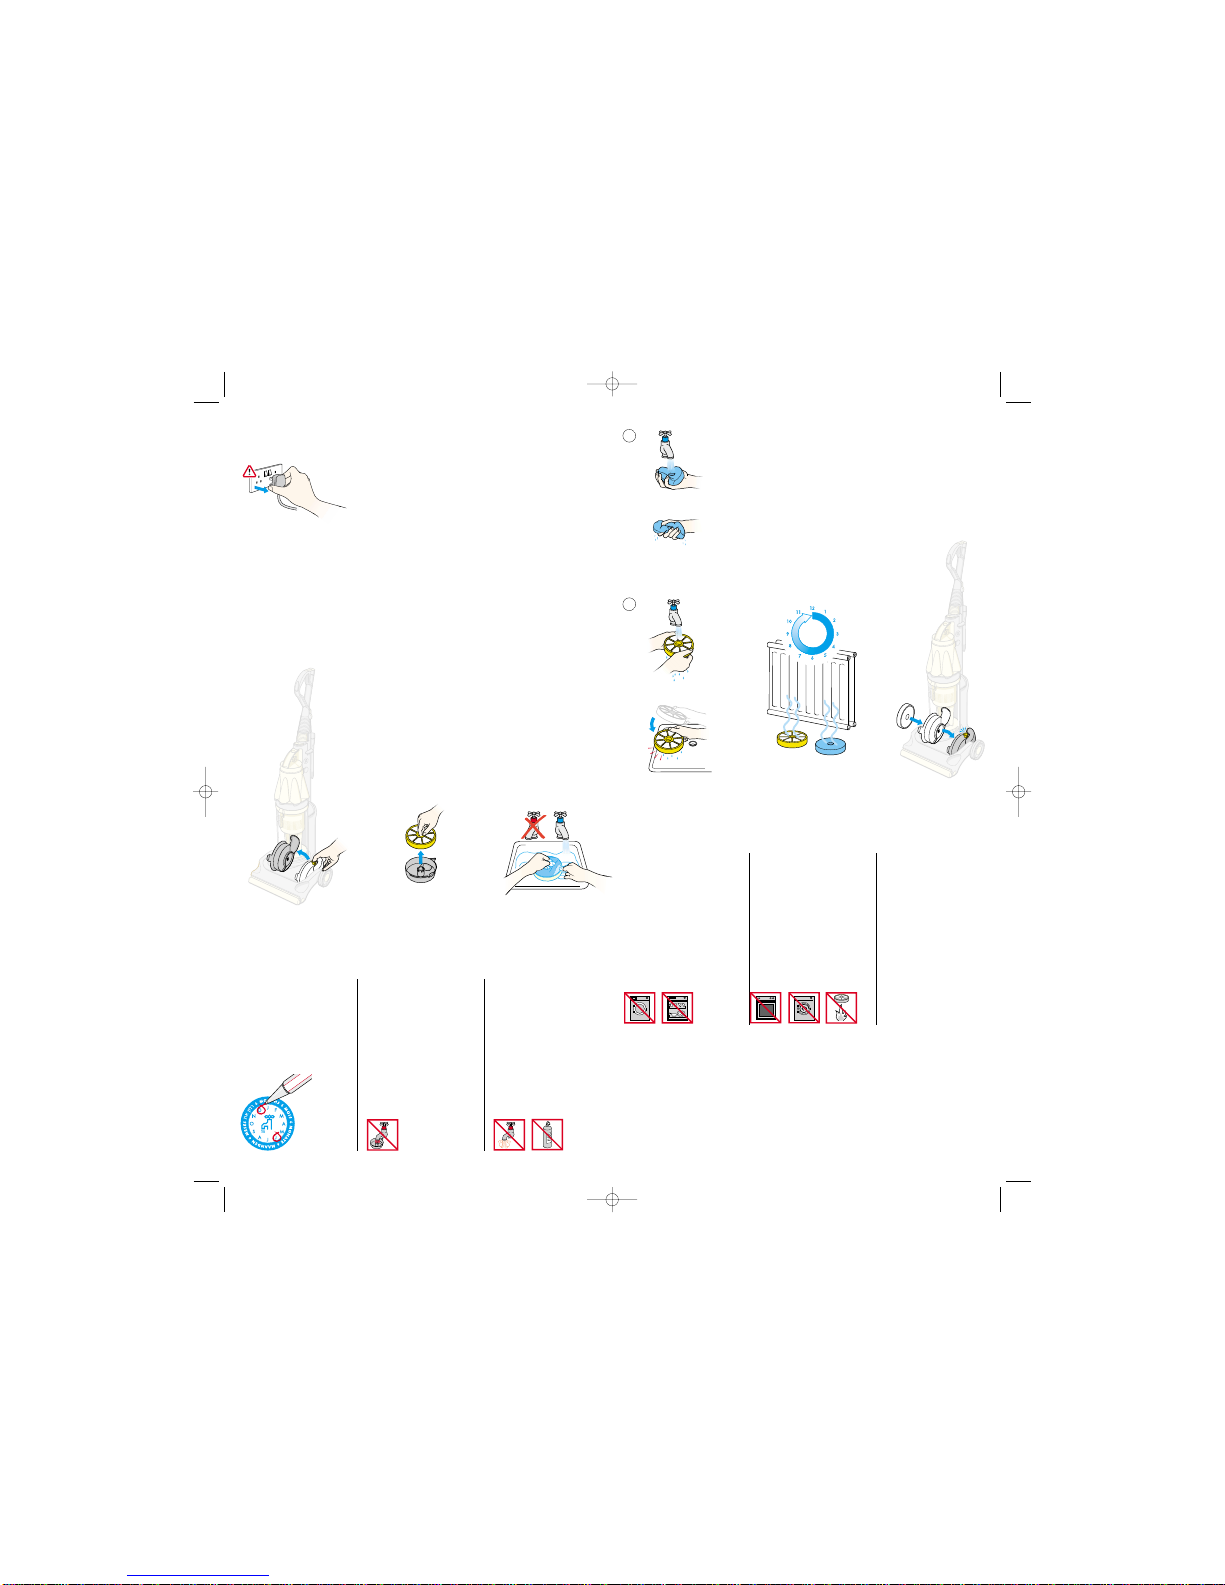
•Do not use the cleaner if the cable
or plug are damaged or if the
cleaner has been damaged,
dropped or has come into contact
with water or any other liquid. In
these cases, contact
the Helpline.
•When vacuuming, certain carpets
may generate small static charges
in the clear bin. These are entirely
harmless and are not associated
with the mains supply. To minimise
any effect from this, do not put your
hand or insert any object into the
clear bin unless you
have first emptied it and rinsed it
out with cold water.
•Do not continue to use the cleaner
if any part appears to be faulty,
missing or damaged.
PN.04482-01-02 JN.6057 24.09.01
*items not approved by British Allergy Foundation.
•Do not carry out any maintenance
work other than that shown in this
manual or advised by the Helpline
and do not put anything into the
openings or moving parts of the
machine.
•Only use parts produced or
recommended by Dyson; failure
to do so could invalidate your
guarantee.
European conformity information:
a sample of this product has been
tested and found to be in
conformity with the following
European Directives: 73/23/EEC
Low Voltage (Safety) Directive,
93/68/ EEC CE Marking Directive
and 89/336/EEC EMC Directive.
NB: Small details may vary slightly.
Equivalent patents, design registrations and
applications exist in other countries.
6057-DCO7 OPS MAN (UPDATE) 10/23/01 12:26 PM Page 12

UK 08705 275 104 Tetbury Hill, Malmesbury, Wilts SN16 0RP.
IRL (01) 475 7109 Unit 2, Baldonneu Business Park, Naas Road, Co Dublin.
Visit the Dyson website for product information and to order accessories and spares.
helpline
6057-DCO7 OPS MAN (UPDATE) 10/23/01 12:26 PM Page 14
Other manuals for DCo7
4
Table of contents
Other Dyson Vacuum Cleaner manuals

Dyson
Dyson DC 37C User manual

Dyson
Dyson Ball User manual

Dyson
Dyson DC15 The Ball User manual

Dyson
Dyson Radix 6 User manual

Dyson
Dyson 360 Eye Operating instructions

Dyson
Dyson V7 Motorhead User manual

Dyson
Dyson SV03 User manual

Dyson
Dyson DC 33 C User manual

Dyson
Dyson DC61 User manual

Dyson
Dyson DC29dB User manual

Dyson
Dyson V11 User manual

Dyson
Dyson V8 ORIGIN User manual

Dyson
Dyson D23 stowaway User manual

Dyson
Dyson Ball DC25 User manual

Dyson
Dyson DC16 motorhead User manual

Dyson
Dyson DC17 Absolute User manual

Dyson
Dyson 330V11ANIMAL+ User manual

Dyson
Dyson DC26 User manual

Dyson
Dyson DC59 Animal User manual

Dyson
Dyson Slim User manual