manuals.online logo
Brands
  1. Home
  2. •
  3. Brands
  4. •
  5. Eastwood
  6. •
  7. Tools Storage
  8. •
  9. Eastwood CUT-N-WELD 21273 User manual

Eastwood CUT-N-WELD 21273 User manual

CUT-N-WELD
INSTRUCTIONS
Item #21273
2Eastwood Technical Assistance: 800.343.9353 >> techelp@eastwood.com
The EASTWOOD CUT-N-WELD WELDING TOP AND PLASMA CUTTING TOPS are available separately and designed to fit the Eastwood 750 lb. Work Stand
(#43120) and others with up to a 1.25” [32mm] tube diameter. The Welding Top is constructed of heavy 14 gauge steel for superior warp-resistance and has
generous 1.00” wide clamping slots for maximum welding versatility. The Plasma Cutting Top consists of a rugged steel frame with (10) 22” x 1.25” 12 gauge
steel, replaceable Cutting Slats (#21275).
CONTENTS
#21273 Includes:(1) Welding Top (2) M6 x 12mm Round Head Screws (2) 1.25” [32mm] x 0.4” [1.0mm] Spacers
(2) M6 x 12mm Countersunk Screws
#21274 Includes: (1) Plasma Cutting Top (4) M6 x 12mm Round Head Screws (2) 1.25” [32mm] x 0.4” [1.0mm] Spacers
SPECIFICATIONS
#21273 Welding Top: • 29” [738mm] x 19.10” [485mm] Working Surface • 14 gauge • Weight Limit: 250lbs.
#21274 Plasma Cutting Top: • 23.20” [588.5mm] x 22.05” [560mm] • 12 gauge • Weight Limit: 100lbs.
READ INSTRUCTIONS
• Thoroughly read and understand this manual before using.
• Save for future reference.
PINCH & CRUSH HAZARD!
• Keep fingers and hands away from moving parts when operating.
INJURY HAZARD!
• Exercise caution when using Plasma Cutting Table Top to keep the cutting area centered over the Cutting Slats. Failure to do so could
result in damage to the Table Top or Folding Stand structure causing an unsafe condition due to reduced load capacity.
• Inspect Table Tops and Stand before each use for loose, broken, or damaged components. Do not use tables if any components are
damaged or not properly adjusted.
CUT HAZARD!
• Handling sharp metal can cause serious cuts. Wear thick, well fitting work gloves to prevent cuts from handling sharp metal.
INJURY HAZARD!
• Handling sharp metal can cause serious cuts. Wear thick, well fitting work gloves to prevent cuts from handling sharp metal.
DANGER indicates a hazardous situation which, if not avoided, will result in death or serious injury.
WARNING indicates a hazardous situation which, if not avoided, could result in death or serious injury.
CAUTION used with the safety alert symbol, indicates a hazardous situation which, if not avoided, could result in minor or moderate injury.
NOTICE is used to address practices not related to personal injury.
SAFETY INFORMATION
The following explanations are displayed in this manual, on the labeling, and on all other information provided with this product:
OR
To order parts and supplies: 800.343.9353 >> eastwood.com 3
ASSEMBLY
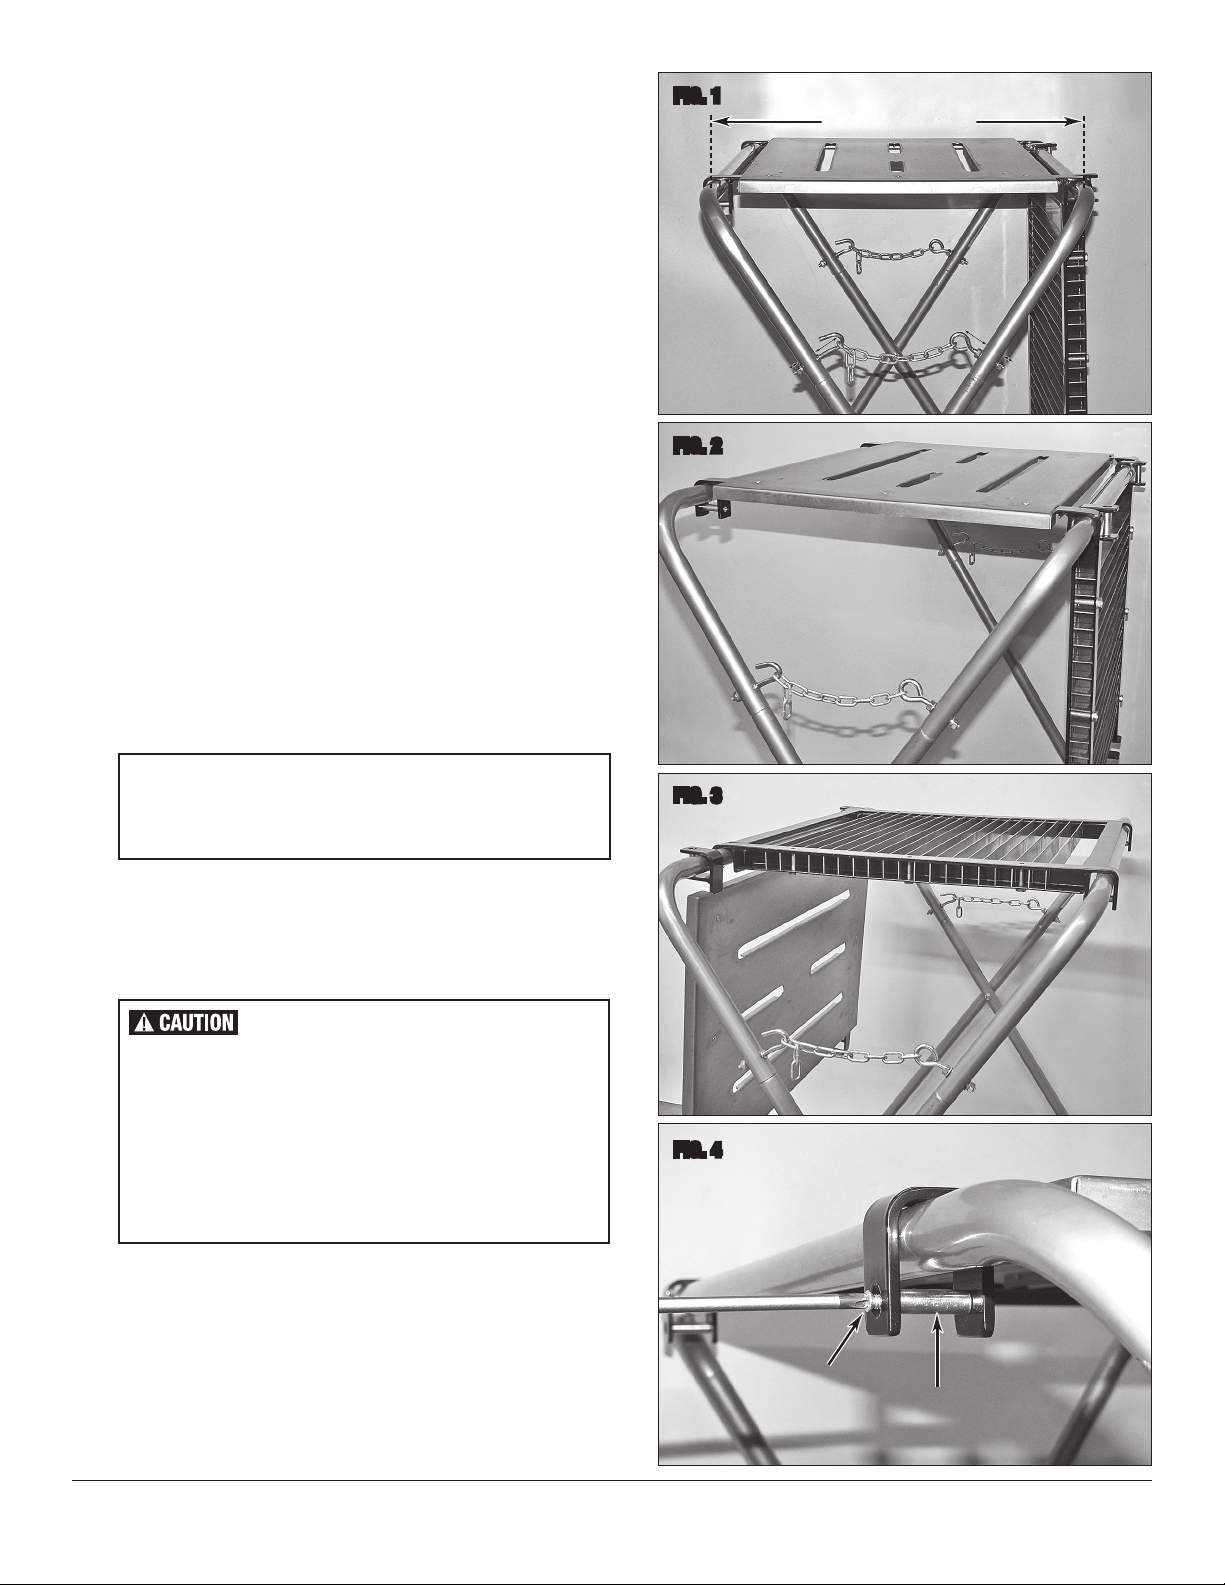
• Remove Foam Padding from existing work stand.
• The center-to-center dimension between the tops of the work stand tubes
must be set at 23” [584mm] (FIG 1).
• Most stands rely on chains, “Eye” hooks and “J” hooks to support the
spread of the tubular members.
- First, place the chain links into the “J” hooks that most closely provide
the 23” [584mm] top-tube CL to CL dimension (FIG 1).
- Some fine tuning, in-and-out adjustment of the mounting of the
“J” and “Eye” hooks may be required (FIG 1).
• Carefully set the #21273 Welding Top or the #21274 Plasma Cutting Top
with the open end of the brackets over the tops of the work stand tubes
(FIG 2). IMPORTANT NOTE: If using both tops, carefully swing the
previously mounted one up, over and allow it to hang (FIG 3).
• Note that the Spacers are threaded. Place one of the Spacers under the
tube and between the tabs of the bracket.
• Insert an M6 x 12mm tapered screw through the countersunk hole and
thread into the Spacer (FIG 4).
• Insert an M6 x 12mm pan head screw into the backside hole of the
bracket and thread into the Spacer.
• Once both screws have started threading, they should then be tightened.
• Repeat for remaining screw and spacer.
• The Eastwood Welding Top and/or Plasma Cutting Top is now ready
for use.
TECH TIP:
Mark the appropriate chain link before folding the
stand for storage so that the 23” [584mm] top
tube spacing dimension can be quickly returned
to the next time the stand is needed.
FIG. 1
FIG. 2
FIG. 3
FIG. 4
Adjust to: 23” [584mm]
Center to Center
✓
✓
Out
In In
Out
✓
✓
✓
✓
✓
✓
✓
✓
Screw
✓
Spacer
✓
INJURY HAZARD!
• Exercise caution when using Plasma Cutting Table Top
to keep the cutting area centered over the Cutting Slats.
Failure to do so could result in damage to the Table Top
or Folding Stand structure causing an unsafe condition
due to reduced load capacity.
• Inspect Table Tops and Stand before each use for loose,
broken, or damaged components. Do not use tables if
any components are damaged or not properly adjusted.
© Copyright 2017 Easthill Group, Inc. 1/17 Instruction Item #21273Q Rev. 3
If you have any questions about the use of this product, please contact
The Eastwood Technical Assistance Service Department: 800.343.9353 >> email: techelp@eastwood.com
PDF version of this manual is available online >> eastwood.com/21273manual
The Eastwood Company 263 Shoemaker Road, Pottstown, PA 19464, USA
US and Canada: 800.343.9353 Outside US: 610.718.8335
Fax: 610.323.6268 eastwood.com
ADDITIONAL ITEMS
#13689 Plasma Cutting Guide
#20188 Magnetic Plasma Cutting Guide
#30722 Corner Vise
#20162 6pc Clamp Kit
REPLACING SLATS ON PLASMA
CUTTING TOP WITH #21275 SLAT KIT
• Remove Plasma Cutting Top from work stand.
• Place top upside down on a flat surface.
• Remove 3 bolts from one frame cross member assembly with a 17mm wrench
and withdraw the slotted cross member beam (FIG 5).
• Loosen (do not remove) the 3 bolts on the opposite cross member.
• Remove all or some of the slats as required.
• Replace Slats.
• Line up slots and replace beam and Retaining Bolts.
• Tighten remaining bolts.
FIG. 5

This manual suits for next models

1

Other Eastwood Tools Storage manuals

Eastwood 31654 User manual

Eastwood

Eastwood 31654 User manual

Eastwood 31652 User manual

Eastwood

Eastwood 31652 User manual

Eastwood 31554 User manual

Eastwood

Eastwood 31554 User manual

Eastwood 14142 User manual

Eastwood

Eastwood 14142 User manual

Popular Tools Storage manuals by other brands

Denios PolySafe-Depot Typ K user manual

Denios

Denios PolySafe-Depot Typ K user manual

Rubbermaid 6191 manual

Rubbermaid

Rubbermaid 6191 manual

Craftsman 706.657840 Assembly instructions

Craftsman

Craftsman 706.657840 Assembly instructions

Clarke CWB300 Assembly instructions

Clarke

Clarke CWB300 Assembly instructions

Extreme Tools RX5513HR owner's manual

Extreme Tools

Extreme Tools RX5513HR owner's manual

DIVERSIFIED WOODCRAFTS WB Series Assembly instructions

DIVERSIFIED WOODCRAFTS

DIVERSIFIED WOODCRAFTS WB Series Assembly instructions

Grizzly T33254 instructions

Grizzly

Grizzly T33254 instructions

brennenstuhl MB 120 KH Operation and safety notes

brennenstuhl

brennenstuhl MB 120 KH Operation and safety notes

Pollard 120 Assembly instructions

Pollard

Pollard 120 Assembly instructions

Edsal VR400BLK manual

Edsal

Edsal VR400BLK manual

DRAPER TOOLS Bunker 08222 Assembly instructions

DRAPER TOOLS

DRAPER TOOLS Bunker 08222 Assembly instructions

Husky H4CH1 Use and care guide

Husky

Husky H4CH1 Use and care guide

Members Mark 20802B Assembly instructions & user manual

Members Mark

Members Mark 20802B Assembly instructions & user manual

Newpo Light Duty Workbench Guide to Assembly & Usage

Newpo

Newpo Light Duty Workbench Guide to Assembly & Usage

Grizzly H7507 instruction sheet

Grizzly

Grizzly H7507 instruction sheet

Supatool STP7536 Operation manual

Supatool

Supatool STP7536 Operation manual

Clarke CWB1205P Assembly instructions

Clarke

Clarke CWB1205P Assembly instructions

CMT ORANGE TOOLS CMT200-04 Operating/safety instructions

CMT ORANGE TOOLS

CMT ORANGE TOOLS CMT200-04 Operating/safety instructions

manuals.online logo
manuals.online logoBrands
  • About & Mission
  • Contact us
  • Privacy Policy
  • Terms and Conditions

Copyright 2025 Manuals.Online. All Rights Reserved.