Echo DM-6120 User manual

1????
OPERATOR'S MANUAL
MANUAL DE INSTRUCCIONES
MANUAL DO OPERADOR
ENGLISH
ESPAÑOL
PORTUGUÊS
DM-6120
WARNING
READ THE INSTRUCTIONS CAREFULLY AND FOLLOW THE RULES FOR
SAFE OPERATION.
FAILURE TO DO SO COULD RESULT IN SERIOUS INJURY.
ADVERTENCIA
LEA ATENTAMENTE LAS INSTRUCCIONES Y SIGA LAS INDICACIONES
PARA UN FUNCIONAMIENTO SEGURO.
DE NO HACERLO, PODRÍA SUFRIR LESIONES GRAVES.
ATENÇÃO
LEIA AS INSTRUÇÕES CUIDADOSAMENTE E SIGA AS REGRAS PARA OP-
ERAÇÃO SEGURA.
O NÃO CUMPRIMENTO PODE RESULTAR EM LESÕES GRAVES.

2

1Top cover
ENGLISH
OPERATOR'S MANUAL
KNAPSACK TYPE
DUSTER/MIST BLOWER
DM-6120
WARNING
READ THE INSTRUCTIONS CAREFULLY AND FOLLOW THE
RULES FOR SAFE OPERATION.
FAILURE TO DO SO COULD RESULT IN SERIOUS INJURY.

2
Contents
For safe use of your product............................................................................................... 3
Description.......................................................................................................................... 7
Before you start .................................................................................................................. 8
Assembly ....................................................................................................................... 8
Preparing the fuel .......................................................................................................... 9
Chemicals.................................................................................................................... 10
Engine operation...............................................................................................................11
Starting the engine ...................................................................................................... 11
Stopping the engine..................................................................................................... 12
Operating mist blower....................................................................................................... 13
Filling chemical tank .................................................................................................... 13
Adjusting spray pattern................................................................................................ 13
Adjusting spray volume................................................................................................ 14
Cleaning chemical tank................................................................................................ 14
Maintenance and care ...................................................................................................... 15
Servicing guideline....................................................................................................... 15
Maintenance and care ................................................................................................. 15
Troubleshooting table .................................................................................................. 18
Long-term storage(30 days or more)........................................................................... 19
Specifications.................................................................................................................... 20

3
For safe use of your product
For safe us e of your pro duct
Important information
WARNING
Please ensure that you read the operator's manual before using your product.
About your operator's manual
This manual contains necessary information about the assembly, operation, and maintenance of your product.
Please read it carefully and absorb its contents.
Always keep your manual in a place where it is readily accessible.
If you have lost your manual or it is damaged and no longer readable, please purchase a new one from your dealer.
The units used in this manual are SI units (International System of Units). Figures in parentheses are reference val-
ues, and there may be a slight conversion error in some cases.
Failure to do so could lead to an accident or serious injury.
Intended use of this product
This product is lightweight, high-performance, petrol engined knapsack units designed for spreading powder, gran-
ule, liquid chemical and fertilizer.
Do not use this unit for any purpose other than aforementioned.
The content of this manual may be changed without notice for the purpose of upgrades to the product. Some of the
illustrations used may differ from the product itself in order to make the explanations clearer.
Please consult your dealer if anything is unclear or of concern.
Failure to do so could lead to an accident or serious injury.
Do not modify the product
You must not modify the product.
To do so could lead to an accident or serious injury. Any malfunction resulting from a modification to the product will not be
covered by the manufacturer's warranty.
Do not use the product unless it has been checked and maintained
You must not use the product unless it has been checked and maintained. Always ensure that the product is checked
and maintained on a regular basis.
Failure to do so could lead to an accident or serious injury.
Loaning or assigning your product
When loaning your product to another party, ensure that the person borrowing the product receives the operator's
manual along with it.
If you assign your product to another party, please enclose the operator's manual with the product when handing it
over.
Failure to do so could lead to an accident or serious injury.
Users of the product
The product should not be used by:
people who are tired
people who have taken alcohol
people who are on medication
people who are pregnant
people who are in poor physical condition
people who have not read the operator's manual
children
Avoid direct contact or ingestion of chemicals you may use. Consult the label the chemicals, you may use for addi-
tional warning and precautions as well as emergency treatment. Stop operating the unit immediately if you feel sick
or excessive fatigue during operation. See a doctor if this condition persists.
Keep in mind that the operator or user is responsible for accidents or hazards occurring to other people or their prop-
erty.
Failure to observe these instructions could lead to an accident.

4
For safe use of your product
Vibration and cold
It is believed that a condition called Raynaud's Phenomenon which affects the fingers of certain individuals may be
brought about by exposure to vibration and cold. Exposure to vibration and cold may cause tingling and burning,
followed by loss of colour and numbness in the fingers. The following precautions are strongly recommended be-
cause the minimum exposure which might trigger the ailment is unknown.
Keep your body warm, especially the head and neck, feet and ankles, and hands and wrists.
Maintain good blood circulation by performing vigorous arm exercises during frequent work breaks, and also by
not smoking.
Limit the number of hours of operation. Try to fill each day with jobs where operating the duster/mist blower or
other hand-held power equipment is not required.
If you experience discomfort redness and swelling of the fingers, followed by whitening and loss of feeling, con-
sult your physician before exposing yourself further to cold and vibration.
Failure to observe these instructions could result in damage to your health.
Repetitive stress injuries
It is believed that over-using the muscles and tendons of the fingers, hands, arms and shoulders may cause sore-
ness, swelling, numbness, weakness and extreme pain to the areas just mentioned. Certain repetitive hand activities
may put you at a high risk for developing a repetitive stress injury (RSI). To reduce the risk of RSI, do the following:
Avoid using your wrist in a bent, extended or twisted position.
Take periodic breaks to minimize repetition and rest your hands. Reduce the speed and force in which you do the
repetitive movement.
Do exercises to strengthen hand and arm muscles.
See a doctor if you feel tingling, numbness or pain in your fingers, hands, wrists or arms. The sooner RSI is diag-
nosed, the more likely permanent nerve and muscle damage can be prevented.
Failure to observe these instructions could result in damage to your health.
Proper training
Do not permit operation without proper training and protective equipment.
Be thoroughly familiar with the controls and proper use of unit.
Know how to stop the unit and shut off the engine.
Know how to unhook a harnessed unit quickly.
Never allow anyone to use the unit without proper instruction.
Failure to observe these instructions could result in damage to your health.
Wear proper clothing.
Do not wear ties, jewellery, or loose, dangling clothing which could be caught in the
unit.
Do not wear open toed footwear, or go bare-foot or barelegged.
Secure hair so it is above shoulder length.
Failure to observe these precautions could result in damage to your sight or hearing, or lead
to a serious injury.
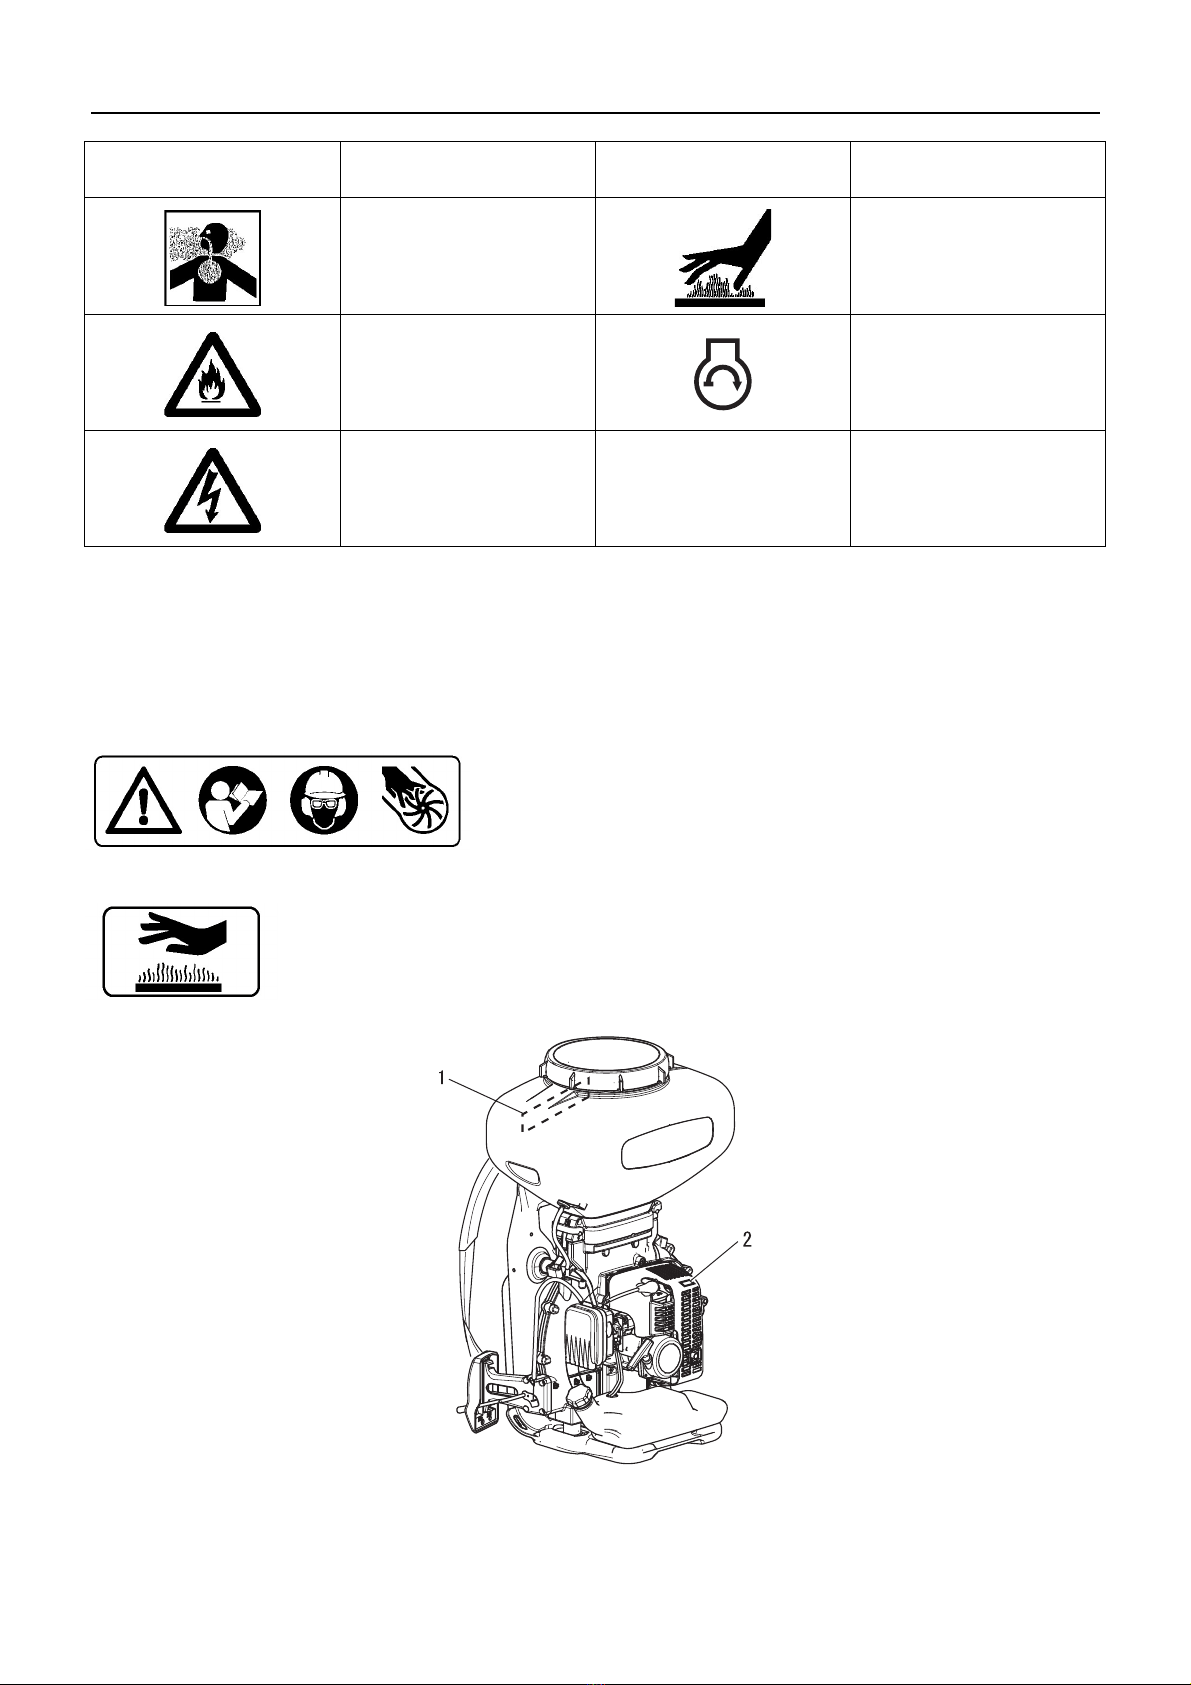
Wear protective gear
Always wear the following protective gear when working with the unit.
Head protection (cap): Protects the head
Ear muffs or ear plugs: Protect the hearing
Safety goggles: Protect the eyes
Officially approved toxic mist respirator: Protects the breathing
Non-slip, heavy rubber work gloves: Protect the hands from chemicals
Chemical resisting work clothes: Protect the body
Non-skid sole shoes (with toecaps) : Protect the feet
Failure to observe these precautions could result in damage to your sight or hearing, or lead to a serious injury.
Environment of use and operation
Do not use the product:
a windy day or rainy day to avoid chemical drift.
on steep slopes or in places which give no secure foothold and are thus slippery.
at night or in dark places with poor visibility.
A serious injury could result if you fall or slip, or fail to operate the product correctly.
Heavy protective clothing can increase operator fatigue which may lead to heat stroke. Delay heavy work until the
temperature drops.
Failure to observe these instructions could result in damage to your health.
WARNING

5
For safe use of your product
Warning notices
Other indicators
Symbols
Being prepared in case of an injury
In the unlikely event of an accident or injury, please ensure that you are
prepared.
First aid kit
Towels and wipes (to stop any bleeding)
Whistle or mobile phone (for calling outside help)
If you are unable to perform first aid or call for outside help, the injury could
worsen.
Put safety first in the case of fire or smoke
If fire comes from the engine or smoke appears from any area other than the exhaust vent, first distance
yourself from the product to ensure your physical safety.
Use a shovel to throw sand or other such material on the fire to prevent it from spreading, or put it out
with a fire extinguisher.
A panicked reaction could result in the fire and other damage becoming more extensive.
WARNING
DANGER WARNING CAUTION
This symbol accompanied by the
word "DANGER" calls attentions to
an act or a condition which will lead to
serious personal injury or death of op-
erators and bystanders.
This symbol accompanied by the
word "WARNING" calls attentions to
an act or a condition which can lead to
serious personal injury or death of op-
erators and bystanders.
"CAUTION" indicates a potentially
hazardous situation which, if not
avoided, may result in minor or mod-
erate injury.
Circle and slash sym-
bol means whatever is
shown is prohibited.
NOTE IMPORTANT
This enclosed message provides tips
for use, care and maintenance of the
product.
Framed text featuring the word "IM-
PORTANT" contains important infor-
mation about the use, checking,
maintenance and storage of the prod-
uct described in this manual.
Symbol form/shape Symbol description/applica-
tion
Symbol form/shape Symbol description/applica-
tion
Carefully read the operator's
manual Petrol and oil mixture
Wear eyes, ears and head
protection
Choke Control "Cold Start"
Position (Choke Closed)
Wear foot protection and
gloves
Choke Control "Run" Position
(Choke Open)
Emergency stop Finger Severing

6
For safe use of your product
Safety decal(s)
The safety decal shown below has been attached to the products described in this manual. Ensure that you understand what
the decal means before using your product.
If the decal becomes unreadable due to wear and tear or damage, or peels off and is lost, please purchase a replacement decal
from your dealer and attach it in the location shown in the illustrations below. Ensure that the decal is readable at all times.
Do not use the product in plac-
es with poor ventilation
Beware of high-temperature
areas
Beware of fire Engine start
Beware of electric shocks
Symbol form/shape Symbol description/applica-
tion
Symbol form/shape Symbol description/applica-
tion
1. Safety decal (Part number 890160-09461)
2. Safety decal (Part number X505-002310)

7
Description
Description
The dusting device is optional, please contact your dealer.
1. Chemical tank - Contains chemical.
2. Shoulder harness - Used to support unit on operator's
back.
3. Cushion back-plate
4. Throttle control lever - Activated by the operator's hand
for controlling the engine speed.
5. Air cleaner cover - Covers air filter.
6. Fuel tank cap - For closing the fuel tank.
7. Choke lever - Device for enriching the fuel/air mixture in
the carburettor to aid starting.Contains fuel and fuel fil-
ter.
8. Carburettor
9. Starter grip - Pull grip to start the engine.
10. Silencer - The silencer controls the exhaust noise and
prevents hot, glowing particles of carbon from leaving
the silencer.
11. Spark plug

8
Before you start
Before you start
Assembly
Misting
Chemical tank assembly
1. Chemical tank cap
2. Clamp
3. Filter
4. Pressure tube
5. Nut
6. Pressure tube
7. Clamp
8. Plate
9. Bracket
10. Holder
11. Screw
12. Pin
13. Discharge tube
14. Outlet connector
15. Clamp
Pipe/Tube connection
16. Packing
17. Flexible pipe
18. Packing
19. Clamp
20. Straight pipe
21. Handle
22. Rubber band
23. Straight pipe
24. Curbed pipe
25. Nozzle
26. Discharge tube
27. Valve .... secured by clamp
28. Hook
WARNING
Read the operator's manual carefully to ensure that you assemble the product correctly.
Using a product that has been incorrectly assembled could lead to an accident or serious injury.

9
Before you start
Preparing the fuel
Fuel
Recommended mixture ratio; 50 : 1 (2 %) for ISO-L-EGD
Standard (ISO/CD 13738), JASO FC,FD grade and ECHO
Premium 50 : 1 oil.
Do not mix directly in engine fuel tank.
Fuel supply
Do not add so much fuel that it reaches the mouth of the fuel
tank (A). Keep the fuel within the prescribed level (up to the
shoulder level (B) of the fuel tank).
Tighten the fuel tank cap securely after refuelling.
DANGER
Do not fuel up while the engine is hot or in operation.
Do not smoke or hold a flame near when refuelling.
If you do so, the fuel could ignite and cause fire, leading to burns.
WARNING
Do not fill fuel tanks indoors. Always fill fuel tanks outdoors over bare ground. Do not refuel the product on the load-
ing platform of a truck, or in other such places.
Fuel tanks/cans may be under pressure. Always loosen fuel caps slowly allowing pressure to equalize.
Otherwise, fuel may get spewed.
Mop up any fuel that overflows or spills out due to overfilling.
Fuel spills can cause fire and burns when ignited.
After refuelling, always check that there are no leaks or discharges of fuel from the fuel pipe, fuel system grommets,
or around the fuel tank cap. If you do find fuel leaks or discharges, stop using the product immediately and contact
your dealer to have it repaired.
Any fuel leaks could cause fire.
Keep the refuelling tank in a shaded area away from fire.
Use an approved fuel container.
IMPORTANT
Fuel is a mixture of regular grade petrol and an air-cooled 2-stroke engine oil of reputable brand name. Minimum 89 Octane
unleaded petrol is recommended. Do not use fuel containing methyl alcohol or more than 10% of ethyl alcohol.
Stored fuel ages. Do not mix more fuel than you expect to use in thirty (30) days.

10
Before you start
Chemicals
Follow all precautions and instructions in the label of chemi-
cals when handling.
Never allow untrained persons or children to handle chemicals
and the unit.
Stop engine and put the unit down when filling chemicals.
Be sure to close valve before filling chemicals.
Do not overfill chemicals and wipe spillage away immediately.
Secure chemical tank cap firmly to avoid leakage of chemicals
during the operation.
WARNING
Avoid direct contact and ingestion of chemicals. Some chemicals may be strongly harmful to human and animals.
Misuse of the chemicals can result in serious poisoning or death.
Sulfur is a very inflammable material. When spraying chemicals containing sulfur, carefully read explanation on ap-
plication attached to the chemicals and treat them with care.
NOTE
Do not dilute chemicals directly in the chemical tank.
Always use fresh, dry (powder/granule/fertilizer) chemicals.

11
Engine operation
Engine operation
Starting the engine
Starting a cold engine
(Connect the spark plug cap if the product has been in storage for
a long period of time.)
1. Move choke lever (A) up to CLOSED position.
2. Close valve (mister).
3. Push purge bulb (C) until fuel is visible in clear fuel return line
(D).
4. Move throttle control lever (E) to START position (F) 1 or 2
and securely hold the machine, pull starter grip (G) several
times until first firing sound.
5. Move choke lever down to OPEN position. Restart the en-
gine and allow to warm up for a few minutes, before using.
WARNING
Be particularly careful to observe the following precautions when starting the engine:
Move at least 3m from the place where you refueled.
Place the product in a flat, well ventilated place.
Check that there are no fuel leaks.
Check that none of the nuts and bolts are loose.
Leave plenty of space around the product and do not allow people or animals near it.
Take precautions to keep hair from being drawn into fan.
Start the engine on the ground with the throttle lever at start position.
Hold the product firmly to the ground when starting the engine.
Failure to observe the precautions could cause an accident or injury, or even lead to a fatality.
Check that there are no abnormal vibrations or sounds once the engine starts. Do not use the product if there are
abnormal vibrations or sounds. Contact your dealer to have it repaired.
Accidents involving parts that fall or shatter off can cause wounds or serious injury.
The exhaust fumes from the engine contain toxic gases. Do not operate the product indoors or in other
ill ventilated places.
The exhaust fumes could cause poisoning.
Do not touch silencer, spark plug, and other high temperature components while the product is running
or for some time after it stops.
You could burn yourself if you touch a high temperature component.
Do not touch spark plug, spark plug wire, and other high voltage components while the product is run-
ning.
You could receive an electric shock if you touch a high voltage component while the product is running.
NOTE
Pull out the starter grip gently at first, and then more rapidly. Do not pull the starter rope out to more than 2/3 of its length.
Do not let go of the starter grip as it returns.

12
Engine operation
Starting a warm engine
1. Move throttle control lever to START position 1 or 2.
2. Move choke lever (A) up to OPEN position.
3. If fuel tank is not empty, pull starter grip one to three times
and engine should fire. Do not use choke.
4. If fuel tank is empty, after refilling, push the purge bulb (C)
(until fuel is visible in clear fuel return line (D)) and then pull
the starter grip. Do not use choke.
Stopping the engine 1. Close valve (mister).
2. Then let engine run at idle for cooling down.
3. Move throttle control lever (E) down STOP position (H).
4. If engine does not stop, move the choke lever up to close po-
sition to stall Engine. The engine will stall and come to a halt
(an emergency stop).
If the engine fails to stop, have your dealer inspect and repair
before you use the product again.
5. Always disconnect the spark plug wire from the spark plug to
ensure the engine cannot be started before you work on the
unit or leave it unattended.
NOTE
If engine does not start after 4 pulls, use cold starting proce-
dures.

13
Operating mist blower
Filling chemical tank
Close valve.
Fill liquid chemical through filter into tank (A). Stir up after fill-
ing to avoid chemical deposits at bottom of tank.
Secure tank cap (B) firmly to avoid air pressure leakage. If not,
it results in poor spraying.
Adjusting spray pattern The spray pattern can be adjusted from the straight stream to an
open spray by adjusting the position of collar.
Loosen collar nut (A) and pull collar (B) forward to obtain a
straight stream.
Push collar backward to obtain a wide spray.
WARNING
Before starting the job, check wind direction. Avoid blowing in the direction of open doors and windows, cars, pets,
children or anything that could be harmed by chemical.
This unit is designed for upright use only, do not lay down or lean excessively to avoid leakage of chemicals when
operating and transporting.
This unit will change your equilibrium. Extra precautions should be taken to maintain your footing and balance.
Check the shoulder harnesses are not tangled with any control levers when you put the unit on your back.
Transport of the product
When transporting in the situations described below, turn off the engine and position the silencer away from your-
self.
Moving to the place where you are working.
Moving to another area while you are working.
Leaving the place where you have been working.
Failure to observe these precautions could cause burns or serious injury.
When transporting the product by car, empty the fuel tank, and secure the product firmly in place to prevent it from
moving around.
Travelling by car with fuel in the fuel tank could lead to a fire.
IMPORTANT
Mist blowing must be done leewardly. Choose morning or evening when it is not so windy, and the ground temperature re-
verses, so as to minimize dispersion Iosses and enhance chemical adhesion effect and for less hazardous operation.
Before operating the unit, check and follow Iocal regulations concerning sound level and hours of operation.
Avoid using units when people are likely to be disturbed, such as late at night or early in the morning.
Operate the unit at the lowest possible throttle setting that gets the job done.
Make sure the silencer works well. Also check the air intakes and the air filter to make sure the unit is working properly.
Use only one piece of equipment at a time.

14
Operating mist blower
Adjusting spray volume The spray volume can be adjusted by lining up the number (A)
with mark as shown. The spraying volume is prescribed as fol-
lows.
(Orientation of the pipe: horizontal)
Cleaning chemical tank Clean chemical tank after each use.
1. Fill chemical tank with clear water and run the engine.
2. Open valve to pour water out to clean internal parts of mist-
ing device.
Settingnumber 123456
Discharge volume
(L /min) 0.6 1.1 2.1 3.4 5.1 6.1
NOTE
Keep nozzle at a distance of 70 cm far from plants to pre-
vent damage.
Make job done before diluted chemical depositing at the
bottom of the chemical tank..

15
Maintenance and care
Servicing guideline
Maintenance and care
Cleaning air filter
1. Close choke, remove air cleaner cover (B), grids (C), air fil-
ters. Then check and/or clean air filters by washing in a suit-
able solvent when heavily soiled.
2. Dry filters before reinstalling.
WARNING
Observe the following precautions when checking and maintaining your product after use:
Turn the engine off and do not attempt to check or maintain the product until the engine has cooled.
You could burn yourself.
Remove the spark plug cap before performing checks and maintenance.
An accident could occur if the product starts unexpectedly.
IMPORTANT
Checking and maintenance requires specialist knowledge. If you are unable to check and maintain the product or deal with a
fault yourself, consult your dealer. Do not attempt to dismantle the product.
Area Maintenance Page Before use Monthly
Air filter Clean/Replace 15 •
Fuel filter Inspect/Clean/Replace 16 •
Spark plug Inspect/Clean/Adjust/Replace 17 •
Carburettor Inspect/Replace and adjust - •
Cooling system Inspect/Clean 16 •
Silencer Inspect/Tighten - •
Silencer Clean 16 •*
Starter Inspect - •
Fuel system Inspect 17 •
Screws, bolts and nuts Inspect, Tighten/Replace - •
* Or 100 hours, whichever occurs first.
IMPORTANT
Time intervals are maximum. Actual use and your experience will determine the frequency of required maintenance.
Carburettor has been correctly adjusted in factory. Do not readjust yourself unless it is necessary. It should be readjusted by
dealer.
If you have any questions or problems, please contact your dealer.
NOTE
Clean air filter (A) after each use.

16
Maintenance and care
Replacing fuel filter
1. Use a piece of metal wire or the like to pick up fuel filter (A)
through fuel tank opening.
2. Pull old filter from fuel line (B).
3. Install new fuel filter.
4. Make sure fuel filter goes to bottom of the tank.
Cooling system maintenance
Remove dust and dirt from between fins (A).
Remove all dirt, Ieaves, and other debris from fan case grid.
Care should be taken not to let foreign objects enter fan case
through grid (B). It surely cause damage to fan and fan case.
Cleaning silencer
Clean silencer by removing carbon deposits at outlet port (A).
This should be done periodically to maintain constant perfor-
mance of engine.
NOTE
A clogged fuel filter will cause hard starting or poor engine
performance.
Keep fuel tank clean - do not allow dirt or debris to enter fuel
tank.
WARNING
Do not place hand between engine and backpack housing while engine is in operation. Be sure the engine is fully
stopped before inserting hands to remove any debris. If available, use a utensil to remove the debris.
Failure to observe the precautions could cause an accident or injury, or even lead to a fatality.
IMPORTANT
To maintain proper engine operating temperature, cooling air must pass freely through the cylinder fin area. This
flow of air carries combustion heat away from the engine. Overheating and engine seizure can occur when:
Air intakes are blocked, preventing cooling air from reaching the cylinder,
Dust and grass build up on the outside of the cylinder. This build-up insulates the engine and prevents the heat
from leaving.
Removal of cooling passage blockages or cleaning of cylinder fins is considered "Normal Maintenance". Any resultant failure
attributed to lack of maintenance is not warranted.

17
Maintenance and care
Check fuel system
Check before every use.
After refuelling, make sure fuel does not leak or exude from
around fuel pipe (A), fuel grommet (B) or fuel tank cap (C).
In case of fuel leakage or exudation, there is a danger of fire.
Stop using the machine immediately and request your dealer
to inspect or replace.
Check spark plug
1. Check plug gap. Correct gap is 0.6 mm to 0.7 mm.
2. Inspect electrode for wear.
3. Inspect insulator for oil or other deposits.
4. If the electrodes or terminals are worn, or if there are cracks
in the ceramics, replace them with new parts.
5. Tighten to 15 N·m - 17 N·m (150 kgf·cm to 170 kgf·cm).
The spark test (for checking whether the spark plug is spark-
ing) must be carried out by your dealer.
a: 0.6 - 0.7 mm

18
Maintenance and care
Troubleshooting table
IMPORTANT
For spare parts and consumables, please use only genuine parts and designated products and components.
Using parts from other manufacturers or non-designated components may result in a malfunction.
Problem Diagnosis Cause Solution
The engine does
not start
There is no fuel in the fuel tank
Excess fuel suction
Electrical fault
Carburettor malfunction or internal stick-
ing
Internal engine malfunction
Fuel supply
Start the engine after
servicing
Consult your dealer
Consult your dealer
Consult your dealer
Engine is difficult to
start, fluctuating ro-
tation
Fuel is entering the overflow
pipe
Fuel degradation
Carburettor problem
Replace with new fuel
Consult your dealer
No fuel is entering the over-
flow pipe
Fuel filter is clogged
Fuel system is clogged
Internal carburettor parts sticking
Clean or replace
Consult your dealer
Consult your dealer
The spark plug is dirty or
damp
Fuel degradation
Incorrect electrode gap
Carbon deposits
Electrical fault
Replace
Replace
Replace
Consult your dealer
Engine starts but
no acceleration is
possible
Dirty air filter
Dirty fuel filter
Blocked fuel passage
Carburettor adjustment problem
Blocked exhaust vent or silencer vent
Clean or replace
Clean or replace
Consult your dealer
Adjust
Clean
The engine stops Carburettor adjustment problem
Electrical fault
Adjust
Consult your dealer
No mist discharge
or poor mist dis-
charge
Valve closed (or partially closed)
Valve clogged
Discharge pipe clogged
Nozzle clogged
Loosened chemical tank cap
Open
Clean
Clean
Clean
Secure
No/poor discharge
of dust/granule/fer-
tilizer
Malfunction of shutter mecha-
nism
Frozen shutter
Distortion of shutter mechanism
Loosening/dislocation of shutter linkage
Misposition of shutter control arm
Damped/aged chemica
Clean or replace
Replace
Adjust/secure
Adjust
Use fesh/dry chemical
Chemical cause Foreign substance in the chemical
Hardened chemical
Loosened chemical tank cap
Remove/use fresh
chemical
Crush well
Secure
Poor preparation Unstable seating of chemical tank mount Secure
Consult your dealer in the event of a problem that is not covered in the table above, or other such concerns.
Please contact your dealer in order to dispose of the product or its parts in compliance with national laws.
Table of contents
Languages:
Other Echo Paint Sprayer manuals

Echo
Echo MS-41BPD User manual

Echo
Echo MS-4010BPD User manual

Echo
Echo shindaiwa SP41BPS User manual

Echo
Echo MS-5010BP User manual

Echo
Echo MS-4 User manual

Echo
Echo MS-20H User manual

Echo
Echo MS-5 User manual

Echo
Echo MS-4010BP User manual

Echo
Echo SHR-210 User manual

Echo
Echo BACKPACK MS-40BD User manual