Echo SHP-800 User manual

1Top cover
OPERATOR'S MANUAL
HIGH PRESSURE POWER SPRAYER
ENGLISH
ESPAÑOL
PORTUGUÊS
WARNING
Read the instructions carefully and follow the rules for safe
operation.
Failure to do so could result in serious injury.

2
Introduction
2Introduc tion
ECHO HIGH PRESSURE POWER SPRAYER is lightweight, high-performance, petrol engined knapsack units desigend for
spraying liquid chemical.
Do not use this unit for any purpose other than aforementioned.
Never let children operate this unit.
This Manual provides the information necessary for assembly, operation and maintenance.
You must read this Manual to understand the safe and effective operation of your ECHO product.
For future reference, you should keep this Operator's Manual.
If this Operator's Manual has become illegible through impairment or is lost, please purchase a new one from your ECHO dealer.
When renting or lending this machine to a person who will operate it, always include this Operator's Manual, which provides
explanation and instructions.
When transferring a product, please deliver it attaching the Operator's Manual.
Specifications, descriptions and illustrative material in this literature are as accurate as known at the time of publication, but are
subject to change without notice.
Illustrations may include optional equipment and accessories, and may not include all standard equipment.
If there is any clause in this Manual that is hard to be understood, please contact your ECHO dealer.

3
Contents
Decals and symbols...............................................................................................4
Rules for safe operation.........................................................................................5
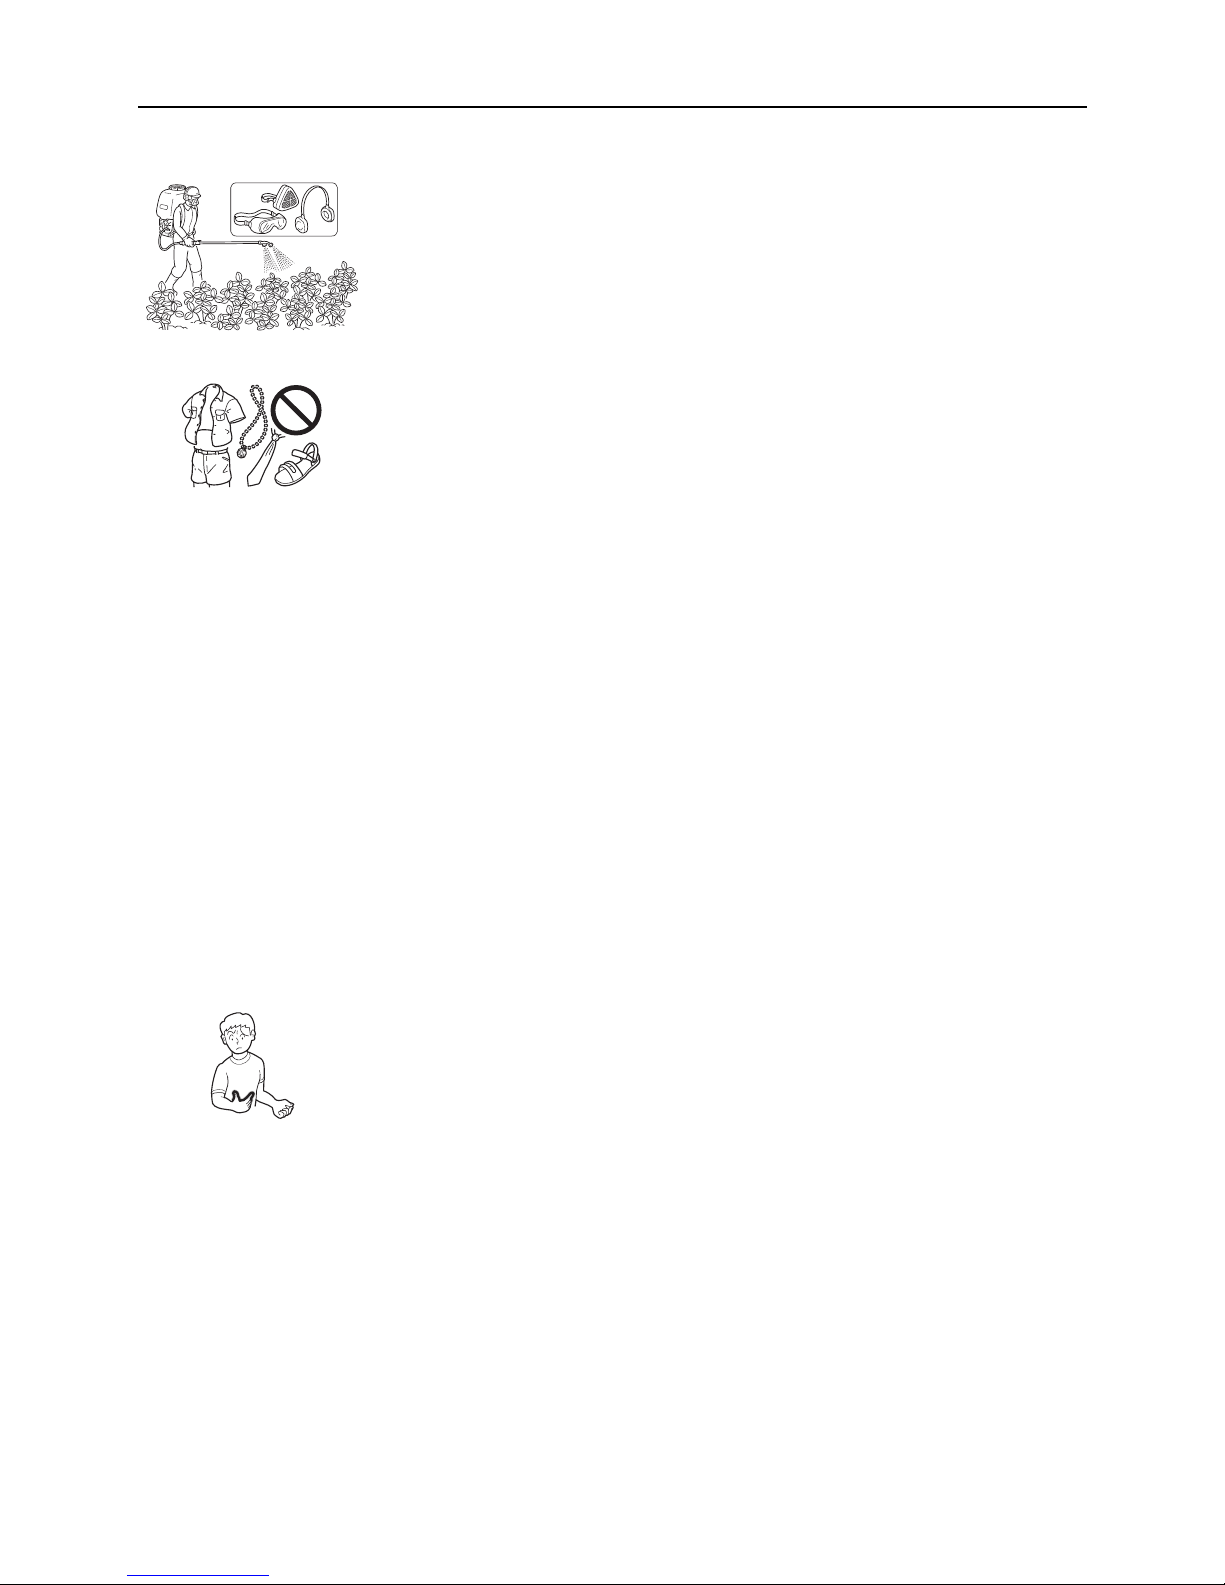
Operator safety.................................................................................................. 5
Reduce noise ....................................................................................................6
Reduce chances of damage..............................................................................6
Physical condition.............................................................................................. 6
Hot humid weather ............................................................................................ 6
Operation........................................................................................................... 6
Eye, breathing and hearing protection .............................................................. 7
Wear proper clothing.........................................................................................7
Vibration and cold.............................................................................................. 7
Repetitive stress injuries ................................................................................... 7
Description ............................................................................................................. 8
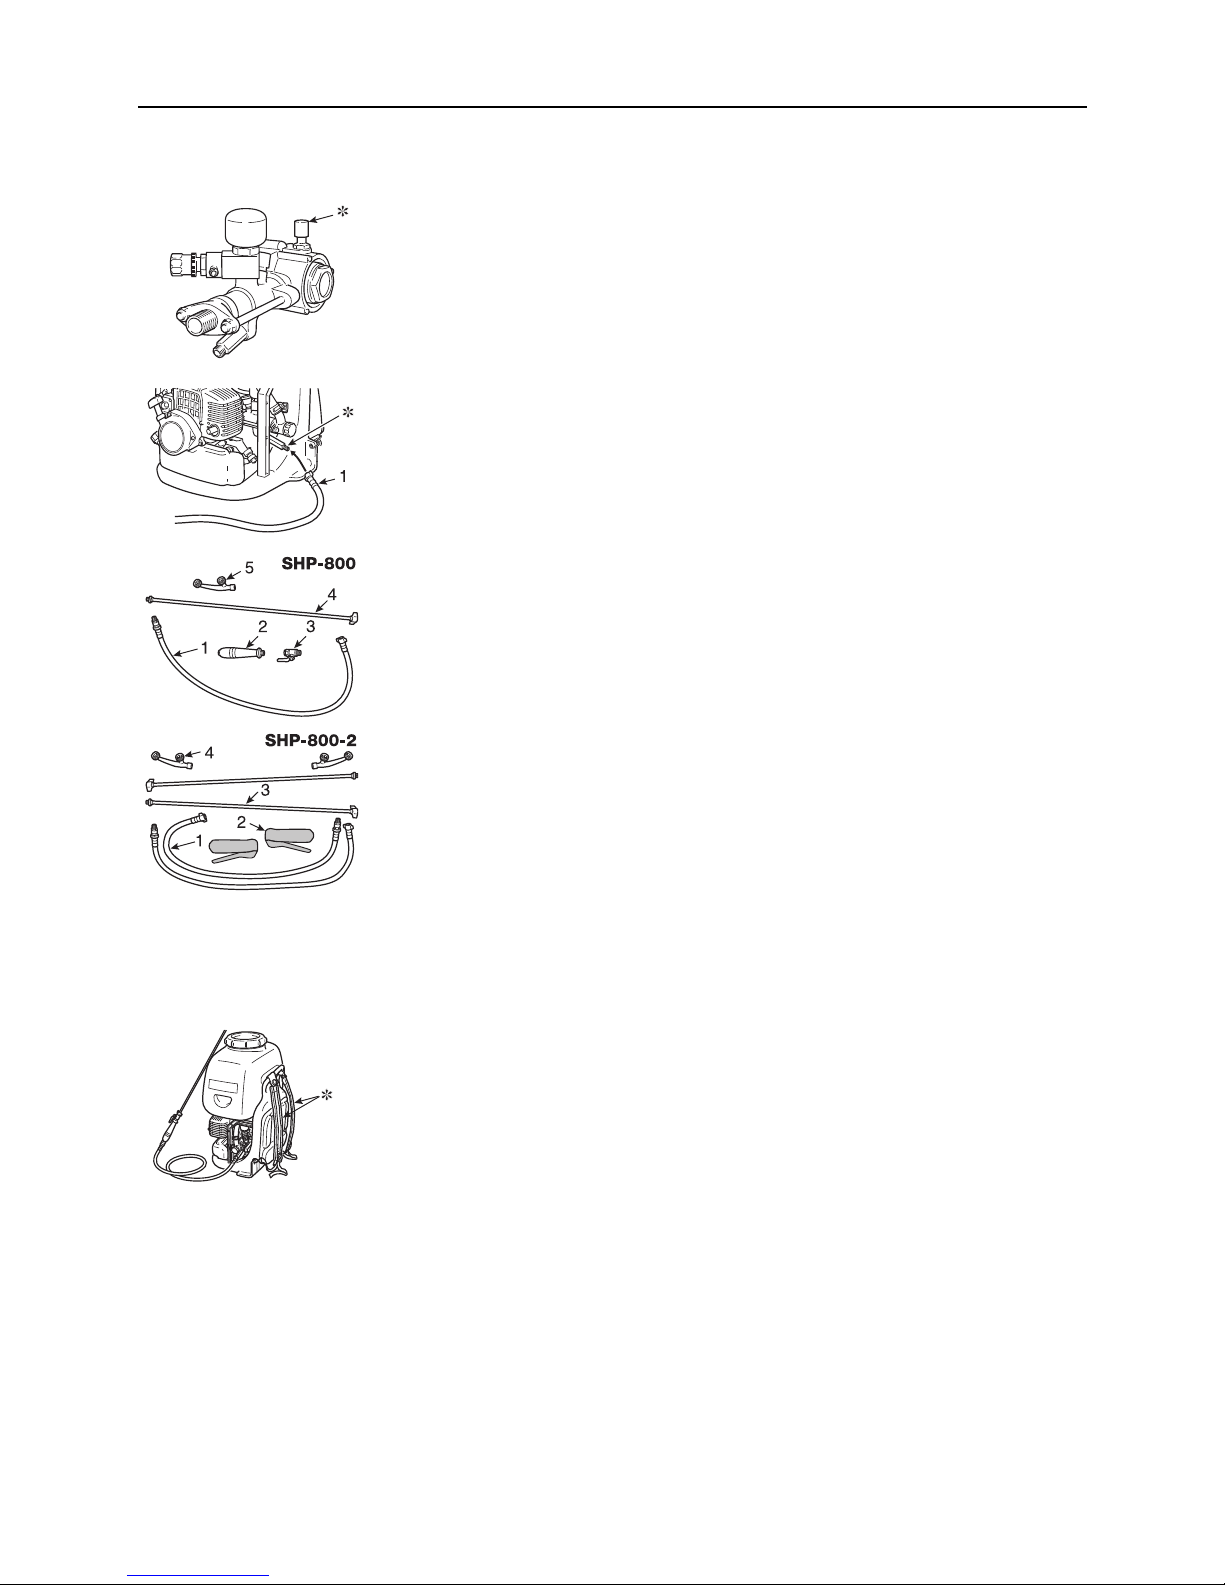
Assembling ............................................................................................................ 9
Spray hose and nozzle...................................................................................... 9
Shoulder straps ................................................................................................. 9
Operation ............................................................................................................. 10
Fuel ................................................................................................................. 10
Handling fuel ................................................................................................... 10
Chemicals........................................................................................................ 10
Chemical liquid tank ........................................................................................ 11
Starting the cold engine................................................................................... 11
Starting the warm engine ................................................................................ 11
Stopping the engine ........................................................................................12
Filling chemical tank ........................................................................................ 12
For safe operation ...........................................................................................12
Spraying .......................................................................................................... 12
Service maintenance guide..................................................................................13
Troubleshooting ...................................................................................................14
Maintenance and care .........................................................................................16
Cleaning air filter .............................................................................................16
Check fuel system ........................................................................................... 16
Replacing fuel filter.......................................................................................... 16
Check spark plug............................................................................................. 16
Cylinder fins (Cooling system).........................................................................17
Carburettor adjustment.................................................................................... 17
Cleaning silencer.............................................................................................17
Cleaning chemical tank ................................................................................... 17
Cleaning chemical tank breather.....................................................................17
When spraying is finished ............................................................................... 18
Storage ................................................................................................................ 19
Disposal procedure ..............................................................................................20
Specifications....................................................................................................... 21

4
Decals and symbols
DANGER WARNING CAUTION
This symbol accompanied by the
word "DANGER" calls attentions to
an act or a condition which will
lead to serious personal injury or
death of operators and bystanders.
This symbol accompanied by the
word "WARNING" calls attentions
to an act or a condition which can
lead to serious personal injury or
death of operators and bystanders.
"CAUTION" indicates a potentially
hazardous situation which, if not
avoided, may result in minor or
moderate injury.
Circle and slash symbol
means whatever is
shown is prohibited.
NOTE
This enclosed message provide tips
for use, care and maintenance of the
unit.
Symbol form / shape Symbol description / application Symbol form / shape Symbol description / application
Carefully read the Operator's Manual Petrol and oil mixture
Beware of high-temperature areas Choke control "cold start" position
(choke closed)

5
Rules for safe operation
Operator safety
Read this Manual carefully.
Be sure you understand how to operate this unit properly before you use it.
Wear non-skid sole shoes.
Do not wear opentoed shoes or operate unit while bare footed.
Wear proper clothing to legs and other exposed parts of your body.
Wear eye, breathing and hearing protection devices.
Secure hair so it is above shoulder length.
Use caution when handling fuel.
The fuel tank may be under pressure.
Always loosen the fuel cap and wait for pressure to be equalized before removing the cap.
Put the fuel caps back tightly on both the fuel can and the fuel tank.
Move at least 3 m from the re-fueling point and be sure there is no leakage of fuel from the
fuel cap or the fuel system before starting the engine.
Wipe any spilled fuel off the unit.
Operate this petrol engine powered equipment in a well-ventilated area only.
Do not operate this unit in closed areas- such as garages, inside building, sheds, etc.
Start the unit on the ground with the throttle lever at start position.
Do not start engine on operator's back.
Do not use a unit on unstable footings.
Do not allow other persons or pets in the area when starting or using the unit.
Do not point the nozzle in the direction of people or animals.
Keep a firm grip on the unit at all times.
Keep hands and body away from hot surfaces such as silencer and cylinder area when
handling the unit to prevent from heat injury.
Never attempt to use incomplete machine or one fitted with unauthorized modification.
A fully loaded unit will change your equilibrium.
Extra precautions should be taken to maintain your footing and balance.
Check the shoulder harnesses are not tangled with the throttle lever when you put the unit
on your back.
This unit is designed for upright use only, do not lay down or lean excessively to avoid
leakage of chemicals when operating and transporting.
WARNING
Users risk injury to themselves and others if the unit is used improperly, and/or safety
precautions are not followed.
Proper clothing and safety gear must be worn when operating unit.

6
Reduce noise
Avoid using units when people are likely to be disturbed, such as late at night or early in the
morning.
Operate the unit at the lowest possible throttle setting that gets the job done.
Make sure the silencer works well.
Also check the air intakes and the air filter to make sure the unit is working properly.
Use only one piece of equipment at a time.
Wear hearing protection when operating the unit.
Reduce chances of damage
Do not use the unit in a windy day or rainy day to avoid chemical drift.
Before starting the job, check wind direction.
Avoid blowing in the direction of open doors and windows, cars, pets, children or anything
that could be harmed by chemical.
Dust and mist blowing must be done leewardly.
Choose morning or evening when it is not so windy, and the ground temperature reserves,
so as to minimize dispersion losses and enhance chemical adhesion effect and for less
hazardous operation.
Physical condition
Your judgement and / or dexterity may be impaired if you are ill, are taking medication, and /
or have taken alcohol or other substances known to affect the way you would normally
function.
Operate this unit if you are in good physical and mental health.
Hot humid weather
Heavy protective clothing can increase operator fatigue which may lead to heat stroke.
Delay heavy work until the temperature drops.
Operation
Do not run the engine indoors, or where there is poor ventilation.
Engine fumes contain deadly poisonous carbon monoxide.
NOTE
Before operating the unit, check and follow local regulations concerning sound level and
hours of operation.
WARNING
Avoid direct contact or ingestion of chemicals you may use.
Consult the label the chemicals, you may use for additional warning and precautions
as well as unit immediately if you feel sick or excessive fatigue during operation.
See a doctor if this condition persists.

7
Eye, breathing and hearing protection
Wear eye protection goggles.
Wear breathing protection such as officially approved toxic dust and mist respirator.
Wear hearing protection.
If this guideline is not followed, hearing loss can occur.
Wear proper clothing
Snug fitting, durable clothing should be worn.
Trousers should have long legs.
Do not wear shorts.
Do not wear loose fitting clothing, scarves, neckties, jewellery or any item that may be drawn
or tangled in the fan.
Wear chemical resisting work clothes.
Wear shoes with non-skid soles.
Do not wear open toed shoes or operate unit bare footed.
Wear no-slip, heavy duty work gloves to improve your grip.
Wearing rubber gloves and cap to prevent direct contact with chemicals.
Vibration and cold
It is believed that a condition called Raynaud's Phenomenon, which affects the fingers of
certain individuals, may be brought about by exposure to cold and vibration.
Exposure to cold and vibration may cause tingling and burning followed by loss of colour and
numbness in the fingers.
The following precautions are strongly recommended because the minimum exposure which
might trigger the ailment is unknown.
Keep your body warm, especially the head and neck, feet and ankles, and hands and
wrists.
Maintain good blood circulation by performing vigorous arm exercises during frequent work
breaks and also by not smoking.
Limit the number of hours of operation.
Try to fill each day with jobs where operating the trimmer or other hand-held power
equipment is not required.
If you experience discomfort, redness and swelling of the fingers, followed by whitening and
loss of feeling, consult your physician before further exposing yourself to cold and vibration.
Repetitive stress injuries
Painful or numb fingers?
See your doctor immediately!
It is believed that over-using the muscles and tendons of the fingers, hands, arms and
shoulders may cause soreness, swelling, numbness, weakness and extreme pain to the
areas just mentioned.
Certain repetitive hand activities may put you at a high risk for developing a repetitive stress
injury (RSI).
To reduce the risk of repetitive stress injury, do the following:
Avoid using your wrist in a bent, extended or twisted position.
Take periodic breaks to minimize repetition and rest your hands.
Reduce the speed and force in which you do the repetitive movement.
Do exercises to strengthen the hand and arm muscles.
See a doctor if you feel tingling, numbness or pain in the fingers, hands, wrists or arms.
The sooner RSI is diagnosed, the more likely permanent nerve and muscle damage can be
prevented.

8
Description
1. Chemical (liquid) tank - Contains chemical.
2. Chemical tank cap - For closing the chemical tank.
3. Nozzle pipe
4. Nozzle
5. Safety decal - Part number 706040-05092.
If a decal cannot be read, a new one can be ordered from
your ECHO dealer.
6. Liquid valve (Grip valve) - Perform the operating and
closing operations for spraying.
7. Grip
8. Spray hose
9. Backpack cushion
10. Shoulder straps
11. Pump - Pump a chemical liquid.
12. Stop switch
13. Throttle lever - Activated operator's hand for controlling
the engine speed.
14. Fuel tank cap - For closing the fuel tank.
15. Fuel tank - Contains fuel and fuel filter.
16. Air cleaner cover - Covers air filter.
17. Starter handle - Pull handle to start the engine.
18. Silencer cover - Cover the silencer not to make operator
touch to hot surface of silencer.
19. Drein cap
20. Regulator knob
21. Air chamber
22. Operator's Manual - Included with unit.
Read before operation and keep for future reference to
learn proper, safe operating techniques.
23. Tools - 17 x 19 mm T-wrench (combination screwdriver
/ spark plug socket), 10 x 12 mm and 14 x 17 mm
spanners.

9
Assembling
Spray hose and nozzle
∗Rubber cap
The rubber cap fitted on the top of pump crank case is for prevention of oil leakage during
transportation.
Remove the cap before operating pump.
∗Nipple
1. Spray hose
1. Spray hose
2. Grip
3. Liquid valve
4. Nozzle pipe
5. Nozzle
Install spray hose, grip, liquid valve, nozzle pipe and nozzle to the machine.
1. Spray hose
2. Grip valve
3. Nozzle pipe
4. Nozzle
Install spray hose, grip valve, nozzle pipe and nozzle to the machine.
Ensure that all nuts, screws and bolts installed are properly tightened.
Check all connections to avoid chemical leak. (nozzle, nozzle pipe, spray hose, etc)
Assemble firmly ,otherwise leakage of chemicals can cause injury.
Please be enough careful.
Shoulder straps
∗Shoulder straps
Shoulder straps are adjustable to fit any operator.
Adjust straps so that pads rest comfortably on the operator's shoulders.

10
Operation
Fuel
Fuel is a mixture of regular grade petrol and an air-cooled 2-stroke engine oil of reputable
brand name.
Minimum 89 Octane unleaded petrol is recommended.
Do not use fuel containing methyl alcohol or more than 10 % of ethyl alcohol.
Recommended mixture ratio; 50 : 1 (2 %) for ISO-L-EGD Standard (ISO/CD 13738), JASO
FC, FD grade and ECHO Premium 50 : 1 oil or 25 : 1 (4 %) for JASO FB grade oil.
- Do not mix directly in engine fuel tank.
- Avoid spilling petrol or oil.
Spilled fuel should always be wiped up.
- Handle petrol with care, it is highly inflammable.
- Always store fuel in approved container.
Handling fuel
Never smoke or allow flame or sparks near fuel.
Always fill the fuel tank outdoors.
Never pour fuel indoors.
Never refuel the engine when it is hot or running.
Always use an approved, safe fuel container.
∗Maximum level line
It is not permitted to fill fuel above the maximum level line of fuel tank.
After fuelling, always wipe away spilled fuel.
Always move at least 3 m away from the fuelling spot before starting the engine.
Never store the unit with fuel in the tank a fuel leak could start a fire.
Chemicals
Follow all precautions and instructions in the label of chemicals when handling.
Never allow untrained persons or children to handle chemicals and the unit.
NOTE
Stored fuel ages.
Do not mix more fuel than you expect to use in thirty (30) days.
Do not mix directly in fuel tank.
DANGER
After refuelling, tighten fuel cap firmly and check for leakage.
In case of fuel leakage, repair before starting operation since there is a danger of fire.
DANGER
Avoid direct contact and ingestion of chemicals.
Some chemicals may be strongly harmful to human and animals.
Misuse of the chemicals can result in serious poisoning or death.

11
Chemical liquid tank
∗Strainer
Stop engine and put the unit down when filling chemicals.
Fill the tank with liquid chemical through the strainer.
Do not fill without strainer.
(Dust in the tank may cause clogging of the liquid line or pump).
The tank contains 25 L of liquid.
Do not overfill chemicals and wipe spillage away immediately.
Secure chemical tank cap firmly to avoid leakage of chemicals during the operation.
Starting the cold engine
1. Chemical tank cap
2. Liquid valve
3. Choke lever
4. Close
5. Open
6. Priming pump (purge bulb)
7. Starter handle
8. Throttle lever
9. Start position
Ensure that chemical liquid valve closed and chemical tank cap firmly secured before
starting engine.
Never start and operate engine before filling chemical tank to avoid damage to pump.
Move choke lever to closed position.
Push purge bulb until fuel is visible in clear fuel return line.
Keep throttle lever at start position (in the middle of scale).
Pull starter handle until first firing sound.
Move choke lever to open position.
Restart the engine and allow to warm up for a few minutes, before using.
Do not run the engine indoors, or where there is poor ventilation.
Engine fumes contain deadly poisonous carbon monoxide.
Starting the warm engine
Move throttle lever to start position.
Move choke lever to open position.
If tank is not empty, pull starter handle one to three times and engine should fire.
If fuel tank is empty, after refilling, push the purge bulb (until fuel is visible in clear fuel return
line) and pull the starter handle.
Do not use choke.
NOTE
Each mark on the face of the tank indicates the 5, 10, 15, 20 and 25 L levels.
Do not dilute chemicals directly in the chemical tank.
Never start and operate engine before filling chemical tank to avoid damage to pump.
NOTE
Check unit for loose nuts, bolts and screws before starting.
Always clear work area of debris before starting operation.
Always hold the unit firmly on the ground.
When pulling starter handle, use short pulls, 1/2 to 2/3 of rope length.
Do not allow the starter handle to snap back against the housing.
NOTE
If engine does not start after four pulls, use cold starting procedure.

12
Stopping the engine
1. Throttle lever
2. Stop button
Turn throttle lever to the lowest position and push stop button.
Filling chemical tank
1. Chemical tank cap
2. Liquid vaive
Close liquid valve.
Fill liquid chemical through filter into tank.
Stir up after filling to avoid chemical deposits at bottom of tank.
For safe operation
1. Secure the chemical tank cap.
2. Check all connections to avoid chemical leak. (nozzle, nozzle pipe, hose etc.)
3. Avoid wearing loose clothing and always wear safety glasses and gloves.
4. Use a face filter mask to avoid breathing chemical.
5. Check wind direction before spraying.
6. Do not point nozzle in the direction of people.
7. Stop the engine when refueling and / or replacing parts.
8. Close chemical liquid valve when not in use.
9. Avoid using at engine speeds where the clutch slips.
Spraying
Ensure that chemical liquid valve is closed before starting engine.
After engine is warmed up, turn throttle lever to the high speed position (Upper position) and
open liquid valve.
WARNING
If engine does not stop, close choke to stall engine.
Have your ECHO dealer inspect and repair.
NOTE
When misting liquid is over, stop the engine.
Do not keep engine running, chemical tank has been emptied.
Carburettor has been correctly adjusted in factory.
Do not readjust yourself unless it is necessary.
It should be readjusted be ECHO dealer.
NOTE
Be sure that valve is closed before starting engine.
NOTE
Since this unit is equipped with a centrifugal clutch, sprinkling not possible when the engine
is running at low speeds (idling).

13
Service maintenance guide
Area Maintenance Page Before use Weekly Monthly Yearly
Air filter Clean / Replace 16 •
Fuel system Inspect 16 •
Fuel line Inspect - •
Fuel filter Inspect / Clean / Replace 16 •
Spark plug Inspect / Clean / Adjust / Replace 16 ••
Cooling system Inspect / Clean 17 •
Carburettor Adjust / Replace and adjust 17 •
Silencer Inspect / Tighten / Clean 17 •
Starter rope Inspect - •
Screws, bolts and nuts Inspect, Tighten / Replace - •
Pump grease cup Supply grease cap by turning
grease cup one turn clockwise 18 •
IMPORTANT
Time intervals shown are maximum.
Actual use and your experience will determine the frequency of required maintenance.
Record dates of monthly and yearly inspections.

14
Troubleshooting
Trouble Cause Remedy
Engine - hard to start
- does not start
Engine
cranks
Fuel at carburettor Not fuel at carburettor Fuel filter clogged
Fuel line clogged
Carburettor
Clean or replace
Clean
Ask your ECHO dealer
Fuel at cylinder No fuel at cylinder Carburettor Ask your ECHO dealer
Silencer wet with fuel Fuel mixture is too rich Open choke
Clean / replace air filter
Adjust carburettor
Ask your ECHO dealer
Spark at end of
plug wire
No spark at end of plug
wire
Electrical problem Ask your ECHO dealer
Spark at plug No spark at plug Spark gap incorrect
Covered with carbon
Fouled with fuel
Spark plug defective
Adjust 0.6 to 0.7 mm
Clean or replace
Clean or replace
Replace plug
Engine
does not
crank
Internal engine problem Ask your ECHO dealer
Engine runs Dies or accelerates poorly Air filter dirty
Fuel filter dirty
Fuel vent plugged
Spark plug
Carburettor
Cooling system plugged
Exhaust port / silencer plugged
Clean or replace
Clean or replace
Clean
Clean and adjust / replace
Adjust
Clean
Clean
Unstable mist discharge Pump valve clogged or
dameged
Cup packing on pump piston is
worn out
Drain cap is not firmly tight-
ened
Clean or replace
Replace
Tighten
No mist discharge / poor mist discharge Nozzle liquid valve closed (or
partially closed)
Nozzle liquid valve clogged
Nozzle clogged
Chemical liquid line defective
(pipe, packing etc.)
Spraying hose pipe cracked
V-packing worn out (low pres-
sure)
V-packing is not firmly tight-
enned
Regulator valve defective
Open
Clean
Clean
Replace
Replace
Replace
Tighten grand nut
Clean or replace
No spray Chemical line is completely
clogged with dirt
Chemical tank is empty
Pump is damaged
Clean
Refill
Ask your ECHO dealer

15
WARNING
Servicing of this machine, other than items listed in the Operator's Manual, should be performed by competent
service personnel.
Fuel vapors are extremely flammable and may cause fire and / or explosion.
Never test for ignition spark by grounding spark plug near cylinder plug hole, otherwise serious personal injury may
result.

16
Maintenance and care
If you have any questions or problems, please contact your ECHO dealer.
Cleaning air filter
1. Air cleaner cover
2. Air filter
Close the choke and loosen screw.
Remove air cleaner cover and air filter.
Then check and / or clean air filter by washing in a suitable solvent when heavily soiled.
Dry filter before reinstalling.
Check fuel system
Check before every use.
After refuelling, make sure fuel does not leak or exude from around fuel pipe, fuel grommet
or fuel tank cap.
In case of fuel leakage or exudation there is a danger of fire.
Stop using he machine immediately and request your dealer to inspect or replace.
Replacing fuel filter
1. Fuel tank cap
2. Fuel filter
3. Fuel line
Pick up the fuel filter through fuel tank opening with a piece of steel wire or the like.
Remove old filter from fuel line.
Install new fuel filter.
Check spark plug
∗Spark plug gap: 0.6 to 0.7 mm
Check plug gap.
Correct gap is 0.6 to 0.7 mm.
Inspect electrode for wear.
Inspect insulator for oil or other deposits.
Replace plug if needed and tighten to 15 - 17 N•m (150 to 170 kgf•cm).
NOTE
Clean air filter after each use.
If filter is excessive dirty or no longer fits properly, replace it.
NOTE
A clogged fuel filter will cause hard starting or poor engine performance.
Keep fuel tank clean - do not allow dirt or debris to enter fuel tank.
Make sure fuel filter goes to bottom of the tank when installing.
NOTE
Do not overtighten spark plug.

17
Cylinder fins (Cooling system)
∗Cylinder fins
Always keep cylinder fins clean.
Clogged cylinder fins will cause engine to overheat.
Clean out grass, mud, leaves, and other debris with a wooden stick periodically.
Carburettor adjustment
1. Carburettor
2. Idle adjustment screw
Do not adjust the carburettor unless necessary.
If idling adjustment is required, turn adjustment screw located a backpack side of
carburettor.
- When turning it anticlockwise, engine speed is reduced.
When the machine is not to be used for a long time, drain fuel out from fuel tank.
Cleaning silencer
∗Silencer
Clean silencer by removing carbon deposits at outlet port, and tighten two bolts.
This should be done periodically to maintain constant performance of engine.
Cleaning chemical tank
∗Chemical tank
Chemical tank should be cleaned after each use.
Fill chemical tank with clear water and run engine.
Open valve to pour water out to clean internal parts of spraying device.
Cleaning chemical tank breather
∗Breather
Clean breather periodically.
Bad sealing of breather may cause a leakage of the chemical tank.
Clogging of the breather may cause a "dent" or a breakage of the chemical tank.

18
When spraying is finished
∗Drain cap
Fill chemical tank with water and spray through nozzle for 2 to 3 minutes for cleaning.
Drain water from the machine by removing drain cap.
Wipe off the liquid chemical on the machine after use.
∗Grand nut
If chemical liquid leaks or discharge pressure goes down, turn grand nut as shown.
1. Grease cup
2. Oil gauge
To supply grease, turn grease cup clockwise one turn weekly.
When grease in grease cup becomes empty, remove the cup and refill grease.
To see oil level check oil gauge before operation by watching it from the side of the
machine.
If oil level is below half, add some more oil.
Use normal engine oil (SC, SD, SE SAE#30 or equivalent.)

19
Storage
Do not store your unit for a prolonged period of time (30 days of longer) without performing
protective storage maintenance which includes the following:
1. Drain or take out remaining chemical from the tank.
Clean inside of chemical tank and spraying hose.
2. Drain the fuel tank completely and pull the recoil starter handle several times to remove
fuel from the carburettor.
3. Remove accumulation of grease, oil, dirt and debris from exterior of unit.
4. Perform all periodic lubrication and services that are required.
5. Tighten all the screws, bolts and nuts.
6. Inspect and adjust every part of the sprayer.
A. Completely clean every part, and repair, if necessary.
B. Apply thin coating of oil on metal parts to prevent rust.
C. Remove spraying hose and pipe.
7. Remove the spark plug and pour 10 mL of fresh, clean, two-stroke engine oil into the
cylinder through the spark plug hole.
A. Place a clean cloth over the spark plug hole.
B. Pull the recoil starter handle two or three times to distribute the oil inside the cylinder.
C. Observe the piston location through the spark plug hole.
Pull the recoil starter handle slowly until the piston reaches the top of its travel and leave
it here.
8. Install the spark plug (do not connect ignition cable).
9. Store unit in a dry, dust free place, out of the reach of children and other unauthorized
persons.
WARNING
Do not store in an enclosure where fuel fumes may accumulate or reach an open
flame or spark.
NOTE
For future reference, you should keep this Operator's Manual.

20
Disposal procedure
Dispose of waste oil in accordance with local regulations.
Major plastic parts making up the product have codes showing their materials.
The codes refer to the following materials; dispose of those plastic parts in accordance with
local regulations.
Please contact your ECHO dealer in case you do not know how you should dispose of
waste oil / plastic parts.
Mark Material
>PA6-GF< Nylon 6 - Glass fiber
>PP-GF< Polypropylene - Glass fiber
>PE-HD< Polyethylene
This manual suits for next models
1
Table of contents
Other Echo Paint Sprayer manuals
Popular Paint Sprayer manuals by other brands

Nordson
Nordson Encore 1096694A instruction sheet

FujiFilm
FujiFilm 3004xpc user manual

Smithco
Smithco Sprayer Star 3180 SmarTrax MD installation manual

Kwazar
Kwazar ORION SUPER GARDEN PRO Series owner's manual

NEU MASTER
NEU MASTER N3140 instruction manual

Goldacres
Goldacres Pro-Reel 200L Operator's & parts manual