Ecolab Nexa User manual

Nexa™
January, 2014
Table of Contents
…………………………………………………….
Installation and Operation……..p 2
Frequently Asked Question……p 11
Troubleshooting……………….. p 14

Nexa™ Customer Service Reference Guide January 2014 Page 2
CONFIDENTIAL
Installation and Operation
1. Unpacking
Items included in the package:
•Classic Dispenser
•3 “D” cell batteries (Classic Touchfree Dispenser)
•I/O manual
•Install Kit (1-packs only)- 2 screws and 2 wall mounts
Remove the dispenser from the shipping box and remove the protective bag from the
dispenser.
2. Opening Cover
Find the cover release button at the top of the dispenser.
Push down on the button with your index finger and rotate the front cover down.
3. Installation: TF dispensers Only
CAUTION:
a. The bottom of the dispenser should be mounted about 15cm above horizontal
surfaces. Shorter distances may be acceptable depending on the reflectivity of
the surface over which the dispenser is being mounted.
b. Do not install in showers or in direct contact with water. The dispenser can be
installed by using screws, anchors and tape.
Note: Manual dispensers can be installed near water, however we highly recommend
screw mounting if this is done.
COVER RELEASE
BUTTON

Nexa™ Customer Service Reference Guide January 2014 Page 3
CONFIDENTIAL
4. Installing unit with screws, anchors and tape
The dispenser is designed to match many of the screw holes of Ecolab’s and some
competitive dispensers. By positioning the dispenser appropriately on the wall, it may
be possible to use the previous anchor locations. For ADA compliance, mount between
15” and 48” off the ground. In order to comply with UL962, the TF dispensers are
required to be mounted using screws.
A. Clean and thoroughly dry the wall that the dispenser is to be mounted to.
Alcohol wipes work well for hard surfaces such as ceramic tile.
B. Use # 10 screws and appropriate anchors (use at least 2 screws to secure
the dispenser to the wall and space them out as far as possible).
C. Place the unit against the wall at the desired location. Using the holes on the
back of the dispenser as a template, mark the wall with a pencil or sharp
object (you must puncture the tape).
D. Use an appropriate size drill bit for the anchors, drill the holes.
E. Insert anchors into the holes.
F. Remove the protective backing on the tape that is affixed to the back of the
dispenser. Ensure proper location. Mount the unit at the desired location by
pressing unit against mounting surface.
G. Open the front cover and apply pressure to the back plate for at least 30
seconds to assure a good bond between the tape and the wall.
H. Insert the screws into the anchors.
MOUNTED WITH 2
SCREWS AND
WALL MOUNTS
MOUNTING HOLE
PATTERN

Nexa™ Customer Service Reference Guide January 2014 Page 4
CONFIDENTIAL
5. Battery Installation (For Touch-Free Dispensers)
Three batteries are included to power the unit and are already installed in the battery
compartment. In order to activate the device,
→pull and remove the battery pull tab that is sticking out from the battery compartment.
6. Battery Replacement (For Touch-Free Dispensers)
a. open the front cover
b. unscrew the 2 thumbscrews attaching the battery cover
c. Remove the old batteries
d. insert fresh batteries into the battery compartment using the battery orientation
sticker as a guide.
e. Make sure battery cover is replaced and the thumbscrews are fully tightened.
a b/e c d
BATTERY PULL TAB
BATTERY
ORIENTATION
STICKER

Nexa™ Customer Service Reference Guide January 2014 Page 5
CONFIDENTIAL
7. Dispenser Status Indicator (For Touch-Free Dispensers)
An LED is visible through the cover (lower left side) of the dispenser. The following is a
list of indicators and status:
•Green flashes once every 0.5 seconds for up to 5 seconds: Device has just received
power
•One green flash: Dispense has occurred
•Red flash every 2.5 seconds:
oLow batteries, change batteries as soon as possible (see above)
oReset require - removal of battery cover and replacement (see above)
•Three quick red flashes upon attempted activation–Low batteries, unit will not operate
•No LED (dispenser will not work) - Batteries are not installed properly or require
changing, confirm battery pull tab is removed
•No LED (dispenser works) - The LED is defective
Nexa Light Codes
Yellow/green repeated blinks
Just received power,-number of blinks corresponds to
program on UTM (3 blinks, pause, 3 blinks=revision 3.3)
Single yellow/green blink
Sensor triggered- dispense should occur immediately after
Low Battery Mode: Slow red blinking light (2.5 seconds
between) and still flashes yellow/green and dispenses when
hand is placed in sensor range.
Low battery indicator- Requires 3 sequential voltage readings
below the low battery threshold to turn on. Should have
1000+ dispenses remaining until shutdown mode will occur.
Red light will not turn off until dispenser is reset.
Shutdown Mode: Slow red blinking light (2.5 seconds
between) and dispenser does not dispense. When hand is
placed in sensor range, you will receive 3 quick red blinks.
Dead battery indicator- Requires 3 sequential voltage readings
below the dead battery threshold to turn on. Red light will
not turn off until dispenser is reset.
Timeout indicator- The dispenser will attempt to dispense for
10 seconds. If it cannot complete a single dispense cycle
(return to home position) after 2 dispense attempts, it will go
into shutdown mode the next time it is able to return home.
However, if after 5 dispenses, it has still not returned home, it
will also go into shutdown mode. This prevents unnecessary
wear on the gears and suggests the dispenser is jammed, has
very low batteries, or the battery cover is not fully secured.
Red light will not turn off until dispenser is reset.
**To reset dispenser- remove battery cover completely and replace
DISPENSER STATUS
INDICATOR

Nexa™ Customer Service Reference Guide January 2014 Page 6
CONFIDENTIAL
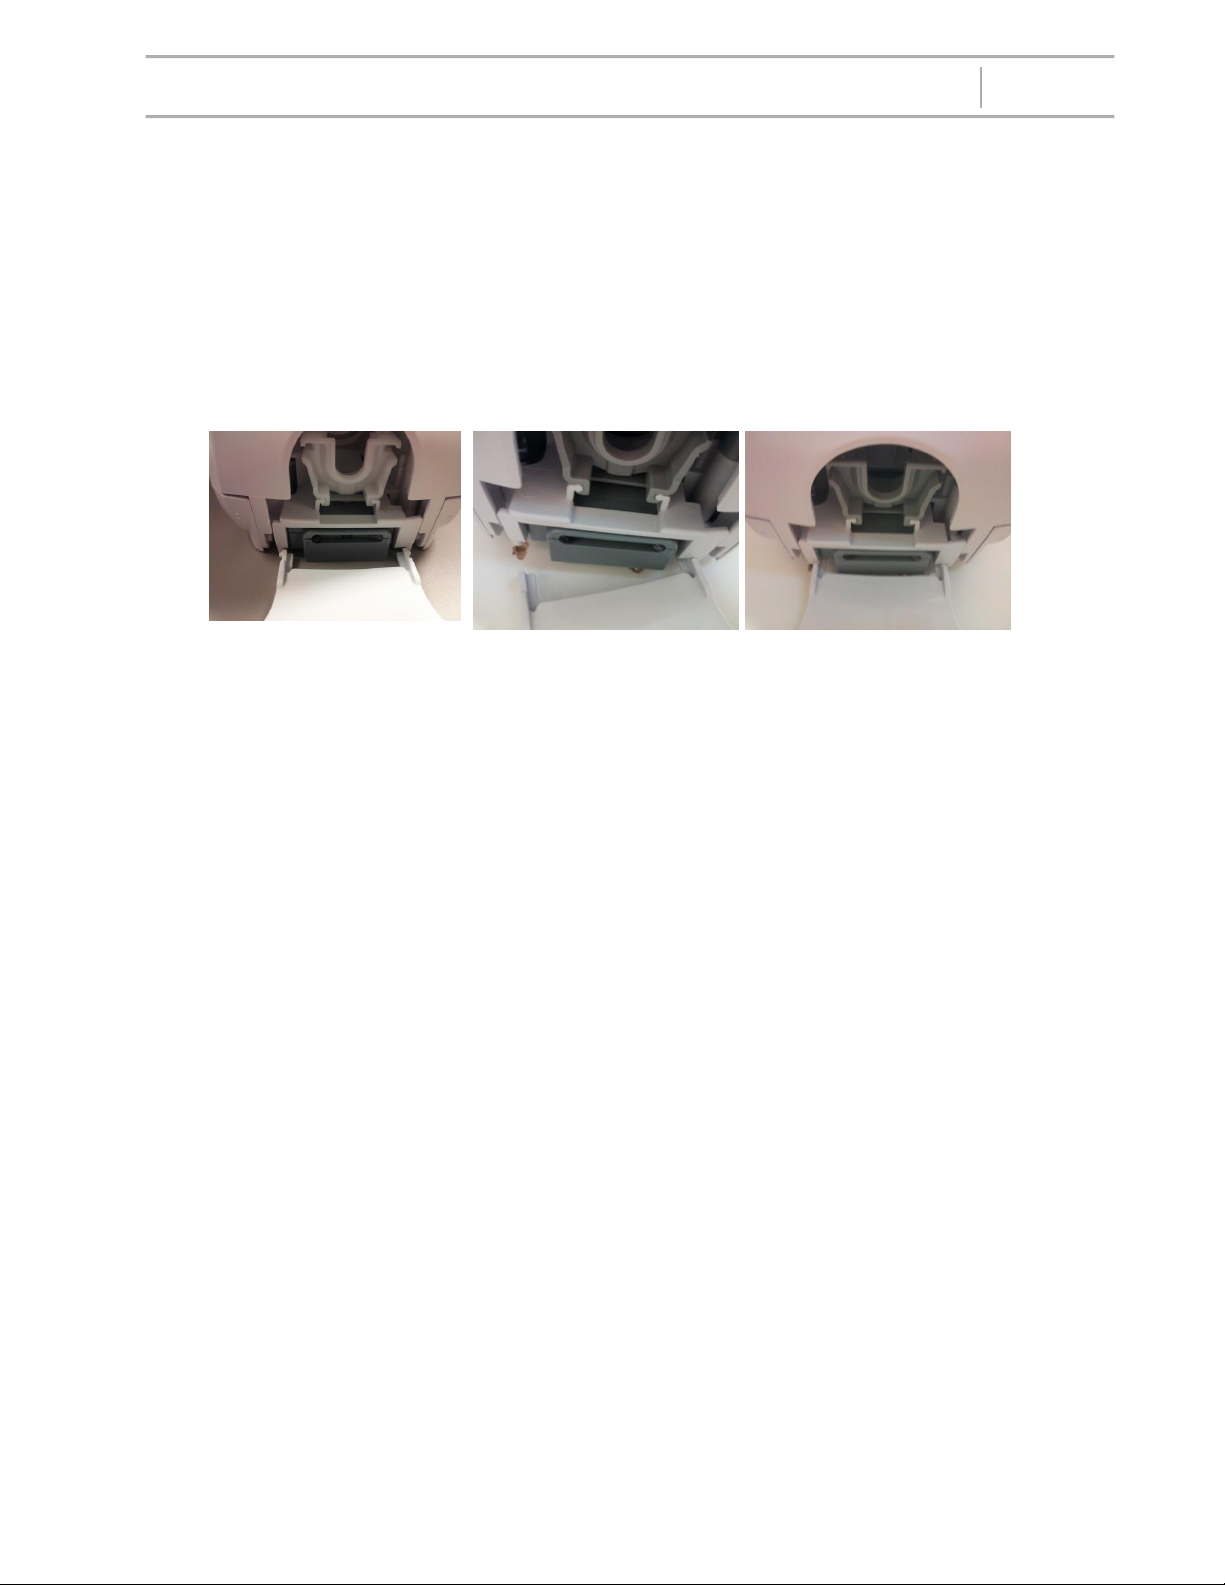
8. Product Bottle Installation/Removal
a. Open the dispenser cover
b. Remove the protective cap from the end of the pump on the bottle.
c. Invert the bottle and insert the bottle flat against the back of the dispenser with
the label facing forward. The collar on the pump is inserted into the pump
holder on the dispenser.
d. Close the cover
e. Place a hand under the dispenser and activate the dispenser multiple times
until the pump is primed and product is dispensed into the hand.
f. When the product package is empty, follow step 2 to open the cover. Once the
cover is open grasp the sides of the bottle and pull straight out.
CORRECT POSITION
WRONG WRONG WRONG
PROPER DOCKING- PUMP
COLLAR IS BETWEEN UPPER AND
LOWER FLANGES
RIGHT SIDE OF PUMP
COLLAR IS TOO LOW
PUMP COLLAR IS TOO LOW-
BELOW LOWER FLANGE
PUMP IS NOT PUSHED BACK
FAR ENOUGH
PUMP COLLAR
UPPER AND
LOWER FLANGES
(ON BOTH SIDES)
REMOVE
PROTECTIVE CAP

Nexa™ Customer Service Reference Guide January 2014 Page 7
CONFIDENTIAL
Cleaning Instructions
The exterior can be cleaned with a non-abrasive detergent and non-abrasive sponge or
cloth.
9. Dose Adjustment
The dosing amount can easily be switched between low and high dose.
a. To switch the dosing amout you must remove the bottle (if it is already in the
dispenser),
a. Remove the dose adjuster by pinching the 2 sides.
b. Flip the dose adjuster 180 degrees and reinstall to the same location it came
from.
c. There is a vertical mark on the dose adjuster that will then point to the chosen
dosing amount
Low Dose (one droplet)
High Dose (two droplets)
Liquid
~ 1.0 ml
~ 1.4 ml
DISPENSER WITH LOW DOSE
PINCH SIDES TO REMOVE
INDICATOR LINE-
POINTS TO THE
DROPLETS
ONE/TWO
DROPLET
MARKS
Nexa™ Customer Service Reference Guide January 2014 Page 8
CONFIDENTIAL
Drip Tray
The drip tray can be ordered as an accessory item (included for field testing).
a. It attaches to the bottom of the dispenser by snapping the 2 hooks into the
openings on the bottom of the dispenser.
b. The drip tray can be further secured to the wall by using adhesive tape on the
back.
c. It is easiest to insert the drip tray if you insert one hook in first and rotate the drip
tray to snap the other hook in place.
PROPERLY SEATED IN
PLACE
RIGHT HOOK SEATED,
ROTATING LEFT HOOK
HOOKS DIRECTLY
BELOW OPENINGS

Nexa™ Customer Service Reference Guide January 2014 Page 9
CONFIDENTIAL
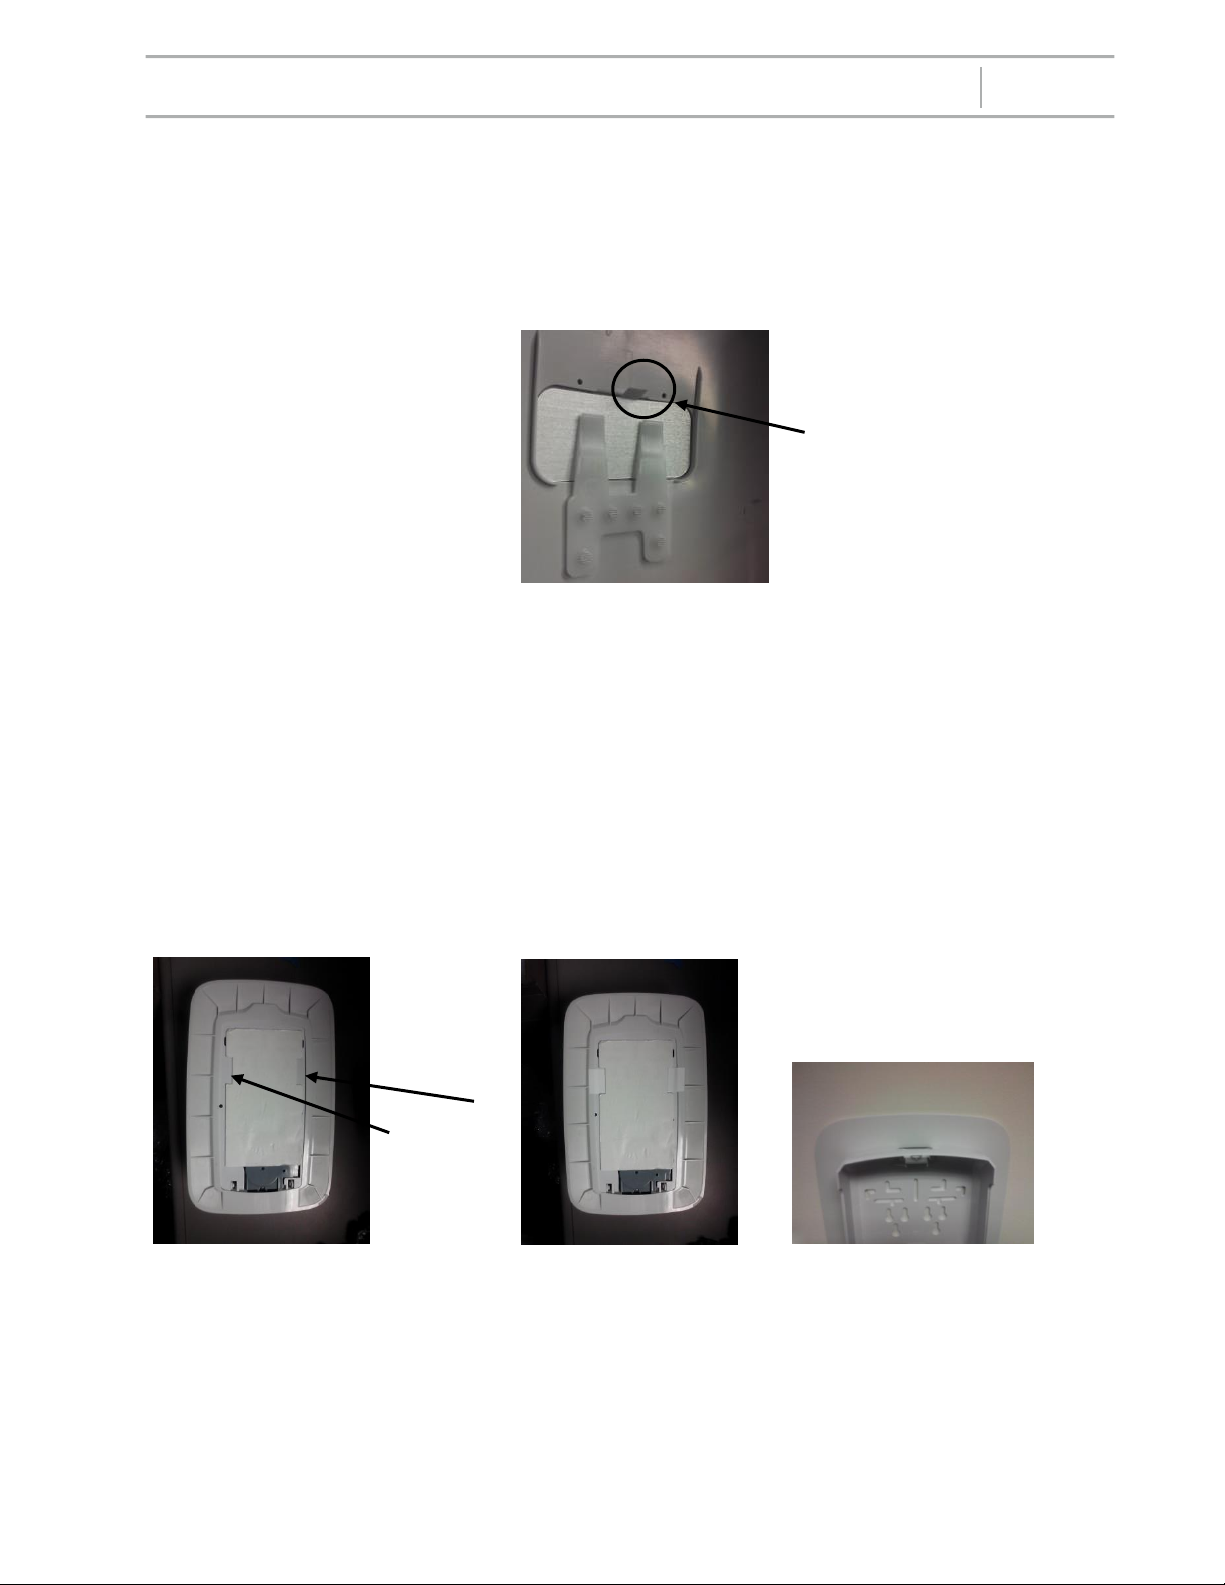
10. Lock and Key
The optional lock and key kit can be used to lock the dispenser.
a. The lock can be inserted at the top of the backplate. There is a vertical mark on
the lock that points to lock/unlock graphics on the backplate.
b. You can switch between the two configurations by rotating the lock 180 degrees.
c. If the dispenser is locked, you must open it using the key provided in the kit or a
paperclip.
d. The key or paperclip can be inserted into the hole on the top exterior of the
backplate and this will allow the cover to open.
INDICATOR LINE-
POINTS TO LOCKED OR
UNLOCKED
LOCKED
UNLOCKED
KEY OPENING
KEY AND PAPERCLIP
LOCK STRADLES THIS
BEAM
Nexa™ Customer Service Reference Guide January 2014 Page 10
CONFIDENTIAL
11. Nameplate (badge)
The dispenser comes with a badge already inserted into the designated badge holder.
There are also product specific badges available by request. If you choose to replace
the generic badge with a product specific badge, please bend the tab on the new
badge.
Mounting Frame –NOT INCLUDED IN FIELD TEST
The mounting frame is an optional accessory that can be used to cover existing wall
damage around where the dispenser is being installed. There are 4 different mounting
frames- white and black of the classic and compact sizes. The same mounting frame
will work on either (TF or manual) dispenser. To mount the dispenser with the mounting
frame you will use the tape provided in the mounting frame kit. Using the notches in the
tape on the back of the dispenser as a guide, tape the mounting frame to the dispenser.
This will temporarily make the mounting frame and the dispenser a single unit. You can
then install the dispenser as you would normally. Then mounting frame will not be
physically attached to the wall- it is pinched between the wall and the dispenser.
BENT TAB
MOUNTING FRAME
AND DISPENSER
AS SINGLE UNIT
TAPE
NOTCHES
TAPE PLACED IN
NOTCHES

Nexa™ Customer Service Reference Guide January 2014 Page 11
CONFIDENTIAL
12. Replacement Push Bar (For Manual Dispensers)
a. To install a replacement push bar, you must first remove the existing push bar.
To do this, remove the cover from the dispenser by pinching the hinges together.
b. Then pull on one side of the dispenser to remove one side of the push bar rod
from its hole.
c. The push bar will then fall out easily.
d. To insert the new push bar or the elbow activator, stick one side of the push bar /
elbow activator rod into the appropriate hole and pry the cover open so the other
side of the rod can be seated.
PINCH HINGES TO REMOVE
COVER
PULL GENTLY ON SIDES OF
COVER
PUSH BAR
HOLE
PUSH BAR
ROD

Nexa™ Customer Service Reference Guide January 2014 Page 12
CONFIDENTIAL
Frequently Asked Questions
1. How is the unit installed and how long with it take?
a. Follow instructions in I/O manual or refer to installation guide above. Total
install time should only take 2-3 minutes.
2. Does the unit come with batteries? How long should they last?
a. The unit comes with either 3 “C” cell batteries or 3 “D” cell batteries
depending on what size dispenser you have. The batteries are already
installed in the dispenser- you just need to remove the battery pull tab sticking
out of the battery compartment in order to activate the dispenser. Estimated
battery life is 50 months for the classic dispenser and 23 months for the
compact dispenser- assuming 50 dispenses per day.
3. What products go into the unit?
a. Nexa dispensers will dispense foams, liquids and gels without any
modifications to the dispenser. You will just need to insert a different bottle to
switch between these styles of products.
b. Refer to the product document from your marketing group for specific
information.
4. Will competitor’s product fit in our unit? Can we make our product cartridge fit in a
competitor unit?
a. You should not be able to put any other bottle into the dispenser except for
the Nexa™ 750mL and 1250mL bottles. These bottles will not work in
competitor dispensers.
b. Note the 750 mL Nexa™ bottle is designed to fit into both the compact (750
mL) and classic (1250 mL) dispenser sizes.
5. What is the output per dispense and how many uses will I get out of a product
cartridge?
a. All dispenser varieties will produce ~0.7 mL of foam product and ~1.0 mL of
liquid product in the configuration the dispenser is shipped in. There is an
feature on the dispenser called a dose adjuster that you can flip 180 degrees
and then the dispenser will output ~1.0 mL of foam product and ~1.4 mL of
liquid product. Refer to installation instructions for more information on
changing from low dose to high dose. The bottles designed for the compact
dispenser contain 750 mL of product (1071 foam dispenses, 750 liquid
dispenses- on low dose). The bottles designed for the classic dispenser
contain 1250 mL of product (1785 foam dispenses, 1250 liquid dispenses-on
low dose).
6. How do I know when the product is low?
a. There are sight windows on both sides of the dispenser to view the product
level. You could also open the front cover of the dispenser to get a full view

Nexa™ Customer Service Reference Guide January 2014 Page 13
CONFIDENTIAL
of the product bottle. The dispenser will continue to dispense product until
there is no product visible near the opening of the bottle.
7. How do I know when the batteries need to be changed?
a. On the bottom left corner of the dispenser there is a small opening that
contains the dispenser status indicator. When the batteries are low the
indicator light will blink red every few seconds. When this light goes on, you
should have approximately 1,000 dispenses worth of battery life remaining. If
you do not change the batteries, eventually the dispenser will stop
dispensing. At this point if you trigger the sensor, the dispense status
indicator will blink red 3 times quickly to tell you the batteries need to be
changed immediately. If you do not address the issue, the dispense status
indicator light will eventually stop working as well.
8. Do I need to open the dispenser to see the expiration date?
a. No, you can see the expiration date through the side windows. It is printed on
the bottle.
9. How can I prevent people from tampering with the dispenser or theft?
a. There is an optional lock and key kit available. If you install the lock in the
locked position, a key will be required to open the dispenser. Refer to the
installation guide for installation instructions.
10.Will the color of the dispenser fade/yellow?
a. There is UV stabilizer in the white dispensers that will prevent them from
drastically changing color from UV. We have performed testing on the black
dispenser to show that its color is not affected by UV.
11.Is there anything customizable on the dispenser?
a. We are offering custom badges for the front window. Please contact your
marketer for more information.
12.What colors are the dispensers available in?
a. The dispensers are available in white and black. There is also a premium
metallic version for the Touch-Free dispensers.
13.It says in the i/o manual to not operate the TF dispenser near aerosol or oxygen
products- why is this and what should I do?
a. This is a general recommendation for all electronic devices required by
UL962. Electronic devices can cause sparks which can be dangerous near
these products. This dispenser has passed ANSI 12.12.01 to show it is not
capable of causing ignition of the surrounding atmosphere. If there is concern
operating the dispenser near aerosol or oxygen products, we recommend
using the manual Nexa™ dispenser that does not have any electronics.
14.Can I mount the Nexa™ Touch-free dispensers to my existing Next Gen stand?
a. Yes, but an adapter plate is required. This is an accessory item that must be
ordered separately.
Nexa™ Customer Service Reference Guide January 2014 Page 14
CONFIDENTIAL
b. Please note that only TF dispensers should be mounted on any of the stand
varieties.
15.Can I order the same products for the both the 750 & 1250ml dispensers?
a. Yes, Ecolab does offer the same products for both dispensers. Please contact
customer service for a list of products for each dispenser.
16.Is the Nexa™ dispenser ADA compliant?
a. Yes, all versions of the Nexa™ dispenser are ADA compliant. Follow
installation directions for height requirements to ensure a ADA compliant
installation.
17.How do I tell which type of product is in the dispenser?
a. The Nexa™ dispensers are shipped with a generic Ecolab badge.
Depending on the division there may be category specific (sanitizer, hand
soap etc) badges also shipped with the dispenser. If the category specific
badges are not included in the packaging they can be ordered separately as
an accessory.
18.What are the sizes of the Nexa™compact and classic dispensers?
a. Compact: Height-9.3”, Width-5.5”, Depth-4”
b. Classic: Height-11.1”, Width-6.1”, Depth-4”
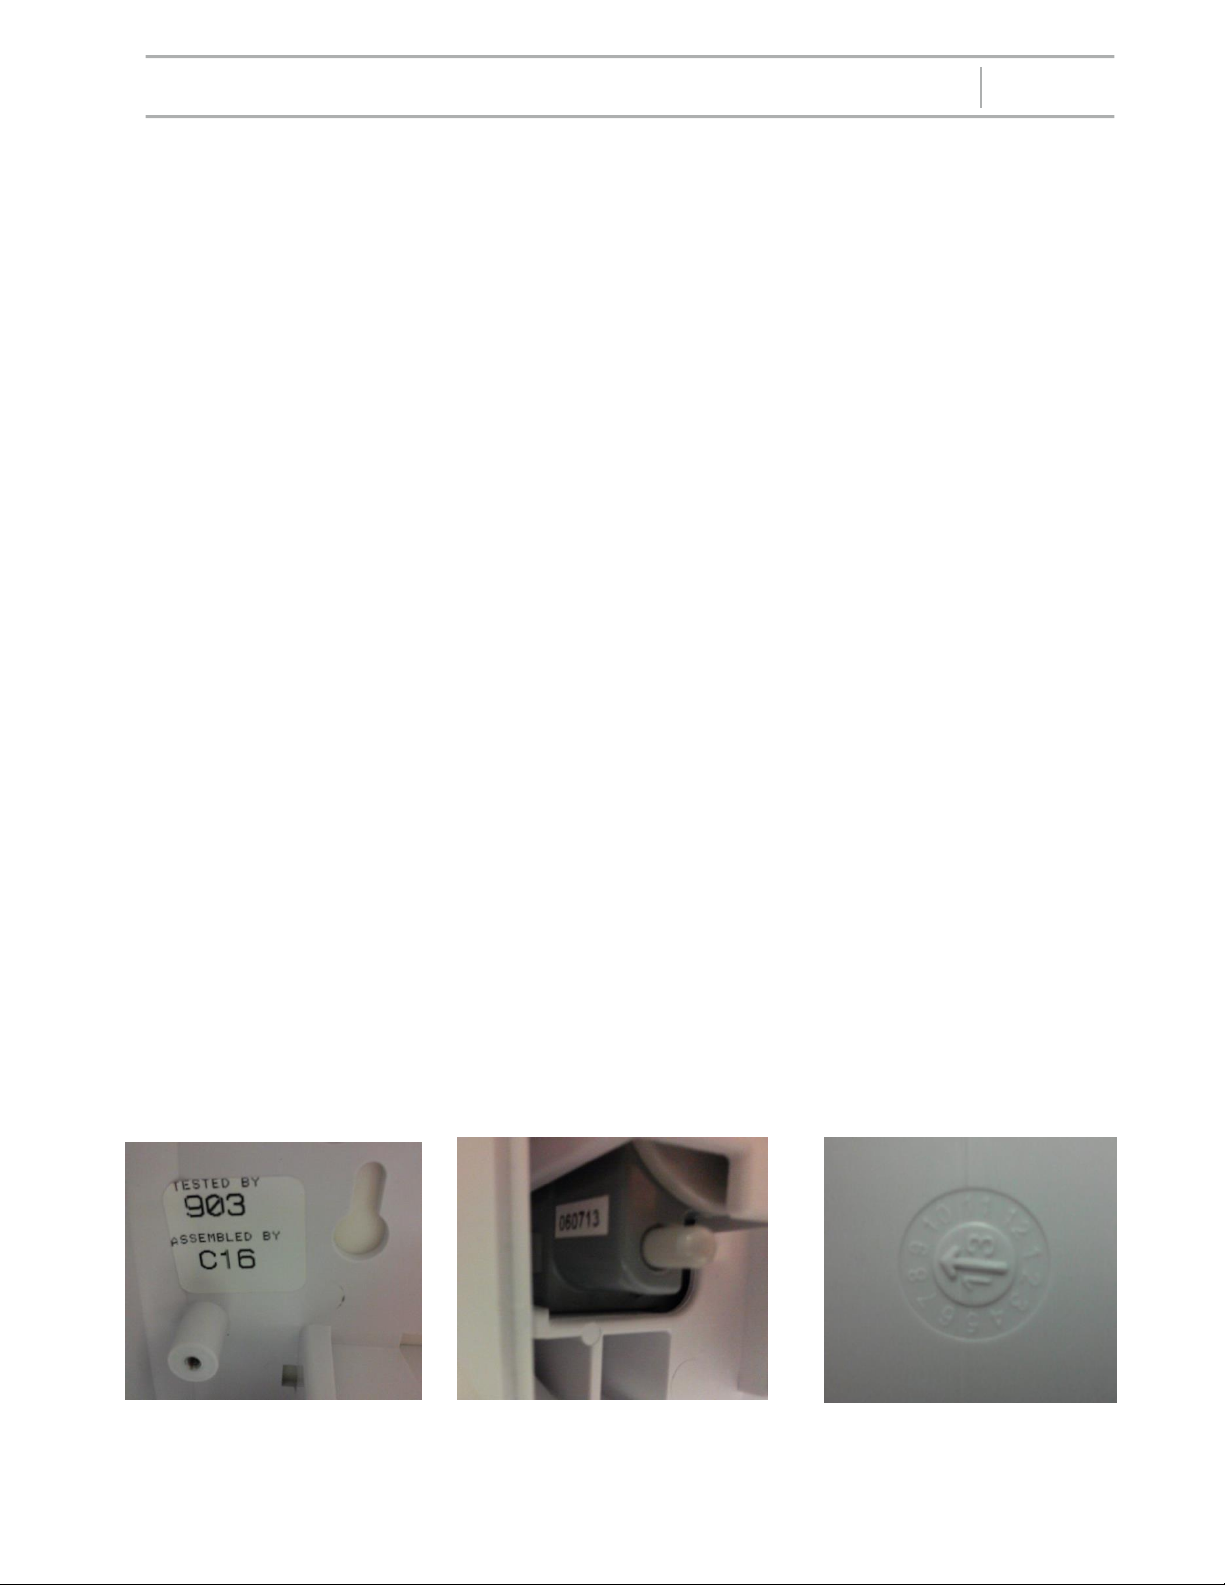
19.Is there a serial number on the dispenser?
a. There is not a serial number on the dispenser, however there are several
important date codes that will allow Ecolab to look up information on the
dispenser.
b. For the manual dispenser, look for the arrow symbol shown below on the
component in question. Every plastic component should have its own
symbol. The arrow points to the month and the year is the number around
the arrow. The image below shows August 2013.
c. For the TF dispenser, look for the symbol shown below on the component in
question as well. In addition to this symbol the Touch-Free Drive (gray) has a
date sticker Ecolab can track (lower left corner of dispenser). Finally, on the
backplate, there is a sticker with “tested by” and “assembled by”- this
information could be required as well.
ARROW SYMBOL
TESTED BY STICKER
TOUCH-FREE DRIVE DATE

Nexa™ Customer Service Reference Guide January 2014 Page 15
CONFIDENTIAL
20.Does the Nexa dispenser comply with the IFC 2012 (International Fire Code)?
a. Yes, the dispenser has a sensor range of less than 4” and an object placed in
the range and left there will only cause one activation.
b. Other IFC requirements are:
i. For corridor installations- maximum capacity of sanitizer (alcohol-
based) is 1.21 L- Nexa alcohol- based sanitizers are only available in
1200 mL or 750 mL (both meet this requirement).
ii. Refer to fire code documentation for installation rules and details.
21.Has anything been done to help prevent the spread of germs while using the manual
dispenser?
a. Nexa manual dispensers have a registered silver additive molded into the
plastic of the push bar as a layer of antimicrobial protection to inhibit the
growth of bacteria, mold and mildew.
b. The additive lasts the useful lifetime of the dispenser because it won’t wash
off or wear away.
c. The silver additive in the push bar is MCX 122009 and has an EPA
registration number of 73148-3.

Nexa™ Customer Service Reference Guide January 2014 Page 16
CONFIDENTIAL
Troubleshooting
PROBLEM
CAUSE
SOLUTION
Did not get the
correct size,
color, or style
dispenser
•Requested
wrong part
number
•Did not know all
of the varieties
There are classic (1250 mL) and compact (750 mL)
dispensers, as well as black and white, and manual
and TF. Make sure you specify all requirements
when ordering.
Dispenser fell
off the wall
•Humid/hot
environment
•Improper
installation
If possible, mount dispenser with screws using the
properly sized holes/wall mounts. This will not be
affected by hot/humid environments or dirty walls.
If using screws is not possible and the tape has not
been contaminated, you can reinstall the dispenser
using the installation procedure in the installation
instructions. Be sure to press down on the tape for
at least 30 seconds and if possible, do not put
product in the dispenser for 24 hours. If the tape is
contaminated, please remove the tape from the
back of the dispenser and replace it before
reinstalling.
TF dispenser
won’t work-
Dispenser
indicator light
has lit up and
dispenser is
making noise
during
dispense
•Bottle has not
been properly
inserted
Remove bottle and re-insert the bottle. Take care
in docking it in the correct location. See installation
instructions for pictures.
•Pump is not
primed
No product will be dispensed for the first 4-8
dispenses. Continue triggering the sensor until you
receive product or the pump umbrella is broken or
the bottle is empty. Note: With several days of non-
use, alcohol foams can require re-priming.
•Dose adjuster is
missing
Need to order new dose adjuster
•Pump is not
engaged
After several activations check to see if the lower
part of the pump has become latched under the
tabs on the dose adjuster. If it has not, you may
DOSE
ADJUSTER
SHOULD BE
HERE

Nexa™ Customer Service Reference Guide January 2014 Page 17
CONFIDENTIAL
need to manually pull the pump down to engage it
in the tabs.
TF dispenser
won’t work-
Dispenser
indicator light
has lit up, but
it is not making
any noise
•Improper use
Wait at least 5 seconds and then put hand 1-4
inches below the dispenser. Make sure fingertips
are fairly close to the wall. Cover must be shut in
order for activation to take place (depresses cover
switch). You must remove your hand completely
and replace it before a new dispense will trigger.
Also, make sure it is not a manual dispenser.
•Batteries are
dead- If the
dispenser
indicator light is
blinking red
every couple
seconds.
Remove the battery cover by taking off the 2
thumbscrews, remove the existing batteries and
replace them with new batteries according to the
battery orientation sticker inside the battery
compartment. Replace the battery cover and fully
screw down the thumbscrews. See installation
instructions.
•Dispenser
needs to be
reset-Dispenser
indicator light
blinks red every
couple seconds
Remove the battery cover by taking off the 2
thumbscrews. Take it completely off and then
replace it by fully screw down the thumbscrews.
TF dispenser
won’t work-
Dispenser
indicator light
is not working
•Batteries are
dead
Remove the battery cover by taking off the 2
thumbscrews, remove the existing batteries and
replace them according to the battery orientation
sticker inside the battery compartment. Replace
the battery cover and fully screw down the
thumbscrews. See installation instructions.
•Battery pull tab
was not removed
Remove the battery pull tab sticking out of the
battery compartment. See installation instructions.
•Thumbscrews
are loose
Try and tighten the thumbscrews- tighten them until
the battery cover cannot easily move around.
•Batteries were
inserted
improperly
Confirm the batteries match the orientation as
shown on the sticker inside the battery
compartment.
NOT ENGAGED
ENGAGED

Nexa™ Customer Service Reference Guide January 2014 Page 18
CONFIDENTIAL
Manual
dispenser
won’t work
•Pump is not
engaged with the
actuator
Be sure the push bar is being fully actuated to
engage the pump. This is only required for the first
couple pumps of a new bottle. If it still does not
engage, manually pull the pump down below the
dose adjuster tabs or try a different product bottle.
•Dose adjuster is
missing
Need to order new dose adjuster
•Improper use
Make sure push bar is being operated and they are
not treating it like a Touch-free dispenser.
The output
seems really
low
•Pump is
defective
If the output is different than it used to be- try
replacing the product bottle with a new product
bottle.
•Personal
preference
The output should be ~0.7 mL for foam and ~1.0
mL for liquids. If this is not enough product, try and
flip the dose adjuster. This is a u-shaped plastic
component near the bottom of the dispenser. You
can pinch the edges to remove it, then flip it 180
degrees and replace it. This will allow the
dispenser to output ~1 ml for foam and ~1.4 mL for
liquid. See installation instructions.
NOT ENGAGED
ENGAGED
DOSE
ADJUSTER
SHOULD BE
HERE

Nexa™ Customer Service Reference Guide January 2014 Page 19
CONFIDENTIAL
Cover will not
shut
•Bottle or other
obstruction in the
way
Remove bottle and replace it- make sure it is all
within the dispenser. Look around edges and the
top of the dispenser to check that nothing is in the
way of the latch. Make sure your are shutting it so
that the backplate and cover mate along the edges.
•Bottle is
backwards in
dispenser
Make sure the label is facing forward. The
dispenser will not close if the bottle has been
inserted backwards.
Dispenser will
not open
•Dispenser is
locked
Dispenser is using the lock accessory and requires
a key to open it. Using the key or a standard
paperclip- insert it into the hole on the top of the
dispenser near the button. If you would like to
unlock the dispenser- remove the component at the
top of the dispenser on the backplate. You can
rotate it 180 degrees and reinsert it or remove it
completely.
Drip tray keeps
falling out
•Retention hooks
have worn down
If the drip tray has been knocked out before, it will
damage the retaining features. You will need to get
a new drip tray or tape it to the wall. This was the
intentional design to prevent damage to the
dispenser if the drip tray is hit.
NEW HOOK
DAMAGED HOOK

Nexa™ Customer Service Reference Guide January 2014 Page 20
CONFIDENTIAL
I can’t get the
drip tray in
•Not inserting the
hooks into the
correct locations
Look at the bottom of the dispenser and find the
openings where the hooks line up. They will only
line up with 2 openings at the same time in one
location. Hook one side into the engagement point
and then pivot the drip tray to snap the other one in
place. Make sure the drip tray is being pressed
toward the dispenser (and not the wall) or it may
not contact the hook opening. See installation
instructions.
TF dispenser is
squeaking
•Grease was
missed in
assembly
•Not enough
grease was used
Dispenser must be taken down and replaced.
Dispenser
cover is falling
off
•Hinge is broken
If it is a touch-free cover- you are able to order a
replacement cover. If it is a manual cover, please
replace the dispenser.
•Opening it to the
side
•It was mounted
crooked
If the cover is opened to the side or the dispenser is
mounted crooked, the hinges will come together
when the cover is opened and one hinge can fall off
its post. Remount the dispenser vertical or take
care in opening the cover straight.
Cannot
unscrew the
thumbscrews
by hand
•Stuck
Please use a #2 Phillips screw driver to unscrew
them. Afterwards tighten them by hand.
Dispenser will
not mount to
my sanitizer
stand
•Missing adapter
plate
An adapter plate is required to allow mounting to
the Next Gen stand. This adapter plate can be
ordered as an accessory (see part list). Mount the
adapter plate to the stand and then the dispenser to
the adapter plate.
Pump
Clogging
•Product built up
in the tip of the
pump
Customer can clean the tip of the pump and put the
bottle back into the dispenser or push the push bar
hard a couple of times to clear the clog.
Pump collar
scuffed
•Pump is applied
with a spindle
capper
There are no issues with the pumps. The customer
should keep using the package.
Bottle Leaking
•Customer
Punctured Bottle
•Damaged during
the shipment
•Sonic Weld
caused a leak
•Bad or no gasket
Customer should replace the bottle
Missing bottle
label
•Customer theft
•Fell off in
shipment
Customer should replace the bottle and then
contact their sales rep with the date code
information.
Other Ecolab Dispenser manuals


