Elba EL 731 Technical manual

BUILT-IN GAS OVENS
Instructions for the use - Installation advices
Made in Italy
10 0%
ELBA QUALITY
MADE IN ITALY

2

3
Dear Customer,
Thank you for having purchased and given your preference to
our product. The safety precautions and recommendations within
this booklet are for your own safety and that of others. They will also
provide a means by which to make full use of the features offered
by your appliance.
Please preserve this booklet carefully. It may be useful in future,
either to yourself or to others in the event that doubts should arise
relating to its operation.
This appliance must be used only for the task it has
explicitly been designed for, that is for cooking foodstuffs. Any
other form of usage is to be considered as inappropriate and
therefore dangerous.
The manufacturer declines all responsibility in the event
of damage caused by improper, incorrect or illogical use of the
appliance.
Before operating this oven, please read these instructions carefully.
CAUTION: this apparatus must only be installed in a permanently ventilated room in
compliance with the applicable regulations.

4
Important:
This appliance is designed and manufactured solely for the cooking of domestic
(household) food and is not suitable for any non domestic application and therefore
should not be used in a commercial environment.
This appliance guarantee will be void if the appliance is used within a non domestic
environment i.e. a semi commercial, commercial or communal environment.
• Read the instructions carefully before installing and using the appliance.
• After unpacking the appliance, check that it is not damaged. In case of doubt, do not
usetheapplianceandcontactyoursupplieroraqualiedengineer.
• Remove all the packing materials (i.e. plastic bags, polystyrene foam, etc.) and do not
leave it around within easy reach of children, as these may cause serious injuries. The
packaging materials are recyclable (symbol ).
• The installation and all the gas/electrical connections shall be made by a qualied
engineer in compliance with local regulations in force and following the manufacturer’s
instructions.
• Do not attempt to modify the technical characteristics of the appliance, as it may be
come dangerous to use.
USING THE OVEN FOR THE FIRST TIME
You are advised to carry out the following operations:
• Assemble the interior of the oven as described under the heading “Cleaning and
maintenance”.
• Switch the empty oven ON at maximum temperature for about two hours to eliminate
traces of grease and smell from the components.
• Let the oven cool down, switch off the electrical supply, then clean the inside of the
oven with a cloth soaked in water and neutral detergent and dry thoroughly.
IMPORTANT PRECAUTIONS AND RECOMMENDATIONS FOR USE OF
ELECTRICAL APPLIANCES
Use of any electrical appliance implies the necessity to follow a series of fundamental rules.
In particular:
• never touch the appliance with wet hands or feet;
• do not operate the appliance barefooted;
• do not allow children or disabled people to use the appliance without your supervision.
The manufacturer cannot be held responsible for any damages caused by improper,
incorrect or unreasonable use of the appliance.

5
IMPORTANT SAFEGUARDS & RECOMMENDATIONS
• If you should decide not to use this appliance any longer (or decide to substitute an
older model), before disposing of it, it is recommended that it is made inoperative in an
appropriate manner in accordance to health and environmental protection regulations,
ensuring in particular that all potentially hazardous parts be made harmless, especially
in relation to children who could play with unused appliances.
• Someappliancesaresuppliedwithaprotectivelmonsteelandaluminiumparts.
This lm must be removed before using the appliance.
• Donotcarryoutanycleaningormaintenancewithoutrstdisconnectingtheappliance
from the electrical supply.
• During and after use of the oven, certain parts will become very hot. Do not touch hot
parts.
• After use always ensure that the control knobs are in the “0”, “ ” or “O” (OFF) position.
• Keep children away from the oven during use.
• Household appliances are not intended to be played with by children.
• Children, or persons with a disability which limits their ability to use the appliance,
hould have a responsible person to instruct them in its use. The instructor should
be satised that they can use the appliance without danger to themselves or their
surroundings.
• WARNING. When correctly installed, your product meets all safety requirements
laid down for this type of product category. However special care should be taken
around the rear or the underneath of the appliance as these areas are not designed or
intended to be touched and may contain sharp or rough edges, that may cause injury.
• Fire Risk!Donotstoreinammablematerialsinsidetheoven.
• Always use oven gloves when removing the shelves and food trays from the oven
whilst hot.
• Clean the oven regularly and do not allow fat or oils to build up in the oven base or
trays. Remove spillages as soon as they occur.
• Do not line the oven walls with aluminium foil. Do not place baking trays or the drip tray
on the base of the oven chamber.
• Always stand back from the oven when opening the oven door to allow steam and hot
air to escape before removing the food.
• Do not hang towels, dishcloths or other items on the oven or its handle – as this could
bearehazard.
• Make sure that electrical cords connecting other appliances in the proximity cannot
become entrapped in the oven door.
• Safe food handling: leave food in the oven for as short a time as possible before and
after cooking. This is to avoid contamination by organisms which may cause food
poisoning. Take particular care during warmer weather.
• Important: This appliance has been designed for domestic use only.

6
Fig. 1.1
Fig. 1.3
Fig. 1.2
2 3
2 3
6
1
1
1
4
5
2 3
CONTROL PANELS
1
CONTROLS DESCRIPTION
1. Gas oven/grill thermostat control knob
2. Oven light/rotisserie control knob
3. If the product is a “fan assisted” gas oven, the oven
light/rotisserie control knob has also the position
(fan motor)
4. Electric clock with alarm
5. Electronic clock with alarm
6. 60’ or 120’ alarm control knob
Notes:
• The electric ignition is incorporated in the thermostat control knob.
• Theappliancehasasafetyvalvesystemtted,theowofgaswillbestoppedifand
whentheameshouldaccidentallygoout.
CAUTION:
If the burner is accidentally extinguished, turn the gas off at the control knob and wait at least 1
minute before attempting to relight.
CAUTION:
Gas appliances produce heat and humidity in the environment in which they are installed.
Ensure that the cooking area is well ventilated by opening the natural ventilation grilles or by
installing an extractor hood connected to an outlet duct.
CAUTION:
If the appliance is used for a prolonged time it may be necessary to provide further ventilation by
openingawindoworbyincreasingthesuctionpoweroftheextractorhood(iftted).
NOTES:
The knobs and symbols may
vary.
The symbols may be printed
on the knob itself.

7
ATTENTION:
The oven door becomes very hot
during operation and very hot steam
goes out from the area below the
control panel. Keep children away.
The door is hot, use the handle.
During use the appliance becomes
hot. Care should be taken to avoid
touching the heating elements inside
the oven.
TECHNICAL FEATURES
The oven is furnished completely clean.
It is advisable however, upon rst use, to
turn the oven on to the maximum tempera-
ture to eliminate possible traces of grease
from the oven burner.
The same operation shall be done with the
gas grill.
Thisovenisttedwith:
• One gas oven burner (2,70 kW), loca-
ted at the bottom, providing self-igni-
tion and safety device.
• One gas grill burner (1,70 kW), placed
on the top, providing self-ignition and
safety device.
• Only for the “fan assisted” models
(models having also the position
, fan motor, on the oven light/
rotisserie control knob) - A fan mo-
tor, positioned on the back panel of
the oven cavity, which can be used in
combination with the oven gas burner
or alone, without heating.
IMPORTANT NOTE - It is not possi-
ble to use the fan motor in combina-
tion with the gas grill: a safety devi-
ce switches off the fan motor when
the gas oven/grill control knob is
turned on grill position.
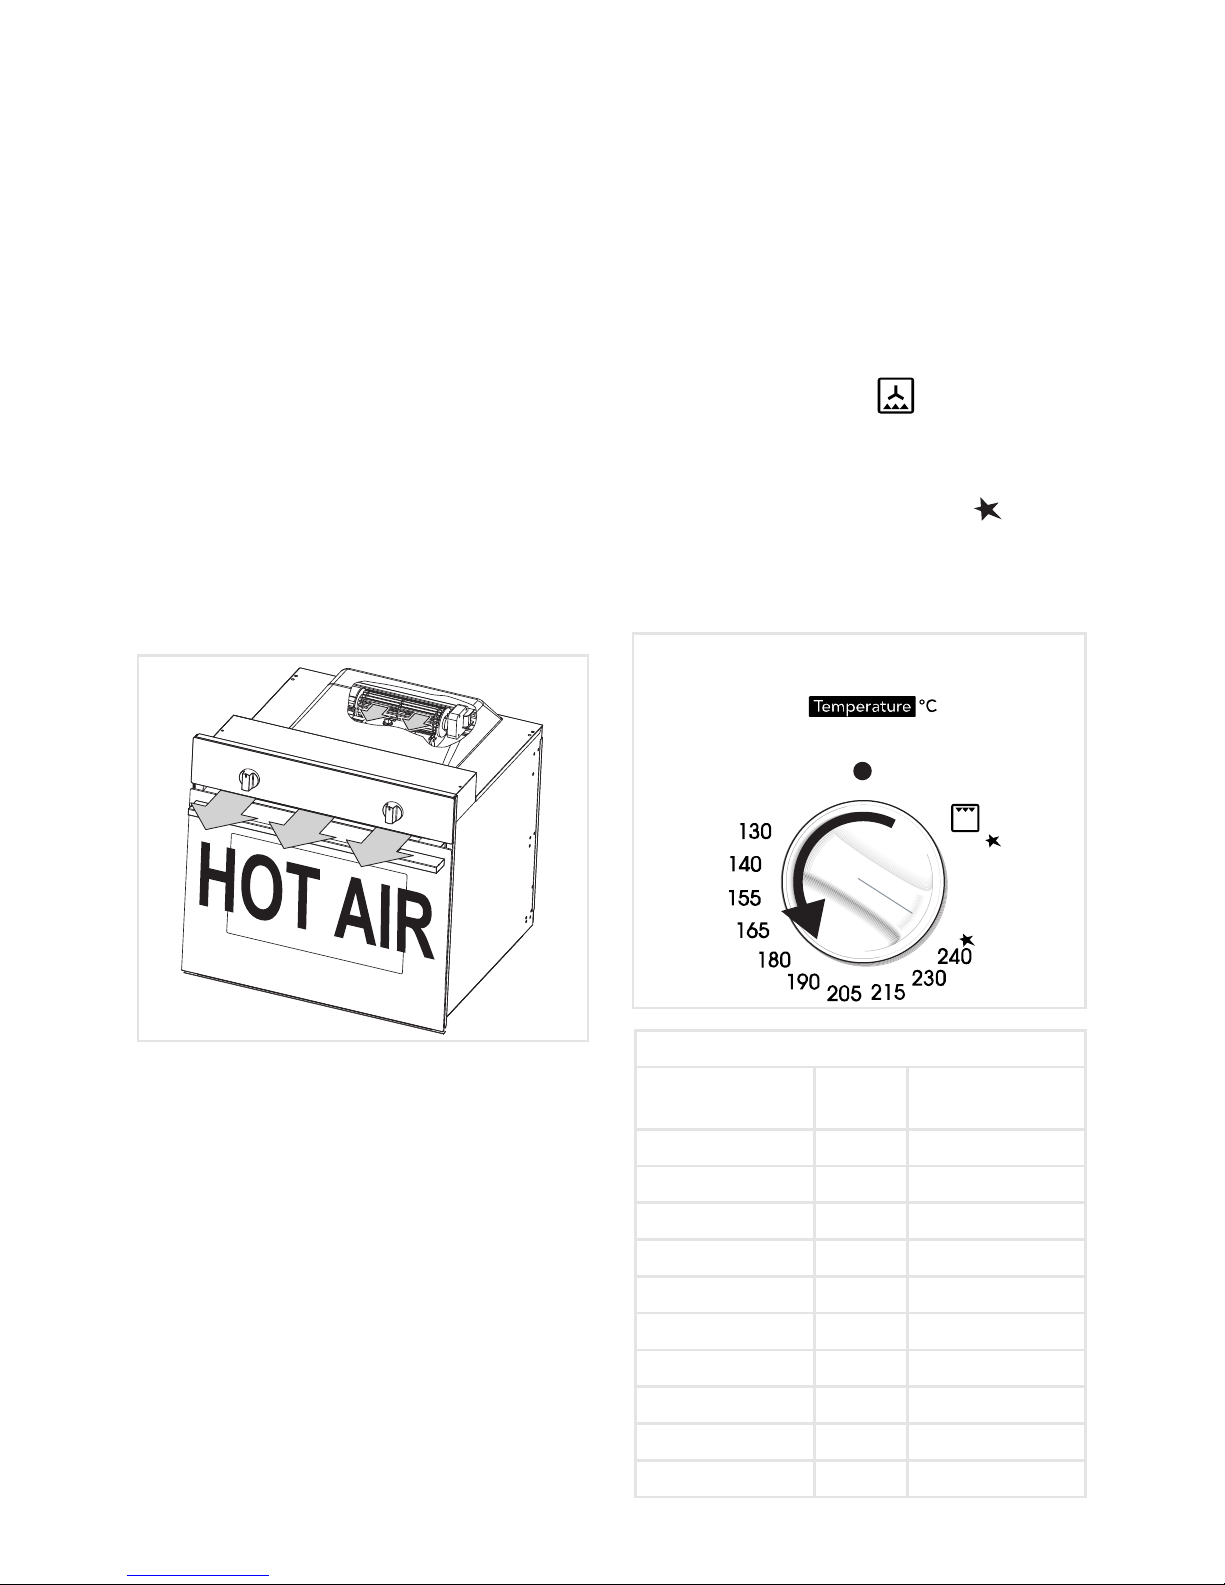
OPERATING PRINCIPLES
Heating and cooking in the gas oven are
obtained in the following ways:
a. by normal convection
The heat is produced by the oven gas
burner.
b. by forced convection (only for the
“fan assisted” models - models ha-
ving also the position , fan motor,
on the oven light/rotisserie control
knob)
The heat produced by the oven burner
is distributed throughout the oven by the
fan.
c. by radiation
The heat is radiated by the gas grill.
d. by ventilation (only for the “fan assi-
sted” models - models having also
the position , fan motor, on the
oven light/rotisserie control knob)
The food is defrosted by using the fan
only without oven burner (this is not a
cooking function).
COOLING FAN MOTOR
This appliance incorporates a safety co-
oling fan motor to achieve optimum ef-
ciency of the controls, ensure lower surfa-
ce temperatures are maintained and cool
the internal components.
The cooling fan motor turns on automati-
cally when igniting the oven or grill burner.
It may run on (for various minutes) even af-
ter the oven or grill burner has been turned
off.
HOW TO USE THE OVEN
2

8
IMPORTANT NOTES:
• Do not use the appliance in case of
power failure or if the cooling fan
motor is damaged. The appliance
may overheat and get damaged due
to the non-operation of the cooling
fan motor.
• In case of failure of the cooling fan
motor during the operation of the
gas oven or gas grill, the oven or
grill burner is turned off automati-
cally after about 20 minutes. In that
case do not use the oven or the grill
and contact the after-sales service.
• When the cooling fan motor is ope-
rating correctly there is an air ow
in the top area of the appliance.
OVEN BURNER
Thegasowtotheburnerisregulatedby
a thermostat which allow to maintain the
oven temperature constant.
The control of the temperature is assured by
a thermostatic probe positioned inside the
oven.
The probe must be always kept in its hou-
sing, in a clean condition, as an incorrect
position or encrustment may cause an al-
teration in the control of the temperature.
Moreover,thethermostatisttedwithasa-
fety valve which automatically shuts off the
gassupplywhentheamegoesout.
THERMOSTAT
The numbers printed on the control panel or
ontheknob(g.2.2)indicatetheincreasing
oven temperature value (see table below).
To regulate the temperature, set the knob
to the chosen number. The “FAN ASSI-
STED GAS OVEN” column refers to the
oven burner used in combination with the
fan motor (forced convection cooking: only
for the “fan assisted” models - models ha-
ving also the position , fan motor, on
the oven light/rotisserie control knob), whi-
le the “GAS OVEN” column refers to the
oven burner used in the normal convection
mode (without fan motor). The symbol
close to the maximum position indicates
that the electric ignition is incorporated into
the knob (activated by the knob itself).
THERMOSTAT GRADE TABLE (°C)
Knob
position
GAS
OVEN
FAN ASSISTED
GAS OVEN
130 (or 1) 130 130
140 (or 2) 140 140
155 (or 3) 155 155
165 (or 4) 165 165
180 (or 5) 180 180
190 (or 6) 190 190
205 (or 7) 205 205
215 (or 8) 215 215
230 (or 9) 230 230
240 (or 10) 240 240
Fig. 2.2
Fig. 2.1
NOTES: The knob and symbols may vary.
The symbols may be printed on the knob
itself.

9
LIGHTING OF OVEN BURNER
IMPORTANT: The oven door must be
open during this operation.
To light the oven burner:
1 – Open the oven door to the full
extent.
If this operation is not performed
you should not proceed to light the
oven.
2 – Lightly press and turn the thermostat
knob anti-clockwise to the maximum
position (g. 2.2). Press the knob
rmlyuntiltheburnerlights.
Never continue this operation for
more than 15 seconds. If the burner
has still not ignited, wait for about
1 minute prior to repeating the igni-
tion.
In case of mains failure, approach a
lighted match or taper to the opening
“A” (g. 2.3) and immediately press
theknobrmly.
3 – Wait about 10/15 seconds after the
burner lighting before releasing the
knob (time of priming of the valve).
4 – Check that the burner has lit; if not,
turn the knob clockwise back to “0”, “
” or “O” (OFF) and repeat the procedu-
re from step 1.
5 – Close the oven door slowly and adjust
the burner according to the power re-
quired.
If the ame extinguishes for any reason,
the safety valve will automatically shut off
the gas supply to the burner.
To re-light the burner, rst turn the oven
control knob to OFF position (“0”, “ ” or
“O”), wait for at least 1 minute and then
repeat the lighting procedure.
For the correct use of the gas oven see the
chapters “COOKING WITH GAS OVEN”
and “COOKING WITH FAN ASSISTED
GAS OVEN” (only for the “fan assisted”
models - models having also the position
, fan motor, on the oven light/rotisserie
control knob).
A
Fig. 2.3
During and after use of the oven,
certain parts will become very hot.
Keep children away.
For a correct pre-heating, we suggest
to remove tray and shelf from the oven
and introduce them again after 15
minutes.
ATTENTION: In case of manual
lighting, never turn the thermostat
before approaching a ame to the hole
“A” of the oor.

10
LIGHTING OF GAS GRILL BURNER
IMPORTANT: The oven door must be
open during this operation.
To light the grill burner:
1 – Open the oven door to the full
extent.
If this operation is not performed
you should not proceed to light the
grill.
2 – Lightly press and turn the thermostat
knob clockwise to the position
(g. 2.4). Press the knob rmly until
the burner lights.
Never continue this operation for
more than 15 seconds. If the burner
has still not ignited, wait for about
1 minute prior to repeating the igni-
tion.
In case of mains failure, approach a
lighted match or taper to the pipe of
the burner (g. 2.5) and immediately
presstheknobrmly.
3 – Wait about 10/15 seconds after the
burner lighting before releasing the
knob (time of priming of the valve).
4 – Check the grill burner has lit; if not,
turn the knob counter-clockwise back
to “0”, “ ” or “O” (OFF) and repeat the
procedure from step 1.
5 – Close the oven door slowly.
The grill must always be used with
the oven door closed.
For correct use see chapter “USE OF
THE GRILL”.
If the ame extinguishes for any reason,
the safety valve will automatically shut off
the gas supply to the burner.
To re-light the burner, rst turn the oven
control knob to OFF position (“0”, “ ” or
“O”), wait for at least 1 minute and then
repeat the lighting procedure.
IMPORTANT NOTE (only for the “fan
assisted” models - models having also
the position , fan motor, on the oven
light/rotisserie control knob): It is not
possible to use the fan motor in combi-
nation with the gas grill; a safety device
switches off the fan motor when the gas
oven/grill control knob is turned on grill
position.
ATTENTION: The oven door becomes
very hot during operation. Keep
children away.
During and after use of the grill, certain
parts will become very hot.
Keep children away.
ATTENTION: In case of manual
lighting, never turn the thermostat
before approaching a ame to the
burner.
Fig. 2.4
Fig. 2.5
NOTES: The knob and symbols may vary.
The symbols may be printed on the knob
itself.

11
COOKING WITH GAS OVEN
Before introducing the food, preheat the
oven to the desired temperature.
For a correct preheating operation, it is advi-
sable to remove the tray from the oven and
introduce it together with the food, when the
oven has reached the desired temperature.
Check the cooking time and turn off the
oven 5 minutes before the theoretical time
to recuperate the stored heat.
FAN MOTOR (Only for the “fan assi-
sted” models - models having also the
position , fan motor, on the oven
light/rotisserie control knob)
The fan motor is designed to distribute
throughout the oven the heat generated by
the oven gas burner.
The fan motor can also be used without the
oven gas burner (without heating) to defrost
frozen foods.
Thefaniscontrolledbyaknob(g.2.6).
• To operate the fan motor turn the knob
indicateding.2.6to position.
• To switch it off turn the knob to the off
position (“O” or “0”).
IMPORTANT: When using the fan motor
together with the oven gas burner, switch
on the fan only after the ignition of the gas
burner.
COOKING WITH FAN ASSISTED
GAS OVEN (Only for the “fan assisted”
models - models having also the posi-
tion , fan motor, on the oven light/
rotisserie control knob)
OVEN BURNER AND FAN MOTOR
After the ignition of the gas burner, close
the oven door and switch on the fan motor.
Before introducing the food, preheat the
oven to the desired temperature.
For a correct preheating operation, it is advi-
sable to remove the tray from the oven and
introduce it together with the food, when the
oven has reached the desired temperature.
Check the cooking time and turn off the
oven 5 minutes before the theoretical time
to recuperate the stored heat.
Fig. 2.6
Fig. 2.7
Only for the “fan assisted” models - models
having also the position , fan motor, on
the oven light/rotisserie control knob.
NOTES: The knob and symbols may vary.
The symbols may be printed on the knob
itself.

12
DEFROSTING FROZEN FOODS
(Only for the “fan assisted” models -
models having also the position ,
fan motor, on the oven light/rotisserie
control knob)
FAN MOTOR ONLY
Switch on the fan motor only.
The oven thermostat control knob shall be
in the “0”, “ ” or “O” (OFF) position.
The defrosting is done by simple ventilation
without heat.
USE OF THE GRILL
Very important: The grill must always be
used with the oven door closed.
Turn on the grill, as explained in the prece-
ding paragraphs and let the oven preheat
for about 5 minutes with the door closed.
Introduce the food to be cooked, positio-
ning the rack as close to the grill as pos-
sible.
The dripping pan should be placed under
the rack to catch the cooking juices and
fats.
Note: It is recommended that you do not
grill for longer than 30 minutes at any
one time.
Attention: The oven door becomes very
hot during operation. Keep children
away.
OVEN LIGHT
The oven provides an interior lamp to allow
the visual inspection during the cooking.
To light the oven lamp turn the knob (g.
2.6 or 2.9) to the symbol .
ROTISSERIE
Theovenisttedwitharotisserie.
To operate the rotisserie motor turn the
knobindicateding.2.6or2.9to po-
sition.
Forthecorrectuseseespecicinstructions
in the section “USING THE ROTISSERIE”.
Fig. 2.8
Fig. 2.9
NOTES: The knob and symbols may vary.
The symbols may be printed on the knob
itself.

13
USING THE ROTISSERIE
(Models
without fan assisted oven - Without fan
motor)
-gs.2.10a,2.10bor2.11
Very important: The rotisserie must
always be used with the oven door clo-
sed.
• Insert the dripping pan into the lowest
level of the oven and insert the rod sup-
port into the intermediate level.
• Putthemeattobecookedontotherod,
being careful to secure it in the center
with the special forks.
• Insert the skewer into the motor hole
and rest the collar on the support; remo-
ve the handgrip by turning it to the left.
• Light the grill burner and then switch on
the rotisserie.
The rotation direction of the rotisserie can
be either clockwise or counterclockwise.
USING THE ROTISSERIE
(
Only for
the “fan assisted” models - models ha-
ving also the position , fan motor, on
the oven light/rotisserie control knob
)
-
g.2.12
Very important: The rotisserie must
always be used with the oven door clo-
sed.
• Insert the dripping pan into the lowest
rack holders of the oven and insert the
rod support into the intermediate rack
holders.
• Putthemeattobecookedontotherod,
being careful to secure it in the center
with the special forks.
• Insert the rod into the side gear ope-
ning “R”(g.2.12).
• Remove the handgrip by turning it to
the left.
• Insert completely the rotisserie sup-
port; the shaft “P” must be inserted in
the spit motor collar “F”.
• Light the grill burner and then switch on
the rotisserie.
The rotation direction of the rotisserie can
be either clockwise or counterclockwise.
F
R
P
Models with embossed cavity - 1
Models with side wire racks
Models with fan oven
Fig. 2.10a
Fig. 2.11
Fig. 2.12
Models with embossed cavity - 2
Fig. 2.10b

14
60’ ALARM (g.3.1)
The timer is equipped with a time buzzer
and may be regulated for a maximum
period of 60 minutes.
The regulating knob must be turned in
a clockwise direction until it reaches the
60 minutes position and then turned to
the desired time by turning the knob in a
counterclockwise direction.
120’ ALARM(g.3.2)
The timer is equipped with a time buzzer
and may be regulated for a maximum
period of 120 minutes.
The regulating knob must be turned in
a clockwise direction until it reaches the
120 minutes position and then turned to
the desired time by turning the knob in a
counterclockwise direction.
Fig. 3.1 60
20
40
80
100
10
30
5070
90
110
Fig. 3.2
ATTENTION - MOST IMPORTANT:
This is only a mechanical timer that DOES NOT switch off the oven or grill.
REMEMBER TO TURN OFF THE OVEN OR GRILL MANUALLY.
ALARM, ELECTRIC OR ELECTRONIC CLOCK
3
NOTES: The knob and symbols may vary.
The symbols may be printed on the knob
itself.

15
Fig. 3.3
MODELS WITH ELECTRIC CLOCK
WITH MINUTE MINDER (g.3.3)
The electric clock is a device which groups
the following functions:
• 12-hour analog clock;
• minute minder (max 3 hours);
• acoustic signal (beep) which is
activated each time the “setting knob”
is pressed or at the end of the minute
minder function.
ELECTRIC CLOCK
Upon immediate connection of the oven
or after a blackout, the “clock indicator
light” is ashing. This indicates that it is
recommended to check if the time of the
day is correct.
• If the time of the day is correct keep
the “setting knob” pressed until the
“clock indicator light” goes out.
• To set the time of the day press the
“settingknob”briey(repeatedly)until
the “clock indicator light” is ashing.
Then turn the “setting knob” (to the
right or left) to set the time of the day.
At the end of the time adjustment,
keep the “setting knob” pressed for
conrmation until the “clock indicator
light” goes out.
MINUTE MINDER
The minute minder function consists only
of a buzzer which is automatically activated
at the end of the set time (max 3 hours).
To set the minute minder press the “setting
knob”briey(oneormoretimes)untilthe
“minuteminderindicatorlight”isashing.
Then turn the “setting knob” (to the right or
left) to set the time.
At the end of the adjustment (within 10
seconds), keep the “setting knob” pressed
for conrmation until the “minute minder
indicator light” changes from ashing to
steadily lit.
Then the countdown starts immediately.
At the end of the time, the “minute minder
indicator light” changes from steadily lit to
ashing and a buzzer (beep) sounds for
one minute.
Pressthe“settingknob”brieytostopthe
buzzerandtoturnofftheashing“minute
minder indicator light”.
During the minute minder program it is
possible, at any time, to display the set time
bypressingthe“settingknob”briey(one
or more times) until the “minute minder
indicatorlight”isashing.
To cancel the program before completion,
keep the “setting knob” pressed for about
3 seconds; the minute minder function will
be cancelled.
Setting knob
Clock indicator
light
Minute minder
indicator light ATTENTION - MOST IMPORTANT:
This is only an alarm that DOES NOT
switch off the oven or grill.
REMEMBER TO TURN OFF THE OVEN
OR GRILL MANUALLY.

16
ELECTRONIC CLOCK WITH ALARM
(g.3.4)
The electronic clock is a device which
groups the following functions:
• 24 hours clock with illuminated display;
• 99 minutes alarm.
Upon immediate connection of the oven or
after a blackout, three zeros will ash on
the display.
To set the hour it is necessary to push the
button and then, within 7 seconds, the
( ) or ( ) button until you have
set the exact hour.
An energy black-out makes the clock go
to zero.
Fig. 3.4
ELECTRONIC ALARM
The alarm program consists only of a
buzzer which may be set for a maximum
period of 99 minutes.
To set the time, push the ( ) or ( )
button
until you obtain the desired time in the
display.Havingnishedthesetting,the
symbol will be lighted and the countdown
will start immediately.
At the end of the time, an intermittent
buzzer, during 7 minutes, will go off; this
can be stopped by pressing the ( )
button.
To stop the alarm countdown in any
moment press the ( ) and ( ),
buttons together and release the ( )
buttonrst.
SETTING THE FREQUENCY OF THE
ALARM SOUND
The selection from 3 possibilities of sound
can be made by pressing the ( )
button.
ATTENTION - MOST IMPORTANT:
This is only an electronic alarm that
DOES NOT switch off the oven or grill.
REMEMBER TO TURN OFF THE OVEN
OR GRILL MANUALLY.
NOTES: The symbols may vary.

17
GENERAL ADVICE
Important:
Before any operation of cleaning and
maintenance disconnect the appliance
from the electrical supply.
• It is advisable to clean when the
appliance is cold and especially for
cleaning the enamelled parts.
• Avoid leaving alkaline or acidic
substances (lemon juice, vinegar, etc.)
on the surfaces.
• Do not use cleaning products with a
chlorine or acidic base.
• The oven must always be cleaned after
every use, using suitable products.
WARNING
When correctly installed, your product
meets all safety requirements laid
down for this type of product category.
However special care should be taken
around the rear or the underneath of
the appliance as these areas are not
designed or intended to be touched and
may contain sharp or rough edges, that
may cause injury.
INSIDE OF OVEN
The oven should always be cleaned after
use when it has cooled down.
The cavity should be cleaned using a mild
detergent solution and warm water.
Suitable proprietary chemical cleaners
may be used after rst consulting with
the manufacturers recommendations and
testing a small sample of the oven cavity.
Abrasive cleaning agents or scouring pads/
cloths should not be used on the cavity
surface.
NOTE: The manufacturers of this appliance
will accept no responsibility for damage
caused by chemical or abrasive cleaning.
Let the oven cool down and pay special
attention no to touch the hot heating
elements inside the oven cavity.
REMOVABLE INNER DOOR PANE
(only for the models with removable
inner pane of glass)
Follow the instructions of pages 22, 23, 24.
Do not use a steam cleaner because
the moisture can get into the appliance
thus make it unsafe.
Do not store ammable material in the
oven.
CLEANING AND MAINTENANCE
4

18
ENAMELLED PARTS
All the enamelled parts must be cleaned
with a sponge and soapy water or other
non-abrasive products.
Dry preferably with a microbre or soft
cloth.
Acidic substances like lemon juice, tomato
sauce, vinegar etc. can damage the enamel
if left too long.
STAINLESS STEEL SURFACES
(MODELS WITHOUT ANTI-
FINGERPRINT TREATMENT),
ALUMINIUM PARTS AND PAINTED OR
SILK-SCREEN PRINTED SURFACES
Clean using an appropriate product. Always
dry thoroughly.
IMPORTANT: these parts must be cleaned
very carefully to avoid scratching and
abrasion.
You are advised to use a soft cloth and
neutral soap.
STAINLESS STEEL SURFACES WITH
ANTI-FINGERPRINT TREATMENT
(SOME MODELS ONLY)
CAUTION: The stainless steel front
surfaces used in some ovens are protected
with a Special Lacquer to reduce nger-
print marks.
To avoid damaging this lacquer, do not
clean the stainless steel with abrasive
cleaners or abrasive cloths or scouring
pads.
ONLY SOAP/WARM WATER MUST BE
USED TO CLEAN THE STAINLESS
STEEL SURFACES.
GLASS CONTROL PANEL (MODELS
WITH GLASS CONTROL PANEL)
Clean using an appropriate product.
Always dry thoroughly.
Do not use harsh abrasive cleaners or
sharp metal scrapers to clean the control
panel since they can scratch the surface,
which may result in shattering of the glass.
Do not use harsh abrasive cleaners or sharp metal scrapers to clean the oven door
glass since they can scratch the surface, which may result in shattering of the
glass.

19
OVEN FITTING OUT
MODELS WITH EMBOSSED CAVITY
The oven shelf must be inserted operating
aspergure4.1a.
To pull it out operate in the inverse order.
Some model only: The oven shelf is
provided with a security block to prevent
accidental extraction. It must be inserted
operatingaspergure4.1b.
To pull it out operate in the inverse order.
Oven tray: Insert the dripping pan into the
side guides of the oven cavity operating
as indicated for the standard shelf (without
securityblock,g.4.1a).
To pull it out operate in the inverse order.
MODELS WITH WIRE RACKS
• Hang up the wire racks “G” on the
ovenwalls(g.4.2).
In the models with catalytic panels
supplied: interpose the catalytic
panels “A”(g.4.2).
• Slide in, on the guides, the shelf and
thetray(g.4.3).
The shelf must be tted so that the
safety catch, which stops it sliding out,
faces the inside of the oven.
• To dismantle, operate in reverse order.
ADVICE FOR USE AND
MAINTENANCE OF CATALYTIC
PANELS
(SOME MODELS ONLY)
The self-cleaning panels are coated in a
special microporous enamel which absorbs
and automatically eliminates spatters of oil
and grease during normal cooking above
200°C.
If, after cooking very greasy foods, the
panels are still dirty, run the oven empty at
maximum temperature for approximately
30 minutes.
Fig. 4.1b
Fig. 4.1a
GA
Fig. 4.2
Fig. 4.3

20
These panels do not require cleaning but
periodically it is nevertheless a good idea
to take them out and dust with a soft damp
cloth.
Do not wash or clean with abrasive
products or products containing acids
or alkalis.
The side panels are reversible and can be
turned round and tted on the other side
when the microporous enamel is worn.
GREASE FILTER - FAN ASSISTED
OVENS (SOME MODELS ONLY)
• A special screen is provided at the
back of the oven to catch grease
particles, mainly when meat is being
roasted(g.4.4).
• When baking pastry etc. this lter
should be removed.
• Slideinthegreaselteronthebackof
theovenasing.4.4.
• Clean the lter after any cooking!
The grease lter can be removed
for cleaning and should be washed
regularly in hot soapy water.
Alwayscleanthelteraftercookingas
any solid residues on it might adversely
affect the oven performance.
• Always dry the lter properly before
ttingitbackintotheoven.
REPLACING THE OVEN LAMP
WARNING: Ensure the appliance is
switched off before replacing the lamp
to avoid the possibility of electric shock.
• Let the oven cavity and the heating
elements to cool down.
• Switch off the electrical supply.
• Remove the protective cover “A”(g.
4.5).
• Unscrew and replace the bulb “B”
with a new one suitable for high
temperatures (300°C) having the
following specications: 220-240V,
E14 and same power (check watt
power as stamped in the bulb itself) of
the replaced bulb.
• Rettheprotectivecover“A”.
Note: Oven bulb replacement is not
covered by your guarantee.
A
B
Fig. 4.4
Fig. 4.5
Table of contents
Other Elba Oven manuals

Elba
Elba EBO9810S Installation and operating instructions

Elba
Elba EL 600 User manual

Elba
Elba ESO-2633BI User manual

Elba
Elba OB60 Series User manual

Elba
Elba OB60S4 User manual

Elba
Elba Elio 60 MW User manual

Elba
Elba ESPERTO EBO-F7018TW(SS) User manual

Elba
Elba IGM-25A-60 User manual

Elba
Elba EBO-N6770 User manual

Elba
Elba EL 810 User manual

Elba
Elba 6306110 Technical manual

Elba
Elba EGC-C9783E(SS) User manual

Elba
Elba OB60SC SERIES User manual

Elba
Elba OB60 Series Mounting instructions

Elba
Elba ESGO-H3850TFT(BK) User manual

Elba
Elba EO-1988 User manual

Elba
Elba PXDO 906 DF Installation and operating instructions

Elba
Elba ESMO-C3582ST User manual

Elba
Elba OB60 Series User manual

Elba
Elba OB60S3 User manual