Installation Instruct ions
DETERM INING WALL PLATE LOCATION UNDER YOUR CABINET
C.
Plate position—beneat h flat bot t om
cabinet
Draw a line on the
back wall equal to the
depth of the front
overhang.
33" to Cooktop
C
3/8"TOEDGE
NOTE:ITISVERYIMPORTANTTO
READANDFOLLOWTHEDIRECTIONS
INTHEINSTALLATIONINSTRUCTIONS
BEFOREPROCEEDINGWITHTHIS
REARWALLTEMPLATE.
ThisRearWallTemplateservestopositionthebottom
mountingplateandtolocatethehorizontalexhaust
outlet.
1.Usealeveltocheckthatthetemplateispositioned
accurately.
2.Locateandmarkatleastonestudontheleftor
rightsideofthecenterline.
Itisimportanttouseatleastonewood
screwmountedfirmlyinastudtosupporttheweight
ofthemicrowave.Marktwoadditional,evenlyspaced
locationsforthesuppliedtogglebolts.
3.Drillholesinthemarkedlocations.Wherethereis
astud,drilla3/16"holeforwoodscrews.Forholes
thatdonotlineupwithastud,drill5/8"holesfor
togglebolts.
DONOTINSTALLTHEMOUNTINGPLATE
ATTHISTIME.
4.Removethetemplatefromtherearwall.
5.ReviewtheInstallationInstructionbookforyour
installationsituation.
Locateandmarkholestoalignwithholesinthe
mountingplate.
IMPORTANT:
LOCATEATLEASTONESTUDONEITHERSIDEOF
THECENTERLINE.
MARKTHELOCATIONFOR2ADDITIONAL,EVENLY
SPACEDTOGGLEBOLTSINTHEMOUNTING PLATE
AREA.
Locateandmarkholestoalignwithholes inthe
mountingplate.
IMPORTANT:
LOCATEATLEASTONESTUDONEITHERSIDEOF
THECENTERLINE.
MARKTHELOCATIONFOR2 ADDITIONAL,EVENLY
SPACEDTOGGLEBOLTSINTHEMOUNTINGPLATE
AREA.
Trimtherearwalltemplatealongthedottedline.
Trimtherearwalltemplatealongthedottedline.
12"
4"
Darlevueltaalahojapara consultarla
versiónenEspañol.
C
L
3/8"TOEDGE
NOTE:ITISVERY IMPORTANT TO
READANDFOLLOW THE DIRECTIONS
INTHEINSTALLATIONINSTRUCTIONS
BEFOREPROCEEDINGWITH THIS
REARWALL TEMPLATE.
ThisRearWall Template servesto positionthebottom
mountingplateand to locatethe horizontal exhaust
outlet.
1.Usealevel to checkthatthetemplate is positioned
a ccurately.
2.Locateandmarkat leastonestudonthe left or
rightsideofthecenterline.
Itis important touse at least one wood
screwmountedfirmly in a studto supporttheweight
ofthemicrowave.Marktwoadditional, evenlyspaced
locationsforthesuppliedtoggle bolts.
3.Drill holesin the markedlocations. Where thereis
astud,drill a3/16" hole forwood screws.Forholes
thatdonot lineupwith a stud, drill 5/8" holes for
togglebolts.
DONOTINSTALLTHE MOUNTINGPLATE
ATTHISTIME.
4.Removethetemplatefrom therearwall.
5.ReviewtheInstallationInstructionbook foryour
installationsituation.
Locateandmark holes to align withholes in the
mountingplate.
IMPORTANT:
LOCATEAT LEAST ONE STUDON EITHER SIDE OF
THECENTERLINE.
MARKTHE LOCATIONFOR2 ADDITIONAL,EVENLY
SPACEDTOGGLE BOLTS INTHE MOUNTINGPLATE
AREA.
Locateandmark holes to align withholes in the
mountingplate.
IMPORTANT:
LOCATEAT LEAST ONE STUDON EITHER SIDEOF
THECENTERLINE.
MARKTHE LOCATIONFOR2ADDITIONAL, EVENLY
SPACEDTOGGLEBOLTS INTHE MOUNTINGPLATE
AREA.
Trimtherear wall template along thedotted line.
Trimtherear walltemplate along thedotted line.
12"
4"
Darlevueltaala hoja paraconsultarla
versiónenEspañol.
3/8"TOEDGE
NOTE:ITISVERYIMPORTANTTO
READANDFOLLOWTHEDIRECTIONS
INTHEINSTALLATIONINSTRUCTIONS
BEFOREPROCEEDINGWITHTHIS
REARWALLTEMPLATE.
ThisRearWallTemplateservestopositionthebottom
mountingplateandtolocatethehorizontalexhaust
outlet.
1.Usealeveltocheckthatthetemplateispositioned
accurately.
2.Locateandmarkatleastonestudontheleftor
rightsideofthecenterline.
Itisimportanttouseatleastonewood
screwmountedfirmlyin a studtosupporttheweight
ofthemicrowave.Marktwoadditional,evenlyspaced
locationsforthesuppliedtogglebolts.
3.Drillholesinthemarkedlocations.Wherethereis
astud,drilla3/16" holeforwoodscrews.Forholes
thatdonotlineupwithastud,drill5/8" holesfor
togglebolts.
DONOTINSTALLTHE MOUNTING PLATE
ATTHISTIME.
4.Removethetemplatefromtherearwall.
5.ReviewtheInstallationInstructionbookforyour
installationsituation.
Locateandmarkholes toalign with holes inthe
mountingplate.
IMPORTANT:
LOCATEATLEASTONESTUDONEITHERSIDE OF
THECENTERLINE.
MARKTHELOCATIONFOR2ADDITIONAL, EVENLY
SPACEDTOGGLEBOLTSIN THEMOUNTINGPLATE
AREA.
Locateandmarkholestoalign with holes in the
mountingplate.
IMPORTANT:
LOCATEATLEASTONESTUDONEITHERSIDEOF
THECENTERLINE.
MARKTHELOCATIONFOR2ADDITIONAL,EVENLY
SPACEDTOGGLE BOLTS IN THEMOUNTING PLATE
AREA.
Trimtherearwalltemplatealongthe dottedline.
Trimtherearwalltemplate alongthedottedline.
12"
4"
Darlevueltaalahojaparaconsultar la
versiónenEspañol.
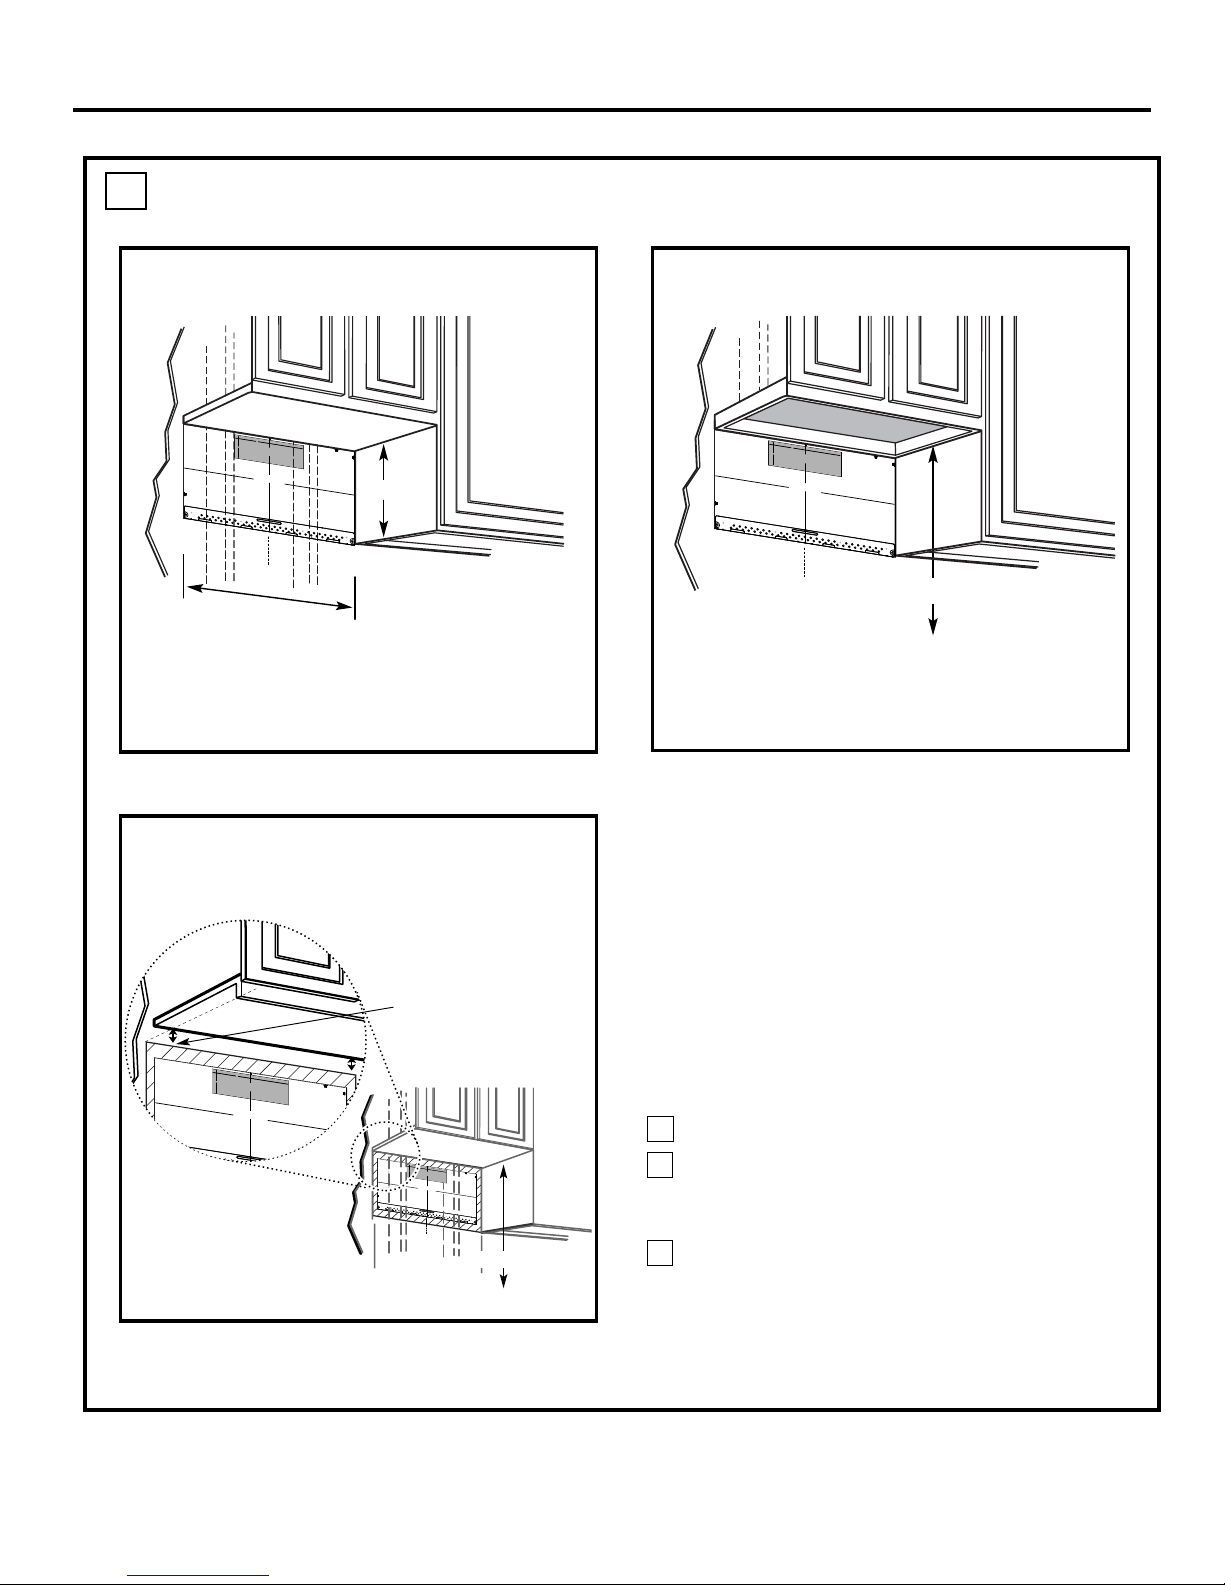
Your cabinets may have decorative trim that
interferes with the microwave installation. Remove
the decorative trim to install the microwave properly
and to make it level.
THE MICROWAVE MUST BE LEVEL.
Use a level to make sure the cabinet bottom is level.
If the cabinets have a front overhang only, with no
back or side frame, install the mounting plate down
the same distance as the front overhang depth. This
will keep the microwave level.
Measure the inside depth of the front overhang.
Draw a horizontal line on the back wall an equal
distance below the cabinet bottom as the inside
depth of the front overhang.
For this type of installation with front overhang
only, align the mounting tabs with this horizontal
line, not touching the cabinet bottom as described
in Step D.
Draw a vertical line on
the wall at the center of
the 30″wide space.
Tape the Rear Wall
Template onto the wall
matching the centerline
and touching the
bottom of the cabinet.
33″to Cooktop
Draw a vertical line on the wall at the center of the
30″space.
Tape the Rear Wall Template onto the wall
matching the centerline and touching the bottom
cabinet frame.
C
3/8"TOEDGE
NOTE:ITISVERYIMPORTANTTO
READANDFOLLOW THE DIRECTIONS
INTHEINSTALLATION INSTRUCTIONS
BEFOREPROCEEDINGWITHTHIS
REARWALLTEMPLATE.
ThisRearWallTemplateservestopositionthebottom
mountingplateandtolocatethehorizontalexhaust
outlet.
1.Usealeveltocheckthatthetemplateispositioned
accurately.
2.Locateandmarkatleastonestudontheleftor
rightsideofthecenterline.
Itisimportanttouse atleastonewood
screwmountedfirmlyinastudtosupporttheweight
ofthemicrowave.Marktwoadditional,evenlyspaced
locationsforthesuppliedtogglebolts.
3.Drillholesinthemarkedlocations.Wherethere is
astud,drilla3/16"holeforwoodscrews.Forholes
thatdonotlineupwithastud,drill5/8"holesfor
togglebolts.
DONOTINSTALLTHEMOUNTINGPLATE
ATTHISTIME.
4.Removethetemplatefrom therearwall.
5.ReviewtheInstallationInstructionbookforyour
installationsituation.
Locateand mark holes toalign withholes inthe
mountingplate.
IMPORTANT:
LOCATEATLEASTONESTUD ON EITHER SIDEOF
THECENTERLINE.
MARKTHELOCATIONFOR 2ADDITIONAL, EVENLY
SPACEDTOGGLEBOLTSINTHEMOUNTING PLATE
AREA.
Locateandmarkholestoalign withholes inthe
mountingplate.
IMPORTANT:
LOCATEATLEASTONESTUDONEITHER SIDEOF
THECENTERLINE.
MARKTHELOCATION FOR2ADDITIONAL,EVENLY
SPACEDTOGGLEBOLTS INTHE MOUNTING PLATE
AREA.
Trimtherear walltemplate along thedottedline.
Trimtherear walltemplate alongthedottedline.
12"
4"
Darlevueltaalahoja paraconsultarla
versiónenEspañol.
cabinet bot t om
cabinet w ith front overhang
Plate position—beneat h fram ed
recessed
Plate position—beneat h recessed
bottom
1
3
2
17-1/8″