Elkron T600 User manual

GUIDA RAPIDA
DS80HA04-002D
ITALIANO
T600
MODULO CONTROLLO TAPPARELLA
LED
Fornisce informazioni sullo stato del modulo.
1 lampeggio: reset del modulo
2 lampeggi: il dispositivo è stato appreso correttamente nel sistema
Un lampeggio ogni 20 minuti: il dispositivo ha perso la connessione al sistema
Lampeggio per 8 minuti: dispositivo in modalità calibrazione
Tasto Funzione
Una pressione: trasmette un segnale di supervisione
Pressione per 3÷8 secondi: attiva la Calibrazione manuale
Pressione per 10 secondi fino al lampeggio del LED: reset del modulo o invio codice di apprendimento
Collegamenti
Lo schema mostra come collegare il modulo tapparella T600.
NOTA BENE: se nell’impianto sono presenti pulsanti locali per la motorizzazione della tapparella, collegarli ai morsetti S1 e S2.
Motore
tapparella
Pul
santi
(opzi
onali
)
Alimentazione
230Vac
1. LED
2. Tasto funzione
3. Ingresso Neutro alimentazione 230Vca (N)
4. Ingresso Fase alimentazione 230Vca (L)
5. Morsetto per pulsante locale S2 (chiusura
tapparella)
6. Morsetto per pulsante locale S1 (apertura
tapparella)
7. Uscita per motore tapparella O1 (apertura
tapparella)
8. Uscita per motore tapparella O2 (chiusura
tapparella)

Calibrazione manuale
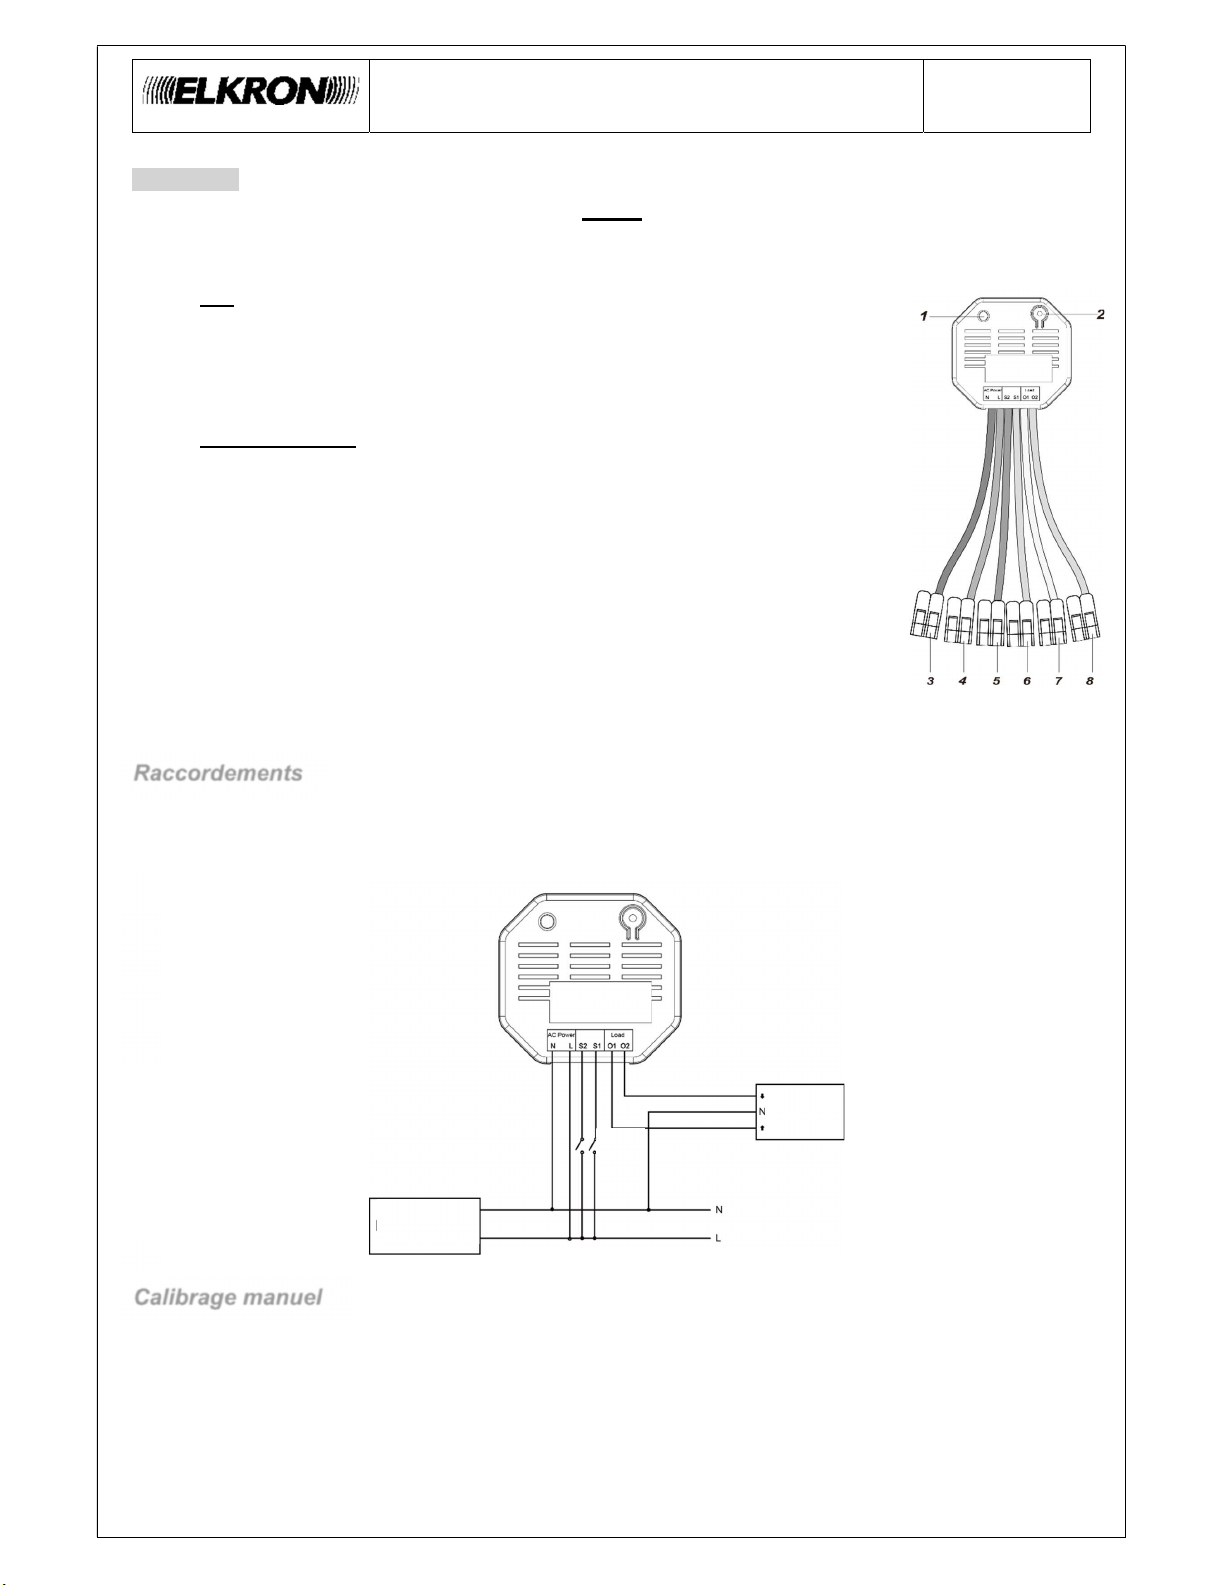
Prima di effettuare la calibrazione manuale, collegare i pulsanti locali ai morsetti S1-S2 del modulo T600. La calibrazione può
essere stabilita anche tramite l’interfaccia locale di programmazione della centrale (vedere Manuale Installatore CR600-CR600
Plus - CR600WF).
Per la calibrazione manuale seguire la procedura sotto descritta:
1. Attivare la modalità Calibrazione tenendo premuto il tasto funzione da 3 a 8 secondi.
2. Durante la fase di calibrazione il led rosso lampeggerà (durata totale 8 minuti)
3. Il motore tapparella inizierà a girare in Apertura per 4 minuti.
4. Non appena il motore tapparella, dopo i primi 4 minuti, avrà finito di girare in apertura, premere in tempi brevi il pulsante
locale S2 per chiudere la tapparella.
Nota bene
Premere S2 prima del termine dei secondi 4 minuti
5. Non appena la tapparella si sarà chiusa completamente, premere il pulsante locale S1 di apertura. Il modulo T600
interpreterà il tempo intercorso tra le azioni 4 e 5 come “tempo di chiusura”
6. In seguito alla pressione del pulsante S1, il modulo T600 attiverà l’apertura
7. Non appena la tapparella si sarà aperta completamente, premere il pulsante locale S2 di chiusura. Il modulo T600
interpreterà il tempo intercorso tra le azioni 6 e 7 come “tempo di apertura”
8. Al termine della calibrazione, il led rosso si spegnerà
ESEMPIO: Se durante la calibrazione manuale, il modulo impiega 30 secondi per la chiusura della tapparella e 40 secondi per
l’apertura, il tempo di chiusura sarà “30 secondi”, mentre il tempo di apertura sarà “40 secondi”. In funzionamento normale,
quando il modulo T600 riceverà un comando di chiusura, il tempo impiegato sarà di 30 secondi, viceversa, per l’apertura sarà di
40 secondi.
Apprendimento
Alimentare il dispositivo prima di procedere al suo apprendimento nel sistema, come descritto sotto:
1. Abilitare la modalità di apprendimento sull’unità di controllo (per i dettagli, fare riferimento al manuale di istruzioni
della stessa);
2. Tenere premuto il Tasto Funzione del dispositivo per 10 secondi, rilasciarlo quando il led rosso lampeggia una
volta. Attendere qualche secondo, ed il led rosso del dispositivo lampeggerà 2 volte per confermare che è stato
appreso nel sistema (ulteriori dettagli sul manuale completo disponibile sul sito).
Ripristino dei valori di fabbrica in caso di mancato apprendimento
Se il dispositivo non è stato appreso correttamente dall’unità di controllo, è possibile usare la funzione di ripristino dei valori di
fabbrica.
1. Mantenere premuto il tasto funzione per 10 secondi, quindi rilasciarlo.
2. Il dispositivo effettuerà il reset di fabbrica.
3. Per procedere a un nuovo apprendimento seguire dettagliatamente la descrizione precedente
Frequenza radio di utilizzo: 2,405-2,475 GHz
Potenza radio trasmessa: 9,63 dBm
DICHIARAZIONE DI CONFORMITÀ UE SEMPLIFICATA
Il fabbricante, URMET S.p.A., dichiara che il tipo di apparecchiatura radio: MODULO TAPPARELLA T600 è conforme alla direttiva
2014/53/UE. Il testo completo della dichiarazione di conformità UE è disponibile al seguente indirizzo Internet: www.elkron.com.
CLICCARE SUL SEGUENTE LINK DEL SITO ELKRON PER ACCEDERE ALLA SCHEDA TECNICA DEL PRODOTTO E
SCARICARE IL MANUALE COMPLETO:
DIRETTIVA 2012/19/UE DEL PARLAMENTO EUROPEO E DEL CONSIGLIO del 4 luglio 2012 sui rifiuti di apparecchiature
elettriche ed elettroniche (RAEE).
Il simbolo del cassonetto barrato riportato sull’apparecchiatura o sulla sua confezione indica che il prodotto alla fine della
propria vita utile deve essere raccolto separatamente dagli altri rifiuti.
L’utente dovrà, pertanto, conferire l’apparecchiatura giunta a fine vita agli idonei centri comunali di raccolta differenziata
dei rifiuti elettrotecnici ed elettronici. In alternativa alla gestione autonoma è possibile consegnare l’apparecchiatura che
si desidera smaltire al rivenditore, al momento dell’acquisto di una nuova apparecchiatura di tipo equivalente.
Presso i rivenditori di prodotti elettronici con superficie di vendita di almeno 400 m2 è inoltre possibile consegnare gratuitamente,
senza obbligo di acquisto, i prodotti elettronici da smaltire con dimensione massima inferiore a 25 cm.
L’adeguata raccolta differenziata per l’avvio successivo dell’apparecchiatura dismessa al riciclaggio, al trattamento e allo
smaltimento ambientalmente compatibile contribuisce ad evitare possibili effetti negativi sull’ambiente e sulla salute e favorisce il
reimpiego e/o riciclo dei materiali di cui è composta l’apparecchiatura.
ELKRON
Tel. +39 011.3986711 - Fax +39 011.3986703
www.elkron.com – mail to: info@elkron.it
ELKRON è un marchio commerciale di URMET S.p.A.
Via Bologna 188/C – 10154 Torino (TO) Italia
HUwww.urmet.comUH
MADE IN TAIWAN

QUICK GUIDE
DS80HA04-002D
ENGLISH
T600
SHUTTER CONTROL
Parts Identification
1. LED indicator
2. Function Button
3. Power Input Terminal N (Neutral Lead)
4. Power input Terminal L (Line Lead)
5. Local Switch Terminal S1 (Close Direction)
6. Local Switch Terminal S2 (Open Direction)
7. Motor Output O1 (Open Direction)
8. Motor Output O2 (Close Direction)
The LED indicator is used to indicate Shutter Control status:
- Flashes once: The Shutter Control has reset.
- Flashes twice: The Shutter Control has successfully joined the network.
- Flashes once every 20 minutes: the Shutter Control has lost connection.
- Flashes for 8 minutes: the Shutter Control is in calibration
The Function Button is to be used in the following way:
- Press once: Transmit a supervision signal.
- Press and hold for 3~8 seconds: Enter calibration mode
- Press and hold for 10 seconds: Reset the Shutter Control to join the network or transmission of the learning code
Wire Connection Diagram
Connect T600 according to the diagram below.
Installation
Connect L terminal of T600 to the L terminal of Power Supply.
Connect N terminal of T600 to the N terminal of Power Supply.
Connect O1 terminal of T600 to the Open terminal of the Shutter Motor.
Connect O2 terminal of T600 to the Close terminal of the Shutter Motor.
(Optional local switch) Connect S1 and S2 terminals of T600 to the L terminal of Power Supply.

Calibration
The calibration can be also done with the means of the programming local interface (see dedicated control panel manual).
Calibrate the activation according to procedure below:
1. Before calibration, the external local switches must be connected to the Shutter Control.
2. During calibration, the red LED will flash continuously (8 minutes)
3. Press and hold the Function button for 3~8 seconds and release to enter Calibration mode. The Shutter Control will
roll toward the “Open” direction for 4 minutes upon entering Calibration mode.
4. Wait for 4 minutes for Shutter Control to stop rolling to “Open” direction, then activate as soon as possible the
connected external local “Close” switch to close the shutter.
NOTE: “close” switch must be closed within the further 4 minutes
5. Activate the “Open” external local switch the moment the shutter is fully closed. The Shutter control will record to time
it took between step 4 and 5 as the new “close time”.
6. The Shutter Control will roll toward open direction after step 4.
7. Activate the “Close” external local switch the moment the shutter is fully opened. The Shutter control will record to
time it took between step 6 and 7 as the new “open time”.
8. At the end of the calibration, the red LED will be lighted off.
Example
If it takes 30 seconds for the shutter to move from Open to Close, and 40 seconds to move from Close to Open, the
new close time will be 30 seconds and new open time will be 40 seconds.
After calibration, whenever the Shutter Control receives close command, it will roll toward close direction for 30
seconds. When it receives open command, it will roll toward open for 40 seconds.
The activation time will be reset to 4 minutes whenever the Shutter Control joins a network.
Joining the Network
Please follow the steps below to join the Shutter Control Unit into the network.
Connect the Shutter Control Unit to power cable.
Set the control unit to learning mode (see the instruction manual of the control unit for details).
Press and hold the Function button for 10 seconds, then release it to join the network. If the device successfully joins
the network, the LED Indicator will flash twice to confirm.
Removing Device from Network (Factory Reset)
Factory Reset function can clear the device of its stored setting and information and prompt it to search for new network.
1. Press and hold the function button for 10 seconds, then release the button to reset the Shutter Control Unit.
2. The device will perform its factory reset.
3. Fully follow the previous instructions to join again the device
Radio frequency of use: 2,405-2,475 GHz
Radio power transmitted: 9,63 dBm

MADE IN TAIWAN
SIMPLIFIED EU DECLARATION OF CONFORMITY
Hereby, URMET S.p.A. declares that the radio equipment type: SHUTTER CONTROL T600 is in compliance with Directive
2014/53/EU. The full text of the EU declaration of conformity is available at the following internet address: www.elkron.com.
CLICK ON THE FOLLOWING LINK OF THE ELKRON SITE TO ACCESS THE PRODUCT TECHNICAL SHEET AND
DOWNLOAD THE COMPLETE MANUAL:
DIRECTIVE 2012/19/EU OF THE EUROPEAN PARLIAMENT AND OF THE COUNCIL of 4 July 2012 on waste electrical and
electronic equipment (WEEE).
The symbol of the crossed-out wheeled bin on the product or on its packaging indicates that this product must not be
disposed of with your other household waste.
Instead, it is your responsibility to dispose of your waste equipment by handing it over to a designated collection point
for the recycling of waste electrical and electronic equipment. The separate collection and recycling of your waste equipment at
the time of disposal will help to conserve natural resources and ensure that it is recycled in a manner that protects human health
and the environment.
For more information about where you can drop off your waste equipment for recycling, please contact your local city office,
your household waste disposal service or the shop where you purchased the product.
ELKRON
Tel. +39 011.3986711 - Fax +39 011.3986703
www.elkron.com – mail to: [email protected]
ELKRON is a trademark of URMET S.p.A.
Via Bologna, 188/C - 10154 Torino (TO) – Italy
www.urmet.com

FRANÇAIS
T600
MODULE DE COMMANDE STORE
1. LED
Fournit des informations sur l’état du module.
1 clignotement : réinitialisation du module
2 clignotements : le dispositif a été correctement appris par le système
1 clignotement toutes les 20 minutes : perte de connexion du dispositif avec le système
Lampeggio per 8 minuti: il dispositivo è nella fase di calibrazione
2. Touche de fonction
Un appui : transmet un signal de supervision
Appui pendant 3÷8 seconde : active le calibrage manuel
Appui pendant 10 secondes, jusqu’au clignotement de la LED : réinitialisation du module
o invio codice di apprendimento
3. Entrée neutre alimenttion 230Vac (N)
4. Entrée phase d’alimentation 230Vac (L)
5. Bornier pour bouton local S2 (fermeture store)
6. Bornier pour bouton local S1 (ouverture store)
7. Sortie pour moteur O1 (ouverture store)
8. Sortie pour moteur O2 (fermeture store)
Raccordements
Le schéma ci-dessous illustre le raccordement du module store T600.
N.B. : si des boutons locaux de motorisation du store sont présents dans l’installation les raccorder aux bornes S1 et S2.
Calibrage manuel
Lorsque le bouton local est enfoncé ou la centrale envoie une commande d’ouverture/fermeture, le module T600 est activé
pendant 4 minutes. Pour que le module T600 fonctionne correctement, le temps d'activation doit être calibré.
Avant d’effectuer le calibrage, raccorder les boutons locaux aux bornes S1-S2 du module T600 (ou bien utiliser les commandes
du clavier de la centrale). Après cette opération, procéder comme suit :
1. Activer le mode Calibrage en maintenant la touche de fonction enfoncée pendant 3÷8 avant de la relâcher : le moteur du
store démarrera en mode ouverture pendant 4 minutes. En présence de butées de fin de course mécaniques déjà calibrées
dans le moteur, le store s’arrêtera en position d’ouverture totale, mais il sera néanmoins nécessaire d’attendre 4 minutes
depuis le démarrage du moteur en mode ouverture. Pendant toute la phase d'étalonnage, la LED rouge clignote (durée
totale 8 minutes)
GUIDE RAPIDE
DS80HA04-002D
Alimentation
230Vca
Moteur
store
Bouton
locaux
(en
option)

2. Au bout de 4 minutes, le moteur cessera de tourner en mode ouverture. Dans un court laps de temps appuyer alors sur le
bouton local S2 pour refermer le store.
Remarque : appuyez sur S2 avant la fin des 4 secondes minutes
3. Une fois le store complètement fermé, appuyer instantanément le bouton local S1 d’ouverture. Le module T600 interprétera
le temps écoulé entre les actions 2 et 3 comme “temps de fermeture”.
4. Après avoir appuyé sur le bouton S1, le module T600 activera l’ouverture.
5. Une fois le store complètement ouvert, appuyer instantanément le bouton local S2 de fermeture. Le module T600 interprétera
le temps écoulé entre les actions 4 et 5 comme “temps d’ouverture”.
6. A la fin du calibrage, la led rouge s'éteindra
EXEMPLE
Si, pendant le calibrage manuel, le module met 30 secondes pour la fermeture du store et 40 secondes pour son ouverture, le
temps de fermeture sera de “30 secondes” et celui d’ouverture de “40 secondes”. En mode de fonctionnement normal, lorsque le
module T600 recevra une commande de fermeture, le temps nécessaire sera de 30 secondes et, inversement, il sera de 40
secondes pour l’ouverture.
Apprentissage
Alimenter le dispositif avant de procéder à son apprentissage dans le système, comme décrit ci-après :
1. Activer le mode d’apprentissage sur la centrale ou le navigateur (pour les détails, se reporter au manuel d’instructions
de la centrale) ;
2. Maintenir la touche de fonction du dispositif enfoncée pendant 10 secondes, puis la relâcher et patienter 5 secondes. Le
double clignotement suivant de la LED confirme l'apprentissage du dispositif dans le système.
3. Une fois appris, le module store est automatiquement enregistré dans le système. Vérifier néanmoins sur la centrale que
la procédure d’apprentissage a bien été effectuée.
Rétablissement des paramètres d’usine
Si le dispositif n’a pas été appris correctement par la centrale ou si l’on souhaite le retirer et l'associer à une nouvelle centrale, il
est nécessaire d’utiliser la fonction de rétablissement des valeurs d’usine pour effacer les paramètres et les informations
mémorisés dans le relais de puissance avant de pouvoir l’associer à une autre unité de contrôle. Pour rétablir les paramètres
d’usine, procéder comme suit :
1. Maintenir la touche de fonction enfoncée pendant 10 secondes, puis la relâcher dès que la LED clignote une fois.
2. Le dispositif rétablira les paramètres d’usine.
3. Pour effectuer un nouvel apprentissage, procéder comme décrit plus haut.
Fréquence radio d'utilisation : 2,405-2,475 GHz
Puissance radio transmise : 9,63 dBm

DÉCLARATION DE CONFORMITÉ UE SIMPLIFIÉE
Le fabricant, URMET S.p.A., déclare que le type d’équipement radio : MODULE DE COMMANDE STORE T600 est conforme à
la Directive 2014/53/UE. Le texte intégral de la Déclaration de conformité UE est disponible sur le site Web suivant :
www.elkron.com.
CLIQUEZ SUR LE LIEN SUIVANT DU SITE ELKRON POUR ACCÉDER À LA FICHE TECHNIQUE DU PRODUIT ET
TÉLÉCHARGER LE MANUEL COMPLET :
LES BONS GESTES DE MISE AU REBUT DE CE PRODUIT (Déchets d’équipements électriques et électroniques)
Ce symbole apposé sur le produit, ses accessoires ou sa documentation indique que ni le produit, ni ses accessoires
électroniques usagés (chargeur, casque audio, câble USB, etc.), ne peuvent être jetés avec les autres déchets
ménagers.
La mise au rebut incontrôlée des déchets présentant des risques environnementaux et de santé publique, veuillez
séparer vos produits et accessoires usagés des autres déchets. Vous favoriserez ainsi le recyclage de la matière qui les compose
dans le cadre d’un développement durable.
ELKRON
Tel. +39 011.3986711 - Fax +39 011.3986703
www.elkron.com – mail to: info@elkron.it
ELKRON est une marque commerciale de URMET S.p.A.
Via Bologna 188/C – 10154 Turin (TO) Italie
www.urmet.com
FABRIQUÉ EN TAIWAN
Table of contents
Languages:
Other Elkron Control Unit manuals

Elkron
Elkron MP120 Owner's manual

Elkron
Elkron MP120 User manual

Elkron
Elkron MR16 User manual

Elkron
Elkron MP 200 Manual

Elkron
Elkron PRO MEDEA/32 User manual

Elkron
Elkron IMG500/N User manual

Elkron
Elkron IT700-WIFI User manual

Elkron
Elkron MP 110 User manual

Elkron
Elkron DK510M-P User manual

Elkron
Elkron IO501 User manual