Standard Installation
For pools with one skimmer, using the automatic regul ator valve.
The advantage of this install ation is that the automatic regulator
valve automatic ally balances the water flow
between the skimmer and the cleaner . We strongly recommend the
use of a uto mati c reg ulat or v alv e for maxi mum saf e ty a nd
performance. The valve auto matically adjusts to change s in th e
amount of water flow to provide the cleaner with the power
necessary to ensure proper cleaning performance.
1) Turn the pool pump off.
2) Close the main dra in and all su ction lines, except the line from the
skimmer to which the cleaner will be connected.
3) Remove skimmer basket.
4) Press the 2" hose cone into the vacuum connection in the bottom
of the skimmer, as shown in figure 7.
5) Press the automatic regulator valve into the 2" Hose Cone. The
end of the valve th at is marked "Attach Hose This End"mus t point
up. See Figure 7.
6) Place the cle aner into the pool and all ow it to sink to the floor.
Continue to feed the h ose ve rtically down into the pool until it is
completely fill ed with water and purged of air.
7) Insert the end of the hose throug h the sk immer opening and
connect the hose directly onto the automatic regula tor valve.
IV. Adjustments
After completing the installa tion, turn the p ool pump on. Allow the
pump t o run for a couple of minut es to ensure all air cycles out of the
system. t he cleaner should be movi ng about the poo l at a rate of 8
to 12 feet per m inu te. C hec k eac h o f the fol low ing i nit ial
adjustments to the cleaner at this time.
Hose Length
IMPORTANT: The pump must be on when y ou check the hose length.
The hose contracts when the pump i s operating an d will be longer
when the pump is off.
With the cleaner operating, position it at the furthest point of the
pool from where it's attached. ( It is e asy t o pos ition the cleaner the
pool by moving it about with your pool pole an d brush.) the cleaner's
hose shou ld be long enoug h to reach the end of the pool, plus one
hose section. If necessary, remove extra hose sections from the
center portion of hose. Re moving center hose sections avoids
having to di sturb the hose weight placement . Save extra h ose
sections for use as needed for
replacement. NOTE: T urn pool pum p off w hen adding or removing
hose sections.
Return Line Water Flow
IMPORTANT: The water flow from your return line can push the
cleaner's hose and affect i ts perform ance. It may caus e the cleaner
to steer away from the end of the pool where the return li ne is
located, or it may ca use the cleaner to re main in one section of t he
pool. To cor rect this, u se the eyeball diverter in cluded with your th e
cleaner.
To install the eyeball diverter:
First make sure yo ur pool p ump is off. Remove th e original eyeball
from the return line at the pool by unscrewing the lock rin g.
Replace the original eyeball with the cleaner eyeball diverter.
Replace the lock ring and tighten. Make sure the opening of the
eyeball diverter points in the proper direction before tightening fully.
See "Eyeball Dive rter positions" below.
Eyeball Diverter Positions
Position the diverter opening to red irect the return line wa ter flow so
it does not interfere with the cleaner's movement. Try different
positions to see which works best in your pool:
Flow directed along the side of pool (the tile line).
Flow directed downward.
Flow directed against the hose will help s teer the cleaner away from
obstructions such as stairs and ladders.
After installing the ey eball diverter, turn the pool pump on. The
cleaner s hould begin moving acros s the pool floor vacuuming up
debris in its path.
V1. Troubleshooting
Be ca us e of the indi vi du al characteristics of your pool, s om e
additional adjustment may be require d t o g et the rest performa nce
from your the cleaner.
If there seems to be a problem, check these commo n causes of
cleaner problems.
Is bottom main drain closed? Close drain
Is filter clean? Clean filter
Is pump strainer basket clean? Clean basket.
Is debris blocking the bottom
of the cleaner? Remove debris.
Are there any leaks in the hose? Replace leaky section
Is automatic regulator valve
free of debris? Clean valve.
If the cleaner is not moving or not pulsating.
Check to en sure that t he main dra in and all suction lines are closed ,
except for the suction line to which the cleaner is attac hed.
Check for debris in the filter or pump basket.
Check for debris in th e cleaner's Flipper. Debris may prevent Flipper
movement or restrict flow.
Pool pump and filter system may be too s mall (inc apable of
providing 20 gallons per minute water flow). Cons ult your pool
professional.
If the cleaner stays in one end of the pool.
Check the return line water flow and redirect as necessary with an
eyeball diverte r.
Check that hose is long enough to reach to end of pool.
Check that the cleaner has proper hose balance.
If the cleaner stays on the main drain.
Check to ensure that main drain is closed. A pool p rofessional may
need to assist you.
Check to ensure that a main drain grate is installed.
If main drain is not flush w ith the p ool floor, c onsult your pool
professional.
If the cleaner s lows or stops and air bubbles enter the po ol at the
return line.
Find an d corre ct the air leak that is causing the pump to lose its
prime.
Check the hose to ensure there are no le aks.
Check the vacuum connection. It should be submerged s o no
air enters the system.
Check the pump basket lid for looseness, cracks, and worn or missing
O-rings. If you need assistance,
contact your pool professional.
If the cleaner pulls air from, or remains at , the water surface.
Check to ensure the dive float mechanism is operating freely and the
dive float restrictor is installed. ( See page 2 for how to install dive float
restrictor.)
Check the automatic regulator valve for its proper installation and
ensure it is not clogged with debris.
Make sure the water level is at least 3 inches below the pool deck.
Check to insure your the cleaner is operating at the prop er speed of 8-
12 feet per minute.
If the cleaner stays at the shallow end steps.
Check the return line water flow and re-direct as neces sary with an
eyeball diverte r.
Check the automatic regulator valve for its proper installation and
ensure it is not clogged with debris.
Check that hose is long enough to reach the furthest poin t of the pool,
including pool steps.
Check that the cleaner has proper hose balance in shallow end.
Check to ensure your the cleaner is operating at the prop er speed of 8-
12 feet per minute.
Check to ensure the dive float mechanism is operating freely and the
dive float restrictor is installed. (See page 2 for how to install dive float
restrictor.)
Shorten the roller bumper strap by 1/2 inch. (Pull out up per end of
bumper strap from locking end clip attached to swivel head .Cut 1/2
inch off, then return bumper strap into locking end cli p.)
If the cleaner tracks in a repetitive pattern.
Check the swivel on the top of the cleaner. It should turn fr eely.
Check the return line water flow and re-direct as neces sary with an
eyeball diverte r.
Check the cleaner's hose to ensure it has not become bent o r kinked. It
only takes one bent or kinked hose section to hinder the cl eaning
coverage. One way to check for kinks in your hose is to lay eac h
section flat on your pool's deck (or other flat surface). The hose should
be perfectly straight and flat.
Do not coil the hose when taking your the cleaner out of the pool
because it will retain the coil shape, forming a bend or kink.
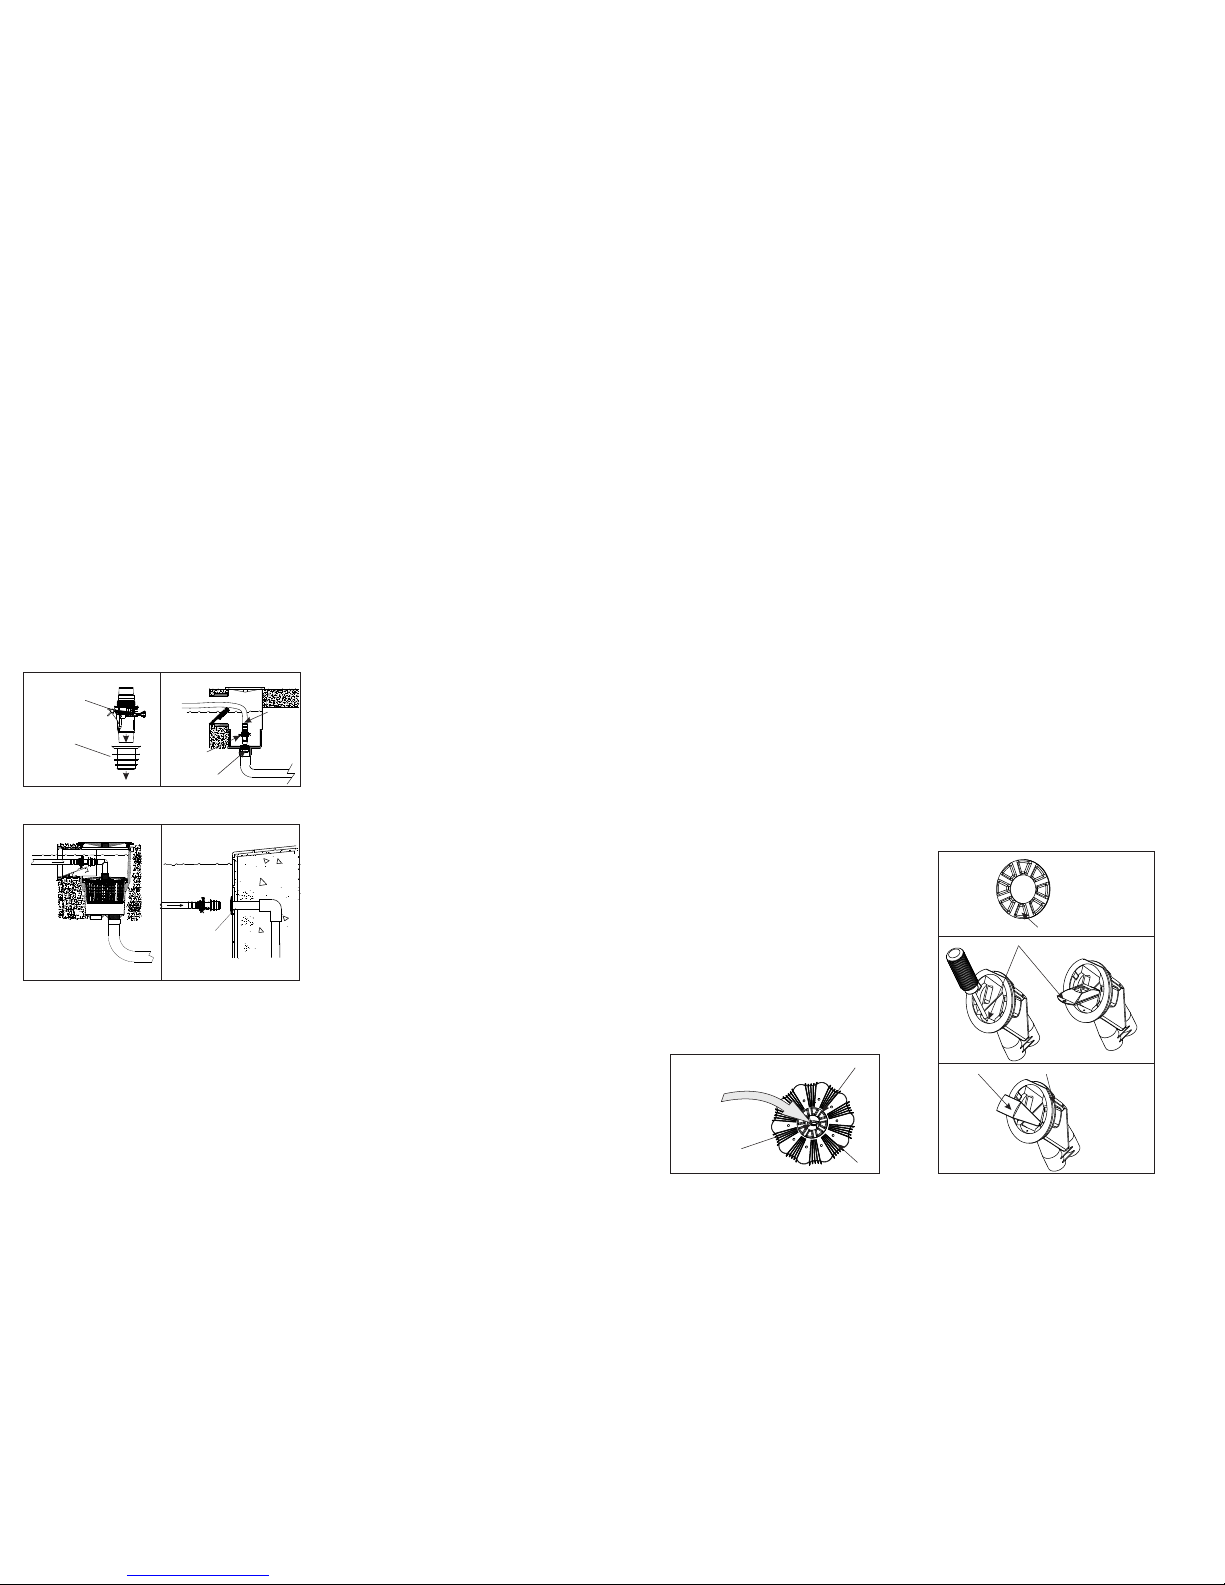
To Remove Debris from the Flipper
Sometimes debris may clog the bottom of the cleaner and prevent
Flipper movement or restrict flow. The Flipper is located inside the mai n
body and must move freely at all times. You can see the Flipper
through the opening in the Flipper Cover, when you turn t he cleaner
upside down as shown in Figure 10. Jiggle the Flipper with your finger or
flush the cavity with a hose to force out any debris lodged i nside the
main body.
If debris is still lo dged inside, you must remove the Flipper. First, get ri d
of four lids in the Interleaver, unscrew it, and then rem ove it from the
main body. In secession, take out the screw from piffle plate, pull it out
and lastly, remove the Flipper. See Figure 11
Once the debris is dislodged, insert the Flipper back into the main body
and snap the Flipper Cover back into position. Be sure that it is securely
in place. See Figure 11
Maintenance
The cleaner requires almost no maintenance. Visually inspect your
the cleaner from time to time to make sure that:
The Flipper is moving freely and is not obstructed by debris.
The Interleaver is not excessively worn. When the traction pads on
the bottom have worn down, it is time for replacement.
When storing the cleaner, do not coil the hose.
Lay the hose flat in an area protected from direct sunlight. If hose
sections are disconnected, try not to disturb the hose weight
locations.
The cleaner's hose is specially designed to ensure optimum
performance from the cleaner. Should replacement be required,
insist on genuine the cleaner hose.
Disclaimer of Liability-About Your Pool and the cleaner
There are a multitude of factors that contribute to the life of your
pool. The cleaner automatic pool cleaner is a very passive
product that will have no impact on pool life.
Please be aware that over time, deterioration, discoloration and
brittleness of any pool finish can be caused separately by, or in
combination with, age, an imbalance in pool water chemistry,
improper installation and other factors. An automatic pool
cleaner, such as the cleaner, will not remove or cause wear on
"good" pool plaster. In fact, the opposite is true-pool plaster will
eventually cause wear on the cleaner.
The same situation holds true for vinyl-lined in ground swimming
pools, because vinyl liners are also affected by the environment
and factors such as pool water chemistry, sunlight and the pool's
surroundings. Therefore over time, vinyl can become brittle and
weak. In addition, vinyl-lined pools are affected by the
workmanship, composition and installation of the liner and the
workmanship and quality of construction of the supporting walls
and pool base. There are all factors which can contribute to liner
failure. The existence of any of these type of conditions in your
pool is not caused by the use or operation of the cleaner. The
manufacturer disclaims any liability for repairs or replacement to
any of these structures or components of the customer's pool.
The pool owner must assume all responsibility for the condition and
maintenance of the pool's surface, water and deck.
Figure 10
Bottom view of cleaner
Flipper is
inside
Flipper Cover
Interleaver
Pleated Disc
Figure 11
Flipper Main body
Interleaver
(not necessary to remove)
Flipper Cover
23
Attach hose this end
Automatic
regulator valve
1.5” / 2” hose cone
Press into
bottom of skimmer
Figure 6 Figure 7 To of skimmer
Hose through
skimmer
opening
Automatic
regulator
valve
1.5” / 2” hose cone
Attach
hose
this end
Figure 8 Figure 9
Suction fitting