Be sure to unplug your guitar when not in use to avoid current drain on the battery!
Tone
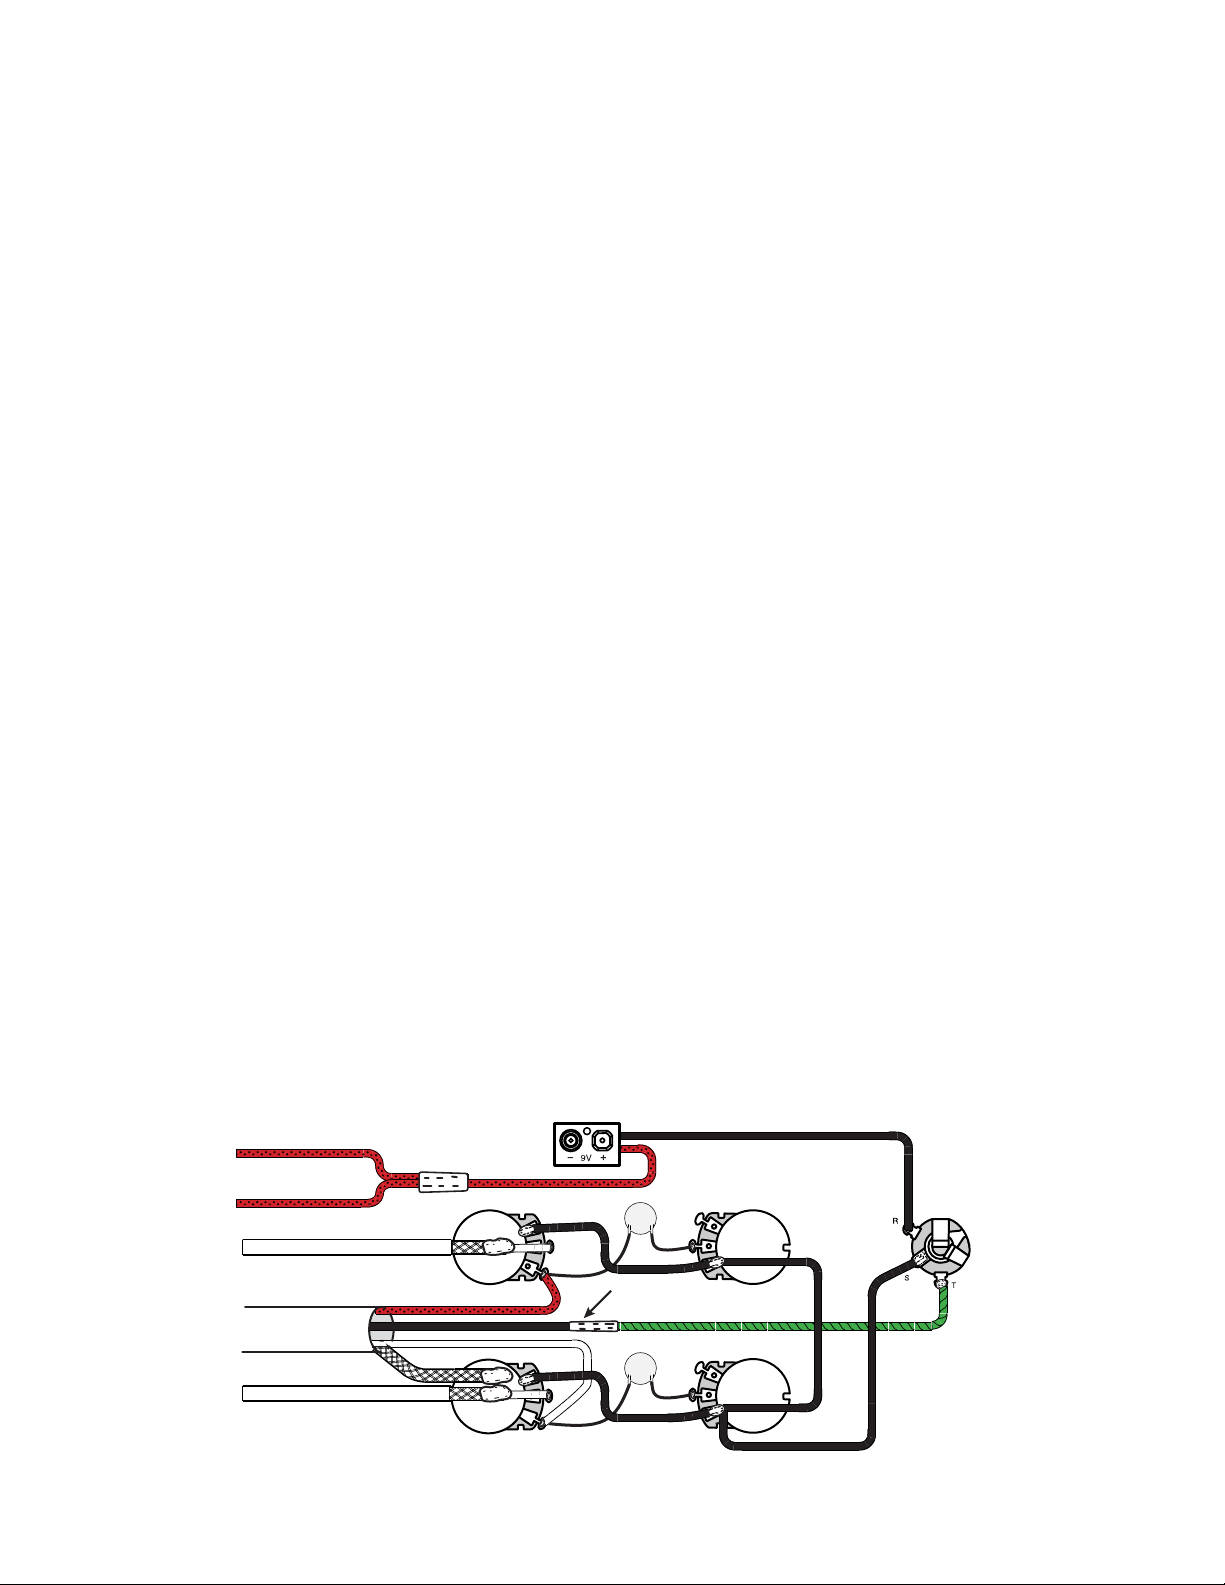
Tone
Volume
Volume
.1
.1
RED
Bottom View
Bridge pickup cable
(Gibson Les Paul
April 1975 and later)
Cable from
3 way switch
Finger Board pickup cable
RED FROM PICKUPS
BLACK
BLACK
Black wire/ Green
wire shrink tubing.
GREEN
WHITE
BLACK
RED
Installation Procedures for Models:
EMG Model: EMG-ZW Set, EMG-81/EMG-85
1) Mount the volume and tone control sets included
with the EMG-ZW as shown in the diagram. Extra hex
nuts are provided to set the height of each control
so the knobs fit nicely on the top of the guitar.
2) Install the pickups in the guitar routing the
pickup cables into the control cavity. Solder the
braid (shield) to the control casing and white wire
to the center terminal of each volume control.
Set the red wires aside for now.
3) Solder the Red wire of the switch cable to the
outside terminal of the rhythm pickup volume control.
4) Solder the White wire of the switch cable to the
outside terminal of the bridge pickup volume control.
5) Solder the Braid (shield) wire of the switch cable to the
casing of the rhythm pickup volume control
6) Install the Output jack/Battery clip set included and
fasten the output jack securely to the jack plate.
7) Solder the Black wire of the switch cable to the Green
wire of the output jack and cover the connection with
the shrink tubing provided.
8) Solder the Black wire of the Output jack to the casing
of the rhythm tone control
9) There is a small black wire included with the System
to ground the two volume control casings together,
Solder one end of this wire to the rhythm pickup volume
control casing and the other end to the bridge pickup
volume control casing.
10) Solder the red wires of the pickups to the red wire of the
battery clip, cover the connection with the heat shrink
tubing provided.
11) This completes the installation. Before stringing up the
guitar, install a 9 Volt battery, plug in the guitar and test
it through an amp. Tap on the pickups lightly with a small
screwdriver and check the operation of the volume and
tone controls. Wrap the battery in some of the packaging
foam provided to insulate from the controls and
reassemble the guitar.
12) String it up and Boogie down Broadway.
4) Remove the knobs and hex nuts from the pots and
the output jack as well. Remove the whole plate as a
single unit. It will not be reused.
a) Red wire at the rhythm pickup volume control
b) White wire at the bridge pickup volume control
c) Black wire at the solder lug terminal in the
center of the control plate
d) Braid (shield) at the solder lug terminal in the
center of the control plate
e) Bridge ground wire soldered to the volume control casing
(Do not reconnect during installation)
3) Unsolder the following wires coming from the
selection switch cable.
2) Unsolder the pickup cables that go to the casing of
the volume controls and the center terminal of the
volume controls. Remove the pickups from the guitar.
Set the guitar aside and mount the EMG Pickups into
the pickup mounting rings using the screws and
springs supplied and set them aside.
1) Remove the control cavity cover (4 screws) and
unscrew the screw(s) that fasten the shielding can.
The ZW Model is designed as a direct replacement into
Gibson Les Paul Guitars. LPGuitars manufactured after
April of 1975 require long shaft pots. Inside the control
cavity the existing electronics are mounted to a metal
control plate, which will be removed as a whole unit,
and will not be reused. If your Les Paul was manufactured
before April of 1975 or is an import model it will not
require long shaft pots. Both pot types have been included
with this system.
Refer to other diagrams included on this sheet for reference.
Diagram 1 shows the installation for the Gibson Les Paul
Guitar (after 1975) which uses the long shaft pots. Start
by removing the strings and loosening the pickup
mounting screws.


