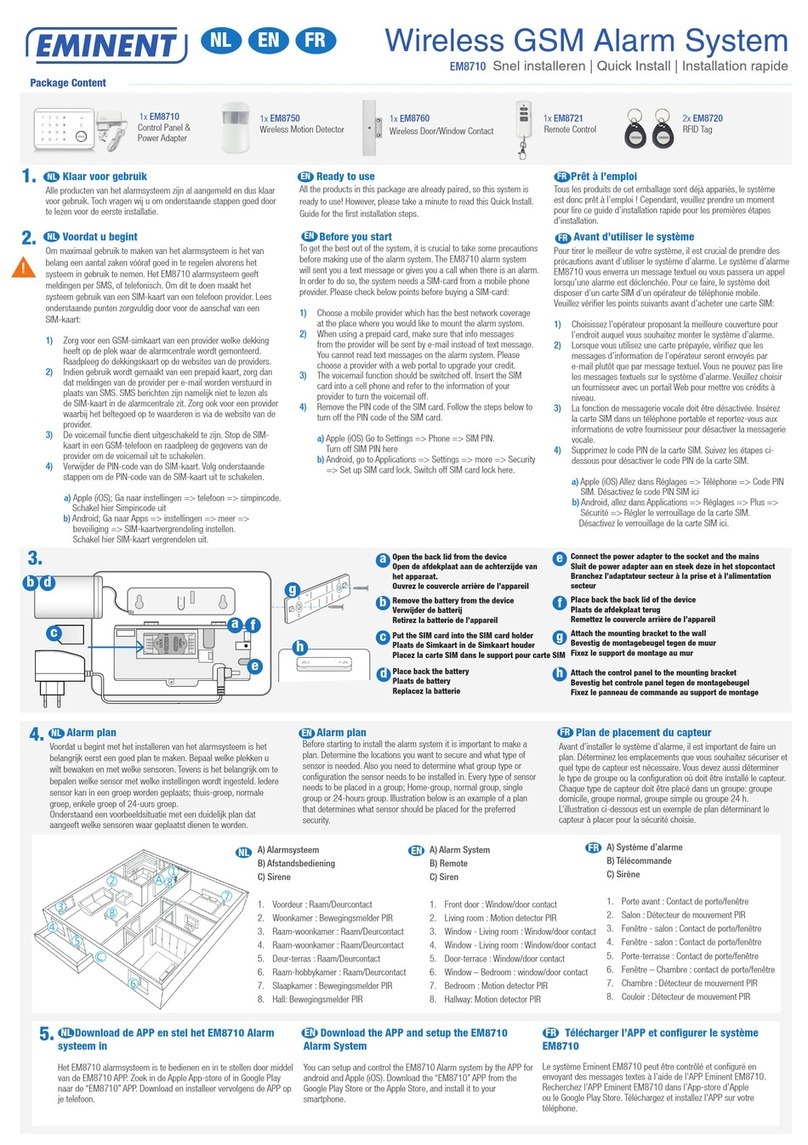
Eminent EM8710 User manual

EM8710
GSM Alarm System Starter Kit

2|ENGLISH
EM8710 - GSM Alarm System Starter Kit
Table of contents
1.0 Introduction ...........................................................................................................3
1.1 Packing contents...............................................................................................4
2.0 Explanation of the Alarm system ...........................................................................5
2.1 Front..................................................................................................................5
2.2 Rear..................................................................................................................7
3.0 Preparation............................................................................................................8
3.1 GSM SIM card...................................................................................................8
3.2 Download APP ..................................................................................................9
3.3 Setting up the host phone number.....................................................................9
3.4 Mounting the Alarm Panel................................................................................10
3.5 Explanation of the groups................................................................................11
3.6 Plan for sensor placement...............................................................................12
3.7 Registered sensors..........................................................................................12
4.0 Adding accessories/sensors................................................................................13
4.1 Adding motion, door/window sensor. ...............................................................13
4.2 Adding a remote control and RFID tags...........................................................13
4.3 Add an indoor wireless siren............................................................................14
5.0 Deleting accessories/sensors ..............................................................................15
5.1 Deleting all sensors .........................................................................................15
5.2 Delete a sensor from zone 1-9.........................................................................15
5.3 Deleting all sensors after zone 9......................................................................15
5.4 Deleting all remotes.........................................................................................15
5.5 Delete a remote from 1-9.................................................................................15
5.6 Deleting all remotes after 9..............................................................................15
5.7 Deleting all RFID tags......................................................................................16
5.8 Delete a RFID tag from 1-9..............................................................................16
5.9 Deleting all RFID tags after 9...........................................................................16
6.0 How does the Alarm system communicate ..........................................................16
6.1 Alarm notifications...........................................................................................16
7.0 Apple and Android APP.......................................................................................17
7.1 Setting up the GSM Host number (Full control)................................................17
7.2 Create and add an account..............................................................................18
7.3 Modify or delete a device in your account........................................................18
7.3.1 iOS............................................................................................................18
7.3.2 Android......................................................................................................18
8.0 Configure the alarm system.................................................................................18
8.1 Configure phone numbers ...............................................................................18
8.2 Change language............................................................................................20
8.3 Arm or disarm the alarm system......................................................................21
8.3.1 By using the Alarm panel...........................................................................21
8.3.2 By using the APP.......................................................................................21
3|ENGLISH
8.3.3 By text message........................................................................................21
8.3.4 By voice call alert.......................................................................................22
8.4 Change Sensor (zone) name...........................................................................23
8.5 Low battery warning of a sensor by text message............................................24
8.6 Sabotage warning of a sensor by text message...............................................24
8.7 Configure the delay time..................................................................................24
8.8 Adjust siren volume and time of alarm.............................................................25
8.9 Change PIN.....................................................................................................25
8.10 Restore factory defaults.................................................................................25
9.0 Remote control....................................................................................................26
9.1 Register a new remote control ....................................................................26
9.2 Arm the alarm..................................................................................................26
9.3 Disarm the alarm.............................................................................................27
9.4 In-home mode.................................................................................................27
9.5 Panic button ....................................................................................................27
9.6 Replace the battery .........................................................................................28
10.0 Install motion detector........................................................................................28
10.1 Pair the motion detector.................................................................................28
10.2 Power saving mode.......................................................................................29
10.3 Installation tips...............................................................................................29
11.0 Install the Window/Door sensor .........................................................................30
11.1 Pair the Window/Door sensor ........................................................................30
11.2 Installation tips...............................................................................................31
12.0 Technical specifications.....................................................................................32
12.1 Alarm system.................................................................................................32
12.2 Remote control..............................................................................................32
12.3 Motion detector..............................................................................................32
12.4 Window/door contact.....................................................................................33
13.0 Command overview...........................................................................................33
13.1 Touch panel commands ................................................................................33
13.2 SMS commands............................................................................................35
13.3 SMS Alerts notification overview....................................................................37
14.0 Frequently Asked Questions and other related information................................38
15.0 Service and support...........................................................................................38
16.0 Warning and points of attention .........................................................................38
17.0 Warranty conditions...........................................................................................40
1.0 Introduction
Congratulations with the purchase of this high-quality Eminent product! This product
has undergone extensive testing by Eminent’s technical experts. Should you
experience any problems with this product, you are covered by a five-year Eminent
warranty. Please keep this manual and the receipt in a safe place.
Register your product now on www.eminent-online.com and receive product updates!

4|ENGLISH
1.1 Packing contents
The following parts need to be present in the packing:
•1 x Alarm system with built-in mobile module, siren and 1 back-up battery
(EM8710)
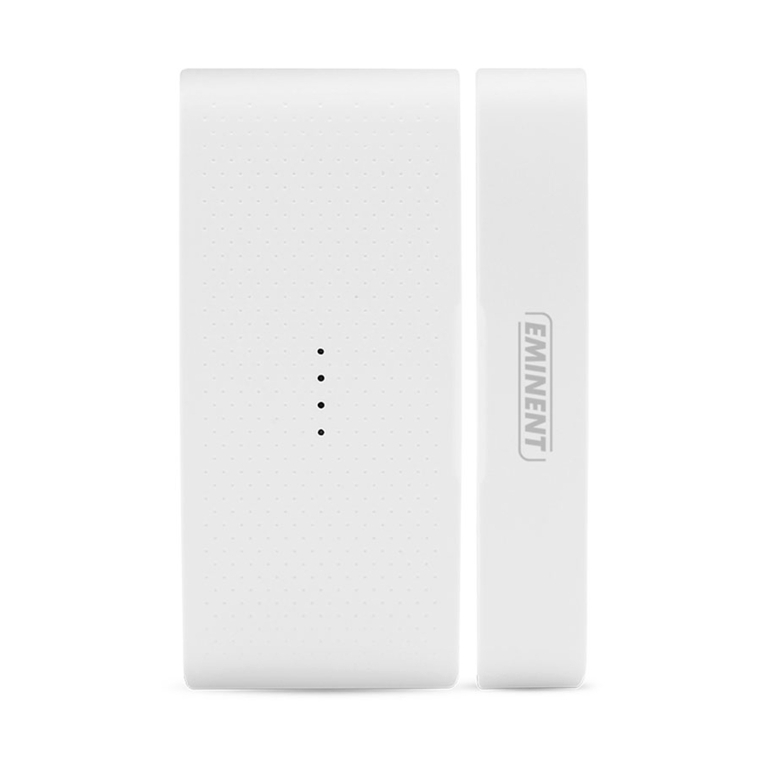
•1 x wireless door/window contact. (EM8760)
•1 x wireless PIR motion detector. (EM8750)
•1 x multifunctional remote controls. (EM8721)
•2 x RFID tag. (EM8720)
•1 x power adapter for the Alarm system.
•1 x window alarm sticker
•All required batteries.
•QIG.
Notice: The alarm system can be used and configured by SMS text messages. For the
use of SMS text messages, you will be charged by your telecom provider. Inform with
your telecom provider the estimated cost rates for sending SMS text messages.

5|ENGLISH
2.0 Explanation of the Alarm system
2.1 Front
A. Touch control panel
B. Microphone
C. Siren
D. RFID sensor area
E. GSM Signal indicator

6|ENGLISH
Definition of LEDs
LED
Indication
GSM Status LED
Flashing once every second: Registering with host device
Flashing once every three seconds: Successful registration with
GSM base station
Off: No AC power, alarm panel running on battery
Recorded message
LED & Key
Flashing: Recording / Listen-In in progress
On: Message playback in progress
Fully security mode
LED & Key
On: Fully security mode
Flashing: Fully security mode + exit delay
In-Home mode LED
& Key
On: In-Home Mode
Flashing: Home Mode Exit Delay
Disarm mode LED &
Key
On: Disarm Mode
Flashing: Waiting for device binding / Test Mode
ALARM LED
Flashing: Alarm event triggered
TEL LED & Key
On: Using GSM Telephone
Flashing: GSM sending SMS
RFID LED
[LED around siren area]
On: Reading Tag ID
Numbers 1-9
LED & Keys
On: Indicator for sensor zone 1 to 9, or which remote control 1- 9, or
RFID tags 1-4
Number 0
LED & Key
On: Indicator for sensor zone > 9 or RFID tags > 4.

7|ENGLISH
2.2 Rear
F. Speaker
G. Battery/SIM card cover
H. Wall mounting bracket
I. SIM Card slot
J. Battery connector
K. DC-jack
L. Factory reset
5

8|ENGLISH
3.0 Preparation
3.1 GSM SIM card
To get the best out of the system, it is crucial to take some precautions before making
use of the alarm system.
The EM8710 GSM alarm system will notify you by using the mobile module and will
send you a text message or call you when there is an alarm triggered. To do so, the
system needs a SIM card from a mobile phone provider. Please check below points
before buying a SIM card:
1) Choose a mobile provider which has the best network coverage at the place
where you would like to mount the alarm system.
2) When using a prepaid card, make sure that info messages from the provider will
be send by e-mail instead of text message. You cannot read text messages on the
alarm system. Please choose a provider with a web portal to upgrade your credit.
3) The voicemail function should be switched off. Insert the SIM card into a cell
phone and refer to the information of your provider to turn the voicemail off.
4) Remove the PIN code of the SIM card. Follow the steps below to turn off the PIN
code of the SIM card.
a) Apple (iOS) Go to Settings→Phone→SIM PIN. Turn off SIM PIN here
b) Android, go to Applications→Settings→More→Security→
Set up SIM card lock. Switch off SIM card lock here.
5) The SIM card size required is mini SIM. For micro SIM and nano SIM, use a SIM
card adaptor before inserting into the alarm panel.
6) Ensure the SIM card is not expired.
Inserting the SIM card
1. Remove battery cover of the alarm panel.
2. Insert a SIM card into the slot and connect the 9V
power adapter.
3. Wait until the GSM status LED blinks slowly (once
every 3 seconds) implying the SIM card is ready for
use.
Please check www.eminent-online.com for more information and instruction movies

9|ENGLISH
3.2 Download APP
The EM8710 system can be set and operated with an APP, but it can also be fully
used with text messages.
The APP is only available for Android and Apple (iOS) devices.
Search for the "EM8710" APP in the Google Play store or the Apple Store.
See chapter "Apple and Android APP" for more information on the operation of the
APP
3.3 Setting up the host phone number
First, you need to enter the Host Phone Number so that the GSM notification can
function normally. The host phone number refers to the owner’s phone number that
needs to be entered the alarm panel, so that it will recognize SMS commands sent
from the owner’s phone.
Note: The “Show Caller ID” function on the owner’s mobile phone must be turned on.
The alarm panel can only then determine if this number is authorized to use SMS
commands.
1. Begin configuration by entering the default configuration PIN code ‘1234’
2. On the touch keypad, enter 66 + Key + Owner’s number + key
Note: Do not enter the phone number assigned to the SIM card inside the alarm
panel.
3. You will receive an SMS message saying phone number set successfully.
4. Your alarm panel can now be controlled from the smartphone app.

10 |ENGLISH
3.4 Mounting the Alarm Panel
Selecting a suitable location:
•Mount the alarm panel close to the door which you normally use to enter/exit
your house.
•Note that the Alarm panel requires a power outlet to function properly.
•Ensure the location selected has a good GSM signal. You can do this by
cross checking the signal bar on your phone at that location.
•The panel must not be co-located or operated in conjunction with any other
nearby transmitting devices or antenna.
1. Remove the back panel mounting bracket of the alarm and mount the bracket
on the wall using wall anchors and screws.
2. Once secured, ensure the power connectivity, and install the alarm panel to the
secured mounting bracket.
3. Power on the panel and test to make sure the alarm system has a good signal.

11 |ENGLISH
3.5 Explanation of the groups
The alarm panel will group motion sensors and door/window sensors into 5 security
types, each assigned according to the owner’s application need.
Explanation of the groups
•Security Type “0”: in-Home group. The sensor will be activated only when the
system is in Full security mode . This sensor will not be activated when set to
in-Home mode . When sensor is triggered in Full security mode the siren will
be triggered immediately without any delay.
Example: A PIR motion detection sensor installed in your living room.
•Security Type “1”: in-Home and Normal group. The sensor will be activated
when the system is in either in-Home mode or Full security mode . When
sensor is triggered in-Home or Full security mode the siren will be triggered
immediately without any preset delay.
Example: A door/window sensor.
•Security Type “2”: in-Home group + Delay. Same as Security Type “0” except
when sensor is triggered the siren will be triggered after a configured Entry/Exit
delay time. This is mostly used for main entrance to prevent accidental
triggering of the alarm by the user when arming or disarming the alarm.
Example: a PIR in the corridor facing the front door.
•Security Type “3”: in-Home and Normal group + Delay. Same Security Type
“1” except when sensor is triggered the siren will be triggered after a configured
Entry/Exit delay time. This is mostly used for main entrance to prevent
accidental triggering of the alarm by the user when arming or disarming the
alarm.
Example: A door/window sensor installed on the front door
•Security Type “4”: 24Hrs intruder: the sensor will immediately trigger an
alarm regardless whether the system is in Disarm , Fully or in-Home
mode. This is normally used to protect areas 24/7 from unauthorized access as
safe box, electrical maintenance room etc.
Example: A door/window sensor installed on a safe box

12 |ENGLISH
3.6 Plan for sensor placement
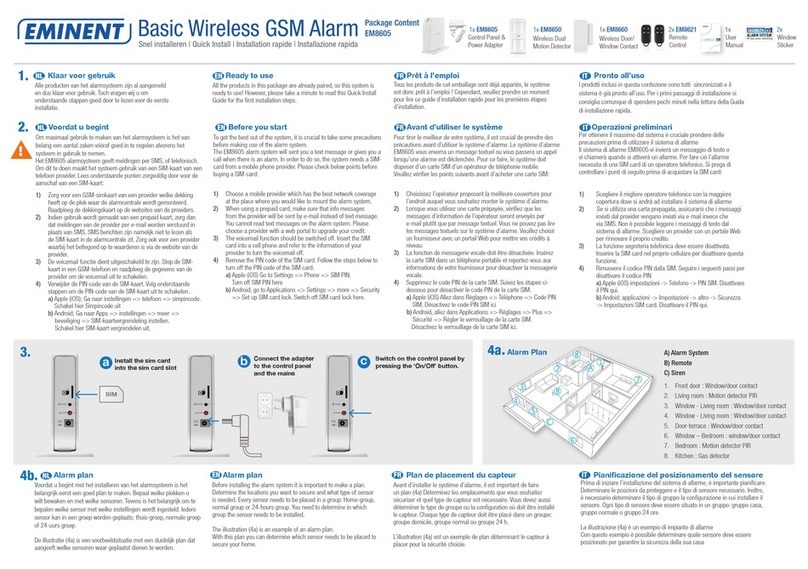
Before starting to install the alarm system it is important to make a plan. Determine the
locations you want to secure and what type of sensor is needed. Also, you need to
determine what group type or configuration the sensor needs to be installed in. Every
type of sensor needs to be placed in a group; in-Home-group, normal group, single
group or 24-hours group (more information about the groups will be explained in the
chapter “Explanation of the groups”).
Illustration below is an example of a plan that determines what sensor should be
placed for the preferred security.
A. Alarm system
B. Remote control
1. Front door: Window/door contact (security type 3)
2. Living room: Motion detector PIR (security type 0)
3. Window - Living room: Window/door contact (security type 1)
4. Window - Living room: Window/door contact (security type 1)
5. Door-terrace: Window/door contact (security type 1)
6. Window –Bedroom: window/door contact (security type 1)
7. Bedroom: Motion detector PIR (security type 0)
8. Hallway: Motion detector PIR (security type 2)
Check www.eminent-online.com for an overview of all available sensors and
accessories.
3.7 Registered sensors
The motion detector and window/door sensor included with the alarm system are
already paired to the system. The motion detector is set by default as in-Home group
and the window/door contact is configured as Fully arm group.

13 |ENGLISH
The window/door contact is paired with Zone 1. The motion detector is paired with
Zone 2.
The supplied remote controls and RFIDs are already paired to the system.
For more information about zones please see chapter “Change Sensor (zone) name”
4.0 Adding accessories/sensors
4.1 Adding motion, door/window sensor.
When a new sensor is added it needs to be assigned to a Security Type as
described in chapter Explanation of the groups.
To add a sensor:
1. Power on the sensor by inserting its batteries.
2. On the alarm panel, enter the PIN + Key to disarm the system.
3. Enter PIN + 15 + Security Type + to start the binding process. The DISARM
LED will start to blink for 30 seconds and beep once.
4. Within 30 seconds, set the sensor to enter binding mode using its learn-
key/tamper button.
5. If a sensor is successfully added, the DISARM LED will turn on for 1 second
along with a long beep. The Keypad LED will turn on to indicate the allocated
zone number. (Numbers 1 –9 for zones 1 –9, Number 0 for Sensor Zones 10
or higher).
6. If the binding process fails, it will timeout after 30 seconds and 3 short beeps will
be heard.
7. To exit the binding process, press the Key
Note: The first accessory registered is assigned to zone 1, the second accessory
registered is assigned to zone 2, etc. Zones 1 to 9 can be renamed. Zones 10 to 100
cannot be renamed. It is advised to label a sensor with its zone number immediately
after successfully binding it.
4.2 Adding a remote control and RFID tags.
To add these devices:
1. Power on the device by inserting its batteries (not needed for the RFID tag).
2. On the alarm panel, enter the PIN + key to disarm the system.

14 |ENGLISH
3. Enter PIN + 15 + to start the binding process. The DISARM LED will beep
once and start to blink for 30 seconds.
4. Within 30 seconds, press a button on the remote.
5. For RFID tags, simply swipe it in front of the alarm
panel in the area above the siren.
6. If a device is successfully added, the DISARM LED will turn on for 1 second
along with a long beep.
7. If the binding process fails, it will timeout after 30 seconds and 3 short beeps will
be heard.
8. To exit the binding process, press the key
4.3 Add an indoor wireless siren
First check if the wireless siren communication is enabled.
Enter PIN + 04 + and check if the 0LED is ON (if the 0LED is OFF press the “0” to
enable the communication) confirm with the button.
Enter the pairing mode of the siren by pressing the pairing button approx. 3 seconds
until you hear a confirmation beep.
Now enter the PIN + key the siren is paired successfully when you hear a beep from
the wireless siren.
To activate the indoor wireless siren, close the battery compartment the activation is
confirmed by the flashing LEDs on the indoor wireless siren.

15 |ENGLISH
5.0 Deleting accessories/sensors
5.1 Deleting all sensors
1. On the alarm panel, enter the PIN + key to disarm the system.
2. Enter PIN + 20 + 1 +
5.2 Delete a sensor from zone 1-9
First define the sensor zone number you wish to delete.
To define the zone number of the sensor, follow the following steps: Arm the alarm
panel, trigger the sensor you wish to delete, the sensors zone number will now be
illuminated on the touch panel of the alarm 1-9 (0 are all sensor zones above 9) in this
example the sensor zone is 2.
1. On the alarm panel, enter the PIN + key to disarm the system.
2. Enter PIN + 20 + 1 + 2+ (the 2 should be replaced with the zone number
assigned to the sensor you wish to delete).
5.3 Deleting all sensors after zone 9
1. On the alarm panel, enter the PIN + key to disarm the system.
2. Enter PIN + 20 + 1 + 0 +
5.4 Deleting all remotes
1. On the alarm panel, enter the PIN + key to disarm the system.
2. Enter PIN + 20 + 2 +
5.5 Delete a remote from 1-9
First define the remote number you wish to delete. In this example we want to delete
remote 2.
1. On the alarm panel, enter the PIN + key to disarm the system.
2. Enter PIN + 20 + 2 + 2+ (the 2 should be replaced with the remote number
assigned to the remote you wish to delete).
5.6 Deleting all remotes after 9
1. On the alarm panel, enter the PIN + key to disarm the system.
2. Enter PIN + 20 + 2 + 0 +

16 |ENGLISH
5.7 Deleting all RFID tags
1. On the alarm panel, enter the PIN + key to disarm the system.
2. Enter PIN + 20 + 3 +
5.8 Delete a RFID tag from 1-9
First define the RFID tag number you wish to delete. In this example we want to delete
RFID tag 3.
1. On the alarm panel, enter the PIN + key to disarm the system.
2. Enter PIN + 20 + 3 + 3+ (the 2 should be replaced with the remote number
assigned to the remote you wish to delete).
5.9 Deleting all RFID tags after 9
1. On the alarm panel, enter the PIN + key to disarm the system.
2. Enter PIN + 20 + 3 + 0 +
6.0 How does the Alarm system communicate
The Alarm system can communicate in 2 different ways with your phone.
•Send and receive text messages using the mobile network (SIM card
required).
•Call your phone (SIM card required).
6.1 Alarm notifications
The alarm system will check the programmed phone numbers one by one. Firstly, the
alarm system will send a text message one by one to the programmed phone
numbers. When this is fulfilled the alarm system will start calling the programmed
phone numbers. If one of the phone number has the voicemail enabled the system will
continue to call the next phone number.
Between every text message and phone call there will be a time span of
approximately 15 seconds (depending on additional voicemail duration).
SMS 1
SMS 2
SMS 3 →TEL 1 →TEL 2 →TEL 3 →TEL 4→TEL 5
SMS 4
SMS 5
If the alarm system is switched off during the notification process the alarm system will
stop sending/calling the remaining phone numbers. For example: Phone number 2
receives a text message notification and switches off the alarm system via the APP
phone number 3 will not receive a text message.

17 |ENGLISH
7.0 Apple and Android APP
The EM8710 system can be controlled and configured by using the “EM8710” APP.
Search for the EM8710 APP in the Apple App-store or in the Google Play Store.
Download and install the APP on your phone/tablet.
Notice: The alarm system can be used and configured by text messages, even if
used with Android or Apple App! For the use of text messages, you will be charged
by your telecom provider. Inform with your telecom provider the estimated cost rates
for sending text messages.
7.1 Setting up the GSM Host number (Full control)
1. Enter the PIN (default 1234) of the control panel.
2. Followed by “66”
3. Now enter the Host phone number that will have full control of the alarm
system.
4. And confirm with the key
5. The LED will flash to confirm the host number is set
Example 1234 + 66 + 0049 + 612345678 +
With this configuration the Host phone number is also configured as the first Phone
number to be configured for receiving alarm notifications via SMS text message and
dialing, further the number is configured as first Speed dial number (Long Press “1” to
use Speed dial 1).

18 |ENGLISH
7.2 Create and add an account
1. Start the APP on your phone and enter a name for the alarm system and the
phone number of the SIM card installed in the alarm panel.
Click “Save”.
7.3 Modify or delete a device in your account
7.3.1 iOS
To modify or delete a device from your account.
Select the option “Accounts” from the main menu of the APP.
Select the device you wish to modify or delete from the account list.
Now you can modify the accounts name, phone number, or delete the account.
7.3.2 Android
To modify or delete a device from your account.
Select, press, and hold the Account from the main menu of the APP.
Select the option “Edit”or “Delete”to modify or delete the device from the account list.
Now you can modify the accounts name, phone number, or delete the account.
8.0 Configure the alarm system
All settings of the system can be controlled and configured by using the APP or by
sending text message commands.
8.1 Configure phone numbers
These numbers are the phone numbers that will receive a text message and/or will be
called when the alarm is triggered or the numbers you wish to set as a speed dial.
You need to make sure the country code is entered first. For example, the country
code for the UK is 0044. You can add multiple phone numbers to the list. Send the
message when you are finished adding phone numbers.

19 |ENGLISH
You can set up to five phone numbers which should receive a text message, should
be called during an alarm event or to be called as speed dial.
Remark: Only mobile numbers entered as alarm number can control the alarm system
by text message commands or by the APP!
With the EM8710 APP:
Press “Settings” –“Alerts”
By text message command:
You can also set the numbers by sending a text message with “5” (call), “6” (text
messages), “8” (Speed dial) to the alarm system. You will receive a text message with
the current settings.

20 |ENGLISH
Copy the received text into a new text message, modify the text by adding/editing the
phone numbers and send the text message back to the GSM-number of the alarm
system.
Notice: When configuring 5 numbers without using the APP you will need to send 2
SMS text messages (the maximum amount characters to configure 5 numbers
exceeds the maximum amount of characters per default SMS). In this case use the
copied text and remove the last row “5.XXXXXXXXX” and send the SMS. After you
received a reply from the alarm “OK” paste the text again and now delete the rows 1.
until 4. So only the text “5.XXXXXXXXXX”remains and send the SMS.
8.2 Change language
With the EM8710 APP:
Restart the APP to view the APP in the selected language.
By text message command:
You can also set the language by sending a text message to the number of the alarm
system with the 4-digit command:
EN:
0001
NL:
0002
FR:
0003
IT:
0004
ES:
0005
DE:
0006
Other manuals for EM8710
1
Table of contents
Other Eminent Security System manuals

Eminent
Eminent EM8610 R0 User manual

Eminent
Eminent EM8710 Instructions for use

Eminent
Eminent EM8775 Instructions for use

Eminent
Eminent EM8617 User manual

Eminent
Eminent EM8676 User manual

Eminent
Eminent EM8670 Instructions for use

Eminent
Eminent EM8605 User manual

Eminent
Eminent EM6575 User manual

Eminent
Eminent EM8615 User manual

Eminent
Eminent EM8605 Instructions for use