8
1. DESCRIZIONE DEI COMPONENTI GBGB
3.1 Compliance with the regulations
Air conditioners are conform to the European stadanrd:
2014/30/EU regarding Electromagnetic Compatibility
2014/35/EU standards on Low Voltage.
In accordance with the directive 2012/19/EC WEE of the European par-
liament, herewith we inform the users about the disposal requirements
of the electrical and electronic products.
RoHS 2011/65/EU of the European parliament and of the council on the
Restriction of the use of Certain Hazardous
2009/125/EC COMMISSION REGULATION (EU) No 206/2012
on the specific ecodesign requirements for air conditioners and fans.
2010/30/EU COMMISSION DELEGATED REGULATION (EU)
No 626/2011 as regards the labeling of the energy consumption of air
conditioners air.
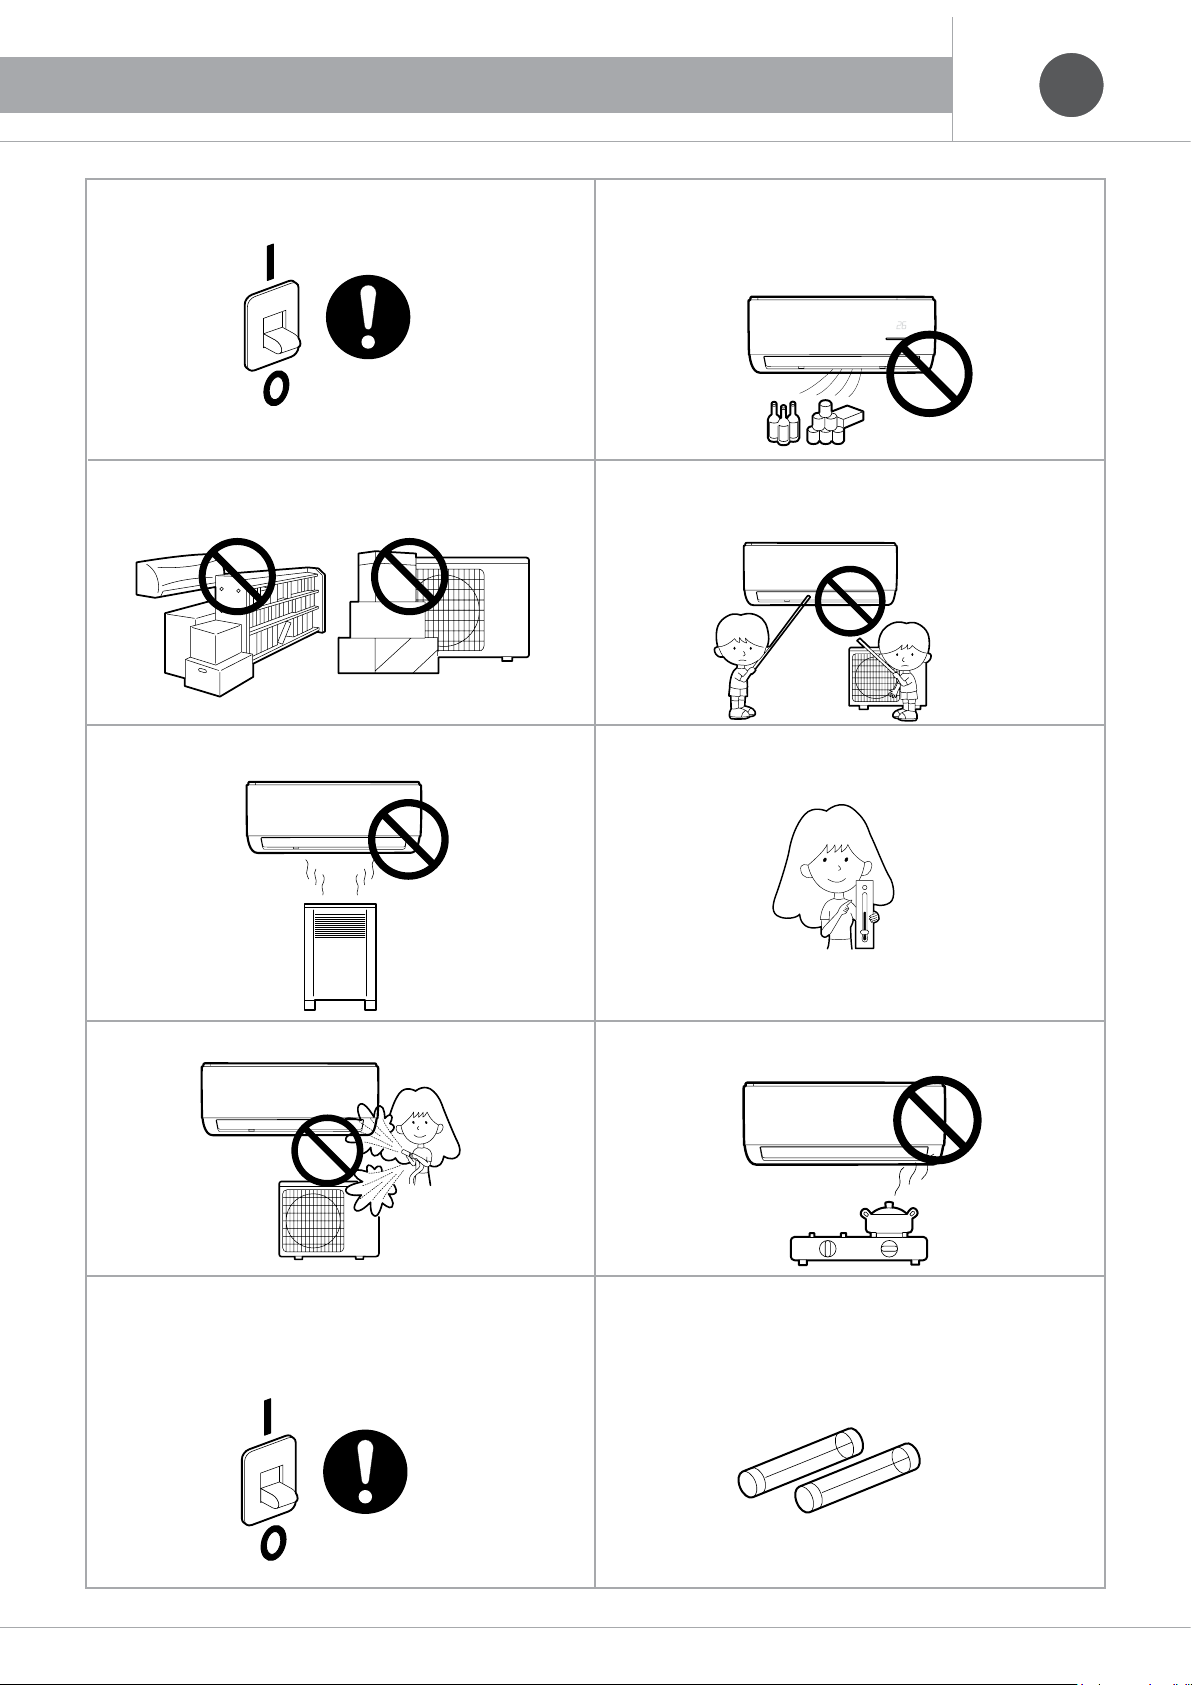
3. IMPORTANT INFORMATION
3.2 Degree of protection provided by enclosures
(Code IP)
Indoor Unit IPXO
X= Degree of protection against drilling of external solid bodies is
omitted.
0= Not protected against water
Outdoor unit IP24
2= Protected against solid foreign objects of perforation: ≥12.5 mm
(against access to hazardous parts with a finger)
4= Protected against the ingress of water with harmful effects: water
spray
3.3 Important information of
the refrigerant used R32
This product contains fluorinated greenhouse gases covered
include in the Kyoto Protocol. Do not vent into the atmosphere.
Type of refrigerant:
R32
GWP* value
675
GWP* = global warming potential
Fill out with permanent ink
the factory charge of refrigerant of the product
the amount of additional refrigerant for the pipes
the total charge of refrigerant
Label must be attached in a visible place outside the unit structure.
A
contains fluoride gases that contribute to the greenhouse effect and
which are covered by the Kyoto Protocol.
B
factory charge of refrigerant of the product: see tag with name of unit.
C
amount of additional refrigerant for the pipes.
Dtotal refrigerant charge.
E
outdoor unit.
F
refrigerant cylinder and charge collector.
11 =
22 =
2211 =+
11
22
B
C
F
E
A
D
ITIT Questo prodotto contiene gas fluorurati ad effetto serra inclusi
nel Protocollo di Kyoto. Non liberare tali gas nell’atmosfera.
GBGB This product contains fluorinated greenhouse gases covered
by the Kyoto Protocol. Do not vent into the atmosphere.
ESES
Este producto contiene gas fluorado con efecto invernadero incluidos
en el protocolo di Kyoto. No vierta este tipo de gas a la atmosfera.
DEDE Dieses Produkt enthält fluorierte Treibhausgase,
die durch das Kyoto-Protokoll abgedeckt werden.
Lassen Sie Gase nicht in die Atmosphäre ab.
FRFR Ce produit contient des gaz fluorés à effet de serre, prévus
par le protocole de Kyoto.
Ne pas laisser les gaz s’échapper dans l’atmosphére.
22
=
2211 =+
11
22
B
C
F
E
A
D
ITIT Questo prodotto contiene gas fluorurati ad effetto serra inclusi
nel Protocollo di Kyoto. Non liberare tali gas nell’atmosfera.
GBGB This product contains fluorinated greenhouse gases covered
by the Kyoto Protocol. Do not vent into the atmosphere.
ESES
Este producto contiene gas fluorado con efecto invernadero incluidos
en el protocolo di Kyoto. No vierta este tipo de gas a la atmosfera.
DEDE Dieses Produkt enthält fluorierte Treibhausgase,
die durch das Kyoto-Protokoll abgedeckt werden.
Lassen Sie Gase nicht in die Atmosphäre ab.
FRFR Ce produit contient des gaz fluorés à effet de serre, prévus
par le protocole de Kyoto.
Ne pas laisser les gaz s’échapper dans l’atmosphére.
Kg
Kg
Kg
R 32
11 =
22 =
2211 =+
11
22
B
C
F
E
ITIT Questo prodotto contiene gas fluorurati ad effetto serra.
Non liberare tali gas nell’atmosfera.
GBGB This product contains fluorinated greenhouse gases.
Do not vent into the atmosphere.
ESES
Este producto contiene gas fluorado con efecto invernadero.
No vierta este tipo de gas a la atmosfera.
DEDE Dieses Produkt enthält fluorierte Treibhausgase,
die durch. Lassen Sie Gase nicht in die Atmosphäre ab.
FRFR Ce produit contient des gaz fluorés à effet de serre.
Ne pas laisser les gaz s’échapper dans l’atmosphére.
External temperature
External unit Cooling °C Heating°C
XEVO-0917-M3E -15 ÷ 50 -15 ÷ 30
XEVO-1217-M3E -15 ÷ 50 -15 ÷ 30
XEVO-1817-D3E -15 ÷ 50 -15 ÷ 30
XEVO-2717-T3E -15 ÷ 50 -15 ÷ 30
3.4 Operating limits
EXTERNAL UNIT VALUES - Outdoor temperature (wet bulb)
Model Cooling °C Heating°C
Single 9k
17 (15) ÷ 32 (29)
0 ÷ 30
Single 12k
Single 18k
Single 27k
INTERNAL UNIT VALUES
Outdoor temperature (wet bulb)
Maximum operating pressure friction circuit: 4.6 MPa