Empire AXE User manual

O
W
W
NE
R
R
’
S
S
M
A
A
N
U
U
A
L
L

CONTENTS
1. Rules for Safe Marker Handling
2. Introduction and Specifications
3. Battery Replacement and Life Indicator
4. Basic Operation
5. Compressed Air/Nitrogen Supply
6. Installing a Loader and Paintballs
7. Firing the Empire AXE
8. Break Beam Eyes Operation
9. Unloading the Empire AXE
10. Regulator and Velocity Adjustments
11. Programming
12. Trigger Adjustments
13. General Maintenance
14. Storage and Transportation
15. Assembly/Disassembly
16. Trouble Shooting Guide
17. Diagrams and Parts List
18. Warranty Information
Read the full Operator’s Manual for technical information, usage instructions, and
maintenance tips for your Axe marker. The full manual can be found on the CD en-
closed with the marker or by contacting Paintball Solutions at 1-800-220-3222 or at
www.paintballsolutions.com.
1. Rules for Safe Marker Handling
Important: Never carry your Empire AXE uncased when not on a playing field. The non-
paintball playing public and law enforcement personnel may not be able to distinguish
between a paintball marker and firearm. For your own safety and to protect the image of
the sport, always carry your Empire AXE in a suitable marker case or in the box in which
it came in.
Safety and safe marker handling are the most important aspects of paintball sports.
Please practice each of the following steps with an unloaded marker before attempting
to operate your marker with an air source and paintballs.
Read this entire manual before loading, or installing an air cylinder, or in any way
attempting to operate the marker
*READ OWNER’S MANUAL BEFORE USING*
• Treat every marker as if it were loaded.
• Never look down the barrel of a paintball marker.
• Keep your finger off the trigger until ready to shoot.
• Never point the marker at anything you don’t wish to shoot.
• Keep the marker off until ready to shoot.
• Keep the barrel-blocking device in/on the marker’s barrel when not shooting.
• Always remove paintballs and air source before disassembly.
• After removing air source, point marker in safe direction and discharge until marker
is degassed.
• Store the marker unloaded and degassed in a secure place.
• Follow warnings listed on the air source for handling and storage
• Do not shoot at fragile objects such as windows.
• Every person within range must wear eye, face, and ear protection designed
specifically to stop paintballs and meeting ASTM standard F1776.
• Always measure your marker’s velocity before playing paintball and never shoot
at velocities in excess of 300 feet-per-second (91.44 meters).
• Remember that the ultimate safety device is you, the operator.
This is not a toy. Misuse may cause serious injury or death. Eye protection designed
specifically for paintball must be worn by the user and persons within range.
Recommend 18 years of age or older to purchase. Persons under 18 years of age must
have adult supervision.
For manuals and warranty details, go to: paintballsolutions.com
For manuals in other languages (where applicable), go to: paintballsolutions.com

2. Introduction and Specifications
Welcome to the world of the Empire AXE. The Empire AXE is a modern culmination
in the pursuit of speed, technology, weight reduction, and overall performance. It
started with radical imaginative concepts, which in turn inspired years of research
and development, plus countless hours of testing and engineering. As a result, the
Empire AXE features innovative electronic and pneumatic technologies that challenge
the paradigm that formerly defined “how a high performance paintball marker should
function”. The Empire AXE is precision engineered from aircraft-grade aluminum to
meet the demands of the most competitive players, teams, and climates. The ultimate
intent of the Empire AXE is to exceed your expectations.
Empire Paintball expects you to play hard and play frequently and thus the Empire
AXE was built with this in mind. All internal parts, wear, and contact surfaces have
been heat treated or hard anodized. The toughest and most resilient materials and
components have been used in the construction of this marker.
The Empire AXE operates on low-pressure. The main operating pressure is 180–200
psi. The pressure can be nominally adjusted and monitored visually via the gauge on
the bottom-line regulator. There is no secondary regulator to worry about.
The Empire AXE uses .68 caliber, water-soluble paintballs or reballs, readily available
at paintball pro-shops, commercial playing fields, and many sporting goods stores.
Empire AXE Specifications
• Model- Empire AXE
• Barrel- 12” Ported Barrel
• Caliber- .68
• Action- Semi Auto, PSP/Millen Ramping, and NXL Full Auto
• Air Source- Compressed Air
• Battery- One 9-Volt (Alkaline Only)
• Cycle Rate- Up to 20 BPS with stock circuit board
• Main Body Material- Aluminum
• Weight- 36 ounces
Included with your Empire AXE
• 12” Barrel (.691 bore)
• Spares and Allen Wrenches
• Barrel-Blocking Device
• One 9-Volt Alkaline Battery (installed)
• Owners Manual
3. Battery Replacement and Life Indicator
The Empire AXE requires a single 9-volt battery as the electronic power source.
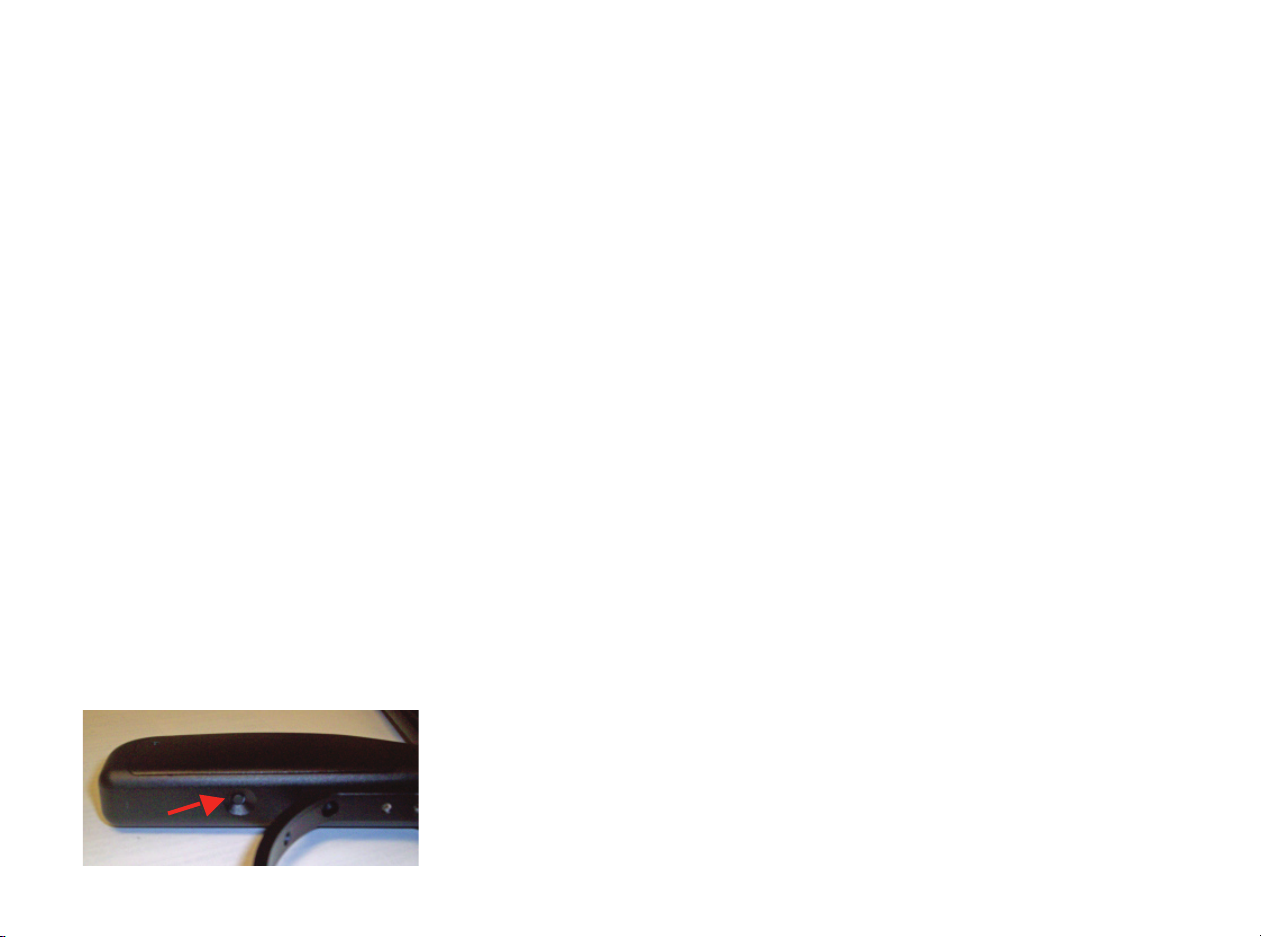
The use of brand-name batteries is recommended. The 9-volt battery is located in the
front fore-grip. The battery is accessed through the removable left side panel on the
front fore-grip. Confirm that the marker is off before changing or installing the battery.
Loosen the screw on the left side of the fore grip by turning it counter-clockwise with
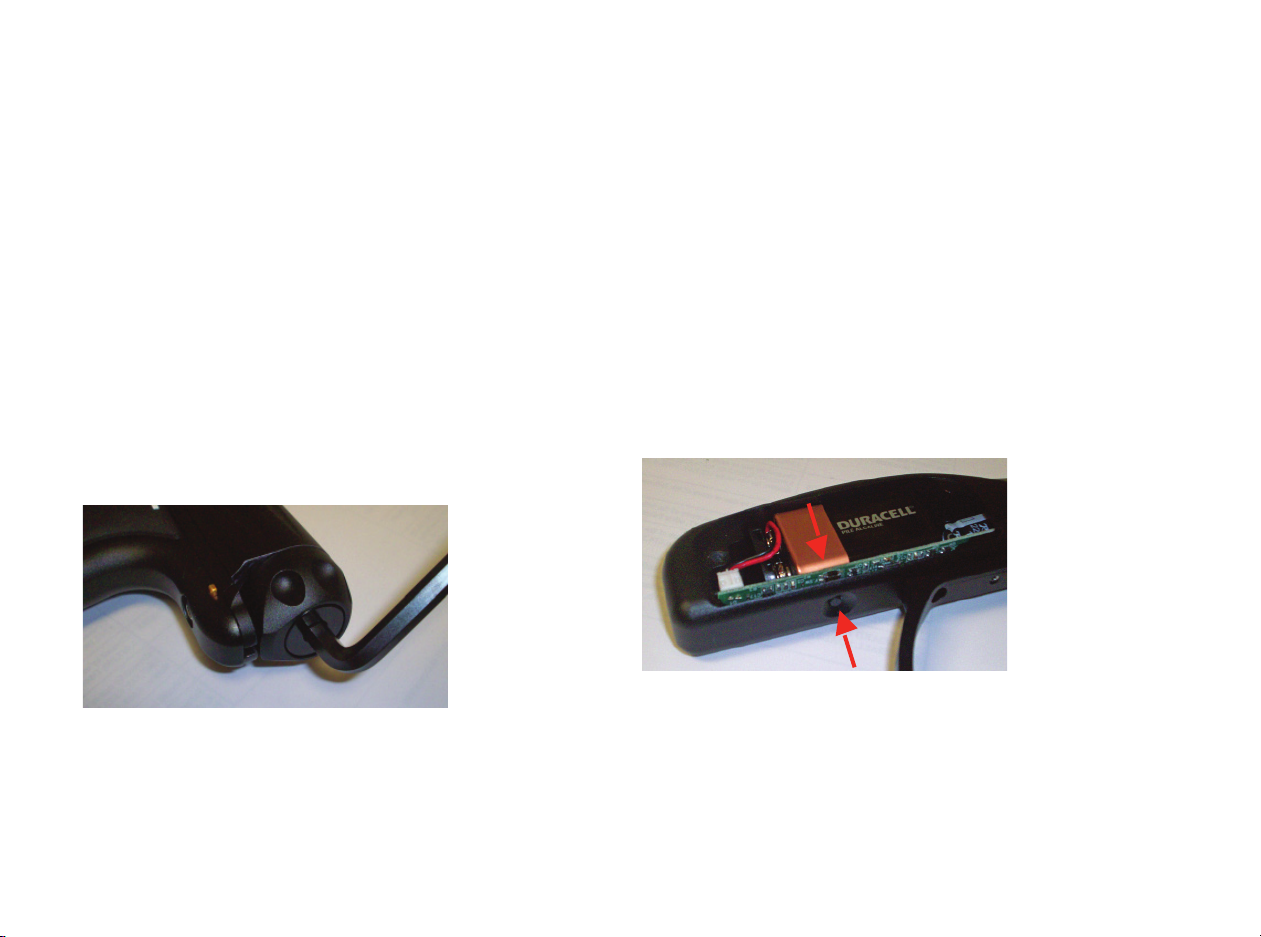
a 5/64” Allen wrench and lift fore grip door off. If there is already a battery in the fore-
grip, carefully disconnect the battery from the battery harness, and then connect a
fresh 9-Volt battery to the harness. Re-insert the battery and harness back into the
battery compartment with the harness pointed down towards the bottom of the grip.
Make sure that there are no abrupt kinks and the wires are comfortably placed. Do not
force them into place. Then re-install the fore grip removable door.
The Empire AXE also has a battery life indicator. If in standard operation and the LED
flashes green, the battery is good; if the LED is flashes orange, the battery is fairly
depleted and should be changed soon; if the LED is flashes red, then the battery is
depleted and should be replaced immediately.
Notes:
• Some rechargeable batteries may be too large for the Empire AXE battery
compartment. If they don’t fit, please don’t force them as this may cause damage.
• The stock circuit board does not store user-defined settings. You must change the
battery quickly to keep your user-defined setting. If the battery is not changed
quickly the circuit board will revert to the factory default settings.

4. Basic Operation
Safety and safe marker handling are the most important aspects of paintball sports.
Please practice each of the following steps with an unloaded marker before attempt-
ing to charge your marker with compressed air and paintballs.
• Keep your finger out of the trigger guard and away from the trigger; point the barrel of
the marker in a safe direction at all times. Keep the marker turned off when not in use.
The Empire AXE uses a power switch for its safety device.
• Always use a barrel plug or barrel-blocking device. Always use ASTM-approved
paintball-specific eye protection in any areas where paintball markers may be dis-
charged.
• Remember that the ultimate safety device is you, the operator.
Barrel Installation
• Make sure the marker is degassed, loader removed, no paintballs in the feed neck
or breech, and the Empire AXE is turned off before installing barrel.
• While pointing marker in a safe direction, place the threaded end of the barrel into
the front opening of the marker body.
• Turn the barrel clockwise until it stops (do not over tighten).
• Install a barrel-blocking device which is included. This can be a barrel plug or other
such device that prevents the accidental discharge of paintballs.
Powering On your Empire AXE
• To turn the Empire AXE on, locate the power button on the back side of the front
fore-grip, in front of the trigger guard and directly under the LED (Fig. 4.1).
• Push and hold the power button for 2 seconds and the LED light will turn green and
then red.
• Release button and the LED will intermittently flash green indicating that the
marker is now turned on.
Powering Off your Empire AXE
Push and hold the power button on the front fore grip for 2 seconds and the LED will
turn solid red and then green. Release button and the Empire AXE will turn off.
Automatic Off feature
The Empire AXE also has an automatic off feature. If you accidentally leave your
Empire AXE powered up, it will shut itself off after approximately 1 hour of inactivity.
Eye Function
The Empire AXE board is pre-programmed to activate the eye system each time the
marker is powered up. Read Section 8 (Break Beam Eyes Operation) for more details.
5. Compressed Air/Nitrogen Supply
The Empire AXE is designed to work with compressed air/nitrogen only. Do not use
CO2, as it will damage your Empire AXE. Low-pressure output compressed air tanks
are recommended.
Consult the place where you purchased your Empire AXE, or a recognized and compe-
tent air smith, for instruction in the safe handling of compressed-air cylinders before
purchasing or connecting one to your Empire AXE.
The Empire AXE utilizes a fully functional regulator at the bottom of the grip frame that
doubles as an on/off ASA (air source adapter) or receiver for a standard threaded pre-
set output compressed air systems. It is strongly recommended that a very high-flow
“low-pressure” (400–450 psi) fixed-output system is utilized as an air source for your
Empire AXE. Using a “high pressure” (750–850 psi) output compressed air tank is ac-
ceptable. If you are using an adjustable output regulator system, the output pressure
should be 400–500 psi.
(Fig. 4.1)

Warning:
• Remember compressed air or nitrogen systems can be extremely dangerous if
misused or improperly handLED. Use only cylinders meeting D.O.T. or regionally
defined specifications.
• Never add any lubricants or greases into the fill adapter on your tank regulator or
into the Empire AXE regulator.
• When connecting a remote system with a slide check, the sudden pressurization
from the slide check can force the poppet open briefly, sometimes pushing a ball
past the detents. It is recommended that you pressurize your Empire AXE before
loading paintballs into your loader.
• Do not install compressed air or load paintballs into your Empire AXE until you feel
completely confident with your ability to handle your Empire AXE safely.
Before Pressurizing your Empire AXE
• Check to make sure that you and anyone within range are wearing eye protection
designed specifically for paintball.
• Double check that all screws are tightened and no parts are loose before installing
your tank.
• Make sure the bolt guide is locked in place properly.
• Ensure you have a barrel plug, barrel sock, or other specifically designed barrel
blocking device in place.
• Make sure there are no paintballs in the marker and the power is off.
Pressurizing your Empire AXE
• Flip the regulators on/off arm forward so it’s pointing toward the front of the marker
(Fig. 5.1).
• Install a compressed air tank, by screwing it in clockwise; making sure it’s fully
threaded into the ASA.
• Flip the on/off arm back so it’s flush with the regulator (Fig. 5.2). The marker will
become pressurized.
De-Pressurizing your Empire AXE
• Make sure a barrel-blocking device is installed in/on the end of the barrel.
• Turn the Empire AXE off by pressing and holding the power button. The LED will
turn from green to red. Observe the light to make sure it is no longer lit.
• Remove loader and all paintballs from marker.
• Flip the on/off arm forward and allow the gas to vent from the regulator.
• Read the pressure gauge and make sure the pressure reads 0 psi.
• Remove your air cylinder by slowly and carefully unscrewing it counter-clockwise.
• Air may remain within the marker once the tank is removed. While the barrel
blocking device is still installed, turn your AXE on with the eyes off and pull the
trigger a few times to deplete all remaining air.
(Fig. 5.1)
(Fig. 5.2)
Other manuals for AXE
1
Table of contents
Other Empire Paintball Equipment manuals